U241E AUTOMATIC TRANSMISSION / TRANSAXLE AUTOMATIC TRANSAXLE UNIT REASSEMBLY
PROCEDURE

 1.BEARING POSITION
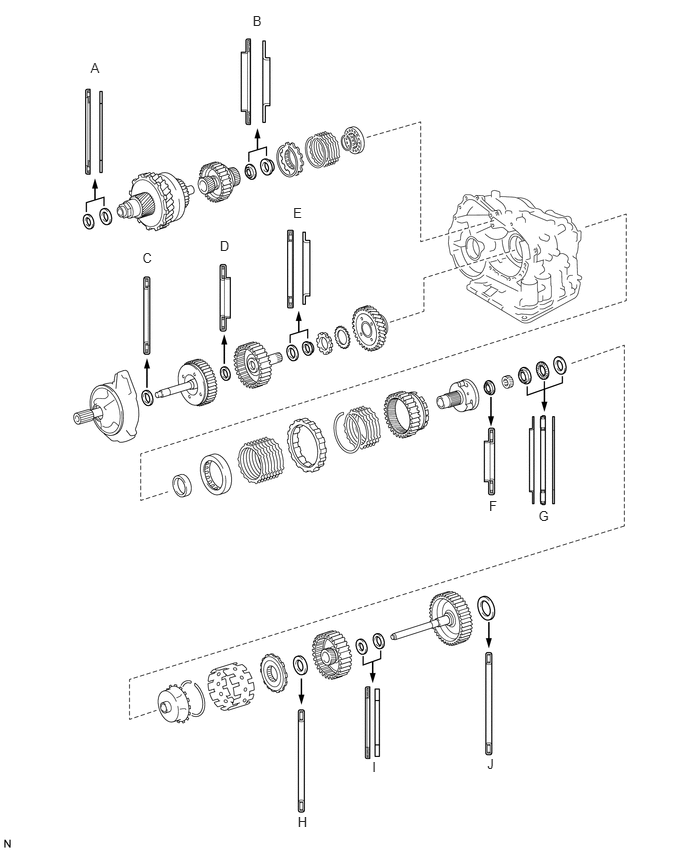
- Standard bearing position:
Mark Front Race Diameter Inside / Outside Thrust Bearing Diameter Inside / Outside Rear Race Diameter Inside / Outside A - 53.0 mm (2.087 in.) / 78.2 mm (3.079 in.) 52.1 mm (2.051 in.) / 75.5 mm (2.972 in.) B - 37.73 mm (1.4854 in.) / 58.0 mm (2.283 in.) 29.9 mm (1.177 in.) / 55.5 mm (2.185 in.) C - 33.85 mm (1.3327 in.) / 52.2 mm (2.055 in.) - D - 23.5 mm (0.925 in.) / 44.0 mm (1.732 in.) - E - 36.3 mm (1.492 in.) / 52.2 mm (2.055 in.) 34.5 mm (1.358 in.) / 48.5 mm (1.909 in.) F - 34.6 mm (1.362 in.) / 52.2 mm (2.055 in.) - G 40.3 mm (1.587 in.) / 58.0 mm (2.283 in.) 38.6 mm (1.520 in.) / 60.0 mm (2.362 in.) 38.6 mm (1.520 in.) / 58.0 mm (2.283 in.) H - 53.6 mm (2.110 in.) / 69.6 mm (2.740 in.) - I - 33.7 mm (1.327 in.) / 48.2 mm (1.898 in.) 30.3 mm (1.193 in.) / 46.0 mm (1.811 in.) J - 53.6 mm (2.110 in.) / 70.18 mm (2.763 in.) or 69.6 mm (2.740 in.) -
35882A
2.INSTALL DIFFERENTIAL GEAR LUBE APPLY TUBE
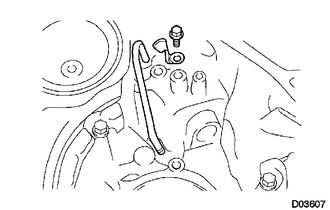
Install the apply tube and apply tube clamp to the transaxle housing with the bolt.
- Torque:
- 5.4 N*m (55 kgf*cm, 48 in.*lbf)
- NOTICE:
-
Make sure to insert the tube to the stopper.
35104C
3.INSTALL NO. 2 BREATHER PLUG
35782D
4.INSTALL COUNTER DRIVE GEAR HOLE SNAP RING
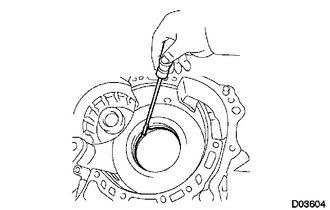
Using a screwdriver, install the hole snap ring to the transaxle.
35782C
5.INSTALL COUNTER DRIVE GEAR
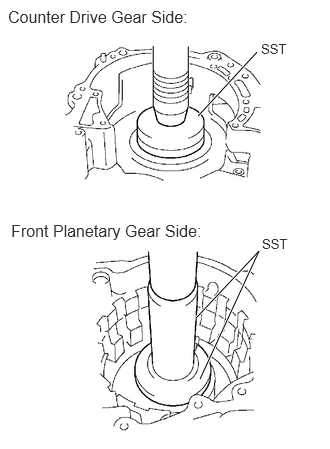
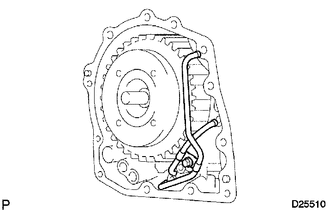
Using SST and a press, press in the 2 counter drive gear bearings outer races to the transaxle.
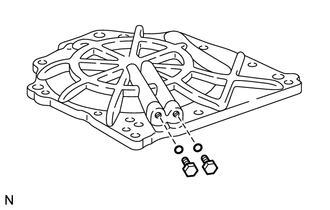
- NOTICE:
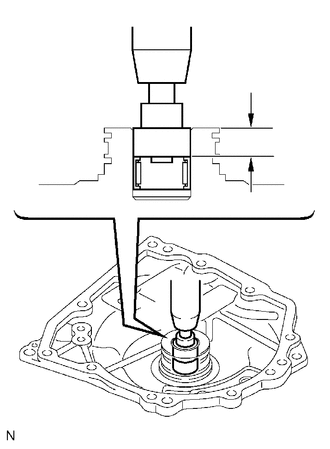
- ·
Press-fit the bearing race until it contacts the snap ring.
·Do not apply excessive pressure.
- SST
- 09950-60020 (09951-00890, 09951-07150)
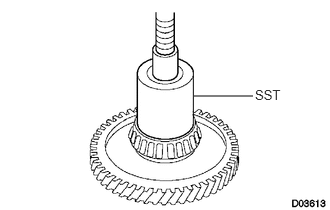
Using SST and a press, press in the tapered roller bearing to the counter drive gear.
- SST
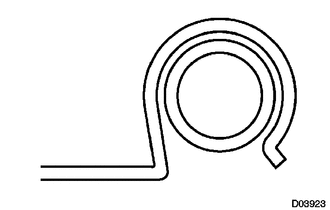
- 09649-17010
- NOTICE:
- ·
Press-fit the bearing inner race until it contacts the counter drive gear.
·Do not apply excessive pressure.
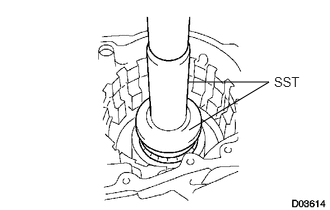
Using SST and a press, press in the counter drive gear and bearing to the transaxle.
- SST
- 09950-60020 (09951-00890)
09950-70010 (09951-07150)
- NOTICE:
-
Do not apply excessive pressure.
35623H
6.INSTALL 1ST AND REVERSE BRAKE PISTON
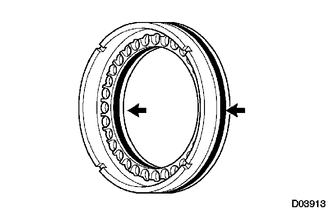
Coat 2 new O-rings with ATF.
Install the 2 O-ring to the 1st and reverse brake piston.
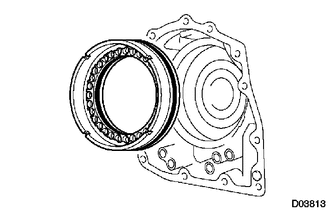
Coat the 1st and reverse brake piston with ATF, and install it to the transaxle.
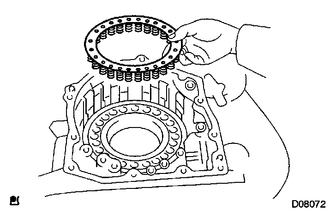
Install the 1st and reverse brake return spring to the 1st and reverse brake piston.
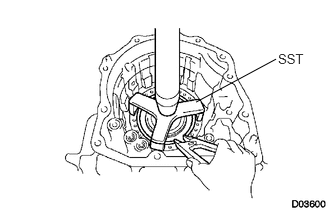
Using SST, a press and snap ring expander, press the piston return spring and snap ring to the transaxle.
- NOTICE:
- ·
Stop the press when the spring sheet is lowered to the place 1 to 2 mm (0.039 to 0.078 in.) from the snap ring groove, preventing the spring sheet from being deform.
·Do not expand the snap ring excessively.
35743
7.INSTALL FRONT PLANETARY RING GEAR
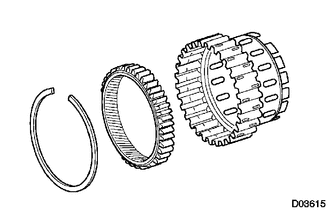
Using a screwdriver, install the front planetary ring gear and brake hub snap ring to the brake hub.
35720
8.INSTALL FRONT PLANETARY GEAR ASSEMBLY
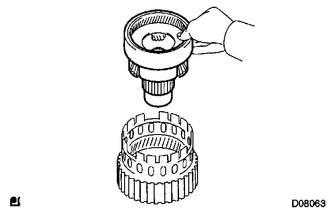
Install the front planetary gear to the brake hub.
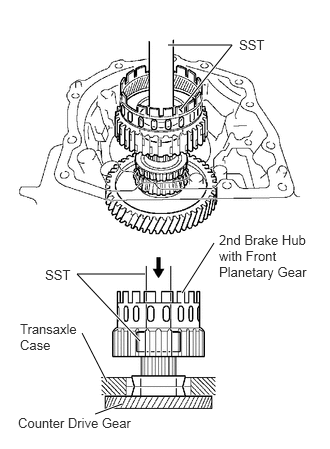
Using SST and a press, press-fit the front planetary gear.
- NOTICE:
-
Do not apply excessive pressure to it.
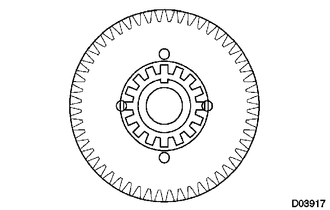
Install the front planetary gear washer, as shown in the illustration.
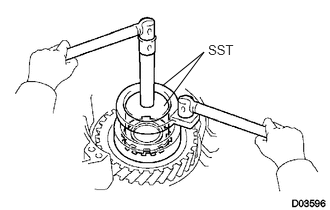
Using SST, install the nut.
- SST
- 09387-00030
09387-00080
T = 280 N*m{ 2,855 kgf*cm 206 ft.*lbf }
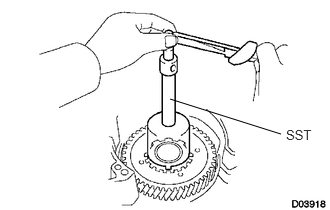
Using SST and a torque wrench, measure the turning torque of the bearing while rotating SST at 60 rpm. When the measured value is not within the specified value, gradually tighten the nut until it reaches the specified value.
- SST
- 09950-60010 (09951-00400)
09950-70010 (09951-07100)
09387-00030
09387-00080
- Torque:
- Standard turning torque at 60 rpm : 0.5 to 1.0 N*m (5.1 to 10.0 kgf*cm, 4.4 to 8.7 in.*lbf)
for new
- 0.3 to 0.5 N*m (3.1 to 5.1 kgf*cm, 2.7 to 4.4 in.*lbf)
for used
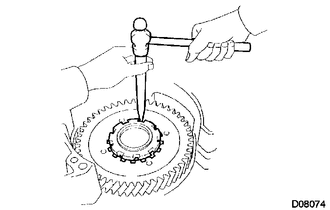
Using a chisel and hammer, stake the front planetary gear washer.
35714B
9.INSTALL INPUT SUN GEAR
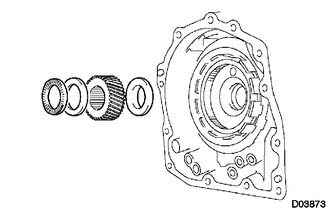
Install the 2 thrust bearings, bearing race and front planetary sun gear to the planetary gear.
- Standard bearing race diameter:
Item Inside Outside Bearing 34.6 mm (1.362 in.) 52.2 mm (2.055 in.) Race 40.3 mm (1.587 in.) 58.0 mm (2.283 in.) Bearing 38.6 mm (1.520 in.) 60.0 mm (2.362 in.)
35760
10.INSTALL REAR PLANETARY GEAR ASSEMBLY
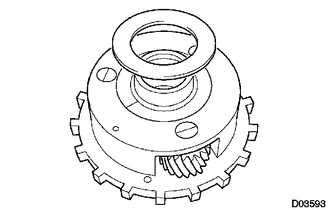
Coat the bearing race with ATF, and install it to the rear planetary gear.
- Standard bearing race diameter:
Item Inside Outside Race 38.6 mm (1.520 in.) 58.0 mm (2.283 in.)
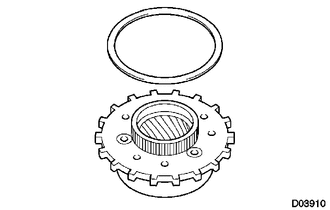
Install the planetary carrier thrust washer to the planetary gear.
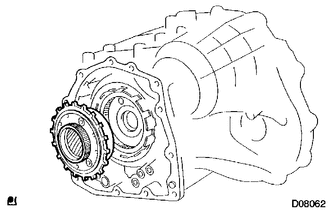
Install the rear planetary gear to the rear planetary ring gear.
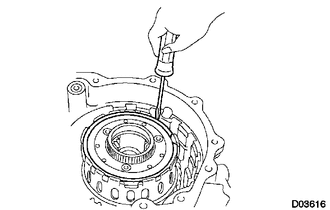
Using a screwdriver, install the snap ring to the brake hub.
35677A
11.INSTALL 1ST AND REVERSE BRAKE CLUTCH DISC
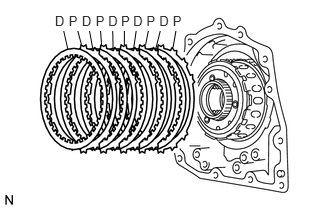
Install the 5 plates and 5 discs.
- Install in order:
P - D - P - D - P - D - P - D - P - D
- HINT:
-
P = Plate
-
D = Disc
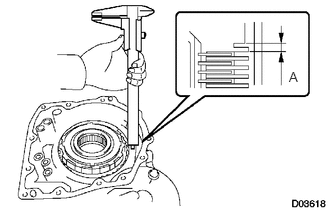
Using a vernier caliper, measure the distance between the disc surface and the contact surface of the 2nd brake cylinder and transaxle (Dimension A).
Select an appropriate flange so that the piston stroke will meet the specified value.
- Pack clearance:
1.02 to 1.21 mm (0.0402 to 0.0476 in.)
- HINT:
-
Piston stroke = Dimension A - Flange thickness
- Standard flange thickness:
Mark Thickness Mark Thickness 1 1.8 mm (0.071 in.) 5 2.2 mm (0.087 in.) 2 1.9 mm (0.075 in.) 6 2.3 mm (0.091 in.) 3 2.0 mm (0.079 in.) 7 2.4 mm (0.094 in.) 4 2.1 mm (0.083 in.) 8 2.5 mm (0.098 in.)
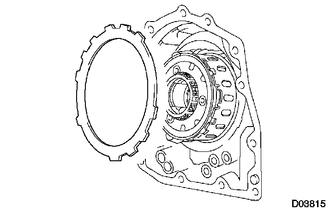
Install the flange.
35677A
12.INSPECT PACK CLEARANCE OF 1ST AND REVERSE BRAKE
35798A
13.INSTALL 1-WAY CLUTCH SLEEVE OUTER
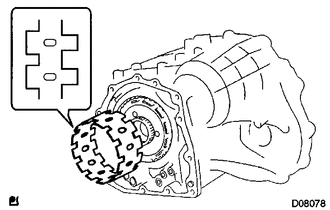
Install the 1-way clutch outer sleeve to the 2nd brake cylinder.
- NOTICE:
-
Check the positioning direction of the outer sleeve.
35790
14.INSTALL 1-WAY CLUTCH ASSEMBLY
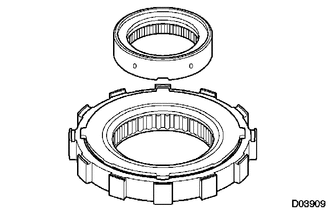
Install the inner race to the 1-way clutch.
- NOTICE:
-
Check the direction of the inner race.
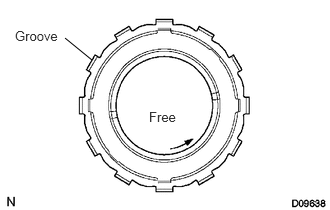
Check the rotating direction of the 1-way clutch for the lock or free operation, as shown in illustration.
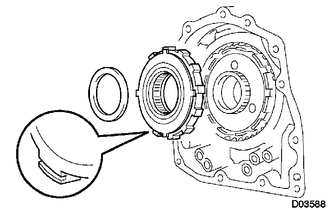
Install the 1-way clutch and bearing to the 1-way clutch outer race sleeve.
- Standard bearing diameter:
Item Inside Outside Bearing 53.6 mm (2.110 in.) 69.6 mm (2.740 in.)
- NOTICE:
-
Install the thrust bearing properly so that no colored race will be visible.
35730
15.INSTALL REAR PLANETARY SUN GEAR ASSEMBLY
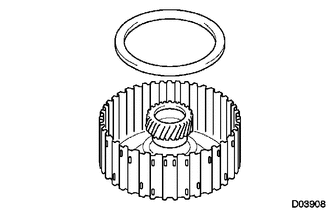
Coat the No. 1 planetary carrier thrust washer with petroleum jelly, and install it onto the rear planetary sun gear.
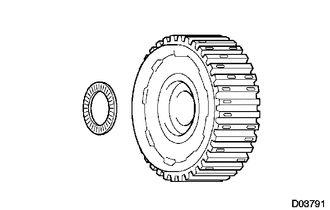
Coat the bearing with petroleum jelly, and install it onto the rear planetary sun gear.
- Standard bearing diameter:
Item Inside Outside Bearing 33.8 mm (1.331 in.) 48.2 mm (1.898 in.)
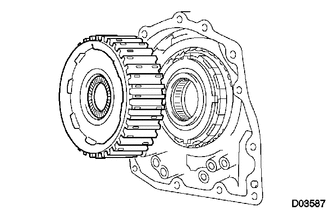
Install the rear planetary sun gear to the rear planetary gear.
35677
16.INSTALL 2ND BRAKE CLUTCH DISC
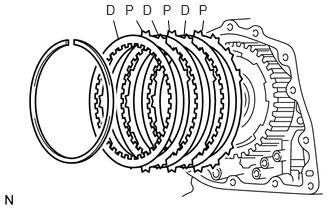
Install the 3 discs and 3 plates to the transaxle.
- Install in order:
P - D - P - D - P - D
- HINT:
-
P = Plate
-
D = Disc
Temporarily install the snap ring.
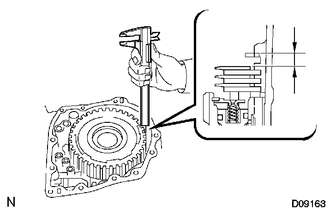
Using a vernier caliper, measure the distance between the disc surface and snap ring surface.
Select an appropriate flange so that the piston stroke will meet the specified value.
- Standard pack clearance:
0.62 to 0.91 mm (0.0244 to 0.0358 in.)
- HINT:
-
Piston stroke = Clearance - Flange thickness -Snap ring thickness 1.6 mm (0.063 in.)
- Standard flange thickness:
Mark Thickness Mark Thickness 1 3.0 mm (0.118 in.) 5 3.4 mm (0.134 in.) 2 3.1 mm (0.122 in.) 6 3.5 mm (0.138 in.) 3 3.2 mm (0.126 in.) 7 3.6 mm (0.142 in.) 4 3.3 mm (0.130 in.) 8 -
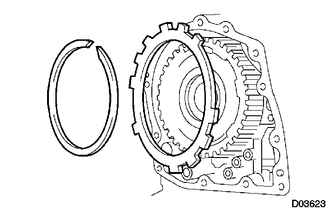
Temporarily remove the snap ring, attach the selected flange and restore the snap ring.
- NOTICE:
-
Secure the snap ring so that its gap is visible through the groove of the transaxle case.
17.INSTALL DIRECT CLUTCH
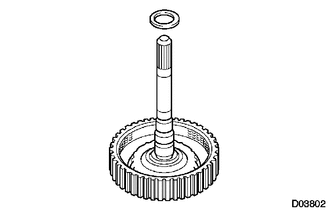
Install the bearing race to the direct clutch.
- Standard bearing diameter:
Item Inside Outside Bearing race 30.3 mm (1.193 in.) 46.0 mm (1.811 in.)
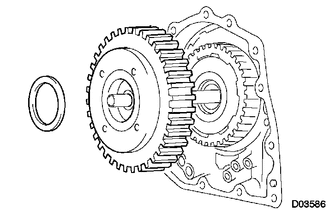
Install the direct clutch and thrust needle roller bearing to the rear planetary sun gear.
- NOTICE:
-
The disc in the direct clutch should completely align with the hub attached outside the rear planetary sun gear. Otherwise, the rear cover cannot be installed.
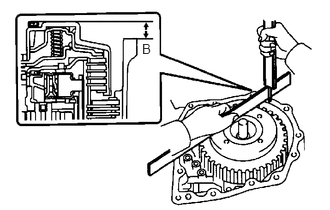
Clean the connector part of the transaxle case and rear cover.
As shown in the illustration, place a straightedge on the direct clutch drum and measure the distance between the transaxle case and the straightedge using a vernier caliper (Dimension B).
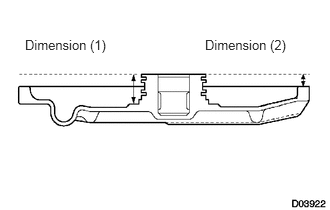
Measure the 2 places of the rear cover as shown in the illustration and calculate a dimension C using the following formula.
- HINT:
-
Dimension C = Dimension (1) - Dimension (2)
Calculate the end play value using the following formula. Select a thrust bearing which satisfies the end play value and install it.
- End play:
0.198 to 0.936 mm (0.00800 to 0.03685 in.)
- NOTICE:
-
Make sure that the colored race side is facing the direct clutch assembly.
- HINT:
-
End play = Dimension C - Dimension B
- Standard bearing thickness and diameter:
Thickness Inside Outside 3.58 mm (0.1409 in.) 53.6 mm (2.110 in.) 69.6 mm (2.740 in.) 3.88 mm (0.1528 in.) 53.6 mm (2.110 in.) 70.18 mm (2.763 in.)
35148
18.INSTALL NO. 1 GOVERNOR APPLY GASKET
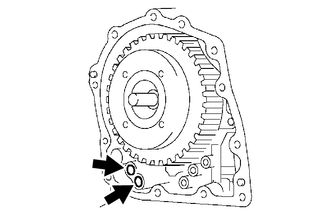
Install 2 new apply gaskets to the transaxle.
35895
19.INSTALL FRONT CLUTCH APPLY TUBE
Install the clamp to the front clutch apply tube.
- NOTICE:
-
Make sure to install the clamp to the apply pipe before installing the apply pipe to the transaxle case. This prevents the apply pipe from being deformed or damaged.
35666D
20.INSTALL BRAKE APPLY TUBE
Install the clamp to the brake apply tube.
- NOTICE:
-
Make sure to install the clamp to the apply pipe before installing the apply pipe to the transaxle case. This prevents the apply pipe from being deformed or damaged.
Install the 2 apply tubes to the transaxle with the bolt.
- Torque:
- 5.4 N*m (55 kgf*cm, 48 in.*lbf)
- NOTICE:
-
Each pipe should be securely inserted until it reaches the stopper.
35104Q
21.INSTALL NO. 1 TRANSAXLE CASE PLUG
Install 2 new O-rings to the 2 plugs.
Install the 2 plugs to the transaxle rear cover.
- Torque:
- 7.4 N*m (75 kgf*cm, 65 in.*lbf)
35102
22.INSTALL TRANSAXLE REAR COVER SUB-ASSEMBLY
Using SST and a press, press in the bearing.
- SST
- 09950-60010 (09951-00230, 09951-00350)
- Standard depth:
12.05 to 12.75 mm (0.4744 to 0.5020 in.)
- NOTICE:
- ·
Face the inscribed mark side of the bearing race up.
·Repeat the press-fit until the specified value is obtained.
Apply adhesive to the 2 screws.
- Adhesive:
Toyota Genuine Adhesive 1344,
Three Bond 1344 or Equivalent
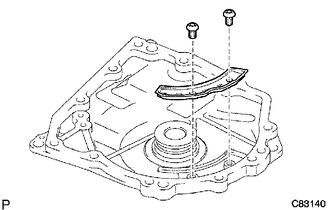
Using a T30 ''torx'' socket, install the transaxle rear cover plate with the 2 screws.
- Torque:
- 7.5 N*m (76 kgf*cm, 66 in.*lbf)
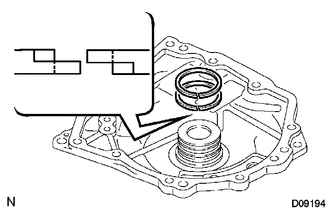
Coat 2 new oil seal rings with ATF, and install them to the transaxle rear cover.
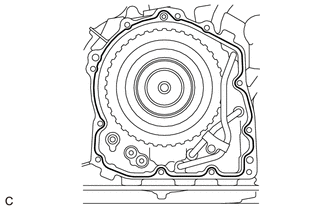
Remove any packing material and be careful not to get oil on the contacting surfaces of the transaxle rear cover or the transaxle.
Apply seal packing to the transaxle case.
- Seal packing:
Toyota Genuine Seal Packing 1281,
Three Bond 1281 or Equivalent
- Seal packing diameter:
1.2 mm (0.0472 in.)
Coat the needle roller bearing with ATF.
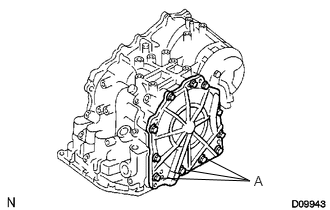
Apply adhesive to the threads of the bolts labeled A.
- Adhesive:
Toyota Genuine Adhesive 1344,
Three Bond 1344 or Equivalent
Install the 11 bolts.
- Torque:
- 19 N*m (194 kgf*cm, 14 ft.*lbf)
for bolt A
- 25 N*m (255 kgf*cm, 18 ft.*lbf)
for other bolt
34244
23.INSTALL UNDERDRIVE CLUTCH DRUM OIL SEAL RING
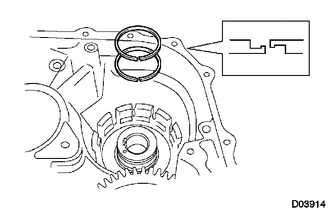
Install 2 new oil seals to the transaxle.
34253
24.INSTALL UNDERDRIVE BRAKE PISTON
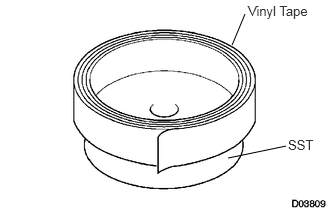
Wind a vinyl tape around SST at the 4.0 mm (0.157 in.) above from the bottom end until the thickness of the wound tape is about 5.0 mm (0.197 in.).
- SST
- 09550-60010 (09951-00320)
- NOTICE:
-
Clean SST to remove deposited oil before winding a vinyl tape.
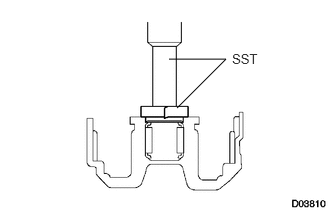
Using SST and a press, press in the needle-roller bearing to the transaxle until the wound vinyl tape contacts the transaxle case.
- SST
- 09550-60010 (09951-00320)
09950-70010 (09951-07100)
09387-00020
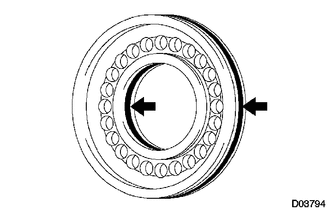
Coat 2 new O-rings with ATF, and install them to the underdrive brake piston.
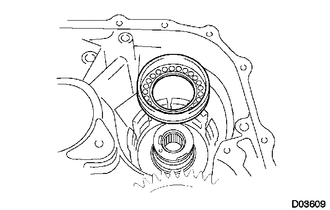
Install the underdrive brake piston to the transaxle.
34207
25.INSTALL UNDERDRIVE BRAKE RETURN SPRING SUB-ASSEMBLY
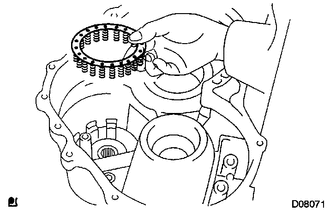
Install the underdrive brake return spring to the underdrive brake piston.
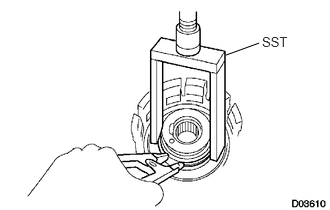
Using SST, a snap ring expander and press, press the return spring and install the snap ring to the transaxle.
- SST
- 09387-00020
- NOTICE:
-
Do not apply excessive pressure.
34262
26.INSTALL NO. 2 UNDERDRIVE CLUTCH DISC
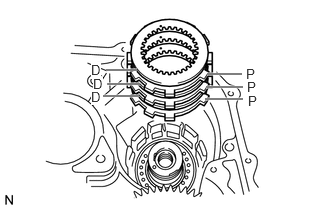
Install the 3 discs and 3 plates to the transaxle.
- Install in order:
P - D - P - D - P - D
- HINT:
-
D = Disc
-
P = Plate
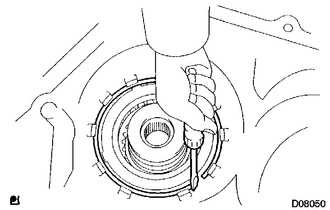
Using a screwdriver, install the snap ring.
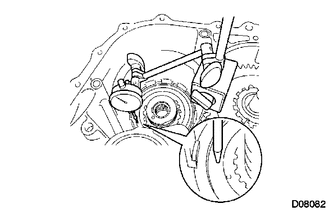
Using a dial indicator, measure the underdrive brake piston stroke while applying and releasing compressed air (392 kPa, 4.0 kgf/cm2, 57 psi).
- Standard piston stroke:
1.81 to 2.20 mm (0.0713 to 0.0866 in.)
- HINT:
-
Select an appropriate flange from the table below so that it will meet the specified value.
- Standard flange thickness:
Mark Thickness Mark Thickness 1 3.0 mm (0.118 in.) 3 3.4 mm (0.134 in.) 2 3.2 mm (0.126 in.) - -
Temporarily remove the snap ring and attach the flange. Restore the snap ring.
34360
27.INSTALL UNDERDRIVE 1-WAY CLUTCH ASSEMBLY
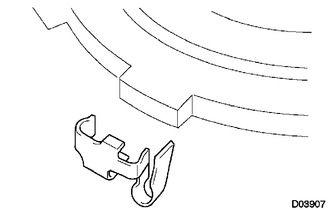
Install the outer race retainer to the 1-way clutch.
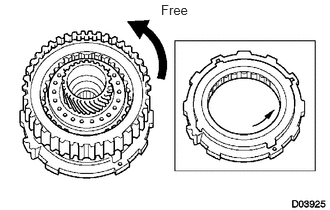
Install the underdrive clutch assembly to the 1-way clutch. Rotate the underdrive clutch to check the rotating direction for the lock or free operation.
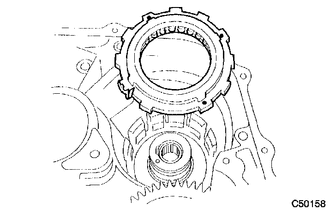
Install the 1-way clutch to the transaxle.
- NOTICE:
-
Make sure that the mark on the 1-way clutch outer race is visible.
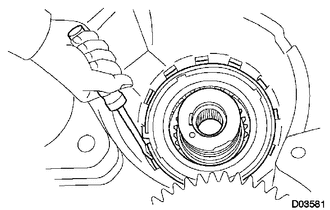
Using a screwdriver, install the snap ring to the transaxle.
28.INSTALL UNDERDRIVE CLUTCH
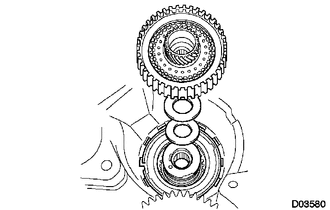
Coat the bearing and bearing race with petroleum jelly, and install them onto the underdrive clutch.
- Standard race diameter:
Item Inside Outside Bearing 37.73 mm (1.4854 in.) 58.0 mm (2.283 in.) Race 29.9 mm (1.177 in.) 55.5 mm (2.185 in.)
Install the underdrive clutch assembly to the transaxle.
29.INSTALL UNDERDRIVE PLANETARY GEAR ASSEMBLY
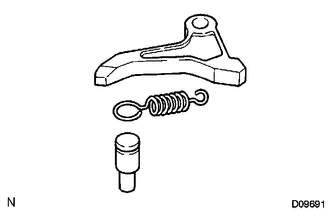
Install the parking lock pawl pin and torsion spring to the parking lock pawl.
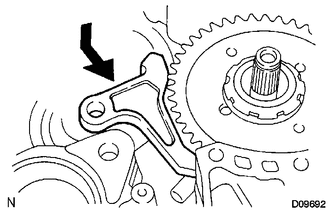
Temporarily install the parking lock pawl, shaft and spring to the transaxle case as shown in the illustration.
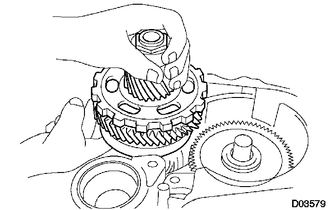
Install the underdrive planetary gear assembly to the transaxle.
- NOTICE:
-
Engage all the discs of the underdrive clutch and hub splines of the underdrive planetary gear assembly firmly and assemble them securely.
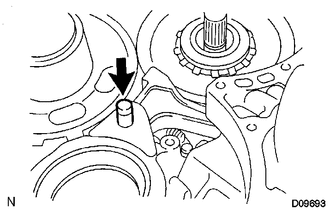
Install the parking lock pawl shaft.
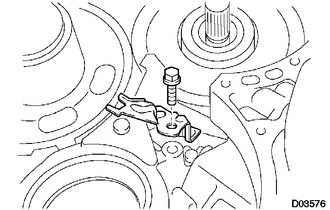
Install the pawl shaft clamp with the bolt.
- Torque:
- 9.8 N*m (100 kgf*cm, 87 in.*lbf)
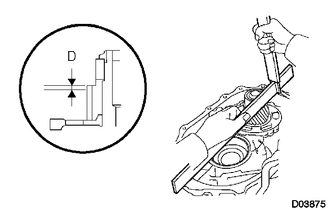
Using a straightedge and vernier caliper as shown in the illustration, measure the gap between the top of the differential drive pinion in the underdrive planetary gear and contact surface of the transaxle and housing (Dimension D).
- NOTICE:
-
Note down the dimension D as it is necessary for the following process.
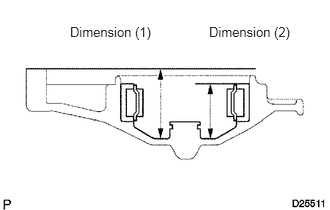
As shown in the illustration, measure the 2 places of the transaxle housing. Calculate the dimension E using the formula.
- NOTICE:
-
Note down the dimension E as it is necessary for the following process.
- HINT:
-
Dimension E = Dimension (1) - Dimension (2)
35631
30.INSPECT MULTIPLE DISC CLUTCH HUB
35631
31.INSTALL MULTIPLE DISC CLUTCH HUB
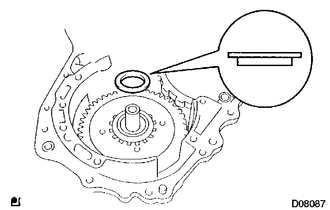
Install the bearing race to the transaxle while checking its direction.
- Standard bearing diameter:
Item Inside Outside Bearing race 34.5 mm (1.358 in.) 48.5 mm (1.909 in.)
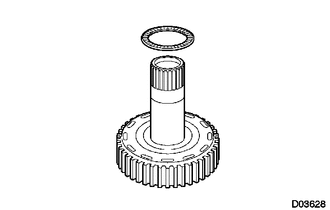
Coat the thrust needle roller bearing and race with petroleum jelly, and install them onto the multiple disc clutch hub.
- Standard thrust bearing and race diameter:
Item Inside Outside Bearing 36.3 mm (1.429 in.) 52.25 mm (2.055 in.)
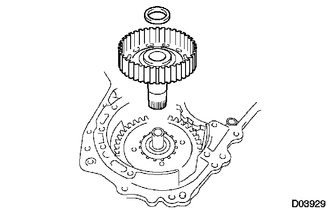
Install the input shaft thrust bearing to the multiple clutch hub.
- Standard bearing diameter:
Item Inside Outside Bearing 23.5 mm (0.925 in.) 44.0 mm (1.732 in.)
Install the forward clutch hub to the transaxle.
32.INSTALL FORWARD CLUTCH ASSEMBLY
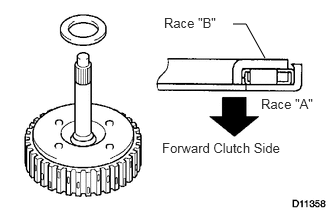
Install the input shaft thrust bearing to the forward clutch.
- Standard bearing diameter:
Item Inside Outside Bearing 33.85 mm (1.3327 in.) 52.2 mm (2.055 in.)
- NOTICE:
-
Install the thrust bearing properly so that the race "B" will be visible.
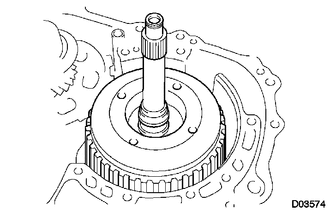
Install the forward clutch to the multiple clutch hub.
- NOTICE:
-
Align the splines of all discs in the forward clutch with those of multiple clutch hub to assemble them securely.
35179
33.INSTALL OVERDRIVE BRAKE GASKET
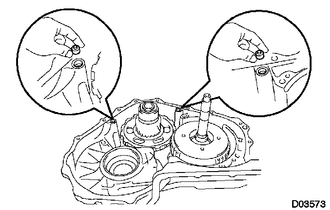
Install 2 new overdrive brake gaskets to the transaxle.
34.INSTALL FRONT DIFFERENTIAL ASSEMBLY
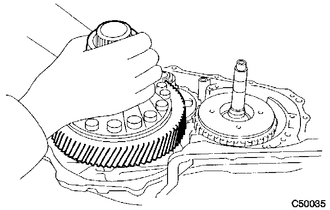
Install the differential assembly to the transaxle.
34736A
35.INSTALL NO. 2 THRUST BEARING UNDERDRIVE RACE
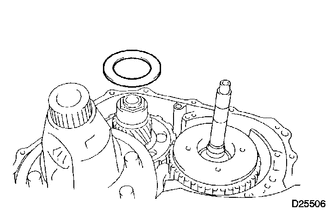
Install the thrust bearing race to the underdrive planetary gear.
35701R
36.INSTALL THRUST NEEDLE ROLLER BEARING
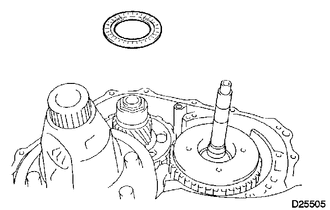
Calculate the end play value using the following formula and value of Dimensions D and E that were measured when installing the cylindrical roller bearing and underdrive planetary gear. Select an appropriate underdrive planetary gear thrust bearing race No. 2 which satisfies the specified end play value, and install it.
- Standard end play:
0.498 to 0.993 mm (0.0194 to 0.0390 in.)
- HINT:
-
End play = Dimension E - Dimension D - thrust bearing thickness 3.28 mm (0.1291 in.) - underdrive thrust bearing race thickness.
- Standard race thickness:
E - D Thickness Less then 7.34 mm (0.2890 in.) 3.5 mm (0.138 in.) 7.34 mm (0.2890 in.) 3.8 mm (0.150 in.)
- Standard bearing and bearing race diameter:
Item Inside Outside Bearing 53.0 mm (2.087 in.) 78.2 mm (3.079 in.) Bearing race 52.1 mm (2.051 in.) 75.5 mm (2.972 in.)
37.INSTALL OIL PUMP ASSEMBLY
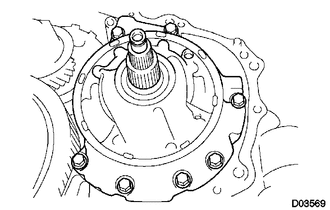
Install the oil pump to the transaxle with the 7 bolts.
- Torque:
- 22 N*m (226 kgf*cm, 16 ft.*lbf)
34346
38.INSTALL UNDERDRIVE OUTPUT SHAFT OIL SEAL RING
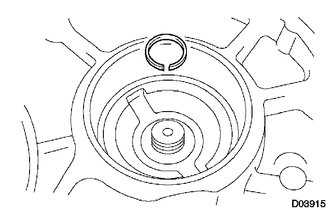
Install a new oil seal ring to the transaxle housing.
34301B
39.INSTALL UNDERDRIVE CYLINDRICAL ROLLER BEARING
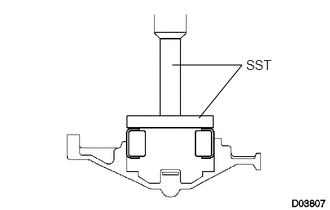
Using SST and a press, press in the underdrive cylindrical roller bearing.
- SST
- 09950-60020
09950-70010 (09951-07100, 09951-07100)
- NOTICE:
-
Do not apply excessive pressure to it.
35111C
40.INSTALL TRANSAXLE HOUSING
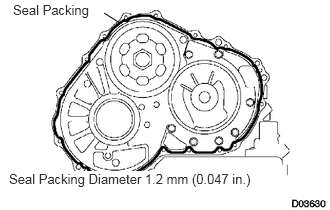
Remove any packing material and be careful not to get oil on the contacting surfaces of the transaxle case or transaxle housing.
Apply seal packing to the transaxle case.
- Seal packing:
Toyota Genuine Seal Packing 1281,
Three Bond 1281 or Equivalent
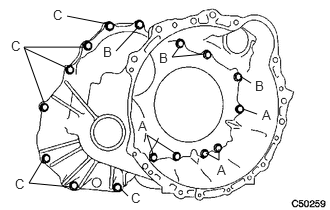
Install the transaxle housing and to the transaxle with the 16 bolts.
- Torque:
- 22 N*m (224 kgf*cm, 16 ft.*lbf)
for bolt A
- 29 N*m (296 kgf*cm, 21 ft.*lbf)
for bolt B and C
- HINT:
-
Each bolt length is indicated below.
- Bolt length:
50 mm (1.969 in.) for bolt A
50 mm (1.969 in.) for bolt B
42 mm (1.654 in.) for bolt C
- NOTICE:
-
Because the bolt A is a seal bolt, apply the seal packing to new bolts and tighten them within 10 minutes after application.
- Seal packing:
Toyota Genuine Seal Packing 1281,
Three Bond 1281 or Equivalent
35104Q
41.INSTALL NO. 1 TRANSAXLE CASE PLUG
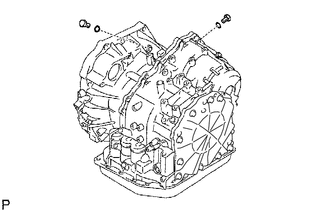
Install 2 new O-rings to the 2 plugs.
Install the 2 plugs to the transaxle housing.
- Torque:
- 7.4 N*m (75 kgf*cm, 65 in.*lbf)
42.INSPECT INPUT SHAFT END PLAY
30500
43.FIX AUTOMATIC TRANSAXLE ASSEMBLY
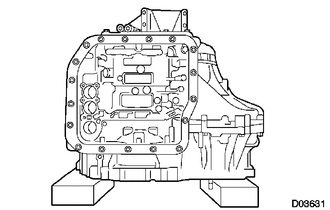
35506F
44.INSTALL MANUAL VALVE LEVER SHAFT OIL SEAL
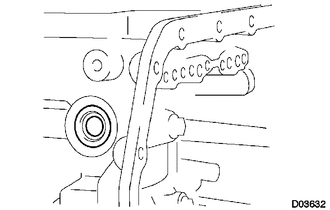
Coat a new oil seal with ATF, and install it to the transaxle.
Install the oil seal to the transaxle.
35501
45.INSTALL PARKING LOCK ROD SUB-ASSEMBLY
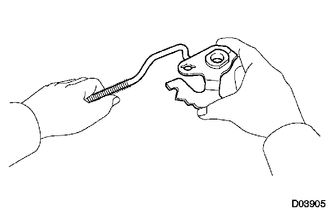
Install the parking lock rod to the manual valve lever.
35505
46.INSTALL MANUAL VALVE LEVER SUB-ASSEMBLY
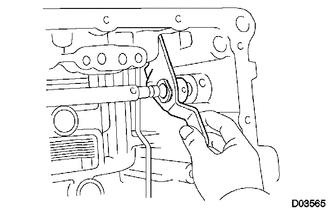
Install a new spacer and manual valve lever shaft to the transaxle.
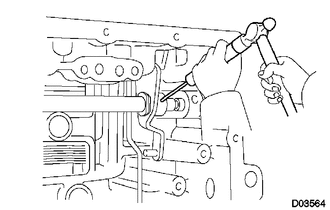
Using a pin punch and hammer, tap in a new pin.
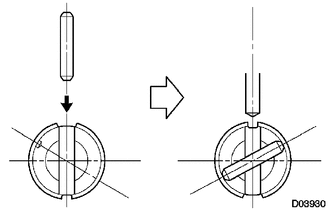
Turn the spacer and lever shaft to align the small hole for locating the staking position in the spacer with the staking position mark on the lever shaft.
Using a pin punch, stake the spacer through the small hole.
Check that the spacer does not turn.
35506J
47.INSTALL MANUAL VALVE LEVER SHAFT RETAINER SPRING
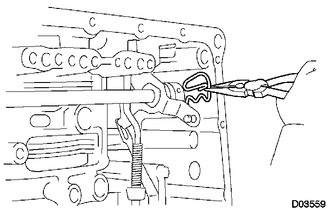
Using needle-nose pliers, install the retainer spring.
35595
48.INSTALL PARKING LOCK PAWL BRACKET
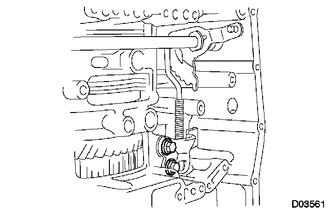
Install the parking lock pawl bracket with the 2 bolts.
- Torque:
- 20 N*m (204 kgf*cm, 15 ft.*lbf)
- Bolt length:
25 mm (0.984 in.)
35409
49.INSTALL MANUAL DETENT SPRING SUB-ASSEMBLY
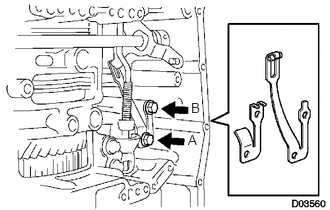
Install the manual detent spring with the 2 bolts.
- NOTICE:
-
Make sure to install the manual detent spring and cover in this order.
- Torque:
- 20 N*m (204 kgf*cm, 15 ft.*lbf)
for bolt A
- 12 N*m (122 kgf*cm, 9 ft.*lbf)
for bolt B
- HINT:
-
Each bolt length is indicated below.
- Bolt length:
27 mm (1.063 in.) for bolt A
16 mm (0.630 in.) for bolt B
35427K
50.INSTALL B-3 ACCUMULATOR PISTON
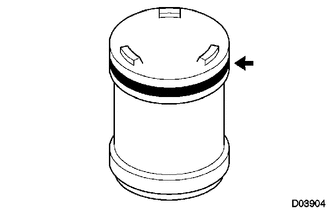
Coat a new O-ring with ATF, and install it to the B-3 accumulator piston.
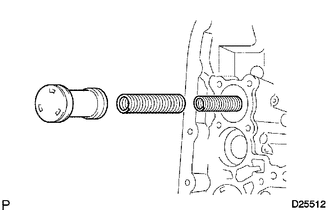
Coat the accumulator B-3 piston and spring with ATF, and install them to the transaxle.
- Standard accumulator spring:
Spring Free length
Outer diameterColor B-3 Inner 60.24 mm (2.3716 in.)
15.9 mm (0.626)Yellowish green B-3 Outer 74.61 mm (2.9374 in.)
21.7 mm (0.854 in.)Blue
35424C
51.INSTALL C-1 ACCUMULATOR PISTON
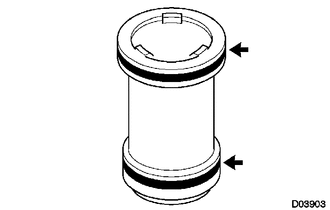
Coat 2 new O-rings with ATF, and install them to the C-1 accumulator piston.
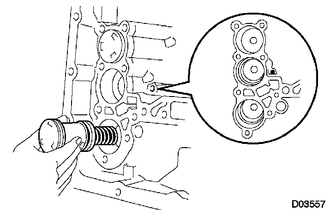
Coat the accumulator C-1 piston with ATF, and install it to the transaxle.
- Standard accumulator spring:
Spring Free length
Outer diameterColor C-1 81.53 mm (3.2098 in.)
18.5 mm (0.728 in.)Pink
35426D
52.INSTALL C-3 ACCUMULATOR PISTON
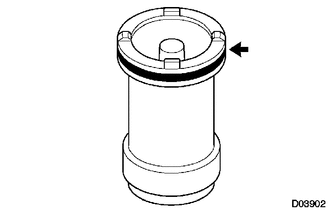
Coat a new O-ring with ATF, and install it to the C-3 accumulator piston.
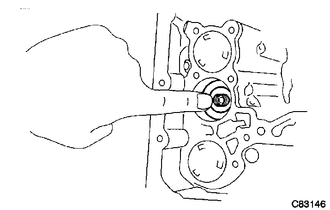
Coat the C-3 accumulator piston with ATF, and install it to the transaxle.
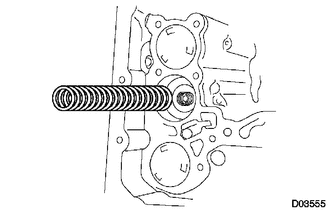
Install the compression spring to the C-3 accumulator piston.
35251
53.INSTALL CHECK BALL BODY
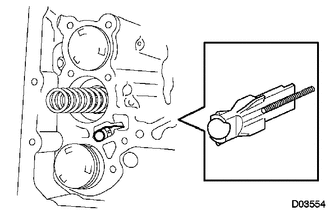
Install the check ball body and spring.
82125J
54.INSTALL TRANSMISSION WIRE
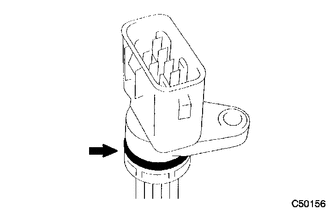
Coat a new O-ring with ATF, and install it to the transaxle solenoid wire.
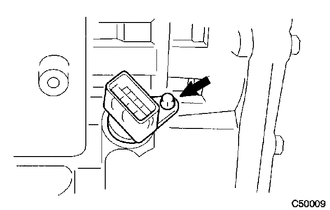
Install the solenoid wire retaining bolt.
- Torque:
- 5.4 N*m (55 kgf*cm, 48 in.*lbf)
35159
55.INSTALL BRAKE DRUM GASKET
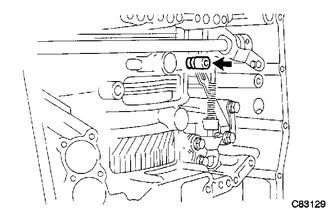
Coat a new brake drum gasket with ATF, and install it to the transaxle.
35149B
56.INSTALL TRANSAXLE CASE 2ND BRAKE GASKET
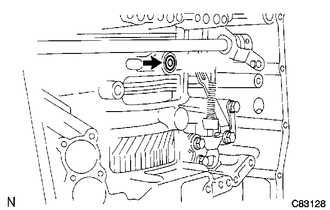
Coat a new transaxle case 2nd brake gasket with ATF, and install it to the transaxle.
35148
57.INSTALL NO. 1 GOVERNOR APPLY GASKET
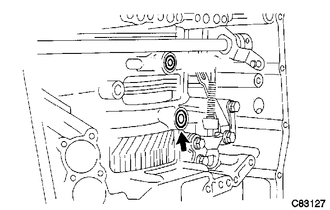
Coat a new governor apply gasket No. 1 with ATF, and install it to the transaxle.
35410
58.INSTALL TRANSMISSION VALVE BODY ASSEMBLY
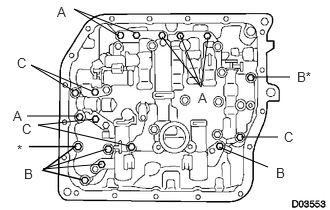
Make sure that the manual valve lever position, install the valve body with the 17 bolts to the transaxle.
- Torque:
- 11 N*m (112 kgf*cm, 8 ft.*lbf)
- HINT:
-
Each bolt length is indicated below.
- Bolt length:
25 mm (0.984 in.) for bolt A
41 mm (1.614 in.) for bolt B
45 mm (1.771 in.) for bolt C
- NOTICE:
- ·
Push the valve body against the accumulator piston spring and the check ball body to install it.
·When installing the valve body to the transaxle case, do not hold the solenoids.
·Tighten the bolts marked by * in the illustration first temporarily because they are positioning bolts.
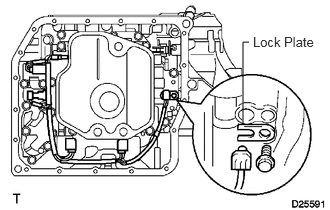
Connect the 5 solenoid connectors.
Install the ATF temperature sensor, clamp and bolt.
- Torque:
- 6.6 N*m (67 kgf*cm, 58 in.*lbf)
35330
59.INSTALL VALVE BODY OIL STRAINER ASSEMBLY
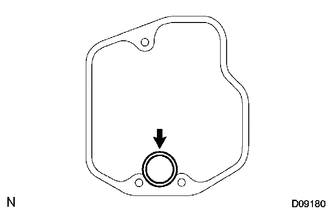
Coat a new O-ring with ATF, and install it to the oil strainer.
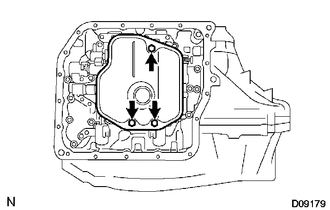
Install the oil strainer and 3 bolts to the valve body.
- Torque:
- 11 N*m (112 kgf*cm, 8 ft.*lbf)
35106D
60.INSTALL AUTOMATIC TRANSAXLE OIL PAN SUB-ASSEMBLY
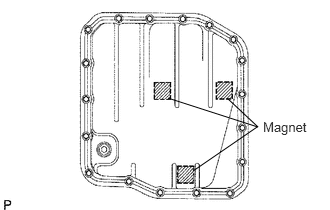
Install the 3 magnets in the oil pan.
Install a new oil pan gasket to the oil pan.
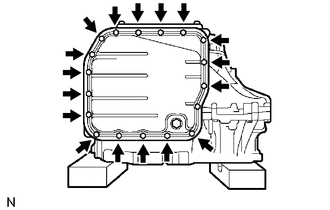
Install the oil pan to the transaxle with the 18 bolts.
- Torque:
- 7.8 N*m (80 kgf*cm, 69 in.*lbf)
- NOTICE:
-
Because the bolts are seal bolts, apply seal packing to new bolts and tighten them within 10 minutes after application.
33403M
61.INSTALL SPEEDOMETER DRIVEN HOLE COVER SUB-ASSEMBLY
Coat a new O-ring with ATF, and install it to the hole cover.
Install the hole cover with the bolt to the transaxle.
- Torque:
- 5.5 N*m (56 kgf*cm, 49 in.*lbf)
89411C
62.INSTALL SPEED SENSOR
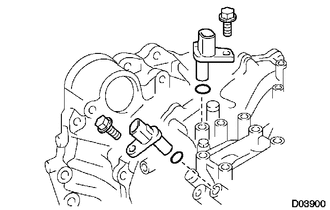
Coat 2 new O-rings with ATF, and install them to the 2 sensors.
Install the 2 sensors with the 2 bolts to the transaxle.
- Torque:
- 8.8 N*m (90 kgf*cm, 77 in.*lbf)
32921C
63.INSTALL OIL COOLER INLET TUBE UNION
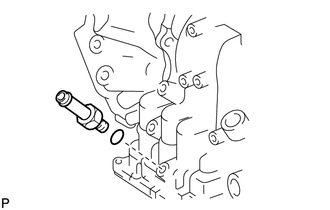
Coat a new O-ring with ATF, and install it to the union.
Install the union to the transaxle.
- Torque:
- 27 N*m (276 kgf*cm, 20 ft.*lbf)
32921C
64.INSTALL OIL COOLER OUTLET TUBE UNION
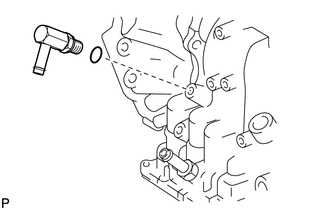
Coat a new O-ring with ATF, and install it to the union.
Install the union to the transaxle case.
- Torque:
- 27 N*m (276 kgf*cm, 20 ft.*lbf)
35104Q
65.INSTALL NO. 1 TRANSAXLE CASE PLUG
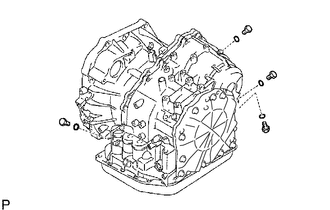
Coat 4 new O-rings with ATF, and install them to the 4 plugs.
Install the 4 plugs to the transaxle.
- Torque:
- 7.4 N*m (75 kgf*cm, 65 in.*lbf)
35104V
66.INSTALL BREATHER PLUG HOSE
Install the breather plug hose to the breather plug.
84540
67.INSTALL PARK/NEUTRAL POSITION SWITCH ASSEMBLY
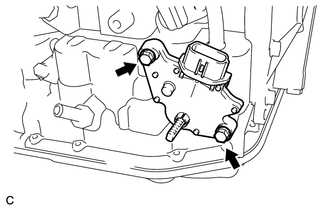
Temporarily install the park/neutral position switch assembly to the automatic transaxle assembly with the 2 bolts.
Install a new lock plate and lock nut to the park/ neutral position switch assembly.
- Torque:
- 6.9 N*m (70 kgf*cm, 61 in.*lbf)
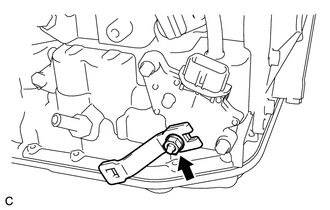
Temporarily install the control shaft lever to the manual valve lever shaft with the nut and washer.
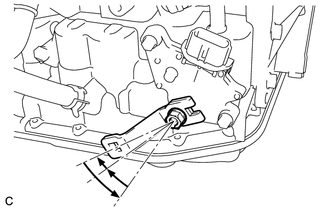
Turn the control shaft lever counterclockwise until it stops, then turn it clockwise 2 notches.
Remove the nut, washer and control shaft lever from the manual valve lever shaft.
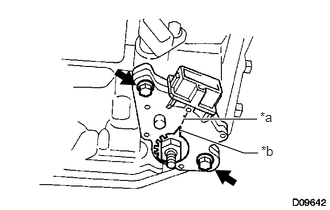
Align the indicator with the neutral basic line.
| *a | Neutral Basic Line |
| *b | Groove |
Hold the park/neutral position switch assembly in position and tighten the 2 bolts.
- Torque:
- 5.4 N*m (55 kgf*cm, 48 in.*lbf)
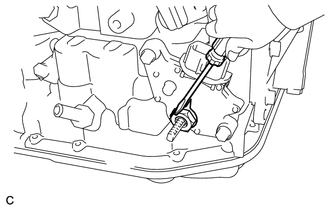
Using a screwdriver, stake the lock nut with the lock plate.
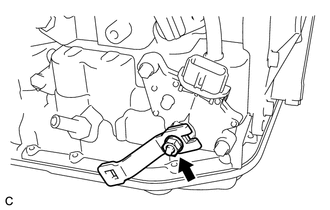
Install the control shaft lever to the manual valve lever shaft with the nut and washer.
- Torque:
- 13 N*m (130 kgf*cm, 9 ft.*lbf)
33403M
68.INSTALL SPEEDOMETER DRIVEN HOLE COVER SUB-ASSEMBLY
Coat a new O-ring with ATF and install it to the hole cover.
Install the hole cover to the transaxle with the bolt.