P0443 Evaporative Emission Control System Purge Control Valve Circuit
Diagnostic trouble codes · Vehicles built Dec 2007 – Jul 2009
Versions by build date: Dec 2007 – Jul 2009 from Aug 2009
DESCRIPTION
To reduce hydrocarbon emissions, evaporated fuel from the fuel tank is routed through a charcoal canister to the intake manifold for combustion in the cylinders.The ECM changes the duty signals to the Purge VSV (Vacuum Switching Valve for Purge Control) so that the intake amount of hydrocarbon emissions is appropriate for the driving conditions (engine load, engine speed, vehicle speed, etc.) after the engine is warmed up.
| DTC No. |
DTC Detection Condition |
Trouble Area |
| P0443 |
Terminal voltage of ECM output circuit does not correspond with drive signals from ECM to purge VSV (1 trip detection logic) |
|
WIRING DIAGRAM
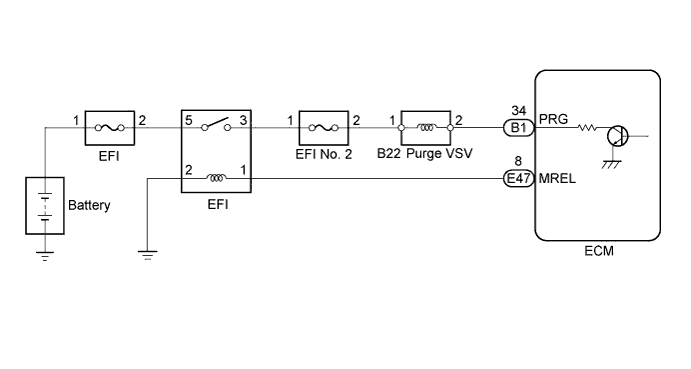

INSPECTION PROCEDURE
- HINT:
- Read freeze frame data using the intelligent tester. Freeze frame data record the engine condition when malfunctions are detected. When troubleshooting, freeze frame data can help determine if the vehicle was moving or stationary, if the engine was warmed up or not, if the air-fuel ratio was lean or rich, and other data from the time the malfunction occurred.
| 1. PERFORM ACTIVE TEST USING INTELLIGENT TESTER (ACTIVATE THE VSV FOR EVAP CONTROL) |

Connect the intelligent tester to the DLC3.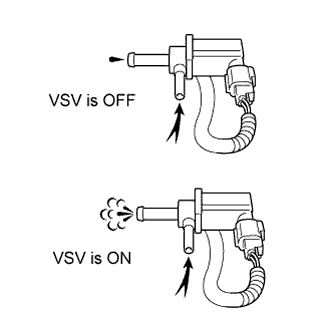
Disconnect the vacuum hose (charcoal canister side) from the purge VSV.
Start the engine.
Turn the tester ON.
Enter the following menus: Powertrain / Engine and ECT / Active Test / Activate the VSV for EVAP Control.
When the purge VSV is operated using the intelligent tester, check whether the port of the purge VSV applies suction to your finger.
- OK:
Tester Operation
Specified Condition
VSV ON
Purge VSV port applies suction to finger
VSV OFF
Purge VSV port applies no suction to finger
Reconnect the vacuum hose to the purge VSV.
|
|
||||

| OK | ||
 |
||
| ||
| 2. INSPECT PURGE VSV (RESISTANCE) |
Disconnect purge VSV connector.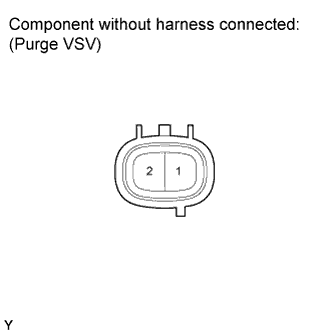
Measure the resistance according to the value(s) in the table below.
- Standard Resistance:
Tester Connection
Condition
Specified Condition
1 - 2
20°C (68°F)
26 to 30 Ω
Reconnect the purge VSV connector.
|
|
||||

| OK | |
 |
| 3. INSPECT PURGE VSV (POWER SOURCE) |
Disconnect the purge VSV connector.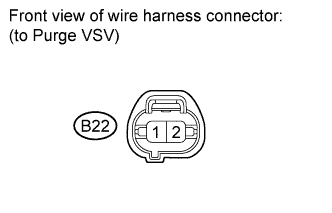
Turn the ignition switch to ON.
Measure the voltage according to the value(s) in the table below.
- Standard Voltage:
Tester Connection
Switch Condition
Specified Condition
B22-1 - Body ground
Ignition switch ON
11 to 14 V
Reconnect the purge VSV connector.
|
|
||||
| OK | |
|
| 4. CHECK HARNESS AND CONNECTOR (PURGE VSV - ECM) |
Disconnect the purge VSV connector.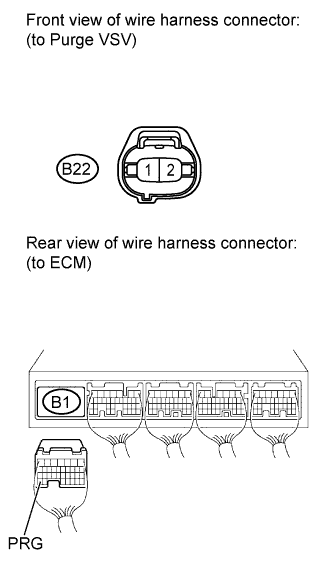
Disconnect the ECM connector.
Measure the resistance according to the value(s) in the table below.
- Standard Resistance :
Tester Connection
Condition
Specified Condition
B22-2 - B1-34 (PRG)
Always
Below 1 Ω
B22-2 or B1-34 (PRG) - Body ground
Always
10 kΩ or higher
Reconnect the purge VSV connector.
Reconnect the ECM connector.
|
|
||||
| OK | ||
|
||
| ||
| 5. CHECK HARNESS AND CONNECTOR (PURGE VSV - EFI NO. 2 FUSE - EFI RELAY) |
Inspect the EFI NO. 2 fuse.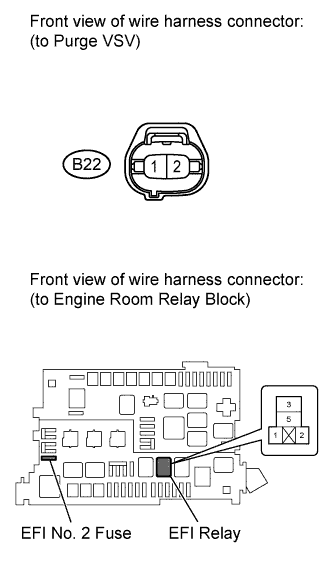
Remove the EFI NO. 2 fuse from the engine room relay block.
Measure the resistance according to the value(s) in the table below.
- Standard Resistance:
Tester Connection
Condition
Specified Condition
EFI NO. 2 fuse
Always
Below 1 Ω
Reinstall the EFI NO. 2 fuse.
Disconnect the purge VSV connector.
Remove the EFI relay from the engine room relay block.
Measure the resistance according to the value(s) in the table below.
- Standard Resistance :
Tester Connection
Condition
Specified Condition
B22-1 - EFI relay (3)
Always
Below 1 Ω
B22-1 or EFI relay (3) - Body ground
Always
10 kΩ or higher
Reconnect the purge VSV connector.
Reinstall the EFI relay.
|
|
||||
| OK | ||
|
||
| ||