Check CAN Bus Line for Short to GND
Circuit diagnosis · Vehicles built Aug 2009 – Oct 2010
DESCRIPTION
A short to GND is suspected in the CAN bus line when there is continuity between terminals 4 (CG) and 6 (CANH) or terminals 4 (CG) and 14 (CANL) of the DLC3.| Symptoms |
Trouble Area |
| There is continuity between terminals 4 (CG) and 6 (CANH) or terminals 4 (CG) and 14 (CANL) of the DLC3. |
|
WIRING DIAGRAM
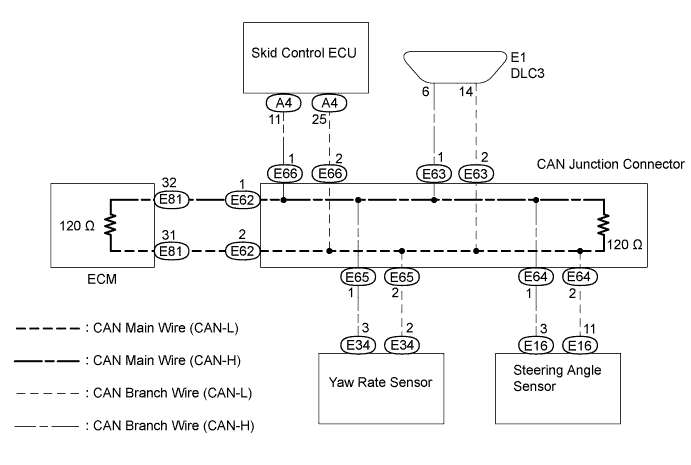

INSPECTION PROCEDURE
- NOTICE:
- Turn the ignition switch off before measuring the resistances of the CAN main wire and the CAN branch wire.
- After the ignition switch is turned off, check that the key reminder warning system is not in operation.
- Before measuring the resistance, leave the vehicle as is for at least 1 minute and do not operate the ignition switch, any other switches or the doors. If doors need to be opened in order to check connectors, open the doors and leave them open.
- Turn the ignition switch off before measuring the resistances of the CAN main wire and the CAN branch wire.
- HINT:
- Operating the ignition switch, any switches or any doors triggers related ECU and sensor communication with the CAN, which causes resistance variation.
| 1. CHECK CAN BUS LINE FOR SHORT TO GND (DLC3 BRANCH WIRE) |

Turn the ignition switch off.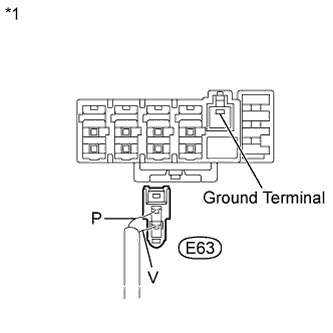
Disconnect the E63 DLC3 branch wire connector.
- NOTICE:
- Before disconnecting the connector, make a note of where it is connected.
- Before disconnecting the connector, make a note of where it is connected.
- Reconnect the connector to its original position.
- Reconnect the connector to its original position.
Text in Illustration *1
Rear view of wire harness connector
(to CAN Junction Connector "A" Side (w/ Ground Terminal))
Measure the resistance according to the value(s) in the table below.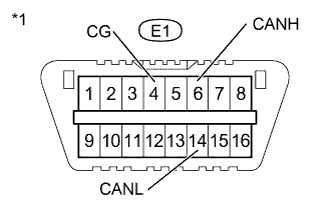
- Standard Resistance:
Tester Connection
Switch Condition
Specified Condition
E1-6 (CANH) - E1-4 (CG)
Ignition switch off
200 Ω or more
E1-14 (CANL) - E1-4 (CG)
Ignition switch off
200 Ω or more
Text in Illustration *1
DLC3
|
|
||||

| OK | |
 |
| 2. CONNECT CONNECTOR |
Reconnect the DLC3 branch wire connector.
| NEXT | |
|
| 3. CHECK CAN BUS LINE FOR SHORT TO GND (SKID CONTROL ECU BRANCH WIRE) |
Turn the ignition switch off.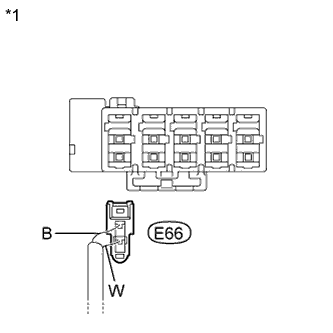
Disconnect the E66 skid control ECU branch wire connector.
- NOTICE:
- Before disconnecting the connector, make a note of where it is connected.
- Before disconnecting the connector, make a note of where it is connected.
- Reconnect the connector to its original position.
- Reconnect the connector to its original position.
Text in Illustration *1
Rear view of wire harness connector
(to CAN Junction Connector "B" Side (w/o Ground Terminal))
Measure the resistance according to the value(s) in the table below.
- Standard Resistance:
Tester Connection
Switch Condition
Specified Condition
E1-6 (CANH) - E1-4 (CG)
Ignition switch off
200 Ω or more
E1-14 (CANL) - E1-4 (CG)
Ignition switch off
200 Ω or more
Text in Illustration *1
DLC3
|
|
||||

| OK | |
|
| 4. CONNECT CONNECTOR |
Reconnect the skid control ECU connector.
| NEXT | |
|
| 5. CHECK CAN BUS LINE FOR SHORT TO GND (SKID CONTROL ECU BRANCH WIRE) |
Turn the ignition switch off.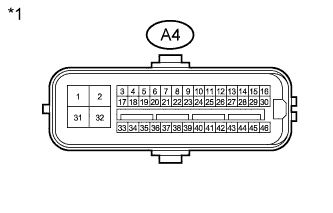
Disconnect the A4 skid control ECU connector.
Text in Illustration *1
Front view of wire harness connector
(to Skid Control ECU)
Measure the resistance according to the value(s) in the table below.
- Standard Resistance:
Tester Connection
Switch Condition
Specified Condition
E1-6 (CANH) - E1-4 (CG)
Ignition switch off
200 Ω or more
E1-14 (CANL) - E1-4 (CG)
Ignition switch off
200 Ω or more
Text in Illustration *1
DLC3
|
|
||||
| OK | ||
 |
||
| ||
| 6. CONNECT CONNECTOR |
Reconnect the skid control ECU branch wire connector.
| NEXT | |
|
| 7. CHECK CAN BUS LINE FOR SHORT TO GND (YAW RATE SENSOR BRANCH WIRE) |
Turn the ignition switch off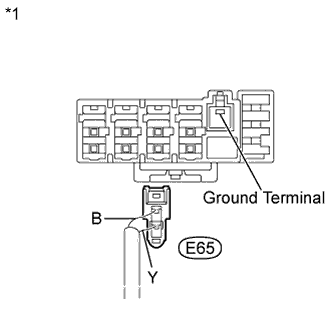
Disconnect the E65 yaw rate sensor branch wire connector.
- NOTICE:
- Before disconnecting the connector, make a note of where it is connected.
- Before disconnecting the connector, make a note of where it is connected.
- Reconnect the connector to its original position.
- Reconnect the connector to its original position.
Text in Illustration *1
Rear view of wire harness connector
(to CAN Junction Connector "A" Side (w/ Ground Terminal))
Measure the resistance according to the value(s) in the table below.
- Standard Resistance:
Tester Connection
Switch Condition
Specified Condition
E1-6 (CANH) - E1-4 (CG)
Ignition switch off
200 Ω or more
E1-14 (CANL) - E1-4 (CG)
Ignition switch off
200 Ω or more
Text in Illustration *1
DLC3
|
|
||||
| OK | |
|
| 8. CONNECT CONNECTOR |
Reconnect the yaw rate sensor branch wire connector.
| NEXT | |
|
| 9. CHECK CAN BUS LINE FOR SHORT TO GND (STEERING ANGLE SENSOR BRANCH WIRE) |
Turn the ignition switch off.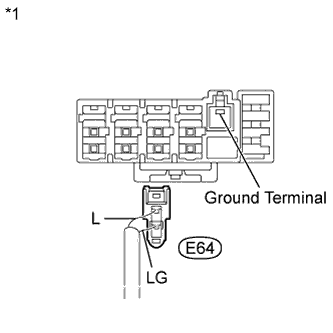
Disconnect the E64 steering angle sensor branch wire connector.
- NOTICE:
- Before disconnecting the connector, make a note of where it is connected.
- Before disconnecting the connector, make a note of where it is connected.
- Reconnect the connector to its original position.
- Reconnect the connector to its original position.
Text in Illustration *1
Rear view of wire harness connector
(to CAN Junction Connector "A" Side (w/ Ground Terminal))
Measure the resistance according to the value(s) in the table below.
- Standard Resistance:
Tester Connection
Switch Condition
Specified Condition
E1-6 (CANH) - E1-4 (CG)
Ignition switch off
200 Ω or more
E1-14 (CANL) - E1-4 (CG)
Ignition switch off
200 Ω or more
Text in Illustration *1
DLC3
|
|
||||
| OK | |
|
| 10. CONNECT CONNECTOR |
Reconnect the yaw rate sensor branch wire connector.
| NEXT | |
|
| 11. CHECK CAN BUS LINE FOR SHORT TO GND (YAW RATE SENSOR BRANCH WIRE) |
Turn the ignition switch off.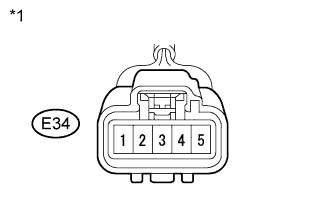
Disconnect the E34 yaw rate sensor connector.
Text in Illustration *1
Front view of wire harness connector
(to Yaw Rate Sensor)
Measure the resistance according to the value(s) in the table below.
- Standard Resistance:
Tester Connection
Switch Condition
Specified Condition
E1-6 (CANH) - E1-4 (CG)
Ignition switch off
200 Ω or more
E1-14 (CANL) - E1-4 (CG)
Ignition switch off
200 Ω or more
Text in Illustration *1
DLC3
|
|
||||
| OK | ||
|
||
| ||
| 12. CONNECT CONNECTOR |
Reconnect the steering angle sensor branch wire connector.
| NEXT | |
|
| 13. CHECK CAN BUS LINE FOR SHORT TO GND (STEERING ANGLE SENSOR BRANCH WIRE) |
Turn the ignition switch off.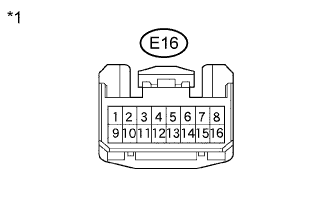
Disconnect the E16 steering angle sensor connector.
Text in Illustration *1
Front view of wire harness connector
(to Steering Angle Sensor)
Measure the resistance according to the value(s) in the table below.
- Standard Resistance:
Tester Connection
Switch Condition
Specified Condition
E1-6 (CANH) - E1-4 (CG)
Ignition switch off
200 Ω or more
E1-14 (CANL) - E1-4 (CG)
Ignition switch off
200 Ω or more
Text in Illustration *1
DLC3
|
|
||||
| OK | ||
|
||
| ||
| 14. CONNECT CONNECTOR |
Reconnect the steering angle sensor branch wire connector.
| NEXT | |
|
| 15. CHECK CAN BUS LINE FOR SHORT TO GND (ECM MAIN WIRE) |
Turn the ignition switch off.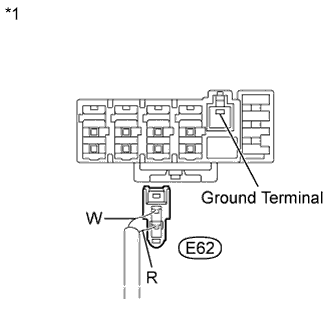
Disconnect the E62 ECM main wire connector.
- NOTICE:
- Before disconnecting the connector, make a note of where it is connected.
- Before disconnecting the connector, make a note of where it is connected.
- Reconnect the connector to its original position.
- Reconnect the connector to its original position.
Text in Illustration *1
Rear view of wire harness connector
(to CAN Junction Connector "A" Side (w/ Ground Terminal))
Measure the resistance according to the value(s) in the table below.
- Standard Resistance:
Tester Connection
Switch Condition
Specified Condition
E1-6 (CANH) - E1-4 (CG)
Ignition switch off
200 Ω or more
E1-14 (CANL) - E1-4 (CG)
Ignition switch off
200 Ω or more
Text in Illustration *1
DLC3
|
|
||||
| OK | |
|
| 16. CONNECT CONNECTOR |
Reconnect the ECM main wire connector.
| NEXT | |
|
| 17. CHECK CAN BUS LINE FOR SHORT TO GND (ECM MAIN WIRE) |
Turn the ignition switch off.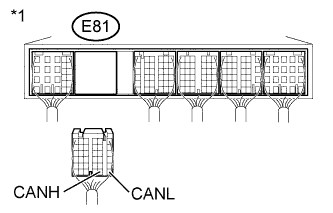
Disconnect the E81 ECM connector.
Text in Illustration *1
Rear view of wire harness connector
(to ECM)
Measure the resistance according to the value(s) in the table below.
- Standard Resistance:
Tester Connection
Switch Condition
Specified Condition
E1-6 (CANH) - E1-4 (CG)
Ignition switch off
200 Ω or more
E1-14 (CANL) - E1-4 (CG)
Ignition switch off
200 Ω or more
Text in Illustration *1
DLC3
|
|
||||
| OK | ||
|
||
| ||