INSTALLATION
Removal / installation · Vehicles built Jul 2007 – Jul 2009
Versions by build date: Jul 2007 – Jul 2009 from Aug 2009
| 1. INSTALL REAR DIFFERENTIAL CARRIER ASSEMBLY |

Remove any dust and oil from the differential carrier assembly and the contact surfaces of the axle housing.
Apply liquid gasket to both sides of a new gasket.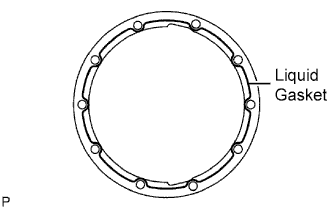

- NOTICE:
- Do not apply the liquid gasket to the stud bolt.
Install a new gasket and the differential carrier assembly with the 11 nuts and 11 washers.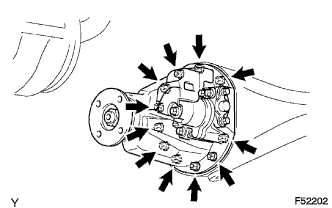
- Torque:
- 25 N*m{ 255 kgf*cm , 18 ft.*lbf }
Connect the differential lock actuator connector.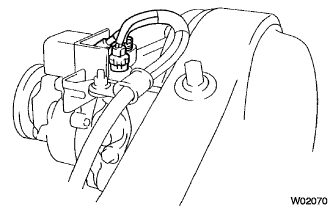
Connect the rear differential lock actuator breather hose to the differential actuator assembly.
| 2. INSTALL REAR AXLE SHAFT LH OIL SEAL |
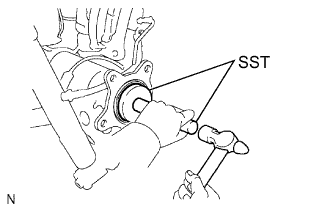 |
Using SST and a hammer, install a new oil seal.
- SST
- 09950-60020
(09951-00770)
09950-70010 (09951-07150)
Coat the lip of the oil seal with MP grease.
| 3. INSTALL REAR AXLE SHAFT RH OIL SEAL |
- HINT:
- Use the same procedure as for the LH side.
| 4. INSTALL REAR AXLE SHAFT LH |
Coat a new O-ring with MP grease and install it.
Install the rear axle shaft together with the parking brake plate with the 4 nuts.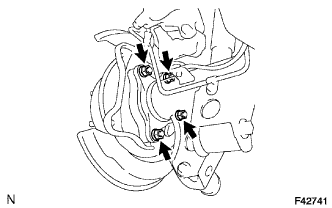
- Torque:
- 120 N*m{ 1,224 kgf*cm , 89 ft.*lbf }
| 5. INSTALL REAR AXLE SHAFT RH |
- HINT:
- Use the same procedure as for the LH side.
| 6. INSPECT REAR AXLE SHAFT BEARING |
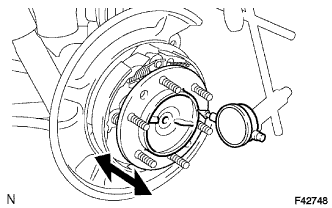 |
Inspect the axle shaft backlash.
Using a dial indicator, check the backlash near the center of the axle shaft.
- Maximum:
- 0.05 mm (0.0020 in.)
Inspect the axle shaft runout.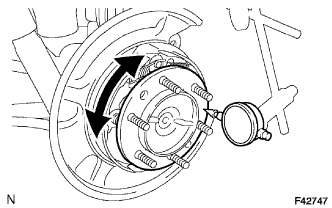
Using a dial indicator, check the runout of the surface of the axle shaft.
- Maximum:
- 0.05 mm (0.0020 in.)
| 7. INSTALL REAR SPEED SENSOR LH |
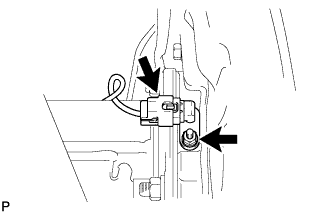 |
Install the rear speed sensor with the nut.
- Torque:
- 8.3 N*m{ 85 kgf*cm , 73 in.*lbf }
- NOTICE:
- Make sure that the sensor tip is clean.
Connect the skid control sensor wire.
| 8. INSTALL REAR SPEED SENSOR RH |
- HINT:
- Use the same procedure as for the LH side.
| 9. INSTALL PARKING BRAKE CABLE LH |
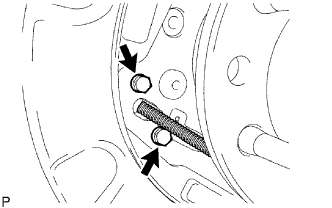 |
Install the parking brake cable onto the parking brake plate with the 2 bolts.
- Torque:
- 8.0 N*m{ 82 kgf*cm , 71 in.*lbf }
| 10. INSTALL PARKING BRAKE CABLE RH |
- HINT:
- Use the same procedure as for the LH side.
| 11. APPLY HIGH TEMPERATURE GREASE |
Apply high temperature grease to the surface of the backing plate which is in contact with the shoe.
| 12. INSTALL PARKING BRAKE SHOE |
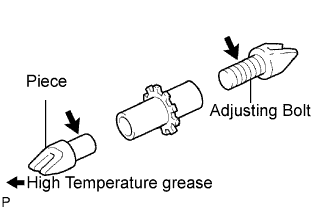 |
Apply high temperature grease to the adjusting bolt and piece.
Using needle-nose pliers, connect the parking brake cable to the parking brake shoe lever.
Install the No. 1 shoe, hold down spring pin, hold down compression spring and 2 hold down spring cups.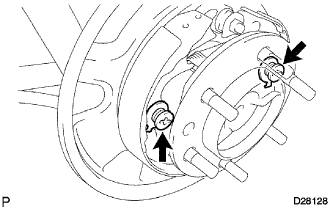
Install the return tension spring and shoe adjusting screw set.
Install the No. 2 shoe, hold down spring pin, hold down compression spring and 2 hold down spring cups.
| 13. INSTALL PARKING BRAKE SHOE STRUT |
Attach the compression spring and parking brake shoe strut to the No. 2 and No. 1 shoes.
| 14. INSTALL PARKING BRAKE SHOE RETURN TENSION SPRING |
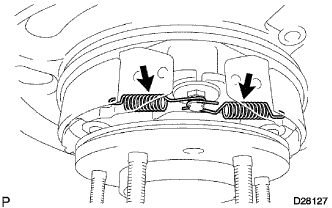 |
Using needle-nose pliers, install the 2 return tension springs.
- HINT:
- First install the front side spring then install the rear side spring.
| 15. CHECK PARKING BRAKE INSTALLATION |
Check that each part is installed properly.
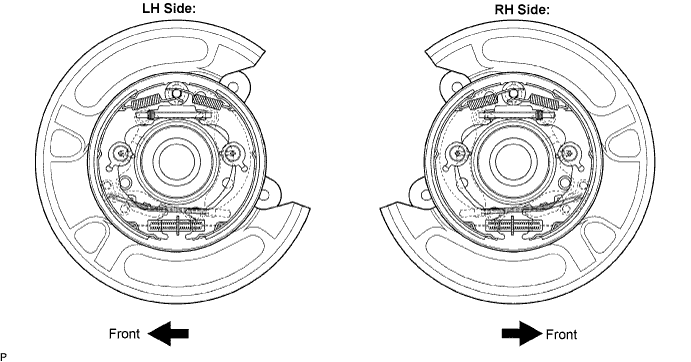
- NOTICE:
- There should be no oil or grease adhering to the friction surfaces of the shoe lining or the disc.
| 16. INSTALL REAR DISC |
Align the matchmarks of the disc and axle hub and install the disc.
| 17. ADJUST PARKING BRAKE SHOE CLEARANCE |
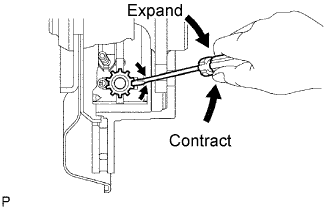 |
Provisionally install the 2 hub nuts.
Remove the hole plug, and turn the adjuster to expand the shoe until the disc locks.
Contract the shoe adjuster until the disc rotates smoothly.
- Standard:
- Return 8 notches
Install the hole plug.
| 18. INSTALL REAR DISC BRAKE CALIPER ASSEMBLY LH |
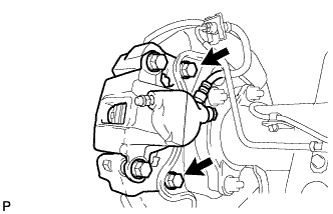 |
Install the disc brake caliper assembly with the 2 bolts and 2 washers.
- Torque:
- 105 N*m{ 1,071 kgf*cm , 78 ft.*lbf }
Install the flexible hose with a new clip.
Using SST, install the brake tube onto the flexible hose.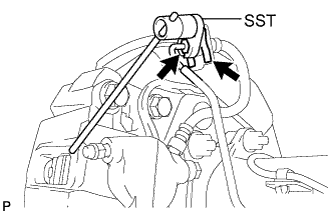
- SST
- 09023-00101
- Torque:
- for use without SST:
- 15 N*m{ 155 kgf*cm , 11 ft.*lbf }
- for use with SST:
- 14 N*m{ 143 kgf*cm , 10 ft.*lbf }
- HINT:
- Use a torque wrench with a fulcrum length of 300 mm (11.81 in.).
- This torque value is effective when SST is parallel to the torque wrench.
- Use a torque wrench with a fulcrum length of 300 mm (11.81 in.).
| 19. INSTALL REAR DISC BRAKE CALIPER ASSEMBLY RH |
- HINT:
- Use the same procedure as for the LH side.
| 20. INSTALL REAR PROPELLER SHAFT ASSEMBLY |
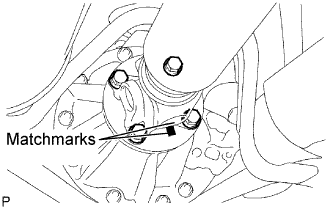 |
Align the matchmarks on the propeller shaft flange and differential flange.
Install the propeller shaft assembly with the 4 bolts, 4 nuts and 4 washers.
- Torque:
- 88 N*m{ 899 kgf*cm , 65 ft.*lbf }
Align the matchmarks on the propeller shaft flange and transfer flange.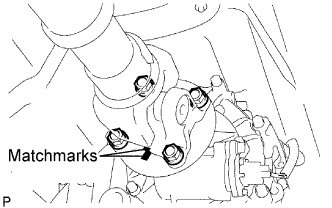
Install the propeller shaft assembly with the 4 nuts and 4 washers.
- Torque:
- 88 N*m{ 899 kgf*cm , 65 ft.*lbf }
| 21. INSTALL REAR WHEEL |
- Torque:
- 112 N*m{ 1,137 kgf*cm , 82 ft.*lbf }
| 22. CONNECT CABLE TO NEGATIVE BATTERY TERMINAL |
- Torque:
- 3.9 N*m{ 40 kgf*cm , 35 in.*lbf }
| 23. INSPECT DIFFERENTIAL OIL |
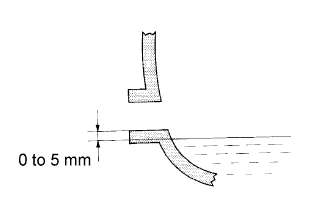 |
Stop the vehicle on a level surface.
Remove the differential filler plug and gasket.
Check that the oil level is between 0 to 5 mm (0 to 0.20 in.) from the bottom lip of the differential filler plug hole.
- NOTICE:
- After changing the oil seal, drive the vehicle and then check the oil level again.
- After changing the oil seal, drive the vehicle and then check the oil level again.
- Too much or too little oil will lead to differential problems.
- Too much or too little oil will lead to differential problems.
- HINT:
- If necessary, fill the differential carrier assembly with hypoid gear oil.
- Front Differential:
Item
Temperature
Oil grade
Viscosity
Capacity
w/ A.D.D.
-
Hypoid gear oil API GL-4 or GL-5
SAE 75W-90
1.45 to 1.55 liters
(1.53 to 1.63 US qts, 1.27 to 1.36 Imp. qts.)
w/o A.D.D.
Above -18 °C (-0.4 °F)
SAE 90
1.35 to 1.45 liters
(1.42 to 1.53 US qts, 1.18 to 1.27 Imp. qts.)
Below -18 °C (-0.4 °F)
SAE 85W-90
- Rear Differential:
Item
Temperature
Oil grade
Viscosity
Capacity
w/o Differential lock
Above -18 °C (-0.4 °F)
Hypoid gear oil API GL-5
SAE 90
2.95 to 3.05 liters
(3.12 to 3.22 US qts, 2.60 to 2.68 Imp. qts.)
Below -18 °C (-0.4 °F)
SAE 85W-90
w/ Differential lock
Above -18 °C (-0.4 °F)
SAE 90
2.85 to 2.95 liters
(3.01 to 3.12 US qts, 2.51 to 2.60 Imp. qts.)
Below -18 °C (-0.4 °F)
SAE 85W-90
Check for oil leakage when the oil level is low.
Install the differential filler plug with a new gasket.
- Torque:
- Front differential:
- 39 N*m{ 400 kgf*cm , 29 ft.*lbf }
- Rear differential:
- 49 N*m{ 500 kgf*cm , 36 ft.*lbf }
| 24. CHECK FOR DIFFERENTIAL OIL LEAKAGE |
| 25. BLEED BRAKE LINE |
Turn the ignition switch to ON.
Remove the brake master cylinder reservoir filler cap assembly.
Add brake fluid until the fluid level is between the MIN and MAX lines of the reservoir.
Repeatedly depress the brake pedal and bleed air from the bleeder plug of the front disc brake cylinder RH.
Repeat the step above until the air is completely bled, and then tighten the bleeder plug while depressing the brake pedal.
- Torque:
- 11 N*m{ 110 kgf*cm , 8 ft.*lbf }
Bleed the air from the bleeder plug of the front disc brake cylinder LH using the same procedure as for the RH side.
With the brake pedal depressed, loosen the bleeder plug of the rear disc brake cylinder RH, continue to hold the brake pedal and allow brake fluid to be drained from the bleeder plug while the pump motor operates.
- HINT:
- Air is bled as the pump motor operates while the brake pedal is being depressed.
- Be sure to release the brake pedal to stop the motor after approximately 100 seconds of continuous operation.
- As brake fluid is continuously drained while the pump operates, it is not necessary to repeatedly depress the brake pedal.
- Air is bled as the pump motor operates while the brake pedal is being depressed.
When there is no more air in the brake fluid, tighten the bleeder plug, and then release the brake pedal.
- Torque:
- 11 N*m{ 110 kgf*cm , 8 ft.*lbf }
Bleed the air from the bleeder plug of the rear disc brake cylinder LH using the same procedure as for the RH side.
Turn the ignition switch off.
Inspect for brake fluid leaks.
Check and adjust the brake fluid level (Click here).
Clear the DTCs (Click here).
| 26. INSPECT PARKING BRAKE LEVER TRAVEL |
Slowly pull the parking brake lever to the fully applied position, counting the number of clicks.
- Parking brake lever travel:
- 5 to 7 clicks at 200 N (20 kgf, 45 lbf)
| 27. ADJUST PARKING BRAKE LEVER TRAVEL |
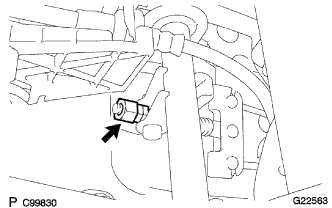 |
Turn the adjusting nut until the parking brake lever travel is corrected to within the specified range.
- Parking brake lever travel:
- 5 to 7 clicks at 200 N (20 kgf, 45 lbf)
Operate the parking brake lever 3 to 4 times, and check the parking brake lever travel.
Check whether the parking brake drags or not.
When operating the parking brake lever, check that the brake warning light illuminates.
- Standard:
- Brake warning light always illuminates at the first click.
| 28. CHECK VSC SENSOR SIGNAL |