REMOVAL
Removal / installation · Vehicles built Jul 2007 – Jul 2009
Versions by build date: Jul 2007 – Jul 2009 Aug 2009 – Oct 2012 Nov 2012 – Jul 2014 from Aug 2014
| 1. DISCHARGE FUEL SYSTEM PRESSURE |

| 2. REMOVE V-BANK COVER |
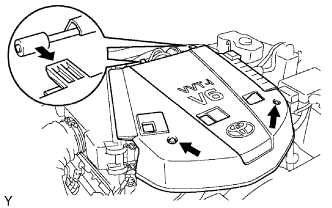  |
Remove the 2 nuts, then remove the V-bank cover.
| 3. REMOVE AIR CLEANER ASSEMBLY |
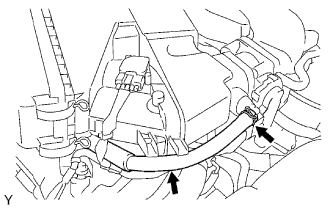 |
Disconnect the No. 2 ventilation hose.
Disconnect the vacuum hose.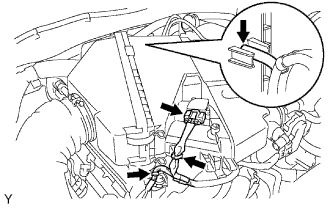
Disconnect the mass air flow meter connector.
Disengage the 2 wire harness clamps.
Loosen the 2 hose clamps.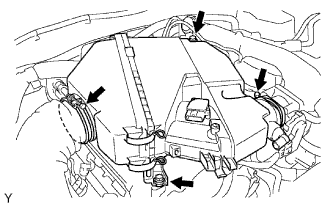
Remove the 2 bolts.
Disconnect the air cleaner hose and remove the air cleaner.
| 4. DISCONNECT NO. 2 FUEL PIPE SUB-ASSEMBLY |
 |
Remove the No. 2 fuel pipe clamp.
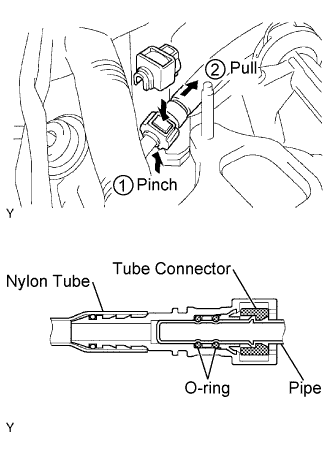
Pinch the tube connector, and then pull the fuel pipe out of the delivery pipe as shown in the illustration.
- NOTICE:
- Remove any dirt and foreign objects from the fuel tube connector before performing this work.
- Do not allow any scratches or foreign objects on the parts when disconnecting, as the fuel tube connector has the O-ring that seals the pipe.
- Perform this work by hand. Do not use any tools.
- Do not forcibly bend, twist or turn the nylon tube.
- Protect the disconnected part by covering it with a vinyl bag after disconnecting the fuel tube.
- If the fuel tube connector and pipe are stuck, push and pull to release them.
- Remove any dirt and foreign objects from the fuel tube connector before performing this work.
| 5. REMOVE FUEL PRESSURE REGULATOR ASSEMBLY |
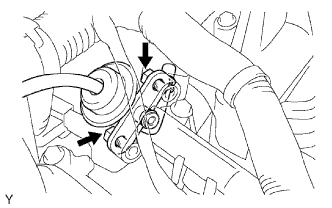 |
Remove the vacuum hose.
Remove the 2 bolts, then remove the fuel pressure regulator.