REASSEMBLY
Removal / installation · Vehicles built Jul 2007 – Oct 2010
Versions by build date: Jul 2007 – Oct 2010 from Nov 2010
| 1.
INSTALL STEERING RACK PISTON RING |
 |
- Coat a new O-ring with power steering fluid and install it onto the steering rack.
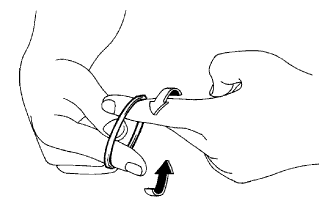
Stretch a new "Teflon" ring with your fingers.
- NOTICE:
- Be careful not to overstretch the "Teflon" ring.
Coat the "Teflon" ring with power steering fluid.
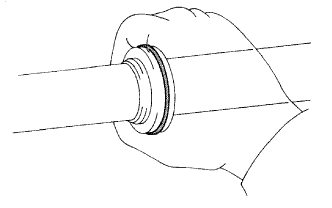
- Install the "Teflon" ring onto the steering rack groove. Grip the ring to press it into the groove.
| 2.
INSTALL POWER STEERING RACK |
|
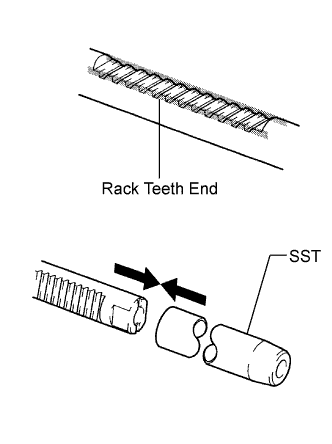
- Apply grease onto the rack teeth ends.
Install SST onto the steering rack.
- SST
- 09631-00350
- HINT:
- If necessary, scrape the burrs off the rack teeth end and burnish.
Coat SST and the power piston oil seal with power steering fluid.
Install the steering rack onto the rack housing.
Remove SST.
- Coat SST with power steering fluid.
- SST
- 09631-00350
Install SST onto the steering rack opposite end.
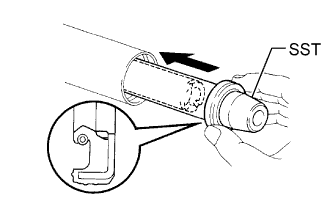
Coat the lip of a new oil seal with power steering fluid. Using SST, install the oil seal onto the steering rack.
- NOTICE:
- Slide SST and the oil seal straight without tilting them.
- Install the oil seal facing in the correct direction.
- Be careful not to damage the lip of the oil seal.
Remove SST.
| 3.
INSTALL CYLINDER END STOPPER |
|
- Apply sealant to the stopper.
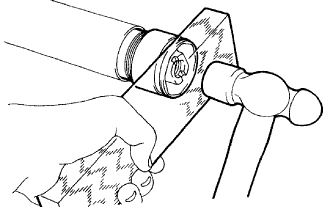
Using a wooden block and hammer, tap in the stopper until it is tightly installed.
- Adhesive:
- Toyota Genuine Adhesive 1344, Three Bond 1344 or equivalent
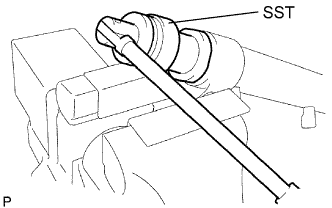
- Using SST, tighten the stopper.
- SST
- 09631-20120
-
Torque:
- 145 N*m{
1,479 kgf*cm
, 107 ft.*lbf
}
| 4.
TEST AIR TIGHTNESS |
|
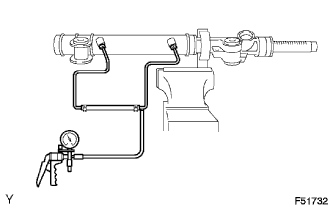
- Install SST to the unions of the rack housing.
- SST
- 09631-12071
(09633-00010)
Apply 53.33 kPa (400 mmHg, 15.75 in.Hg) of vacuum for about 30 seconds.
Check that there is no change in the vacuum.
If there is a change in the vacuum, check the installation of the oil seals.
| 5.
INSTALL POWER STEERING CONTROL VALVE |
|
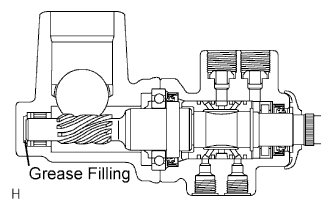
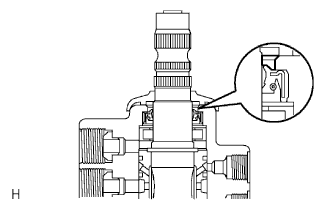
- Apply molybdenum disulfide base grease to the needle roller bearing inside the rack housing shown in the illustration.
- Volume of grease applied:
- Approximately 2 g (0.07 oz)
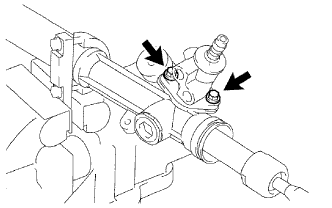
- Install the control valve with the 2 bolts.
-
Torque:
- 18 N*m{
185 kgf*cm
, 13 ft.*lbf
}
| 6.
INSTALL RACK GUIDE |
|
- Install the rack guide and spring.
Apply sealant to 2 or 3 threads of the rack guide spring cap.
- Adhesive:
- Toyota Genuine Adhesive 1344, Three Bond 1344 or equivalent
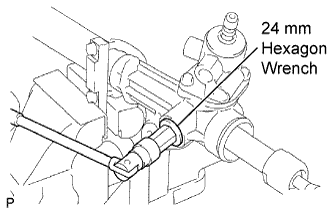
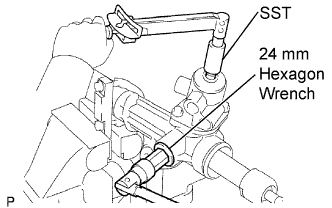
Using a 24 mm hexagon wrench, temporarily install the spring cap.
| 7.
ADJUST TOTAL PRELOAD |
|
- To prevent the steering rack teeth from damaging the lip of the oil seal, temporarily install the RH and LH rack ends.
2WD:
Using a 24 mm hexagon wrench, tighten the rack guide spring cap.
-
Torque:
- 25 N*m{
250 kgf*cm
, 18 ft.*lbf
}
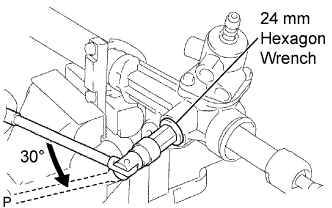
Loosen the cap 30°.
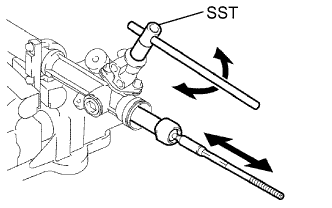
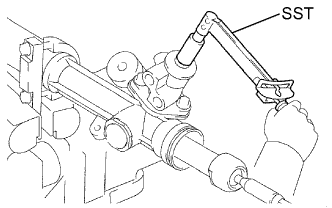
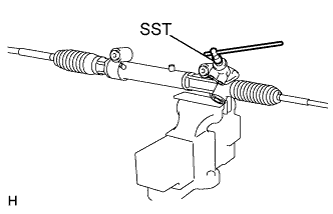
- Using SST, turn the control valve shaft right and left 1 or 2 times. The rack end will move in and out.
- SST
- 09616-00011
Using a 24 mm hexagon wrench, loosen the cap until the rack guide spring does not function.
- Using SST, a torque wrench and 24 mm hexagon wrench, tighten the cap until the preload is within the specification.
- SST
- 09616-00011
-
Torque:
- Preload (turning):
- 0.8 to 1.6 N*m{
8.2 to 16.3 kgf*cm
, 7.1 to 14.2 in.*lbf
}
- NOTICE:
- Perform adjustments in the tightening direction of the spring cap.
Apply sealant to 2 or 3 threads of the lock nut.
- Adhesive:
- Toyota Genuine Adhesive 1344, Three Bond 1344 or equivalent
Temporarily install the lock nut.
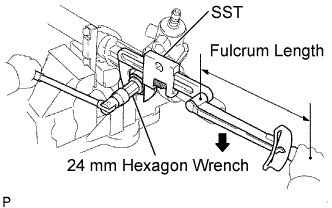
- Using a 24 mm hexagon wrench, hold the rack guide spring cap. Using SST, torque the nut.
- SST
- 09922-10010
-
Torque:
- 69 N*m{
704 kgf*cm
, 51 ft.*lbf
}
for use without SST
- 65 N*m{
660 kgf*cm
, 48 ft.*lbf
}
for use with SST
- NOTICE:
- Rotate SST in the direction shown in the illustration.
- HINT:
- Use a torque wrench with a fulcrum length of 345 mm (13.58 in.).
- Using SST, recheck the total preload.
-
Torque:
- Preload for (turning):
- 0.8 to 1.6 N*m{
8.2 to 16.3 kgf*cm
, 7.1 to 14.2 in.*lbf
}
- SST
- 09616-00011
Remove the RH and LH rack ends.
| 8.
INSPECT POWER STEERING RACK |
|
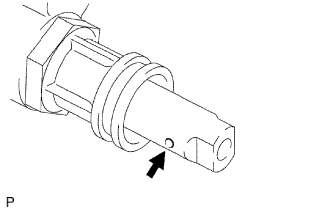
- Insert a wire 20 mm (0.79 in.) into the vent hole of the steering rack, and ensure that the vent hole is not clogged with grease.
- NOTICE:
- If the hole is clogged, the pressure inside the boot will change after it is assembled and the steering wheel is turned.
| 9.
INSTALL STEERING RACK END SUB-ASSEMBLY |
|
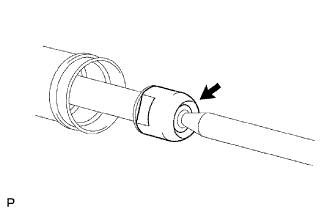
- Install 2 new claw washers onto the power steering rack while aligning the notch on the steering rack end with the claw.
Temporarily install the 2 steering rack ends onto the power steering rack.
Fill up the ball joint of the steering rack ends with MP grease.
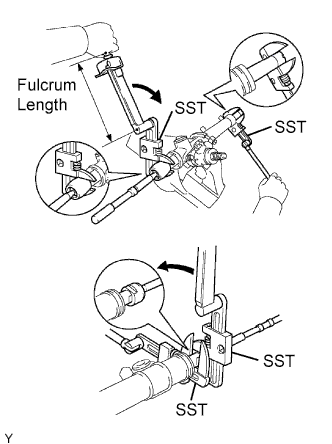
- Using SST, install the power steering rack end (LH side) onto the power steering rack.
- SST
- 09922-10010
-
Torque:
- 103 N*m{
1,050 kgf*cm
, 76 ft.*lbf
}
for use without SST
- 98 N*m{
1,000 kgf*cm
, 72 ft.*lbf
}
for use with SST
- NOTICE:
- Rotate SST in the direction shown in the illustration.
- Use a torque wrench with a fulcrum length of 345 mm (13.58 in.).
Using SST and a wrench, install the power steering rack (LH side).
- SST
- 09922-10010
-
Torque:
- 103 N*m{
1,050 kgf*cm
, 76 ft.*lbf
}
for use without SST
- 98 N*m{
1,000 kgf*cm
, 72 ft.*lbf
}
for use with SST
- NOTICE:
- Rotate SST in the direction shown in the illustration.
- Use a torque wrench with a fulcrum length of 345 mm (13.58 in.).
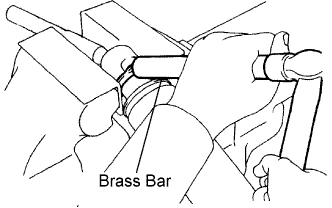
- Using a brass bar and hammer, stake the 2 claw washers (LH and RH sides).
- NOTICE:
- Do not strike the steering rack.
| 10.
INSTALL STEERING RACK BOOT LH |
|
Install the boot.
- NOTICE:
- Be careful not to damage or twist the boot.
| 11.
INSTALL STEERING RACK BOOT RH |
|
- HINT:
- Use the same procedures described for the LH side.
| 12.
INSTALL STEERING RACK BOOT CLAMP LH |
|
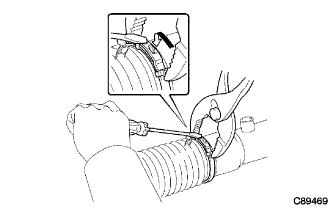
- Using the pliers and a screwdriver, install the rack boot clamp, as shown in the illustration.
| 13.
INSTALL STEERING RACK BOOT CLAMP RH |
|
- HINT:
- Use the same procedures described for the LH side.
| 14.
INSTALL STEERING RACK BOOT CLIP LH |
|
Using pliers, install the clip.
| 15.
INSTALL STEERING RACK BOOT CLIP RH |
|
- HINT:
- Use the same procedures described for the LH side.
| 16.
INSTALL POWER STEERING LINK |
|
- Using SST, check that the rack boot stretches smoothly when the control valve shaft is being rotated.
- SST
- 09616-00011
- Apply MP grease as shown in the illustration.
Install the dust cover.
| 17.
INSTALL STEERING TURN PRESSURE TUBE |
|
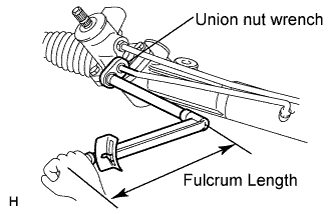
Apply power steering fluid to 2 new O-rings. Using union nut wrench, install the 2 O-rings and the LH turn pressure tube.
- SST
- 09023-38201
-
Torque:
- 25 N*m{
250 kgf*cm
, 18 ft.*lbf
}
for use without union nut wrench
- 23 N*m{
230 kgf*cm
, 17 ft.*lbf
}
for use with union nut wrench
- HINT:
- Use a torque wrench with a fulcrum length of 345 mm (13.58 in.).
- This torque value is effective when union nut wrench is parallel to the torque wrench.
Apply power steering fluid to 2 new O-rings. Using union nut wrench, install the 2 O-rings and the RH turn pressure tube.
- SST
- 09023-38201
-
Torque:
- 25 N*m{
250 kgf*cm
, 18 ft.*lbf
}
for use without union nut wrench
- 23 N*m{
230 kgf*cm
, 17 ft.*lbf
}
for use with union nut wrench
- HINT:
- Use a torque wrench with a fulcrum length of 345 mm (13.58 in.).
- This torque value is effective when union nut wrench is parallel to the torque wrench.