1.
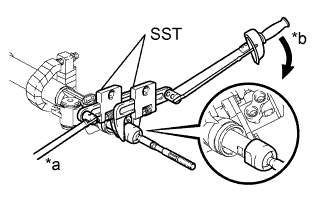
INSTALL STEERING RACK END SUB-ASSEMBLY (for LH Side)
Temporarily install the steering rack end sub-assembly to the steering rack.
Fill up the ball joint of the steering rack end sub-assembly with MP grease.
Using SST, install the steering rack end sub-assembly while holding the steering rack.
Text in Illustration
*a
Hold
*b
Turn
SST
09922-10010
Torque:
without SST:
105 N*m{
1071 kgf*cm
, 77 ft.*lbf
}
with SST:
77 N*m{
783 kgf*cm
, 57 ft.*lbf
}
NOTICE:
Be sure to rotate SST in the correct direction.
Be sure to keep the steering rack fixed in place with SST.
HINT:
This torque value is effective when SST is parallel to the torque wrench.
This torque value can be obtained by using a torque wrench with a fulcrum length of 345 mm (13.6 in.) and SST with a fulcrum length of 126.5 mm (4.98 in.).
If using a torque wrench with a length that is not 345 mm (13.6 in.), calculate the torque specification for the torque wrench and SST based on the "without SST" torque specification (Click here).
2.
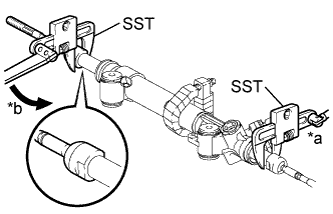
INSTALL STEERING RACK END SUB-ASSEMBLY (for RH Side)
Temporarily install the steering rack end sub-assembly to the steering rack.
Fill up the ball joint of the steering rack end sub-assembly with MP grease.
Using SST, install the steering rack end sub-assembly while holding the steering rack.
Text in Illustration
*a
Hold
*b
Turn
SST
09922-10010
Torque:
without SST:
105 N*m{
1071 kgf*cm
, 77 ft.*lbf
}
with SST:
77 N*m{
783 kgf*cm
, 57 ft.*lbf
}
NOTICE:
Be sure to rotate SST in the correct direction.
Be sure to keep the steering rack fixed in place with SST.
HINT:
This torque value is effective when SST is parallel to the torque wrench.
This torque value can be obtained by using a torque wrench with a fulcrum length of 345 mm (13.6 in.) and SST with a fulcrum length of 126.5 mm (4.98 in.).
If using a torque wrench with a length that is not 345 mm (13.6 in.), calculate the torque specification for the torque wrench and SST based on the "without SST" torque specification (Click here).
3.
INSTALL NO. 2 STEERING RACK BOOT
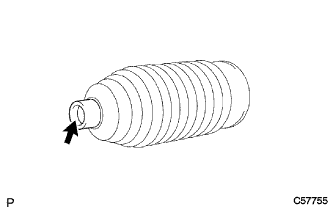
Apply lithium soap base glycol grease to the inside of the small opening of the No. 2 steering rack boot.
Text in Illustration
Lithium soap base glycol grease
Install the No. 2 steering rack boot to the groove on the rack housing.
NOTICE:
Be careful not to damage or twist the steering rack boot.
Make sure that the steering rack boot is free of rust and foreign matter.
4.
INSTALL NO. 1 STEERING RACK BOOT
HINT:
Use the same procedure as for the No. 2 steering rack boot.
5.
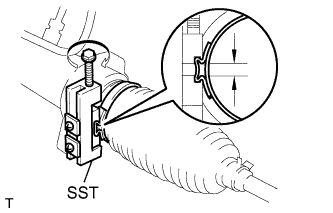
INSTALL STEERING RACK BOOT CLAMP (for LH Side)
Using SST, tighten a new steering rack boot clamp (LH side) as shown in the illustration.
SST
09521-24010
Standard clearance:
3.0 mm (0.118 in.) or less
NOTICE:
Be careful not to damage the steering rack boot.
6.
INSTALL STEERING RACK BOOT CLAMP (for RH Side)
HINT:
Use the same procedure for the RH side as for the LH side.
7.
INSTALL STEERING RACK BOOT CLIP (for LH Side)
Using pliers, install the steering rack boot clip.
8.
INSTALL STEERING RACK BOOT CLIP (for RH Side)
HINT:
Use the same procedure for the RH side as for the LH side.
9.
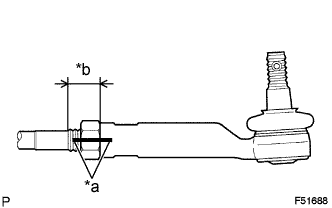
INSTALL TIE ROD END SUB-ASSEMBLY LH
Temporarily install the lock nut and the tie rod end sub-assembly LH to the steering rack end sub-assembly until the matchmarks and length A are aligned, then temporarily tighten the lock nut.
Text in Illustration
*a
Matchmark
*b
Length A
HINT:
After adjusting toe-in, fully tighten the lock nut.
10.
INSTALL TIE ROD END SUB-ASSEMBLY RH
HINT:
Use the same procedure for the RH side as for the LH side.
11.
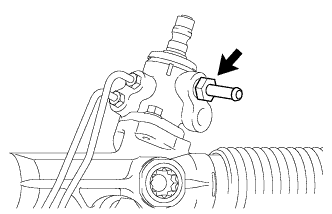
INSTALL STEERING GEAR OUTLET RETURN TUBE
Using a union nut wrench (17 mm), install the steering gear outlet return tube to the power steering link assembly.
Torque:
25 N*m{
255 kgf*cm
, 18 ft.*lbf
}
NOTICE:
Use the formula to calculate special torque values for situations where a union nut wrench is combined with a torque wrench (Click here).
12.
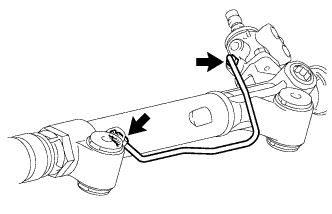
INSTALL TURN PRESSURE TUBE RH
Apply power steering fluid to 2 new O-rings.
Install the 2 O-rings to the turn pressure tube RH.
Using a union nut wrench (12 mm), install the turn pressure tube RH.
Torque:
13 N*m{
127 kgf*cm
, 9 ft.*lbf
}
NOTICE:
Use the formula to calculate special torque values for situations where a union nut wrench is combined with a torque wrench (Click here).
13.
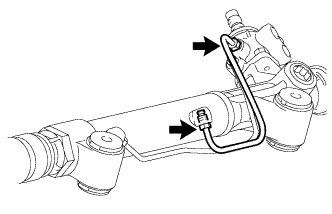
INSTALL TURN PRESSURE TUBE LH
Apply power steering fluid to 2 new O-rings.
Install the 2 O-rings to the turn pressure tube LH.
Using a union nut wrench (12 mm), install the turn pressure tube LH.
Torque:
13 N*m{
127 kgf*cm
, 9 ft.*lbf
}
NOTICE:
Use the formula to calculate special torque values for situations where a union nut wrench is combined with a torque wrench (Click here).