INSTALLATION
Removal / installation · Vehicles built from Aug 2014
Versions by build date: Jul 2007 – Jul 2009 Aug 2009 – Oct 2010 Nov 2010 – Jul 2013 Aug 2013 – Jul 2014 from Aug 2014
| 1. INSTALL OIL COOLER ASSEMBLY |

Install a new seal washer to the bolt.
Install the oil cooler with the bolt and nut.
- Torque:
- for bolt:
- 68 N*m{ 693 kgf*cm , 50 ft.*lbf }
- for nut:
- 10 N*m{ 102 kgf*cm , 7 ft.*lbf }
Install the 2 hoses.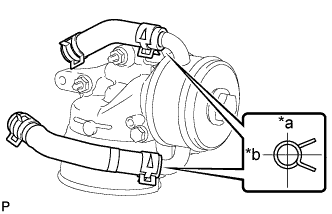

Text in Illustration *a
Upper
*b
Rear
- HINT:
- The direction of the hose clamp is indicated in the illustration.
| 2. INSTALL OIL FILTER BRACKET |
Install the oil filter bracket and new gasket with the 2 nuts and bolt.
- Torque:
- 21 N*m{ 214 kgf*cm , 15 ft.*lbf }
| 3. CONNECT WATER BY-PASS PIPE SUB-ASSEMBLY |
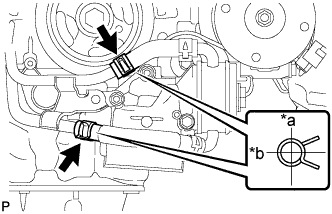 |
Connect the 2 hoses and water by-pass pipe.
Text in Illustration *a
Upper
*b
Rear
- HINT:
- The direction of the hose clamp is indicated in the illustration.
Install the 3 bolts.
- Torque:
- 10 N*m{ 102 kgf*cm , 7 ft.*lbf }
| 4. INSTALL OIL FILTER ELEMENT |
Clean the inside of the oil filter cap, the threads and O-ring groove.
Apply a small amount of engine oil to a new O-ring and install it to the oil filter cap.
Set a new oil filter element to the oil filter cap.
Remove any dirt or foreign matter from the installation surface of the engine.
Apply a small amount of engine oil to the O-ring again and temporarily install the oil filter cap.
Using SST, tighten the oil filter cap.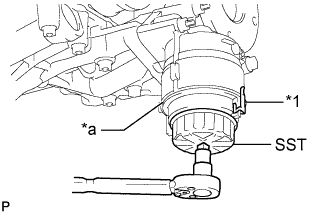
Text in Illustration *1
Oil Filter Bracket Clip
*a
No Clearance
- SST
- 09228-06501
- Torque:
- 25 N*m{ 255 kgf*cm , 18 ft.*lbf }
- NOTICE:
- When tightening the oil filter cap, do not remove the oil filter bracket clip.
- Make sure that the oil filter is installed securely as shown in the illustration.
- Be careful that the O-ring does not get caught between the parts.
- When tightening the oil filter cap, do not remove the oil filter bracket clip.
Apply a small amount of engine oil to a new drain plug O-ring, and install it to the oil filter cap.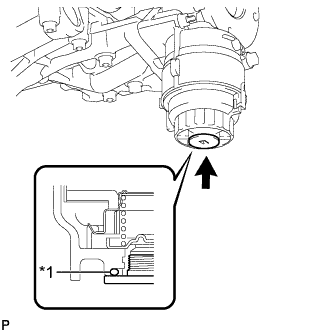
Text in Illustration *1
O-Ring
- NOTICE:
- Before installing the O-ring, remove any dirt or foreign matter from the installation surface of the oil filter cap.
Install the oil filter drain plug.
- Torque:
- 13 N*m{ 127 kgf*cm , 9 ft.*lbf }
- NOTICE:
- Be careful that the O-ring does not get caught between the parts.
| 5. ADD ENGINE OIL |
Add fresh oil.
- NOTICE:
-
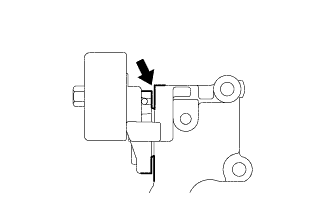
- Do not allow engine oil to adhere to the moving parts of the belt tensioner, as this may cause malfunctions.
- If engine oil is on the location indicated by the arrow, replace the belt tensioner.
- Standard Engine Oil:
Oil grade
Oil Viscosity (SAE)
API grade SL "Energy- Conserving", SM "Energy- Conserving", SN "Resource-Conserving" or ILSAC multigrade engine oil
0W-20 (*1)
5W-20 (*1)
5W-30 (*2)
10W-30 (*2)
API grade SL, SM or SN multigrade engine oil
15W-40 (*2)
20W-50 (*2)
- Standard Oil Capacity (w/o Oil Cooler):
Item
Specified Condition
Drain and refill without oil filter change
5.7 liters (6.0 US qts, 5.0 Imp. qts)
Drain and refill with oil filter change
6.1 liters (6.4 US qts, 5.4 Imp. qts)
Dry fill
6.9 liters (7.3 US qts, 6.1 Imp. qts)
- Standard Oil Capacity (w/ Oil Cooler):
Item
Specified Condition
Drain and refill without oil filter change
5.7 liters (6.0 US qts, 5.0 Imp. qts)
Drain and refill with oil filter change
6.2 liters (6.6 US qts, 5.5 Imp. qts)
Dry fill
7.1 liters (7.5 US qts, 6.3 Imp. qts)
| 6. CHECK ENGINE OIL LEVEL |
Warm up the engine, then stop the engine and wait for 5 minutes.
Check that the engine oil level is between the low level and full level marks on the dipstick.
If low, check for leakage and add oil up to the full level mark.- NOTICE:
- Do not fill engine oil above the full level mark.
| 7. ADD ENGINE COOLANT |
- CAUTION:
- Do not remove the radiator cap sub-assembly while the engine and radiator assembly are still hot. Pressurized, hot engine coolant and steam may be released and cause serious burns.
Remove the service hole cover from the engine under cover.
Install a vinyl hose to the radiator drain cock on the radiator assembly side.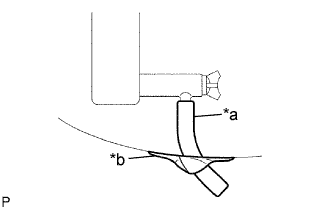
Text in Illustration *a
Vinyl Hose
*b
Tape
Fix the vinyl hose with tape.
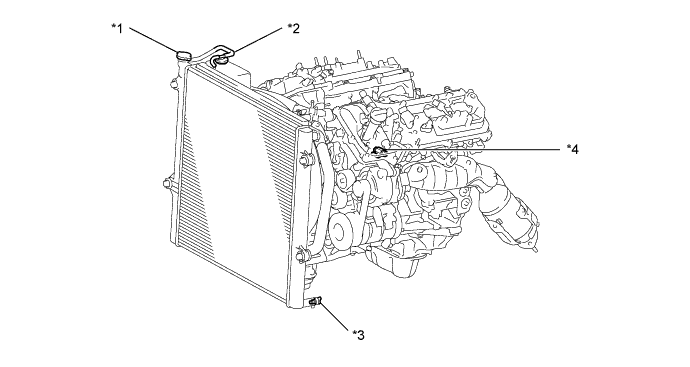
Text in Illustration *1
Radiator Cap Sub-assembly
*2
Radiator Reserve Tank Cap Sub-assembly
*3
Radiator Drain Cock Plug
*4
Cylinder Block Drain Cock Plug
Loosen the radiator drain cock plug.
Remove the radiator cap sub-assembly and drain the engine coolant.
- HINT:
- Collect the engine coolant in a container and dispose of it according to the regulations in your area.
Loosen the cylinder block drain cock plug and drain the engine coolant from the engine.
- NOTICE:
- If engine coolant is not drained from the radiator drain cock plug, cylinder block drain cock plug and radiator reservoir, clogging in the radiator assembly or engine coolant leakage from the seal of water pump may result.
| 8. INSPECT FOR ENGINE OIL LEAK |
Start the engine. Make sure that there are no oil leaks from the area that was worked on.
| 9. INSPECT FOR COOLANT LEAK |
- CAUTION:
- To avoid being burned, do not remove the radiator reservoir cap while the engine and radiator are still hot. Thermal expansion may cause hot engine coolant and steam to blow out from the radiator.
Fill the radiator with engine coolant, and then attach a radiator cap tester.
Warm up the engine.
Using the radiator cap tester, increase the pressure inside the radiator to 123 kPa (1.3 kgf/cm2, 18 psi), and then check that the pressure does not drop.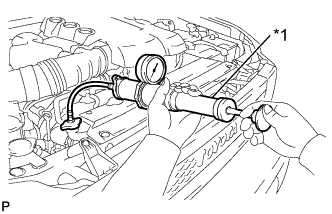
If the pressure drops, check the hoses, radiator and water pump for leakage. If there are no signs or traces of external engine coolant leakage, check the heater core, cylinder block and head.Text in Illustration *1
Radiator Cap Tester
| 10. INSTALL NO. 1 ENGINE UNDER COVER SUB-ASSEMBLY |
Hook the engine under cover to the frame.
Install the 4 bolts.
- Torque:
- 29 N*m{ 296 kgf*cm , 21 ft.*lbf }