INSTALLATION
Removal / installation · Vehicles built from Jul 2007
| 1. INSTALL CLUTCH MASTER CYLINDER PUSH ROD CLEVIS BUSH |

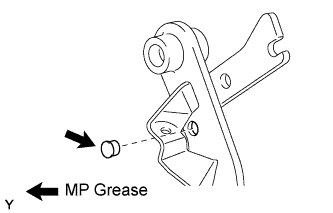  |
Apply MP grease to the inside of a new clevis bush.
Install the clevis bush onto the clutch pedal.
- HINT:
- Install the clevis bush from the left side of the vehicle.
| 2. INSTALL CLUTCH PEDAL TURNOVER BUSH |
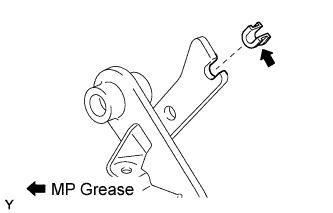 |
Apply MP grease to the clutch pedal turnover bush.
Install the clutch pedal turnover bush onto the clutch pedal.
| 3. INSTALL CLUTCH PEDAL NO.1 CUSHION |
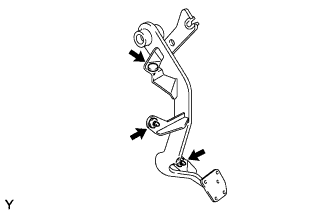 |
Install the 3 No. 1 cushions onto the clutch pedal.
| 4. INSTALL CLUTCH PEDAL SHAFT COLLAR |
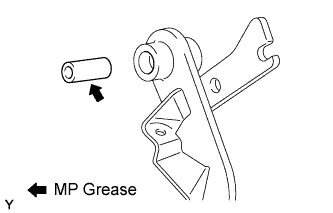 |
Apply MP grease to the clutch pedal shaft collar.
Install the clutch pedal shaft collar onto the clutch pedal.
| 5. INSTALL CLUTCH PEDAL BUSH |
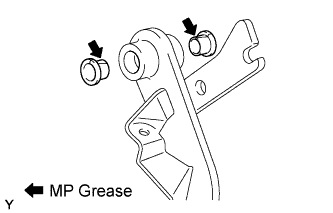 |
Apply MP grease to 2 new bushes.
Install the 2 bushes onto the clutch pedal.
| 6. INSTALL CLUTCH PEDAL PAD |
| 7. INSTALL CLUTCH SWITCH ASSEMBLY |
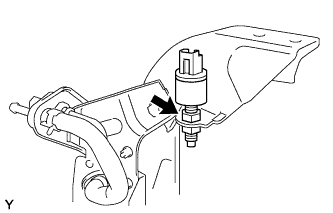 |
Install the clutch switch and provisionally tighten the lock nut.
- HINT:
- Tighten the lock nut to the specified torque when adjusting the clutch pedal.
| 8. INSTALL CLUTCH PEDAL SPRING HOLDER |
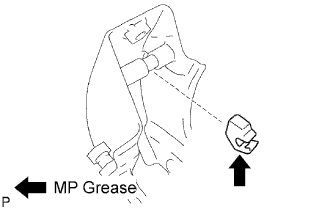 |
Apply MP grease to the contact surface of the clutch pedal spring holder.
Install the clutch pedal spring holder.
| 9. INSTALL CLUTCH PEDAL SUB-ASSEMBLY |
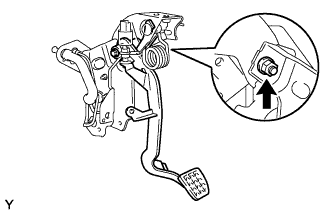 |
Install the clutch pedal onto the clutch pedal support with the bolt and nut.
- Torque:
- 34 N*m{ 350 kgf*cm , 25 ft.*lbf }
- HINT:
- Install the bolt from the left side of the vehicle.
| 10. INSTALL TURN OVER SPRING SEAT COMPRESSION SPRING |
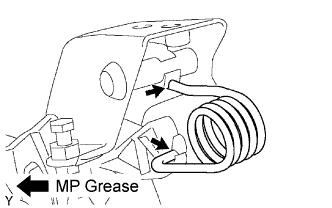 |
Apply MP grease to the contact surfaces of the spring holder, clutch pedal and spring.
Install the spring onto the clutch pedal and spring holder.
| 11. INSTALL CLUTCH MASTER CYLINDER ASSEMBLY |
| 12. BLEED CLUTCH PIPE LINE |
| 13. INSPECT AND ADJUST CLUTCH PEDAL SUB-ASSEMBLY |
Pull back the floor carpet.
Check that the pedal height is correct.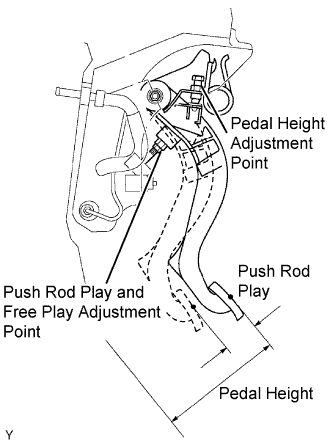
- Pedal height from asphalt sheet:
- 183.5 to 193.5 mm (7.224 to 7.618 in.)
Adjust the pedal height.
Loosen the lock nut and turn the clutch switch until the height is correct. Tighten the lock nut.
- Torque:
- 15 N*m{ 153 kgf*cm , 11 ft.*lbf }
Check that the pedal free play and push rod play are correct.
Depress the pedal until the clutch resistance begins to be felt.
- Pedal free play:
- 5.0 to 15.0 mm (0.197 to 0.591 in.)
Gently depress the pedal until the resistance begins to increase a little.
- Push rod play at pedal top:
- 1.0 to 5.0 mm (0.039 to 0.197 in.)
Adjust the pedal free play and push rod play.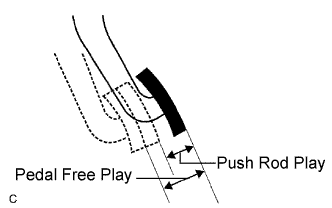
Loosen the lock nut and turn the push rod until the free play and push rod play are correct.
Tighten the lock nut.
After adjusting the pedal free play, check the pedal height.
Connect the air duct and install the lower finish panel.
Check the clutch release point.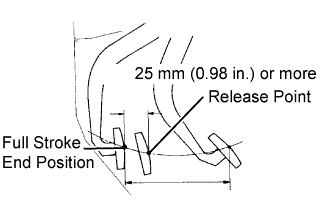
Pull the parking brake lever and chock the wheels.
Start the engine and allow it to idle.
Without depressing the clutch pedal, slowly move the shift lever into the reverse position until the gears engage.
Gradually depress the clutch pedal and measure the stroke distance from the point that the gear noise stops (release point) up to the full stroke end position.
- Standard distance:
- 25 mm (0.984 in.) or more
- (From pedal stroke end position to release point)
- Check the pedal height.
- Check the push rod play and pedal free play.
- Bleed the clutch line.
- Check the clutch cover assembly and disc assembly.
| 14. CHECK FOR CLUTCH FLUID LEAKAGE |
| 15. CHECK FLUID LEVEL IN RESERVOIR |