INSTALLATION
Removal / installation · Vehicles built Nov 2010 – Jul 2014
Versions by build date: Jul 2007 – Oct 2010 Nov 2010 – Jul 2014 from Aug 2014
| 1. INSTALL TRANSFER ASSEMBLY |

Install the transfer onto the transmission.
Install the 2 clamps and 8 bolts.
- Torque:
- 24 N*m{ 244 kgf*cm , 17 ft.*lbf }
| 2. INSTALL MANUAL TRANSMISSION CASE COVER SUB-ASSEMBLY (w/ Case Cover) |
Install the manual transmission case cover sub-assembly onto the manual transmission with the 5 bolts.
- Torque:
- 12 N*m{ 117 kgf*cm , 8 ft.*lbf }
| 3. INSTALL COLLAR (w/o Case Cover) |
Install the 2 collars onto the manual transmission with 2 bolts.
- Torque:
- 12 N*m{ 117 kgf*cm , 8 ft.*lbf }
| 4. INSTALL MANUAL TRANSMISSION WITH TRANSFER |
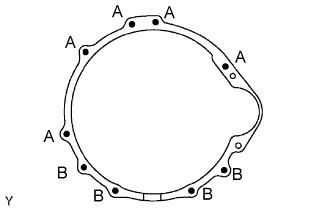  |
Install the manual transmission with transfer with the 9 bolts.
- Torque:
- for Bolt A:
- 71 N*m{ 724 kgf*cm , 52 ft.*lbf }
- for Bolt B:
- 37 N*m{ 377 kgf*cm , 27 ft.*lbf }
| 5. CONNECT WIRE HARNESS |
| 6. CONNECT CONNECTOR |
Connect the back-up light switch connector.
Connect the speedometer sensor connector.
Connect the 2 transfer indicator switch connectors.
| 7. INSTALL REAR NO. 1 ENGINE MOUNTING INSULATOR |
Install the rear No. 1 engine mounting insulator with the 4 bolts.
- Torque:
- 65 N*m{ 663 kgf*cm , 48 ft.*lbf }
| 8. INSTALL NO. 3 FRAME CROSSMEMBER SUB-ASSEMBLY |
Install the No. 3 frame crossmember sub-assembly with the 4 bolts and 4 nuts.
- Torque:
- 72 N*m{ 734 kgf*cm , 53 ft.*lbf }
Install the 4 bolts to the No. 3 frame crossmember sub-assembly.
- Torque:
- 30 N*m{ 306 kgf*cm , 22 ft.*lbf }
| 9. INSTALL FRONT SUSPENSION MEMBER BRACKET LH |
Install the front suspension member bracket LH with the 4 bolts.
- Torque:
- 33 N*m{ 337 kgf*cm , 24 ft.*lbf }
| 10. INSTALL FRONT SUSPENSION MEMBER BRACKET RH |
Install the front suspension member bracket RH with the 4 bolts.
- Torque:
- 33 N*m{ 337 kgf*cm , 24 ft.*lbf }
| 11. INSTALL CLUTCH RELEASE CYLINDER ASSEMBLY |
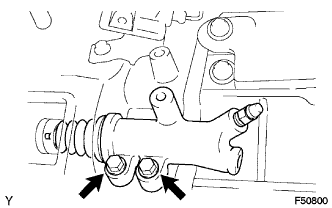 |
Install the clutch release cylinder with the 2 bolts.
- Torque:
- 12 N*m{ 120 kgf*cm , 9 ft.*lbf }
| 12. INSTALL CLUTCH ACCUMULATOR ASSEMBLY |
Install the clutch accumulator assembly with the 3 bolts.
- Torque:
- 12 N*m{ 120 kgf*cm , 9 ft.*lbf }
Temporarily tighten the flexible hose tube to the clutch accumulator assembly.
Install the clutch line bracket with the nut.
- Torque:
- 19 N*m{ 194 kgf*cm , 14 ft.*lbf }
Using a union nut wrench, fully tighten the flexible hose tube.
- Torque:
- for M10 flare nut:
- 15 N*m{ 155 kgf*cm , 11 ft.*lbf }
- for M12 flare nut:
- 20 N*m{ 199 kgf*cm , 14 ft.*lbf }
- NOTICE:
- Use the formula to calculate special torque values for situations where a union nut wrench is combined with a torque wrench (Click here).
Temporarily install the clutch release tube to the clutch accumulator assembly.
Install the clutch line bracket with the bolt.
- Torque:
- 12 N*m{ 120 kgf*cm , 9 ft.*lbf }
Using a union nut wrench, fully tighten the clutch release tube.
- Torque:
- 15 N*m{ 155 kgf*cm , 11 ft.*lbf }
- NOTICE:
- Use the formula to calculate special torque values for situations where a union nut wrench is combined with a torque wrench (Click here).
| 13. INSTALL ACCUMULATOR TO FLEXIBLE HOSE TUBE |
Install the flexible hose tube to the manual transmission with the 3 nuts.
- Torque:
- 19 N*m{ 194 kgf*cm , 14 ft.*lbf }
Using a union nut wrench (12 mm), connect the flexible hose tube to the clutch accumulator assembly.
- Torque:
- 20 N*m{ 199 kgf*cm , 14 ft.*lbf }
- NOTICE:
- Use the formula to calculate special torque values for situations where a union nut wrench is combined with a torque wrench (Click here).
Install the flexible hose with a new clip.
Using a union nut wrench (12 mm), connect the flexible hose tube to the flexible hose while holding the flexible hose with a wrench.
- Torque:
- 20 N*m{ 199 kgf*cm , 14 ft.*lbf }
- NOTICE:
- Use the formula to calculate special torque values for situations where a union nut wrench is combined with a torque wrench (Click here).
| 14. INSTALL NO. 1 CLUTCH HOUSING COVER |
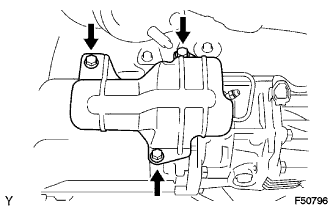 |
Install the No. 1 clutch housing cover with the 3 bolts.
- Torque:
- 12 N*m{ 120 kgf*cm , 9 ft.*lbf }
| 15. INSTALL FLYWHEEL HOUSING SIDE COVER |
Install the flywheel housing side cover onto the cylinder block.
| 16. INSTALL STARTER ASSEMBLY |
Install the starter with the 2 bolts.
- Torque:
- 37 N*m{ 377 kgf*cm , 27 ft.*lbf }
Connect the starter wire with the bolt and nut.
- Torque:
- for bolt:
- 8.0 N*m{ 82 kgf*cm , 71 in.*lbf }
- for nut:
- 9.8 N*m{ 100 kgf*cm , 87 in.*lbf }
Close the terminal cap.
Connect the starter connector.
Connect the ground wire with the bolt.
- Torque:
- 13 N*m{ 133 kgf*cm , 10 ft.*lbf }
| 17. INSTALL NO. 2 MANIFOLD STAY |
Install the manifold stay with the 3 bolts.
- Torque:
- 40 N*m{ 408 kgf*cm , 30 ft.*lbf }
| 18. INSTALL MANIFOLD STAY |
Install the manifold stay with the 3 bolts.
- Torque:
- 40 N*m{ 408 kgf*cm , 30 ft.*lbf }
| 19. INSTALL PROPELLER SHAFT ASSEMBLY |
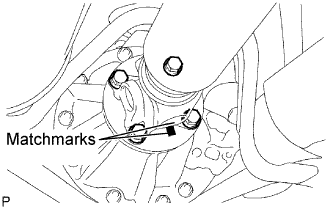 |
Align the matchmarks on the propeller shaft flange and differential flange.
Install the propeller shaft assembly with the 4 bolts, 4 nuts and 4 washers.
- Torque:
- 88 N*m{ 899 kgf*cm , 65 ft.*lbf }
Align the matchmarks on the propeller shaft flange and transfer flange.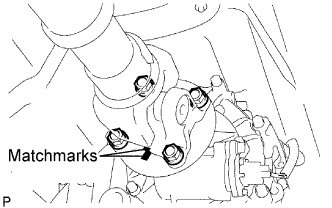
Install the propeller shaft assembly with the 4 nuts and 4 washers.
- Torque:
- 88 N*m{ 899 kgf*cm , 65 ft.*lbf }
| 20. INSTALL FRONT PROPELLER SHAFT ASSEMBLY |
Align the matchmarks on the yoke and differential flange.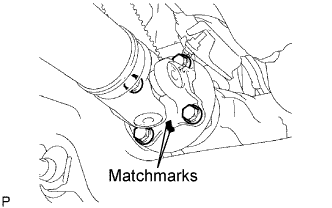
Install the propeller shaft assembly with the 4 bolts, 4 nuts and 4 washers.
- Torque:
- 88 N*m{ 899 kgf*cm , 65 ft.*lbf }
Align the matchmarks on the yoke and transfer flange.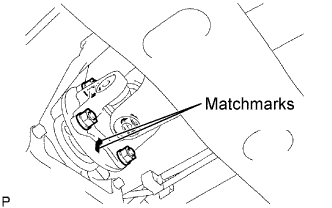
Install the propeller shaft assembly with the 4 nuts and 4 washers.
- Torque:
- 88 N*m{ 899 kgf*cm , 65 ft.*lbf }
| 21. INSTALL PROPELLER SHAFT HEAT INSULATOR |
Install the propeller shaft heat insulator with the 2 bolts.
- Torque:
- 16 N*m{ 160 kgf*cm , 12 ft.*lbf }
| 22. INSTALL FRONT EXHAUST PIPE ASSEMBLY |
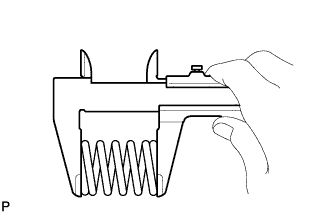 |
Check the free length.
Using vernier calipers, measure the free length of the compression spring.
- Minimum:
- 40.5 mm (1.594 in.)
Install a new exhaust pipe gasket onto the front exhaust pipe.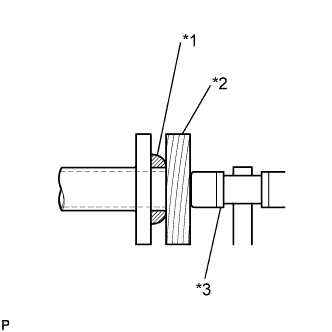
Using a wooden block and plastic-faced hammer, tap in a new gasket until it is flush with the front exhaust pipe end.
Text in Illustration *1
Gasket
*2
Wooden Block
*3
Plastic-faced Hammer
- NOTICE:
- Make sure that the gasket is in the correct direction when installing.
- Do not reuse the removed gasket.
- Do not push in the gasket with the exhaust pipe when connecting it.
- Make sure that the gasket is in the correct direction when installing.
Install a new gasket onto the exhaust manifold RH.
Install the front exhaust pipe with 2 new nuts, 2 bolts and the 2 compression springs.
- Torque:
- Nut:
- 54 N*m{ 554 kgf*cm , 40 ft.*lbf }
- Bolt:
- 48 N*m{ 489 kgf*cm , 35 ft.*lbf }
| 23. INSTALL FRONT NO. 2 EXHAUST PIPE ASSEMBLY |
Install a new gasket onto the exhaust manifold LH.
Install a new gasket onto the front No. 2 exhaust pipe.
Install the front No. 2 exhaust pipe with the 2 bolts, 2 nuts and the exhaust pipe support.
- Torque:
- Nut:
- 54 N*m{ 554 kgf*cm , 40 ft.*lbf }
- Bolt:
- 48 N*m{ 489 kgf*cm , 35 ft.*lbf }
| 24. INSTALL EXHAUST PIPE STOPPER BRACKET |
Install the exhaust pipe stopper bracket to the frame sub-assembly with the 2 bolts.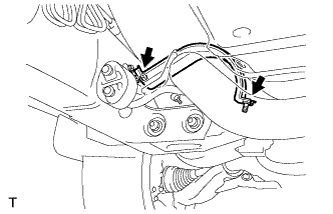
- Torque:
- 19 N*m{ 194 kgf*cm , 14 ft.*lbf }
| 25. ADD MANUAL TRANSMISSION OIL |
| 26. ADJUST MANUAL TRANSMISSION OIL |
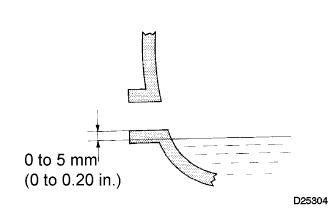 |
Park the vehicle in a level place.
Remove the transmission filler plug and gasket.
Check that the oil surface is within 5 mm (0.20 in.) of the lowest point of the transmission filler plug opening.
- NOTICE:
- Problems may occur when the oil level is too high or low.
- After replacing the oil, drive the vehicle and check the oil level again.
- Problems may occur when the oil level is too high or low.
Check for oil leakage when the oil level is low.
Install the transmission filler plug and a new gasket.
- Torque:
- 37 N*m{ 377 kgf*cm , 27 ft.*lbf }
| 27. INSTALL FLOOR SHIFT SHIFT LEVER ASSEMBLY |
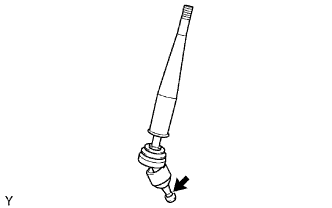 |
Apply MP grease to the tip of the shift lever.
Text in Illustration 
MP grease
Cover the shift lever cap with a cloth.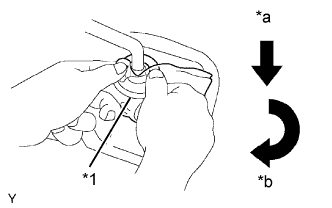
Text in Illustration *1
Cloth
*a
Down
*b
Clockwise
Pressing down on the shift lever cap, turn it clockwise to install the floor shift shift lever assembly.
| 28. REMOVE TRANSFER HIGH AND LOW SHIFT LEVER ASSEMBLY |
Install the transfer high and low shift lever assembly onto the shift lever retainer.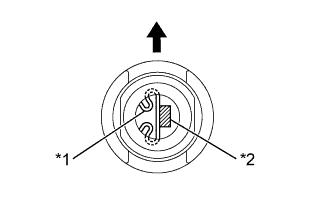
Text in Illustration *1
Select Return Spring
*2
Tip of Shift Lever
Front
Using needle-nose pliers, install the snap ring.
| 29. INSTALL SHIFT LEVER BOOT ASSEMBLY |
Install the shift lever boot assembly with the 4 screws and 2 clips.
| 30. INSTALL TRANSFER SHIFT LEVER KNOB SUB-ASSEMBLY |
Install the shift lever knob.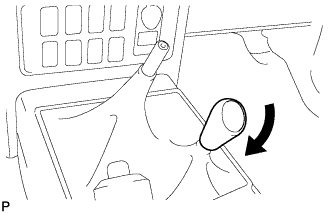
| 31. INSTALL TRANSMISSION SHIFT LEVER KNOB SUB-ASSEMBLY |
Install the shift lever knob.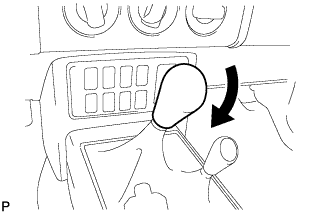
| 32. INSTALL FRONT CONSOLE BOX |
Engage the 5 guides and install the front console box.
Install the 4 <H> bolts.
| 33. INSTALL CONSOLE UPPER REAR PANEL SUB-ASSEMBLY |
Engage the 3 guides and 5 clips and install the console upper rear panel.
| 34. INSTALL PARKING BRAKE HOLE COVER SUB-ASSEMBLY |
Slide the parking brake hole cover toward the rear of the vehicle and engage the 2 guides.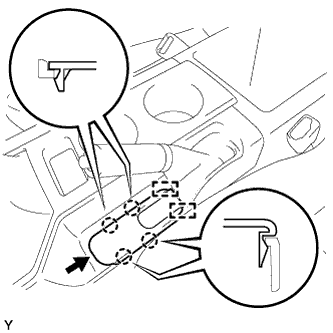
Engage the 4 claws and install the parking brake hole cover.
| 35. INSPECT FOR MANUAL TRANSMISSION OIL LEAK |
| 36. INSPECT FOR EXHAUST GAS LEAK |