REMOVAL
Removal / installation · Vehicles built Jul 2007 – Jul 2009
| 1. DISCHARGE FUEL SYSTEM PRESSURE |

| 2. REMOVE CHAIN SUB-ASSEMBLY |
| 3. REMOVE NO. 1 COOL AIR INLET |
Remove the 2 bolts and the No. 1 cool air inlet.
| 4. REMOVE EXHAUST PIPE STOPPER BRACKET |
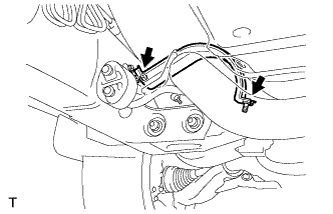  |
Remove the 2 bolts, then remove the exhaust pipe stopper bracket.
| 5. REMOVE NO. 2 FRONT EXHAUST PIPE ASSEMBLY |
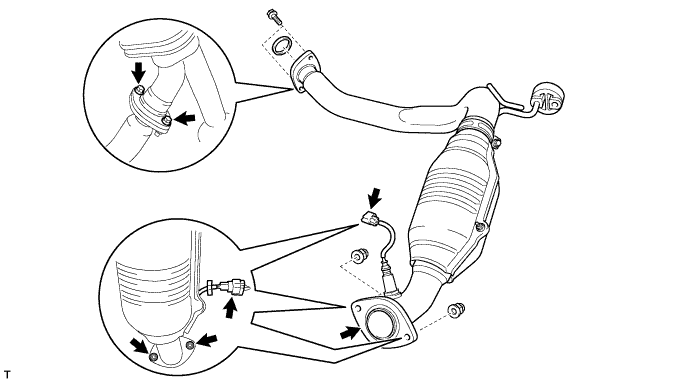
Disconnect the oxygen sensor connector.
Remove the 2 bolts and 2 nuts.
Disengage the support and remove the front exhaust pipe and 2 gaskets.
| 6. REMOVE FRONT EXHAUST PIPE ASSEMBLY |
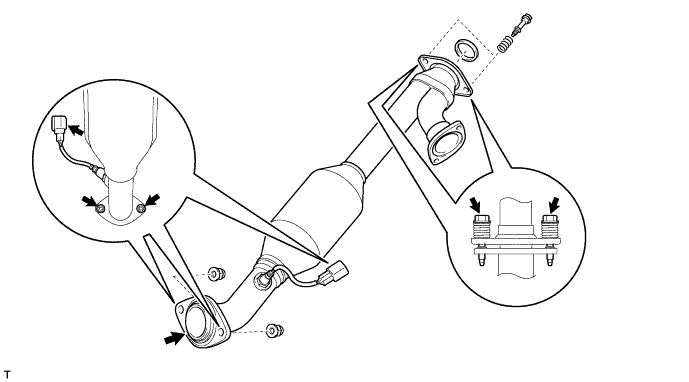
Disconnect the oxygen sensor connector.
Remove the 2 bolts, 2 springs and 2 nuts, then separate the front exhaust pipe from the exhaust manifold RH.
| 7. REMOVE MANIFOLD STAY |
Remove the 3 bolts and manifold stay.
| 8. REMOVE EXHAUST MANIFOLD SUB-ASSEMBLY RH |
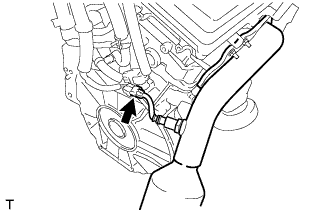 |
Disconnect the air fuel ratio sensor connector.
Remove the 6 nuts and exhaust manifold.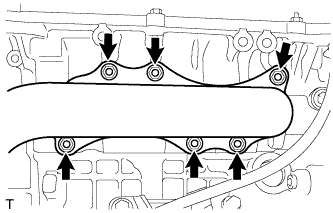
Remove the gasket.
| 9. REMOVE NO. 2 MANIFOLD STAY |
Remove the 3 bolts and the No. 2 manifold stay.
| 10. REMOVE EXHAUST MANIFOLD SUB-ASSEMBLY LH |
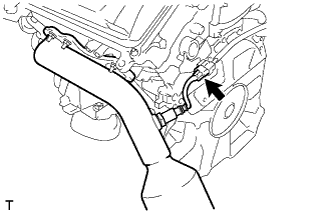 |
Disconnect the air fuel ratio sensor connector.
Remove the 6 nuts and the exhaust manifold.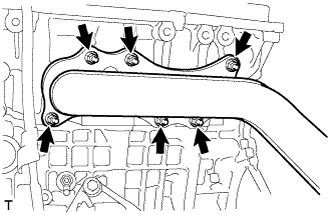
Remove the gasket.
| 11. DISCONNECT NO. 1 FUEL PIPE SUB-ASSEMBLY |
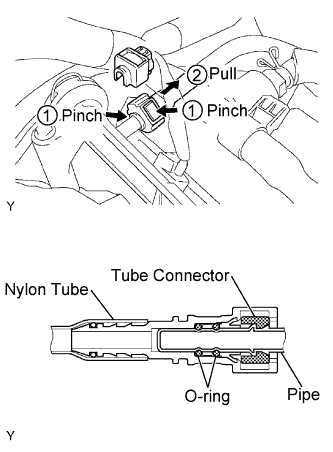 |
Remove the No. 2 fuel pipe clamp.
Pinch the tube connector, and then pull the fuel pipe out of the delivery pipe as shown in the illustration.
- NOTICE:
- Remove any dirt and foreign objects from the fuel tube connector before performing this work.
- Do not allow any scratches or foreign objects on the parts when disconnecting, as the fuel tube connector has the O-ring that seals the pipe.
- Perform this work by hand. Do not use any tools.
- Do not forcibly bend, twist or turn the nylon tube.
- Protect the disconnected part by covering it with a vinyl bag after disconnecting the fuel tube.
- If the fuel tube connector and pipe are stuck, push and pull to release them.
- Remove any dirt and foreign objects from the fuel tube connector before performing this work.
| 12. DISCONNECT NO. 2 FUEL PIPE SUB-ASSEMBLY |
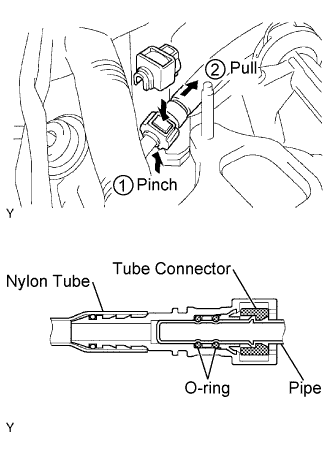 |
Remove the No. 2 fuel pipe clamp.
Pinch the tube connector, and then pull the fuel pipe out of the delivery pipe as shown in the illustration.
- NOTICE:
- Remove any dirt and foreign objects from the fuel tube connector before performing this work.
- Do not allow any scratches or foreign objects on the parts when disconnecting, as the fuel tube connector has the O-ring that seals the pipe.
- Perform this work by hand. Do not use any tools.
- Do not forcibly bend, twist or turn the nylon tube.
- Protect the disconnected part by covering it with a vinyl bag after disconnecting the fuel tube.
- If the fuel tube connector and pipe are stuck, push and pull to release them.
- Remove any dirt and foreign objects from the fuel tube connector before performing this work.
| 13. REMOVE INTAKE MANIFOLD |
Disconnect the 6 fuel injector connectors.
Remove the 10 bolts, then remove the intake manifold and gasket.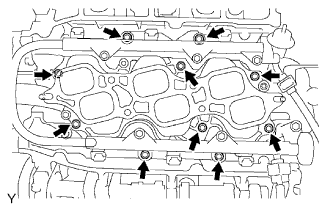
| 14. DISCONNECT HEATER WATER INLET HOSE |
| 15. REMOVE WATER BY-PASS JOINT REAR |
Disconnect the engine coolant temperature sensor connector.
Remove the 2 bolts and 4 nuts, then remove the water by-pass joint RR and 2 gaskets.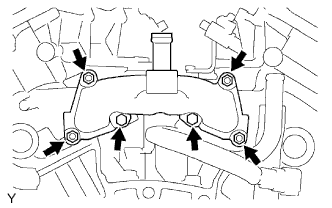
Remove the O-ring from the water outlet hose.
| 16. REMOVE CAMSHAFT TIMING GEARS AND NO. 2 CHAIN (for Bank 1) |
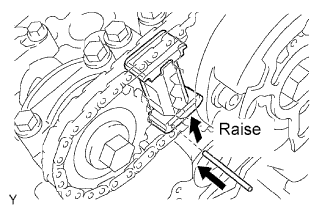 |
While raising the No. 2 chain tensioner, insert a pin of φ 1.0 mm (0.039 in.) into the hole to fix it.
Hold the hexagonal portion of the camshaft with a wrench.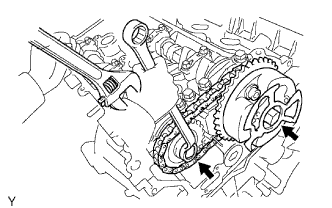
- NOTICE:
- Be careful not to damage the cylinder head and valve lifter with the wrench.
Remove the 2 bolts, then remove the camshaft timing gear, camshaft timing gear assembly and No. 2 timing chain.
- NOTICE:
- Do not disassemble the camshaft timing gear assembly.
| 17. REMOVE NO. 2 CHAIN TENSIONER ASSEMBLY |
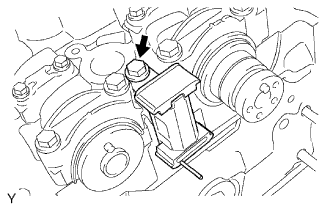 |
Remove the bolt, then remove the No. 2 chain tensioner.
| 18. REMOVE CAMSHAFTS (for Bank 1) |
- NOTICE:
- Keep the camshaft level while it is being removed. The camshaft thrust clearance is very small and failing to keep it level could crack or damage the cylinder head journal surface, which receives the thrust force. This could subsequently lead the camshaft to seize or break. Perform the following steps to avoid such problems.
Rotate the camshafts counterclockwise using a wrench so that the cam lobes of No. 1 cylinder face in the directions shown in the illustration.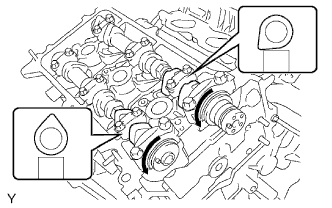
Using several steps, loosen and remove the 16 bearing cap bolts uniformly in the sequence shown in the illustration.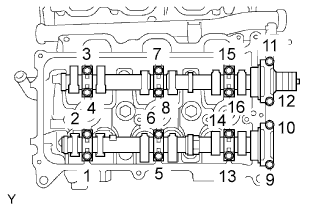
Remove the 8 bearing caps and 2 camshafts.
| 19. REMOVE NO. 2 CAMSHAFT BEARING |
| 20. REMOVE CYLINDER HEAD SUB-ASSEMBLY |
Remove the bolt and separate the ground cable.
Using several steps, loosen the 8 cylinder head bolts on the cylinder head uniformly with a 10 mm bi-hexagon wrench in the sequence shown in the illustration. Remove the 8 cylinder head bolts and 8 plate washers.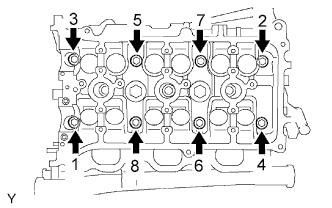
- NOTICE:
- Be careful not to drop the plate washers into the cylinder head.
- Cylinder head warpage or cracking could result from removing the bolts in the wrong order.
- Be careful not to drop the plate washers into the cylinder head.
Lift the cylinder head from the dowels on the cylinder block, and place the cylinder head on wooden blocks on a bench.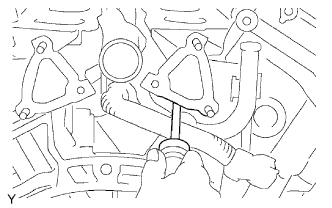
- NOTICE:
- Be careful not to drop the plate washers into the cylinder head.
| 21. REMOVE CYLINDER HEAD GASKET |
| 22. REMOVE NO. 1 CHAIN VIBRATION DAMPER |
Remove the 2 bolts, then remove the No. 1 chain vibration damper.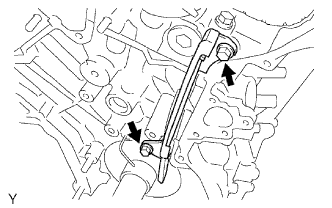
| 23. REMOVE CAMSHAFT TIMING GEARS AND NO. 2 CHAIN (for Bank 2) |
While pushing down the No. 2 chain tensioner, insert a pin of φ 10 mm (0.039 in.) into the hole to fix it.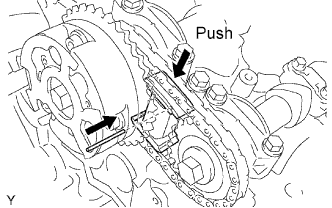
Hold the hexagonal portion of the camshaft with a wrench.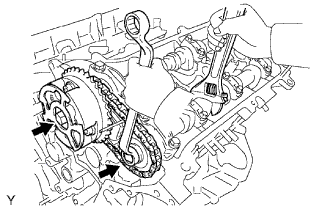
- NOTICE:
- Be careful not to damage the cylinder head and valve lifter with the wrench.
Remove the 2 bolts, then remove the camshaft timing gear, camshaft timing gear assembly and No. 2 timing chain.
- NOTICE:
- Do not disassemble the camshaft timing gear assembly.
| 24. REMOVE NO. 3 CHAIN TENSIONER ASSEMBLY |
Remove the bolt, then remove the No. 3 chain tensioner.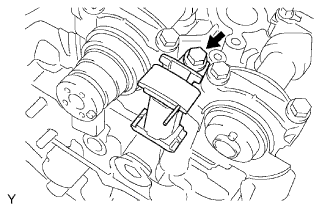
| 25. REMOVE CAMSHAFTS (for Bank 2) |
- NOTICE:
- Keep the camshaft level while it is being removed. The camshaft thrust clearance is very small and failing to keep it level could crack or damage the cylinder head journal surface, which receives the thrust force. This could subsequently lead the camshaft to seize or break. Perform the following steps to avoid such problems.
Using several steps, loosen and remove the 16 bearing cap bolts uniformly in the sequence shown in the illustration.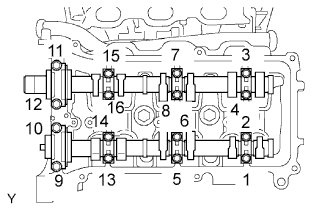
Remove the 8 bearing caps and 2 camshafts.
| 26. REMOVE CYLINDER HEAD LH |
Remove the bolt, then separate the ground cable.
Remove the bolt, then separate the air fuel ratio connector bracket.
Using several steps, remove the 2 cylinder head bolts from the cylinder head in the sequence shown in the illustration.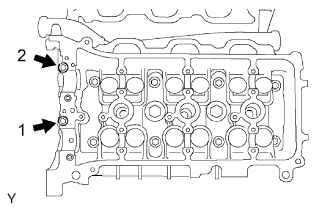
Using several steps, uniformly loosen the 8 cylinder head bolts on the cylinder head with a 10 mm bi-hexagon wrench in the sequence shown in the illustration. Remove the 8 cylinder head bolts and 8 plate washers.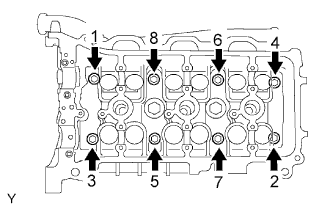
- NOTICE:
- Be careful not to drop the plate washers into the cylinder head.
- Cylinder head warpage or cracking could result form removing the bolts in the wrong order.
- Be careful not to drop the plate washers into the cylinder head.
Lift the cylinder head from the dowels on the cylinder block, and place the cylinder head on wooden blocks on a bench.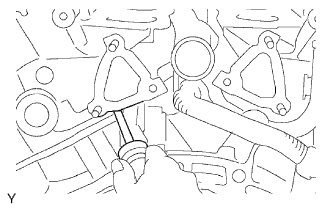
- NOTICE:
- Be careful not to drop the plate washers into the cylinder head.
| 27. REMOVE NO. 2 CYLINDER HEAD GASKET |