Light Control Switch Circuit
Circuit diagnosis · Vehicles built Jul 2007 – Oct 2010
Versions by build date: Jul 2007 – Oct 2010 Nov 2010 – Jul 2014 from Aug 2014
DESCRIPTION
This circuit detects the state of the headlight dimmer switch.WIRING DIAGRAM
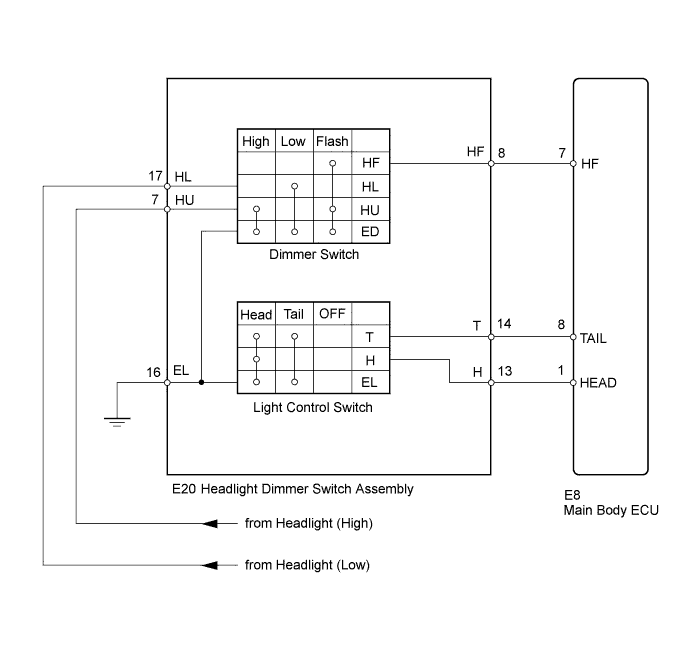

INSPECTION PROCEDURE
| 1. READ VALUE USING INTELLIGENT TESTER |

Connect the intelligent tester to the DLC3.
Turn the ignition switch to ON.
Turn the tester on.
Enter the following menus: Body Electrical / Body / Data List /
According to the display on tester, read the "Data List".
- Body (Main Body ECU):
Tester Display
Measurement Item/Range
Normal Condition
Diagnostic Note
High Flasher SW
Passing light switch signal / ON or OFF
ON: Headlight dimmer switch is in FLASH (PASS) position
OFF: Headlight dimmer switch is not in FLASH (PASS) position
-
Dimmer SW
Dimmer switch signal/ON or OFF
ON: Dimmer switch is ON (High Beam) or High flasher switch is ON
OFF: Dimmer switch is OFF (Low Beam) or High flasher switch is OFF
-
Head Light SW
Headlight control switch signal / ON or OFF
ON: Light control switch is in HEAD position
OFF: Light control switch is not in HEAD position
-
Tail Light SW
Taillight switch signal / ON or OFF
ON: Light control switch is in TAIL or HEAD position
OFF: Light control switch is in OFF position
-
- OK:
- Condition information can be displayed.
|
|
||||

| OK | ||
 |
||
| ||
| 2. INSPECT HEADLIGHT DIMMER SWITCH ASSEMBLY |
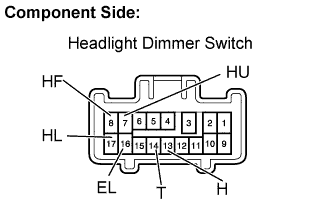 |
Remove the headlight dimmer switch assembly.
Measure the resistance according value(s) in the table below.
Light Control Switch:
- Standard resistance:
Tester Connection
Condition
Specified Condition
14 (T) - 16 (EL)
OFF
10 kΩ or higher
13 (H) - 16 (EL)
14 (T) - 16 (EL)
TAIL
Below 1 Ω
13 (H) - 16 (EL)
10 kΩ or higher
14 (T) - 16 (EL)
HEAD
Below 1 Ω
13 (H) - 16 (EL)
Below 1 Ω
Headlight Dimmer Switch Switch:
- Standard resistance:
Tester Connection
Condition
Specified Condition
7 (HU) - 16 (EL)
HIGH BEAM
Below 1 Ω
17 (HL) - 16 (EL)
LOW BEAM
Below 1 Ω
7 (HU) - 8 (HF) - 16 (EL)
FLASH
Below 1 Ω
Reinstall the headlight dimmer switch assembly.
|
|
||||

| OK | |
 |
| 3. CHECK HARNESS AND CONNECTOR (HEADLIGHT DIMMER SWITCH - MAIN BODY ECU) |
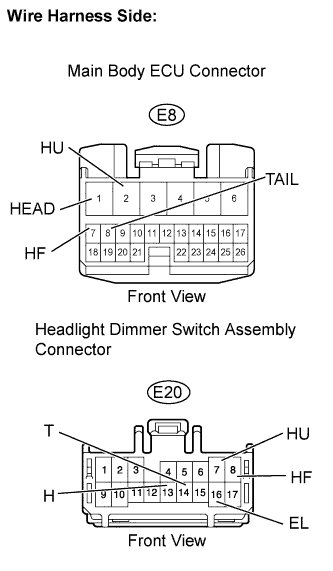 |
Disconnect the E8 main body ECU connector.
Disconnect the E20 headlight dimmer switch assembly connector.
Measure the resistance according value(s) in the table below.
- Standard resistance:
Tester Connection
Condition
Specified Condition
E20-8 (HF) - E8-7 (HF)
Always
Below 1 Ω
E20-8 (HF) or E8-7 (HF) - Body ground
Always
10 kΩ or higher
E20-14 (T) - E8-8 (TAIL)
Always
Below 1 Ω
E20-14 (T) or E8-8 (TAIL) - Body ground
Always
10 kΩ or higher
E20-13 (H) - E8-1 (HEAD)
Always
Below 1 Ω
E20-13 (H) or E8-1 (HEAD) - Body ground
Always
10 kΩ or higher
E20-16 (EL) - Body ground
Always
Below 1 Ω
Reconnect the main body ECU connector.
Reconnect the headlight dimmer switch assembly connector.
|
|
||||
| OK | |
|
| 4. CHECK HARNESS AND CONNECTOR (HEADLIGHT DIMMER SWITCH - HEADLIGHT*) |
Disconnect the E20 headlight dimmer switch assembly connector.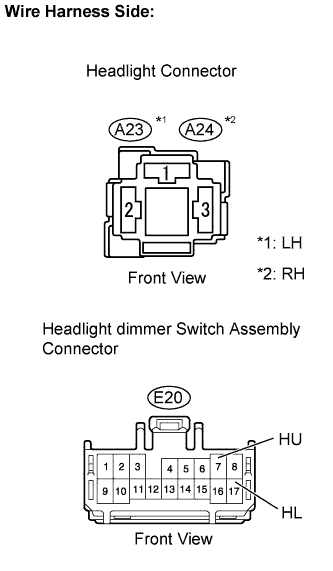
Disconnect the A23 and A24 headlight connectors.
Measure the resistance according value(s) in the table below.
- Standard resistance:
Tester Connection
Condition
Specified Condition
E20-17 (HL) - A23-1
Always
Below 1 Ω
E20-17 (HL) - A24-1
Always
Below 1 Ω
E20-7 (HU) - A23-2
Always
Below 1 Ω
E20-7 (HU) - A24-2
Always
Below 1 Ω
Reconnect the headlight dimmer switch assembly connector.
Reconnect the headlight connectors.
|
|
||||
| OK | ||
|
||
| ||