Light Control Switch Circuit
Circuit diagnosis · Vehicles built Nov 2010 – Jul 2014
Versions by build date: Jul 2007 – Oct 2010 Nov 2010 – Jul 2014 from Aug 2014
DESCRIPTION
This circuit detects the state of the headlight dimmer switch.WIRING DIAGRAM
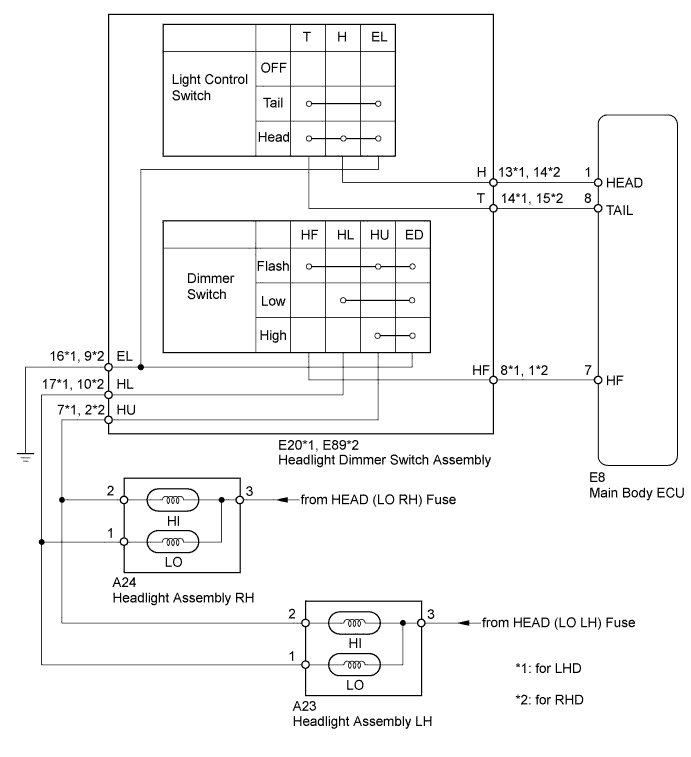

INSPECTION PROCEDURE
- NOTICE:
- Inspect the fuses and bulbs for circuits related to this system before performing the following inspection procedure.
| 1. READ VALUE USING INTELLIGENT TESTER |

Connect the intelligent tester to the DLC3.
Turn the ignition switch to ON.
Turn the tester on.
Enter the following menus: Body / Main Body / Data List /
According to the display on the tester, read the Data List.
| Tester Display |
Measurement Item/Range |
Normal Condition |
Diagnostic Note |
| Passing Light SW |
Dimmer switch HIGH FLASH signal/ ON or OFF |
ON: Dimmer switch in HIGH FLASH (Pass) OFF: Dimmer switch not in HIGH FLASH (Pass) |
- |
| Head Light SW (Head) |
Light control switch HEAD signal/ ON or OFF |
ON: Light control switch in HEAD OFF: Light control switch not in HEAD |
- |
| Head Light SW (Tail) |
Light control switch TAIL signal/ ON or OFF |
ON: Light control switch in TAIL or HEAD OFF: Light control switch in neither TAIL nor HEAD |
- |
- OK:
- Condition information can be displayed.
|
|
||||

| OK | ||
 |
||
| ||
| 2. INSPECT HEADLIGHT DIMMER SWITCH ASSEMBLY |
Inspect the headlight dimmer switch assembly (Click here).
|
|
||||

| OK | |
 |
| 3. CHECK HARNESS AND CONNECTOR (HEADLIGHT DIMMER SWITCH ASSEMBLY - MAIN BODY ECU AND BODY GROUND) |
for LHD
Disconnect the E20 headlight dimmer switch assembly connector.
for RHD
Disconnect the E89 headlight dimmer switch assembly connector.
Disconnect the E8 main body ECU connector.
Measure the resistance according to the value(s) in the table below.
- Standard Resistance:
for LHD Tester Connection
Condition
Specified Condition
E20-8 (HF) - E8-7 (HF)
Always
Below 1 Ω
E20-8 (HF) - Body ground
Always
10 kΩ or higher
E20-14 (T) - E8-8 (TAIL)
Always
Below 1 Ω
E20-14 (T) - Body ground
Always
10 kΩ or higher
E20-13 (H) - E8-1 (HEAD)
Always
Below 1 Ω
E20-13 (H) - Body ground
Always
10 kΩ or higher
E20-16 (EL) - Body ground
Always
Below 1 Ω
for RHD Tester Connection
Condition
Specified Condition
E89-1 (HF) - E8-7 (HF)
Always
Below 1 Ω
E89-1 (HF) - Body ground
Always
10 kΩ or higher
E89-15 (T) - E8-8 (TAIL)
Always
Below 1 Ω
E89-15 (T) - Body ground
Always
10 kΩ or higher
E89-14 (H) - E8-1 (HEAD)
Always
Below 1 Ω
E89-14 (H) - Body ground
Always
10 kΩ or higher
E89-9 (EL) - Body ground
Always
Below 1 Ω
Reconnect the main body ECU connector.
Reconnect the headlight dimmer switch assembly connector.
|
|
||||
| OK | |
|
| 4. CHECK HARNESS AND CONNECTOR (HEADLIGHT DIMMER SWITCH ASSEMBLY - HEADLIGHT ASSEMBLY) |
for LHD
Disconnect the E20 headlight dimmer switch assembly connector.
for RHD
Disconnect the E89 headlight dimmer switch assembly connector.
Disconnect the A23 and A24 headlight assembly connectors.
Measure the resistance according to the value(s) in the table below.
- Standard Resistance:
for LHD Tester Connection
Condition
Specified Condition
E20-17 (HL) - A23-1
Always
Below 1 Ω
E20-17 (HL) - A24-1
Always
Below 1 Ω
E20-7 (HU) - A23-2
Always
Below 1 Ω
E20-7 (HU) - A24-2
Always
Below 1 Ω
for RHD Tester Connection
Condition
Specified Condition
E89-10 (HL) - A23-1
Always
Below 1 Ω
E89-10 (HL) - A24-1
Always
Below 1 Ω
E89-2 (HU) - A23-2
Always
Below 1 Ω
E89-2 (HU) - A24-2
Always
Below 1 Ω
Reconnect the headlight assembly connectors.
Reconnect the headlight dimmer switch assembly connector.
|
|
||||
| OK | ||
|
||
| ||