INSTALLATION
Removal / installation · Vehicles built from Nov 2010
Versions by build date: Jul 2007 – Jul 2009 Aug 2009 – Oct 2010 from Nov 2010
| 1.
INSTALL MONOLITHIC CONVERTER PROTECTOR (w/ Heat Insulator) |
 |
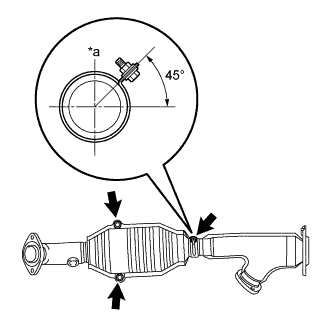
- Install the monolithic converter protector and converter protector stay with the 2 bolts and 2 nuts.
Text in Illustration
*a
|
Upper Side
|
-
Torque:
- 11 N*m{
107 kgf*cm
, 8 ft.*lbf
}
Install the clamp with the bolt as shown in the illustration.
-
Torque:
- 11 N*m{
107 kgf*cm
, 8 ft.*lbf
}
| 2.
INSTALL FRONT EXHAUST PIPE ASSEMBLY |
|
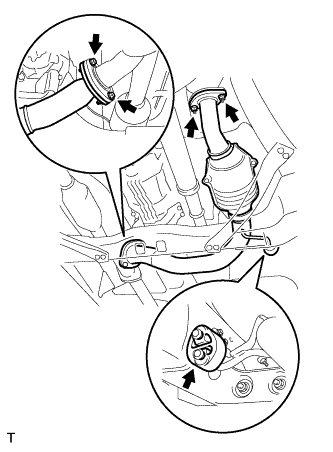
Install a new gasket to the exhaust manifold RH.
- Install the front exhaust pipe assembly with 2 new nuts.
-
Torque:
- 54 N*m{
554 kgf*cm
, 40 ft.*lbf
}
| 3.
INSTALL EXHAUST PIPE GASKET |
|
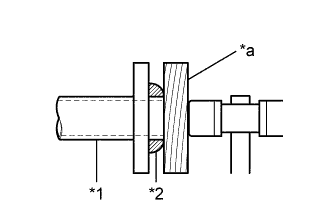
- Install a new exhaust pipe gasket to the front exhaust pipe assembly.
Text in Illustration
*1
|
Front Exhaust Pipe Assembly
|
*2
|
Exhaust Pipe Gasket
|
*a
|
Wooden Block
|
Using a wooden block and plastic hammer, tap in a new exhaust pipe gasket until it is flush with the front exhaust pipe end.
- NOTICE:
- Make sure that the gasket is in the correct direction when installing.
- Do not reuse the removed gasket.
- Do not push in the gasket with the exhaust pipe when connecting it.
| 4.
INSTALL CONVERTER PROTECTOR STAY LH |
|
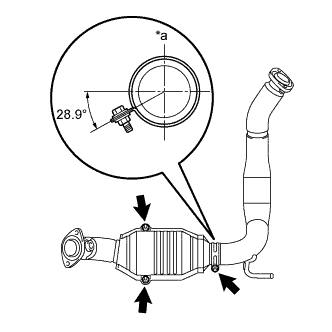
- Install the monolithic converter protector and converter protector stay LH with the 2 bolts and 2 nuts.
Text in Illustration
*a
|
Upper Side
|
-
Torque:
- 11 N*m{
107 kgf*cm
, 8 ft.*lbf
}
Install the clamp with the bolt as shown in the illustration.
-
Torque:
- 11 N*m{
107 kgf*cm
, 8 ft.*lbf
}
| 5.
INSTALL FRONT NO. 2 EXHAUST PIPE ASSEMBLY |
|
Install a new gasket to the exhaust manifold sub-assembly LH.
Install a new gasket to the front No. 2 exhaust pipe assembly.
- Install the front No. 2 exhaust pipe assembly with 2 new nuts, 2 bolts and exhaust pipe support.
-
Torque:
- Nut:
- 54 N*m{
554 kgf*cm
, 40 ft.*lbf
}
- Bolt:
- 48 N*m{
489 kgf*cm
, 35 ft.*lbf
}
| 6.
INSTALL EXHAUST PIPE STOPPER BRACKET |
|
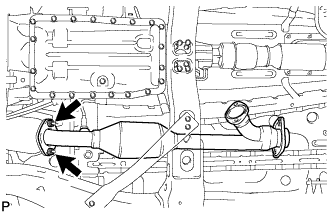
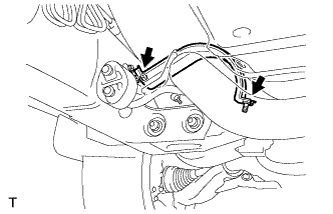
- Install the exhaust pipe stopper bracket to the frame sub-assembly with the 2 bolts.
-
Torque:
- 19 N*m{
194 kgf*cm
, 14 ft.*lbf
}
| 7.
INSTALL CENTER EXHAUST PIPE ASSEMBLY |
|
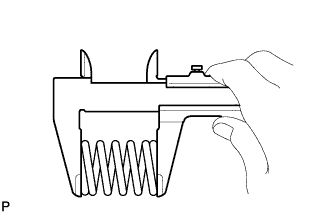
Check the free length.
- Using a vernier caliper, measure the free length of the compression springs.
- Free Length of Compression Spring:
Transmission Type
|
Identification Color
|
Standard Length
|
Minimum Length
|
Manual Transmission
|
White
|
40.36 mm (1.58 in.)
|
38.86 mm (1.53 in.)
|
Automatic Transmission
|
Blue
|
43 mm (1.69 in.)
|
41.5 mm (1.63 in.)
|
Automatic Transmission
|
Pink
|
40 mm (1.57 in.)
|
38.5 mm (1.52 in.)
|
Automatic Transmission
|
None
|
42 mm (1.65 in.)
|
40.5 mm (1.59 in.)
|
If the free length is less that the minimum, replace the compression spring.
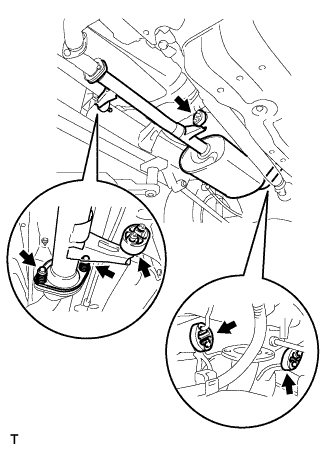
- Install the center exhaust pipe assembly to the 4 exhaust pipe supports.
Install the center exhaust pipe assembly to the front exhaust pipe assembly with the 2 bolts and 2 compression springs.
-
Torque:
- 43 N*m{
438 kgf*cm
, 32 ft.*lbf
}
| 8.
INSTALL TAIL EXHAUST PIPE ASSEMBLY |
|
Install a new gasket to the center exhaust pipe assembly.
- Install the tail exhaust pipe assembly with the 2 bolts and exhaust pipe support.
-
Torque:
- 48 N*m{
489 kgf*cm
, 35 ft.*lbf
}
| 9.
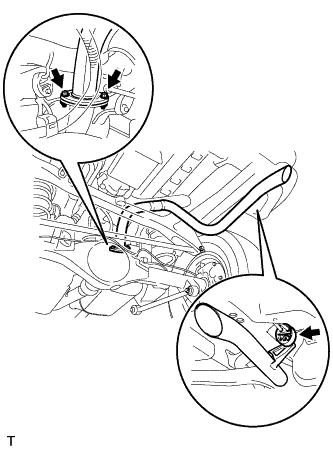
INSTALL HEATED OXYGEN SENSOR (for Bank 1 Sensor 2)
|
|
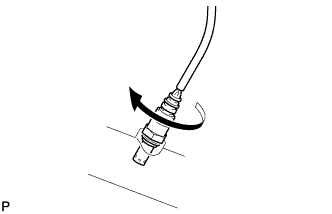
- Temporarily install the sensor to the exhaust pipe by hand.
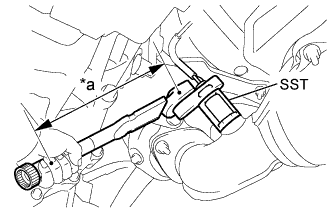
- Using SST, tighten the sensor.
Text in Illustration
*a
|
Fulcrum Length
|
- SST
- 09224-00010
-
Torque:
- without SST:
- 44 N*m{
449 kgf*cm
, 32 ft.*lbf
}
- with SST:
- 40 N*m{
408 kgf*cm
, 30 ft.*lbf
}
- HINT:
- The "with SST" torque value is effective when using SST with a fulcrum length of 30 mm (1.18 in.).
- The "with SST" torque value is effective when using a torque wrench with a fulcrum length of 300 mm (11.81 in.) (Click here).
- This torque value is effective when SST is parallel to the torque wrench.
Connect the sensor connector.
| 10.
INSTALL HEATED OXYGEN SENSOR (for Bank 2 Sensor 2)
|
|
- Temporarily install the sensor to the exhaust pipe by hand.
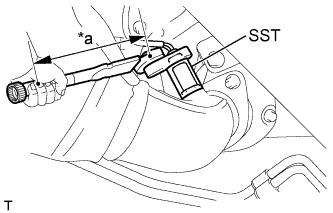
- Using SST, tighten the sensor.
Text in Illustration
*a
|
Fulcrum Length
|
- SST
- 09224-00010
-
Torque:
- without SST:
- 44 N*m{
449 kgf*cm
, 32 ft.*lbf
}
- with SST:
- 40 N*m{
408 kgf*cm
, 30 ft.*lbf
}
- HINT:
- The "with SST" torque value is effective when using SST with a fulcrum length of 30 mm (1.18 in.).
- The "with SST" torque value is effective when using a torque wrench with a fulcrum length of 300 mm (11.81 in.) (Click here).
- This torque value is effective when SST is parallel to the torque wrench.
Connect the sensor connector.
| 11.
INSPECT FOR EXHAUST GAS LEAK |
|