REASSEMBLY
Removal / installation · Vehicles built Jul 2007 – Jul 2009
Versions by build date: Jul 2007 – Jul 2009 from Aug 2009
| 1.
INSTALL GENERATOR DRIVE END FRAME BEARING (for 100A Type) |
 |
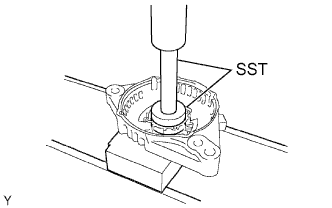
Using SST and a press, press in a new bearing.
- SST
- 09950-60010
(09951-00470)
09950-70010
(09951-07100)
Install the retainer plate with the 4 screws.
-
Torque:
- 2.6 N*m{
27 kgf*cm
, 23 in.*lbf
}
| 2.
INSTALL GENERATOR ROTOR ASSEMBLY |
|
Place the drive end frame on the rotor.
Install the rotor and washer.
| 3.
INSTALL GENERATOR DRIVE FRAME ASSEMBLY (for 80A Type) |
|
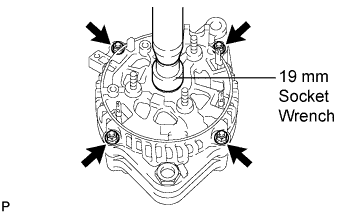
Using a 19 mm socket wrench and press, slowly press in the rectifier end frame.
Install the 4 nuts.
-
Torque:
- 4.5 N*m{
46 kgf*cm
, 40 in.*lbf
}
Install the seal plate onto the rectifier end frame.
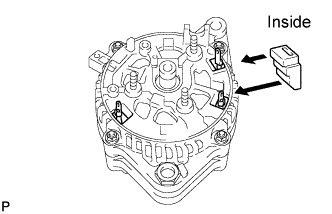
- Install the 3 rubber insulators onto the lead wires.
- NOTICE:
- Make sure to install the rubber insulators are in the right direction.
| 4.
INSTALL GENERATOR COIL ASSEMBLY (for 100A Type) |
|
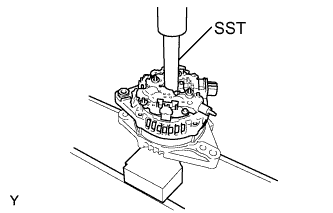
Using SST and a press, press in the coil carefully.
- SST
- 09285-76010
Install the 4 bolts.
-
Torque:
- 5.8 N*m{
59 kgf*cm
, 51 in.*lbf
}
| 5.
INSTALL GENERATOR HOLDER WITH RECTIFIER (for 80A Type) |
|
Install the rectifier holder while pushing it with the 3 screws.
-
Torque:
- 2.0 N*m{
20 kgf*cm
, 18 in.*lbf
}
| 6.
INSTALL GENERATOR VOLTAGE REGULATOR ASSEMBLY (for 80A Type) |
|
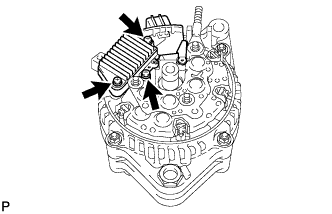
- Install the 3 screws and voltage regulator.
-
Torque:
- 2.0 N*m{
20 kgf*cm
, 18 in.*lbf
}
| 7.
INSTALL GENERATOR BRUSH HOLDER ASSEMBLY (for 100A Type) |
|
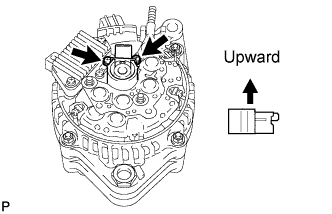
Install the 2 screws.
-
Torque:
- 1.8 N*m{
18 kgf*cm
, 16 in.*lbf
}
| 8.
INSTALL GENERATOR BRUSH HOLDER ASSEMBLY (for 80A Type) |
|
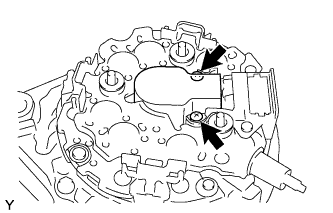
- Install the brush holder with the 2 screws.
-
Torque:
- 2.0 N*m{
20 kgf*cm
, 18 in.*lbf
}
- NOTICE:
- Make sure to install the holder in the correct direction.
Install the brush holder.
| 9.
INSTALL TERMINAL INSULATOR (for 100A Type) |
|
| 10.
INSTALL GENERATOR REAR END COVER (for 100A Type) |
|
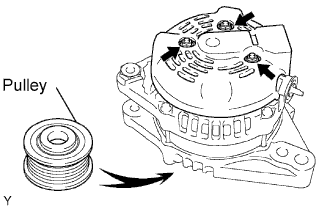
Place the generator on the pulley.
Install the rear end cover with the 3 nuts.
-
Torque:
- 4.6 N*m{
47 kgf*cm
, 41 in.*lbf
}
| 11.
INSTALL GENERATOR REAR END COVER (for 80A Type) |
|
Install the end cover and plate terminal with the bolt and 3 nuts.
-
Torque:
- for Bolt:
- 3.9 N*m{
40 kgf*cm
, 34 in.*lbf
}
- for Nut:
- 4.4 N*m{
45 kgf*cm
, 39 in.*lbf
}
| 12.
INSTALL TERMINAL INSULATOR (for 80A Type) |
|
Install the terminal insulator with the nut.
-
Torque:
- 4.1 N*m{
42 kgf*cm
, 36 in.*lbf
}
| 13.
INSTALL GENERATOR PULLEY |
|
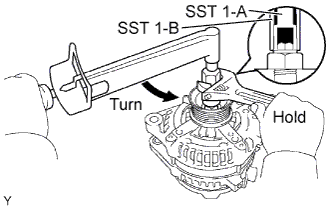
- SST
- 09820-63010
(09820-06010, 09820-06020)
HINT
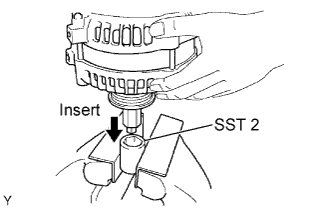
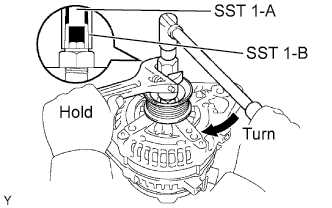
SST 1-A and B
|
09820 - 06010
|
SST 2
|
09820 - 06020
|
Install the pulley onto the rotor shaft by tightening the pulley nut by hand.
Hold SST 1-A with a torque wrench, and tighten SST 1-B clockwise with the specified torque.
-
Torque:
- 39 N*m{
400 kgf*cm
, 29 ft.*lbf
}
- NOTICE:
- Check that SST is secured to the rotor shaft.
- Mount SST 2 in a vice.
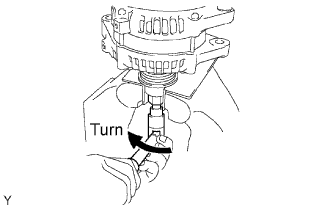
Insert SST 1-A and B into SST 2, and attach the pulley nut to SST 2.
- Tighten the pulley nut by turning SST 1-A in the direction shown in the illustration.
-
Torque:
- 133 N*m{
1356 kgf*cm
, 98 ft.*lbf
}
Remove the generator from SST 2.
- Turn SST 1-B, and remove SST 1-A and B.
Turn the pulley, and check that the pulley moves smoothly.