INSTALLATION
Removal / installation · Vehicles built Jul 2007 – Oct 2010
Versions by build date: Jul 2007 – Oct 2010 Nov 2010 – Jul 2012 from Aug 2012
- HINT:
- The procedure described below is for the LH side. Use the same procedure for both the RH and LH sides, unless otherwise specified.
| 1. INSTALL ROOF SIDE GARNISH PROTECTOR |

Install a new roof side garnish protector with the 4 clips.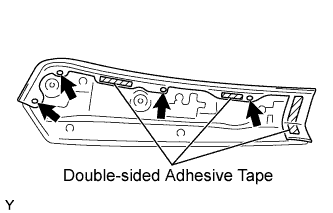

| 2. INSTALL FRONT PILLAR OUTER GARNISH |
Engage the 5 clips and install the front pillar outer garnish.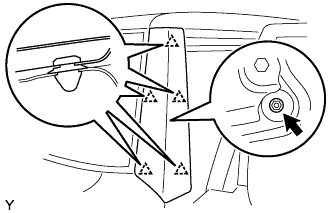
Tighten the nut.
- Torque:
- 5.0 N*m{ 50 kgf*cm , 44 in.*lbf }
| 3. INSTALL FRONT PILLAR GARNISH |
- HINT:
- Use the same procedure as for the RH side (Click here).
| 4. INSTALL ASSIST GRIP ASSEMBLY |
- HINT:
- Use the same procedure as for the RH side (Click here).
| 5. INSTALL ASSIST GRIP PLUG |
- HINT:
- Use the same procedure as for the RH side (Click here).
| 6. INSTALL FRONT DOOR OPENING TRIM WEATHERSTRIP |
- HINT:
- Use the same procedure as for the RH side (Click here).
| 7. INSTALL ROOF DRIP SIDE FINISH MOULDING RETAINER |
 |
- HINT:
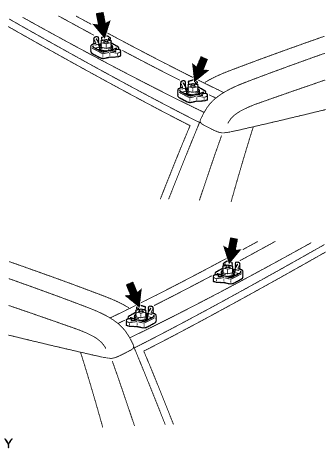
- Use the same procedure to install all the roof drip side finish moulding retainers.
Install the roof drip side finish moulding retainer.
- Torque:
- 5.0 N*m{ 50 kgf*cm , 44 in.*lbf }
| 8. INSTALL WINDSHIELD OUTSIDE UPPER MOULDING SUB-ASSEMBLY |
Clean the windshield glass.
Using a scraper, remove the adhesive from the windshield glass.
Clean the outer circumference of the windshield glass with a non-residue solvent.
- NOTICE:
- Do not touch the windshield glass surface after cleaning it.
Using a brush or sponge, apply Primer G to the contact surface.
- NOTICE:
- Allow the primer to dry for 3 minutes or more.
- Throw away any leftover Primer G.
- Do not apply too much Primer G.
- Allow the primer to dry for 3 minutes or more.
- HINT:
- If Primer G is applied to any areas other than those specified, wipe off the primer with a clean shop rag or piece of cloth before it dries.
Apply adhesive.
- Adhesive:
- Toyota Genuine Windshield Glass Adhesive or the equivalent
Cut the tip off the cartridge nozzle.
- HINT:
- After cutting off the tip, use all adhesive within the times indicated in the table below.
Usage time frame: Temperature
Usage Time Frame
35°C (95°F)
15 minutes
20°C (68°F)
1 hour 40 minutes
5°C (41°F)
8 hours
Load the sealer gun with the cartridge.
Apply adhesive to a new windshield outside upper moulding, as shown in the illustration.
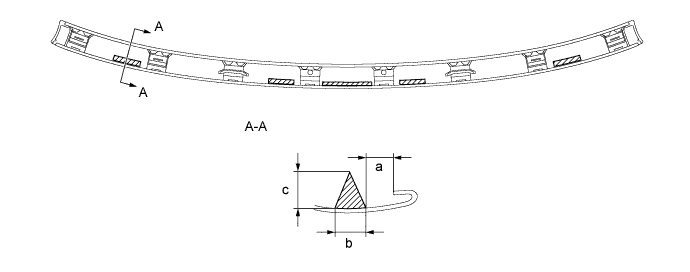
Specification: Area
Measurement
a
7 mm (0.276 in.)
b
8 mm (0.315 in.)
c
10 mm (0.394 in.) or more
Engage the 6 claws and the 2 clips and install a new windshield outside upper moulding.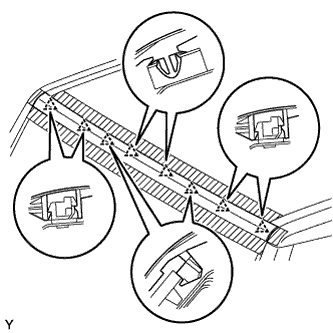
- NOTICE:
- Do not drive the vehicle within the time indicated in the table below.
Minimum time: Temperature
Minimum time prior to driving vehicle
35°C (95°F)
1 hour 30 minutes
20°C (68°F)
5 hour
5°C (41°F)
24 hours
Remove the protective tape.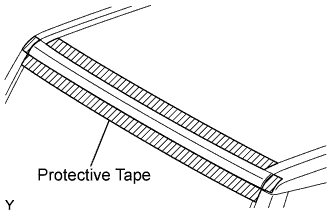
| 9. INSTALL ROOF DRIP SIDE FINISH MOULDING CLIP |
 |
- NOTICE:
- Only follow this procedure when replacing the clips.
- Wear polyethylene gloves when performing steps and avoid having direct contact between the adhesive and your hand.
- Refer to the label on the adhesive for further precautions.
- Only follow this procedure when replacing the clips.
Clean the vehicle body.
Using an industrial dryer, heat the tape remaining on the painted surface to soften it and peel it off with a bamboo scraper.
Clean the surface using a shop rag or piece of cloth soaked in a non-residue solvent.
Apply adhesive.
Load an adhesive cartridge into an adhesive coating gun.
Remove the cap from the adhesive cartridge and pull the lever of the gun. Make sure that the adhesive comes out of the nozzle tip ( 2 outlets) uniformly. (Confirm by applying adhesive to cardboard)
Pull the lever again and apply adhesive to a part of the cardboard where it has not been applied before.
- HINT:
- The amount of the adhesive applied in this step should be greater than that required 0.5mm (0.02 in.)
Using a paddle, mix the adhesive 10 times.
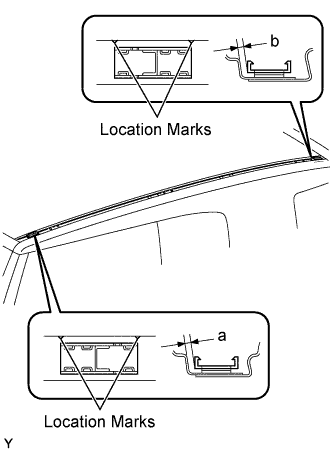
Apply the adhesive, with a uniform thickness of 0.5 mm (0.02 in.), to the surface of the hardening tape on the clip.
Set the clip in the predetermined position on the pillar and press in until extra adhesive protrudes beyond the sides of the tape (20 N (2kgf, 4.4 lb) x 2 seconds).
Specification: Area
Measurement
a
2.5 to 3.5 mm (0.098 to 0.138 in.)
b
2 to 3 mm (0.079 to 0.118 in.)
After pressing the clip, leave it for the predetermined time shown below and then install the moulding.
Ambient temperatures and recommended leaving times: Temperature
Leaving times
5 to 10°C (41 to 50°F)
1 hour or more
10 to 15°C (50 to 59°F)
30 minutes or more
15 to 23°C (59 to 73°F)
30 minutes or more
23°C (73°F) or more
15 minutes or more
| 10. INSTALL NO. 4 ROOF DRIP SIDE FINISH MOULDING |
Engage the clip and install the No. 4 roof drip side finish moulding.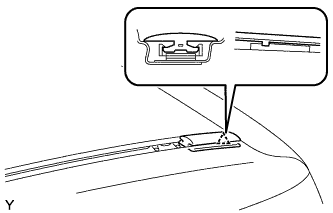
| 11. INSTALL NO. 3 ROOF DRIP SIDE FINISH MOULDING |
Install the No. 3 roof drip side finish moulding as shown in the illustration.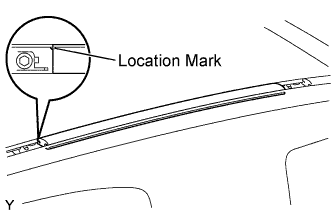
| 12. INSTALL NO. 2 ROOF DRIP SIDE FINISH MOULDING |
Install the No. 2 roof drip side finish moulding as shown in the illustration.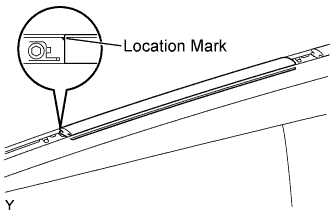
| 13. INSTALL NO. 1 ROOF DRIP SIDE FINISH MOULDING |
Engage the clip and install the No. 1 roof drip side finish moulding.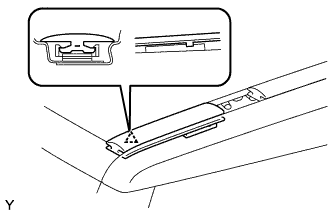
| 14. INSTALL ROOF DRIP SIDE FINISH MOULDING JOINT COVER |
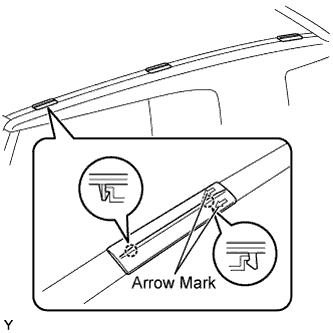 |
- HINT:
- Use the same procedure to remove all the roof drip moulding joint covers.
Engage the 2 claws and install the roof drip moulding joint cover.
- NOTICE:
- Install the roof drip moulding joint cover with the arrow mark facing forward.