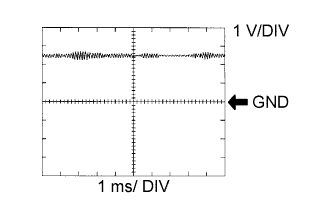
The correct waveform is as shown.
| Item | Content |
| Terminal | KNK1 - EKNK or KNK2 - EKN2 |
| Equipment Setting | 1 V/DIV 1 ms/DIV |
| Condition | Engine speed maintained at 4000 rpm after warming up engine |
DTC P0327 Knock Sensor 1 Circuit Low Input (Bank 1 or Single Sensor) |
DTC P0328 Knock Sensor 1 Circuit High Input (Bank 1 or Single Sensor) |
DTC P0332 Knock Sensor 2 Circuit Low Input (Bank 2) |
DTC P0333 Knock Sensor 2 Circuit High Input (Bank 2) |
| DTC No. | DTC Detection Condition | Trouble Area |
| P0327 P0332 | Output voltage of knock sensor less than 0.5 V for 1 second (1 trip detection logic) |
|
| P0328 P0333 | Output voltage of knock sensor more than 4.5 V for 1 second (1 trip detection logic) |
|
| Item | Content |
| Terminal | KNK1 - EKNK or KNK2 - EKN2 |
| Equipment Setting | 1 V/DIV 1 ms/DIV |
| Condition | Engine speed maintained at 4000 rpm after warming up engine |
| Related DTCs | P0327: Knock sensor (for bank 1) range check (Low voltage) P0328: Knock sensor (for bank 1) range check (High voltage) P0332: Knock sensor (for bank 2) range check (Low voltage) P0333: Knock sensor (for bank 2) range check (High voltage) |
| Required Sensors/Components (Main) | Knock sensor |
| Required Sensors/Components (Related) | - |
| Frequency of Operation | Continuous |
| Duration | 1 second |
| MIL Operation | Immediate |
| Sequence of Operation | None |
| Monitor runs whenever following DTCs not present | None |
| Battery voltage | 10.5 V or more |
| Time after engine start | 5 seconds or more |
| Ignition switch | ON |
| Starter | OFF |
| Knock sensor voltage | Less than 0.5 V |
| Knock sensor voltage | More than 4.5 V |
| Techstream Display | Description |
| NORMAL |
|
| ABNORMAL |
|
| INCOMPLETE |
|
| N/A |
|
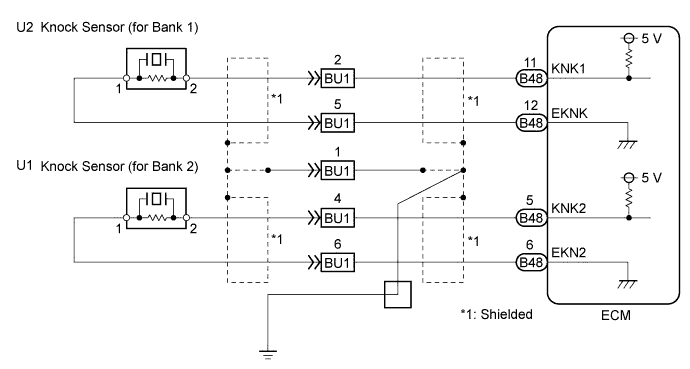
| 1.READ OUTPUT DTC (CHECK KNOCK SENSOR CIRCUIT) |
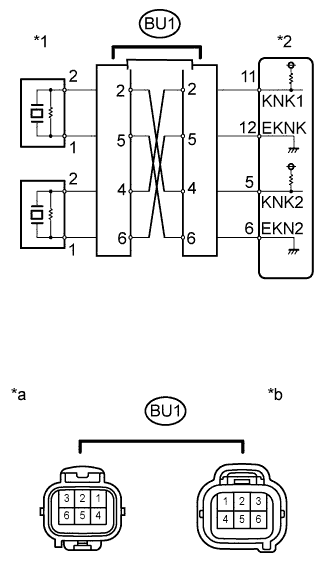 |
Disconnect the BU1 connector.
Using lead wires, connect the connectors as follows.
| Male Connector - Female Connector |
| Terminal 2 - Terminal 4 |
| Terminal 5 - Terminal 6 |
| Terminal 4 - Terminal 2 |
| Terminal 6 - Terminal 5 |
| *1 | Knock Sensor |
| *2 | ECM |
| *a | Male Connector |
| *b | Female Connector |
Warm up the engine.
Run the engine at 3000 rpm for 10 seconds or more.
Connect the Techstream to the DLC3.
Turn the ignition switch to ON and turn the Techstream on.
Enter the following menus: Powertrain / Engine and ECT / Trouble Codes.
Read DTCs.
| Result | Proceed to |
| DTCs same as when vehicle brought in P0327, P0328 → P0327, P0328 or P0332, P0333 → P0332, P0333 | A |
| DTCs different from when vehicle brought in P0327, P0328 → P0332, P0333 or P0332, P0333 → P0327, P0328 | B |
|
| ||||
| A | |
 |
| 2.CHECK HARNESS AND CONNECTOR (CONNECTOR - ECM) |
Disconnect the BU1 connector.
Disconnect the B48 ECM connector.
Measure the resistance according to the value(s) in the table below.
| Tester Connection | Condition | Specified Condition |
| 2 (BU1 female connector) - B48-11 (KNK1) | Always | Below 1 Ω |
| 5 (BU1 female connector) - B48-12 (EKNK) | Always | Below 1 Ω |
| 4 (BU1 female connector) - B48-5 (KNK2) | Always | Below 1 Ω |
| 6 (BU1 female connector) - B48-6 (EKN2) | Always | Below 1 Ω |
| 2 (BU1 female connector) or B48-11 (KNK1) - Body ground | Always | 10 kΩ or higher |
| 5 (BU1 female connector) or B48-12 (EKNK) - Body ground | Always | 10 kΩ or higher |
| 4 (BU1 female connector) or B48-5 (KNK2) - Body ground | Always | 10 kΩ or higher |
| 6 (BU1 female connector) or B48-6 (EKN2) - Body ground | Always | 10 kΩ or higher |
|
| ||||
| OK | |
|
| 3.INSPECT ECM |
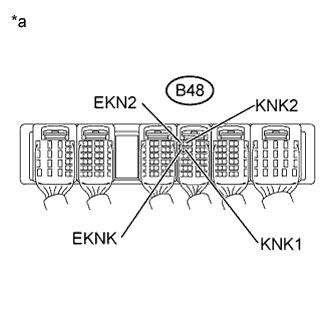 |
Turn the ignition switch to ON.
Measure the voltage according to the value(s) in the table below.
| Tester Connection | Switch Condition | Specified Condition |
| B48-11 (KNK1) - B48-12 (EKNK) | Ignition switch ON | 4.5 to 5.5 V |
| B48-5 (KNK2) - B48-6 (EKN2) | Ignition switch ON | 4.5 to 5.5 V |
| *a | Rear view of wire harness connector (to ECM) |
|
| ||||
| OK | ||
 | ||
| ||
| 4.INSPECT KNOCK SENSOR |
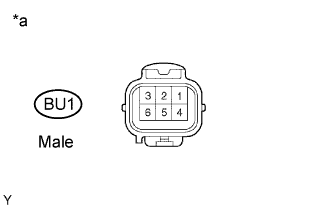 |
Disconnect the BU1 connector.
Measure the resistance according to the value(s) in the table below.
| Tester Connection | Condition | Specified Condition |
| 2 (BU1 male connector) - 5 (BU1 male connector) | 20°C (68°F) | 120 to 280 kΩ |
| 4 (BU1 male connector) - 6 (BU1 male connector) | 20°C (68°F) | 120 to 280 kΩ |
| *a | Front view of wire harness connector (to Knock Sensor wire) |
|
| ||||
| OK | ||
| ||
| ||
| 5.CHECK HARNESS AND CONNECTOR (CONNECTOR - KNOCK SENSOR) |
Disconnect the BU1 connector.
Disconnect the U2 and U1 knock sensor connectors.
Measure the resistance according to the value(s) in the table below.
| Tester Connection | Condition | Specified Condition |
| 2 (BU1 male connector) - U2-2 | Always | Below 1 Ω |
| 5 (BU1 male connector) - U2-1 | Always | Below 1 Ω |
| 4 (BU1 male connector) - U1-2 | Always | Below 1 Ω |
| 6 (BU1 male connector) - U1-1 | Always | Below 1 Ω |
| 2 (BU1 male connector) or U2-2 - Body ground | Always | 10 kΩ or higher |
| 5 (BU1 male connector) or U2-1 - Body ground | Always | 10 kΩ or higher |
| 4 (BU1 male connector) or U1-2 - Body ground | Always | 10 kΩ or higher |
| 6 (BU1 male connector) or U1-1 - Body ground | Always | 10 kΩ or higher |
|
| ||||
| OK | ||
| ||
| ||

