Home › ENGINE › 1GR-FE ENGINE CONTROL SYSTEM › SFI SYSTEM

DTC    P0451    Evaporative Emission Control System Pressure Sensor Range / Performance

DTC    P0452    Evaporative Emission Control System Pressure Sensor / Switch Low Input

DTC    P0453    Evaporative Emission Control System Pressure Sensor / Switch High Input

for Preparation Click here


DTC SUMMARY


DTC No.
Monitoring Item
Malfunction Detection Condition
Trouble Area
Detection Timing
Detection Logic
P0451
Canister pressure sensor noise
Sensor output voltage fluctuates frequently within certain time period.
  1. Canister pump module
  2. Connector/wire harness (Canister pump module - ECM)
  3. EVAP system hose (pipe from air inlet port to canister pump module, canister filter, fuel tank vent hose)
  4. ECM
  1. EVAP monitoring (ignition switch off)
  2. Engine running
2 trip
Canister pressure sensor becomes fixed/flat
Sensor output voltage does not vary within certain time period.
  1. Canister pump module
  2. Connector/wire harness (Canister pump module - ECM)
  3. EVAP system hose (pipe from air inlet port to canister pump module, canister filter, fuel tank vent hose)
  4. ECM
  1. EVAP monitoring (ignition switch off)
2 trip
P0452
Canister pressure sensor voltage low
Evap pressure less than 42.11009 kPa(abs) [315.85 mmHg(abs)] for 0.5 seconds.
  1. Canister pump module
  2. Connector/wire harness (Canister pump module - ECM)
  3. EVAP system hose (pipe from air inlet port to canister pump module, canister filter, fuel tank vent hose)
  4. ECM
  1. Ignition switch ON
  2. EVAP monitoring (ignition switch off)
1 trip
P0453
Canister pressure sensor voltage high
Evap pressure more than 123.76147 kPa(abs) [928.28 mmHg(abs)] for 0.5 seconds.
  1. Canister pump module
  2. Connector/wire harness (Canister pump module - ECM)
  3. EVAP system hose (pipe from air inlet port to canister pump module, canister filter, fuel tank vent hose)
  4. ECM
  1. Ignition switch ON
  2. EVAP monitoring (ignition switch off)
1 trip

HINT:
The canister pressure sensor is built into the canister pump module.


DESCRIPTION

The description can be found in the EVAP (Evaporative Emission) System .

MONITOR DESCRIPTION


A115543E70

  1. (a) DTC P0451: Canister pressure sensor noise or fixed/flat
    If the canister pressure sensor voltage output fluctuates rapidly for 10 seconds, the ECM stops the EVAP system monitor. The ECM interprets this as noise from the canister pressure sensor, and stops the EVAP system monitor. The ECM then illuminates the MIL and stores the DTC.
    Alternatively, if the sensor voltage output does not change for 10 seconds, the ECM interprets this as the sensor being stuck, and stops the monitor. The ECM then illuminates the MIL and stores the DTC (Both the malfunctions are detected by 2 trip detection logic).
  2. (b) DTC P0452: Canister pressure sensor voltage low
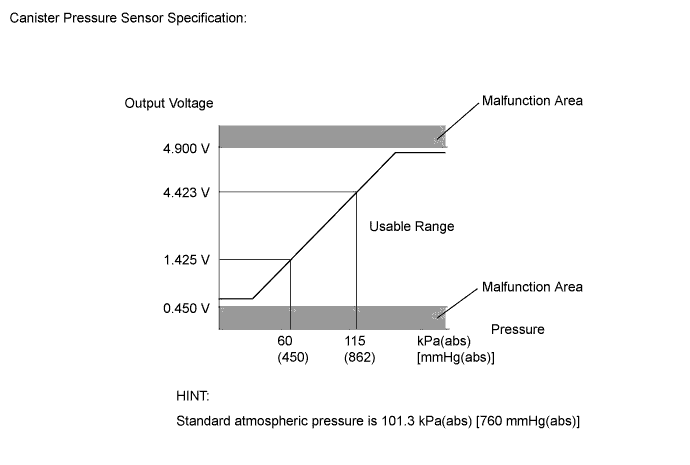
    If the canister pressure sensor voltage output [pressure] is below 0.45 V: 42.11009 kPa(abs) [315.85 mmHg(abs)], the ECM interprets this as an open or short circuit malfunction in the canister pressure sensor or its circuit, and stops the EVAP system monitor. The ECM then illuminates the MIL and stores the DTC (1 trip detection logic).
  3. (c) DTC P0453: Canister pressure sensor voltage high
    If the canister pressure sensor voltage output [pressure] is 4.9 V: 123.76147 kPa(abs) [928.28 mmHg(abs)] or more, the ECM interprets this as an open or short circuit malfunction in the canister pressure sensor or its circuit, and stops the EVAP system monitor. The ECM then illuminates the MIL and stores the DTC (1 trip detection logic).

MONITOR STRATEGY


Required Sensors/Components
Canister pump module
Frequency of Operation
Once per driving cycle: P0451 sensor fixed/flat
Continuous: P0451 sensor noise, P0452 and P0453
Duration
Within 15 seconds: P0451 sensor noise
Within 2 minutes: P0451 sensor fixed/flat
0.5 seconds: P0452 and P0453
MIL Operation
Immediate: P0452 and P0453
2 driving cycles: P0451
Sequence of Operation
None

TYPICAL ENABLING CONDITIONS


P0451 (Noise Monitor) 
Monitor runs whenever these DTCs not present
None
Atmospheric pressure (absolute pressure)
70 kPa(abs) [525 mmHg(abs)] or more, and less than 110 kPa(abs) [825 mmHg(abs)]
Battery voltage
10.5 V or more
IAT
4.4°C (40°F) or more, and less than 50°C (122°F)
Canister pressure sensor malfunction (P0452, 0453)
Not detected
Either of following conditions 1 or 2 is met
-
1. Engine condition
Running
2. Time after key off
5, 7 or 9.5 hours

P0451 (Fixed/Flat Monitor) 
Monitor runs whenever these DTCs not present
None
Battery voltage
10.5 V or more
IAT
4.4°C (40°F) or more, and less than 50°C (122°F)
Canister pressure sensor malfunction (P0452, 0453)
Not detected
Atmospheric pressure (absolute pressure)
Less than 70 kPa(abs) [525 mmHg(abs)], and 110 kPa(abs) [825 mmHg(abs)] or more
Time after key off
5, 7 or 9.5 hours

P0452 and P0453 
Monitor runs whenever these DTCs not present
None
Battery voltage
8 V or more
Starter
OFF
Either of following conditions met
(a) or (b)
(a) Ignition switch
ON
(b) Soak timer
ON

TYPICAL MALFUNCTION THRESHOLDS


P0451: Canister Pressure Sensor Noise 
Frequency that EVAP pressure change is 0.3 kPa(gauge)[2.25 mmHg(gauge)] or more
10 times or more in 10 seconds

P0451: Canister Pressure Sensor Voltage Fixed 
EVAP pressure change during reference pressure measurement
Less than 0.65 kPa(gauge) [4.87 mmHg(gauge)]

P0452: Canister Pressure Sensor Low Voltage 
EVAP pressure
Less than 42.11009 kPa(abs) [(315.85 mmHg(abs)]

P0453: Canister Pressure Sensor High Voltage 
EVAP pressure
More than 123.76147 kPa(abs) [928.28 mmHg(abs)]

CONFIRMATION DRIVING PATTERN

NOTICE:
  1. The Evaporative System Check (Automatic Mode) consists of 6 steps performed automatically by the Techstream. It takes a maximum of approximately 24 minutes.
  2. Do not perform the Evaporative System Check when the fuel tank is more than 90% full because the cut-off valve may be closed, making the fuel tank leak check unavailable.
  3. Do not run the engine during this operation.
  4. When the temperature of the fuel is 35°C (95°F) or more, a large amount of vapor forms and any check results become inaccurate. When performing the Evaporative System Check, keep the fuel temperature below 35°C (95°F).

  1. Connect the Techstream to the DLC3.
  2. Turn the ignition switch to ON and turn the Techstream on.
  3. Enter the following menus: Powertrain / Engine and ECT / Data List / Intake Air.
  4. Clear DTCs (even if no DTCs are stored, perform the clear DTC operation).
  5. Turn the ignition switch off and wait for at least 30 seconds.
  6. Turn the ignition switch to ON and turn the Techstream on.
  7. Enter the following menus: Powertrain / Engine and ECT / Utility / Evaporative System Check / Automatic Mode.
  8. After the "Evaporative System Check" is completed, check for All Readiness by entering the following menus: Powertrain / Engine and ECT / Utility / All Readiness.
  9. Input the DTC: P0451, P0452 or P0453.
  10. Check the DTC judgment result.

    Techstream Display
    Description
    NORMAL
    1. DTC judgment completed
    2. System normal
    ABNORMAL
    1. DTC judgment completed
    2. System abnormal
    INCOMPLETE
    1. DTC judgment not completed
    2. Perform driving pattern after confirming DTC enabling conditions
    N/A
    1. Unable to perform DTC judgment
    2. Number of DTCs which do not fulfill DTC preconditions has reached ECU's memory limit

    HINT:
    1. If the judgment result shows NORMAL, the system is normal.
    2. If the judgment result shows ABNORMAL, the system has a malfunction.

  11. If the judgment result is INCOMPLETE or N/A and no pending DTC is output, perform a universal trip and check for permanent DTCs (Click here).

    HINT:
    1. If a permanent DTC is output, the system is malfunctioning.
    2. If no permanent DTC is output, the system is normal.


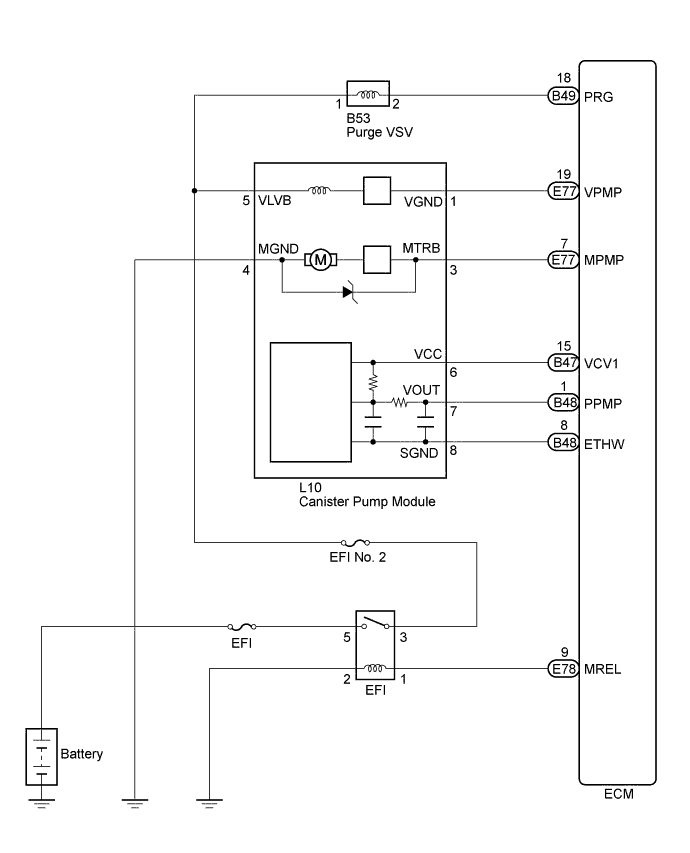
WIRING DIAGRAM


A287422E01


INSPECTION PROCEDURE

NOTICE:
  1. When a vehicle is brought into the workshop, leave it as it is. Do not change the vehicle condition. For example, do not tighten the fuel cap.
  1. Do not disassemble the canister pump module.
  1. The Techstream is required to conduct the following diagnostic troubleshooting procedure.
  2. Inspect the fuses for circuits related to this system before performing the following inspection procedure.

1.CONFIRM DTC AND EVAP PRESSURE
  1. Connect the Techstream to the DLC3.

  1. Turn the ignition switch to ON (do not start the engine).

  1. Turn the Techstream on.

  1. Enter the following menus: Powertrain / Engine and ECT / Trouble Codes.

  1. Read DTCs.

  1. Enter the following menus: Powertrain / Engine and ECT / Data List / Vapor Pressure Pump.

  1. Read the EVAP (Evaporative Emission) pressure displayed on the Techstream.

    Result 
    Result
    Test Result
    Suspected Trouble Area
    Proceed to
    P0451
    -
    Canister pressure sensor
    C
    P0452
    Less than 42.11009 kPa(abs) [(315.85 mmHg(abs)]
    1. Wire harness/connector (ECM - canister pressure sensor)
    2. Canister pressure sensor
    3. Short in ECM circuit
    A
    P0453
    More than 123.76147 kPa(abs) [928.28 mmHg(abs)]
    1. Wire harness/connector (ECM - canister pressure sensor)
    2. Canister pressure sensor
    3. Open in ECM circuit
    B


B
Go to step 4

C
GO TO EVAP SYSTEM (Click here)
A


2.CHECK HARNESS AND CONNECTOR (CANISTER PUMP MODULE - ECM)
  1. Turn the ignition switch off.

  1. Disconnect the B48 ECM connector.

  1. Measure the resistance according to the value(s) in the table below.

    Result 
    Tester Connection
    Condition
    Specified Condition
    Suspected Trouble Area
    Proceed to
    B48-1 (PPMP) - Body ground
    Always
    10 Ω or less
    1. Wire harness/connector (ECM - canister pressure sensor)
    2. Short in canister pressure sensor circuit
    A
    B48-1 (PPMP) - Body ground
    Always
    10 kΩ or more
    1. Wire harness/connector (ECM - canister pressure sensor)
    2. Short in ECM circuit
    B


B
Go to step 7
A


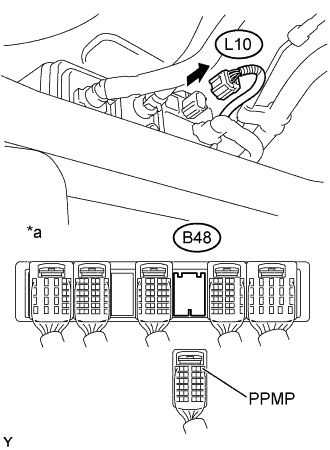
3.CHECK HARNESS AND CONNECTOR (CANISTER PUMP MODULE - ECM)
A287414E01
  1. Disconnect the canister pump module connector.

  1. Disconnect the ECM connector.

  1. Measure the resistance according to the value(s) in the table below.
    Text in Illustration 
    *a
    Rear view of wire harness connector
    (to ECM)

    Result 
    Tester Connection
    Condition
    Specified Condition
    Suspected Trouble Area
    Proceed to
    B48-1 (PPMP) - Body ground
    Always
    10 kΩ or more
    Short in canister pressure sensor circuit
    A
    B48-1 (PPMP) - Body ground
    Always
    10 Ω or less
    Short in wire harness/connector (ECM - canister pressure sensor)
    B


A
Go to step 5

B
Go to step 6

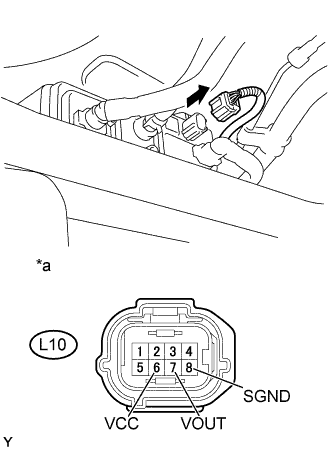
4.CHECK HARNESS AND CONNECTOR (CANISTER PUMP MODULE - ECM)
A287413E01
  1. Disconnect the canister pump module connector.

  1. Measure the resistance according to the value(s) in the table below.

    Standard Resistance:
    Tester Connection
    Condition
    Specified Condition
    L10-8 (SGND) - Body ground
    Always
    100 Ω or less

  1. Turn the ignition switch to ON.

  1. Measure the voltage according to the value(s) in the table below.

    Standard Voltage:
    Tester Connection
    Switch Condition
    Specified Condition
    L10-6 (VCC) - Body ground
    Ignition switch ON
    4.5 V to 5.5 V
    L10-7 (VOUT) - Body ground
    Ignition switch ON
    4.5 V to 5.5 V

    Text in Illustration 
    *a
    Front view of wire harness connector
    (to Canister Pump Module)

    Result 
    Result
    Suspected Trouble Area
    Proceed to
    Voltage and resistance within standard ranges
    Open in canister pressure sensor circuit
    A
    Voltage and resistance outside standard ranges
    Open in wire harness/connector (ECM - canister pressure sensor)
    B


B
Go to step 6
A


5.REPLACE CANISTER


  1. Replace the canister (Click here).


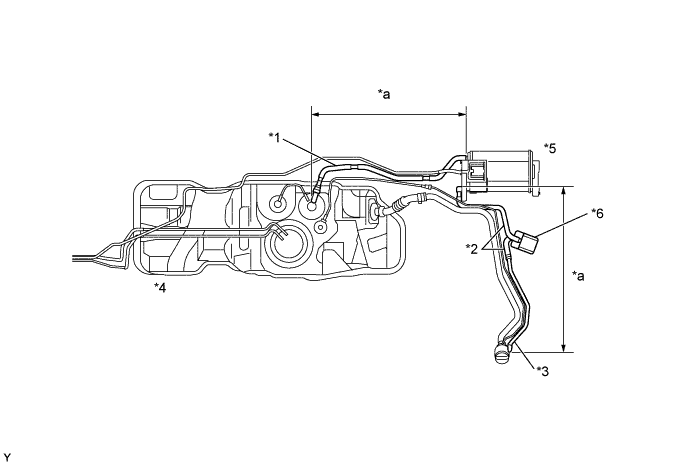
    A287411E01


    Text in Illustration 
    *1
    Fuel Tank Vent Hose
    *2
    Vent Hose
    *3
    Air Inlet Port
    *4
    Fuel Tank
    *5
    Canister
    *6
    Canister Filter
    *a
    Inspection Area
    (check for disconnection and/or cracks)
    -
    -

    NOTICE:
    1. When replacing the canister, check the canister pump module interior and related pipes for water, fuel or other liquids. If liquids are present, check for disconnections and/or cracks in the following: 1) the pipe from the air inlet port to the canister pump module; 2) the canister filter; and 3) the fuel tank vent hose.
    2. Check for filter blockage in the canister filter. If the canister filter has blockages, replace the canister filter.


NEXT
Go to step 8

6.REPAIR OR REPLACE HARNESS OR CONNECTOR (CANISTER PUMP MODULE - ECM)

HINT:
If the exhaust tail pipe has been removed, go to the next step before reinstalling it.


NEXT
Go to step 8

7.REPLACE ECM
  1. Replace the ECM (Click here).


NEXT


8.CHECK WHETHER DTC OUTPUT RECURS (AFTER REPAIR)
  1. Connect the Techstream to the DLC3.

  1. Turn the ignition switch to ON.

  1. Turn the Techstream on.

  1. Clear the DTCs (Click here).

  1. Turn the ignition switch off and wait for at least 30 seconds.

  1. Turn the ignition switch to ON and turn the Techstream on.

  1. Start the engine and warm it up.

  1. Drive the vehicle in accordance with the driving pattern described in Confirmation Driving Pattern.

  1. Enter the following menus: Powertrain / Engine and ECT / Utility / All Readiness.

  1. Input the DTC: P0451, P0452 or P0453.

  1. Check the DTC judgment result.

    Result 
    Techstream Display
    Description
    NORMAL
    1. DTC judgment completed
    2. System normal
    ABNORMAL
    1. DTC judgment completed
    2. System abnormal
    INCOMPLETE
    1. DTC judgment not completed
    2. Perform driving pattern after confirming DTC enabling conditions
    N/A
    1. Unable to perform DTC judgment
    2. Number of DTCs which do not fulfill DTC preconditions has reached ECU's memory limit


NEXT

END