DTC P0617 Starter Relay Circuit High |
| DTC No. | DTC Detection Condition | Trouble Area |
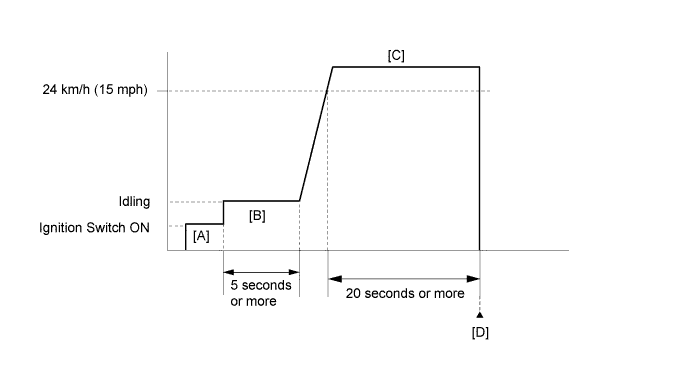
| P0617 | When conditions (a), (b) and (c) met for 20 seconds (1 trip detection logic).
|
|
| Related DTCs | P0617: Starter signal |
| Required Sensors/Components (Main) | STA relay, Park/neutral position sensor switch, Clutch start switch, Clutch start cancel switch, Ignition switch |
| Required Sensors/Components (Related) | Vehicle speed sensor, Crankshaft position sensor |
| Frequency of Operation | Continuous |
| Duration | 20 seconds |
| MIL Operation | Immediate |
| Sequence of Operation | None |
| Monitor runs whenever following DTCs not present | None |
| Battery voltage | 10.5 V or more |
| Vehicle speed | 20 km/h (12.43 mph) or more |
| Engine speed | 1000 rpm or more |
| Starter signal | ON |
| Techstream Display | Description |
| NORMAL |
|
| ABNORMAL |
|
| INCOMPLETE |
|
| N/A |
|
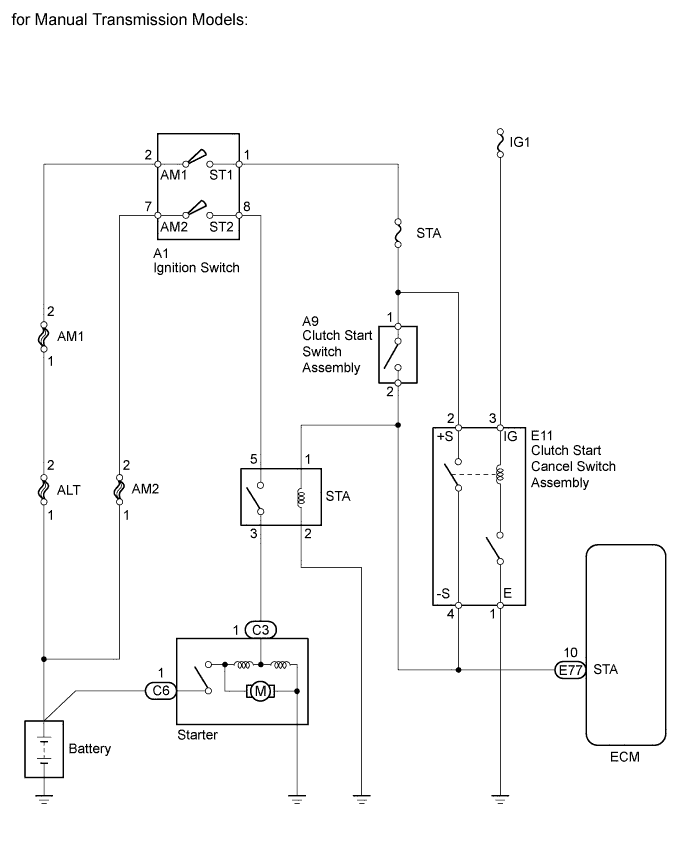
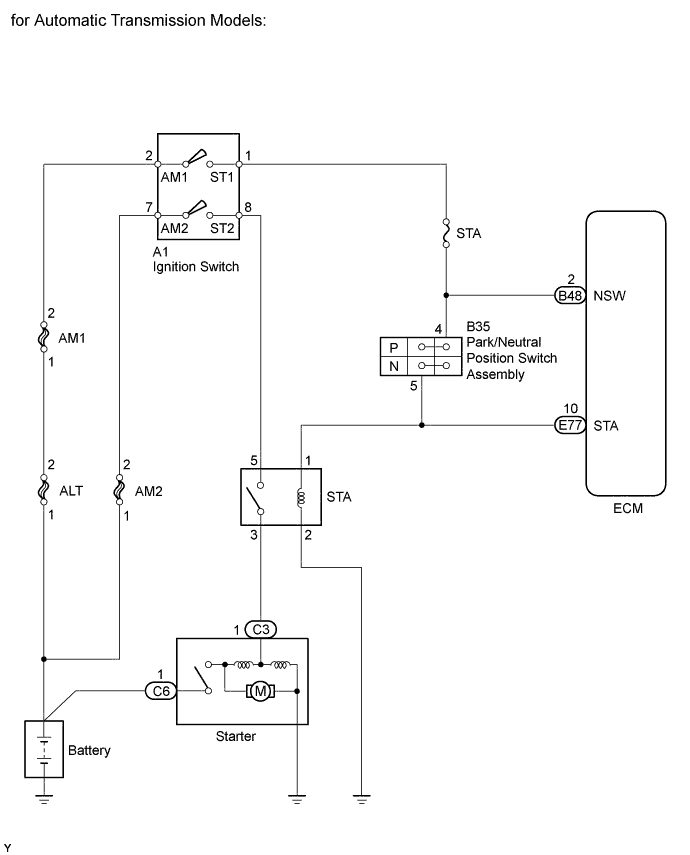
| 1.READ VALUE USING TECHSTREAM (STARTER SIGNAL) |
Connect the Techstream to the DLC3.
Turn the ignition switch to ON.
Turn the Techstream on.
Enter the following menus: Powertrain / Engine and ECT / Data List / Starter Signal.
Check the value displayed on the Techstream when the ignition switch is turned to ON and START.
| Ignition Switch Position | Starter Signal |
| ON | OFF |
| START | ON |
| Result | Proceed to |
| OK | A |
| NG (A/T models) | B |
| NG (M/T models) | C |
|
| ||||
|
| ||||
| A | ||
 | ||
| ||
| 2.READ VALUE USING TECHSTREAM (STARTER SIGNAL) |
Disconnect the Park/Neutral Position (PNP) switch connector.
Connect the Techstream to the DLC3.
Turn the ignition switch to ON.
Turn the Techstream on.
Enter the following menus: Powertrain / Engine and ECT / Data List / Starter Signal.
Check the value displayed on the Techstream when the ignition switch is turned to ON.
| Starter Signal | Proceed to |
| ON | A |
| OFF | B |
|
| ||||
| A | |
 |
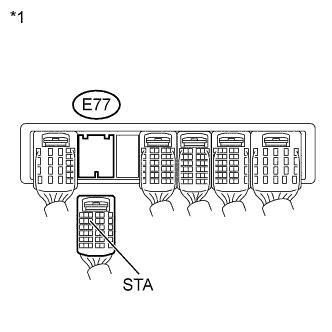
| 3.INSPECT ECM (STA TERMINAL VOLTAGE) |
 |
Disconnect the Park/Neutral Position (PNP) switch connector.
Disconnect the ECM connector.
Turn the ignition switch to ON.
Measure the voltage according to the value(s) in the table below.
| *1 | Rear view of wire harness connector (to ECM) |
| Tester Connection | Switch Condition | Specified Condition | Proceed to |
| E77-10 (STA) - Body ground | Ignition switch ON | 11 to 14 V | A |
| Below 1.5 V | B |
|
| ||||
| A | ||
| ||
| ||
| 4.INSPECT PARK/NEUTRAL POSITION SWITCH |
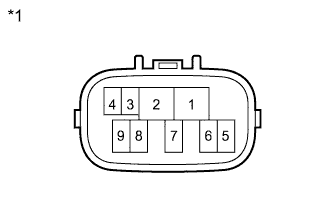 |
Disconnect the Park/Neutral Position (PNP) switch assembly connector.
Measure the resistance according to the value(s) in the table below.
| Tester Connection | Switch Condition | Specified Condition |
| 4 - 5 | Shift lever position except P or N | 10 kΩ or higher |
| 2 - 5 | All shift lever positions (P, R, N, D and S) | 10 kΩ or higher |
| *1 | Component without harness connected (PNP Switch Assembly) |
| Result | Proceed to |
| Short between 4 and 5 | A |
| Short between 2 and 5 | B |
| Within standard range | C |
|
| ||||
|
| ||||
| A | |
|
| 5.REPLACE PARK/NEUTRAL POSITION SWITCH ASSEMBLY |
Replace the park/neutral position switch assembly.
| NEXT | |
|
| 6.INSPECT IGNITION SWITCH ASSEMBLY |
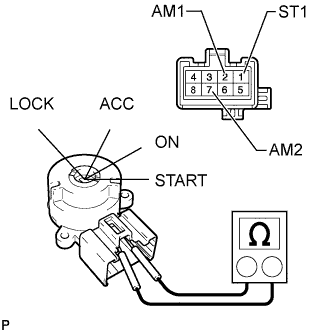 |
Remove the ignition switch assembly (Click here).
Measure the resistance according to the value(s) in the table below.
| Tester Connection | Switch Condition | Specified Condition |
| 1 (ST1) - 2 (AM1) | Ignition switch ON | 10 kΩ or higher |
| 1 (ST1) - 7 (AM2) | Ignition switch ON | 10 kΩ or higher |
|
| ||||
| OK | |
|
| 7.INSPECT ECM (NSW TERMINAL VOLTAGE) |
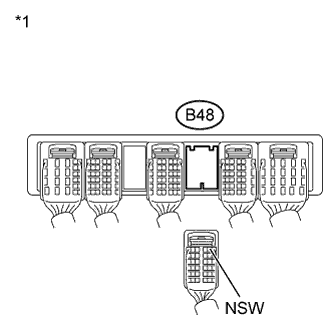 |
Disconnect the ECM connector.
Turn the ignition switch to ON.
Measure the voltage according to the value(s) in the table below.
| *1 | Rear view of wire harness connector (to ECM) |
| Tester Connection | Switch Condition | Specified Condition | Proceed to |
| B48-2 (NSW) - Body ground | Ignition switch ON | 11 to 14 V | A |
| Below 1.5 V | B |
|
| ||||
| A | ||
| ||
| ||
| 8.READ VALUE USING TECHSTREAM (STARTER SIGNAL) |
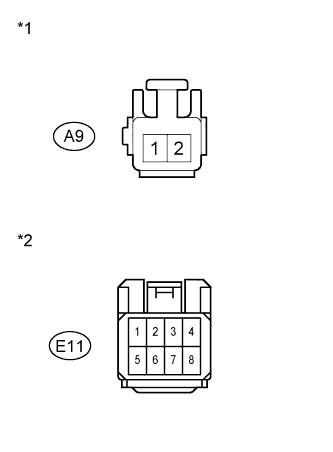 |
Disconnect the clutch start switch connector.
Disconnect the clutch start cancel switch connector.
Connect the Techstream to the DLC3.
Turn the ignition switch to ON.
Turn the Techstream on.
Enter the following menus: Powertrain / Engine and ECT / Data List / Starter Signal.
Check the value displayed on the Techstream when the ignition switch is turned to ON.
| *1 | Front view of wire harness connector (to Clutch Start Switch) |
| *2 | Front view of wire harness connector (to Clutch Start Cancel Switch) |
| Starter Signal | Proceed to |
| ON | A |
| OFF | B |
|
| ||||
| A | |
|
| 9.INSPECT ECM (STA TERMINAL VOLTAGE) |
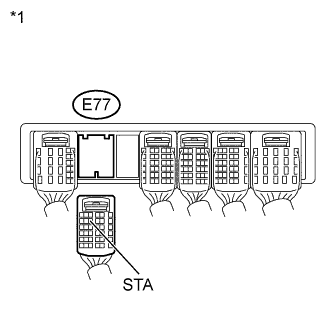 |
Disconnect the clutch start switch connector.
Disconnect the clutch start cancel switch connector.
Disconnect the ECM connector.
Turn the ignition switch to ON.
Measure the voltage according to the value(s) in the table below.
| *1 | Rear view of wire harness connector (to ECM) |
| Tester Connection | Switch Condition | Specified Condition | Proceed to |
| E77-10 (STA) - Body ground | Ignition switch ON | 11 to 14 V | A |
| Below 1.5 V | B |
|
| ||||
| A | ||
| ||
| ||
| 10.INSPECT CLUTCH START SWITCH ASSEMBLY |
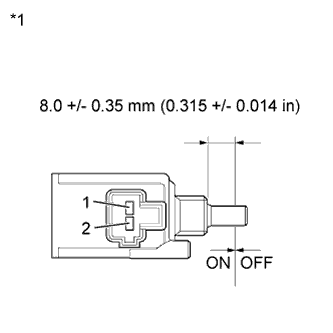 |
Disconnect the clutch start switch connectors.
Measure the resistance according to the value(s) in the table below.
| Tester Connection | Switch Condition | Specified Condition |
| 1 - 2 | OFF (free) | 10 kΩ or higher |
| *1 | Component without harness connected (Clutch Start Switch Assembly) |
| Result | Proceed to |
| Outside standard range | A |
| Within standard range | B |
|
| ||||
| A | |
|
| 11.REPLACE CLUTCH START SWITCH ASSEMBLY |
Replace the clutch start switch assembly (Click here).
| NEXT | |
|
| 12.INSPECT CLUTCH START CANCEL SWITCH ASSEMBLY |
Inspect the clutch start cancel switch assembly (Click here).
| Result | Proceed To |
| Outside standard range | A |
| Within standard range | B |
|
| ||||
| A | |
|
| 13.REPLACE CLUTCH START CANCEL SWITCH ASSEMBLY |
Replace the clutch start cancel switch assembly.
| NEXT | |
|
| 14.INSPECT IGNITION SWITCH ASSEMBLY |
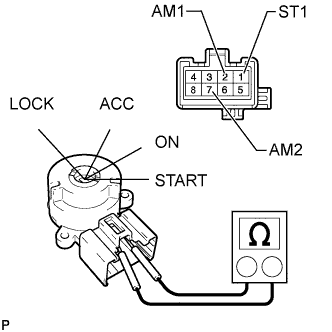 |
Remove the ignition switch assembly (Click here).
Measure the resistance according to the value(s) in the table below.
| Tester Connection | Switch Condition | Specified Condition |
| 1 (ST1) - 2 (AM1) | Ignition switch ON | 10 kΩ or higher |
| 1 (ST1) - 7 (AM2) | Ignition switch ON | 10 kΩ or higher |
|
| ||||
| OK | ||
| ||
| ||

