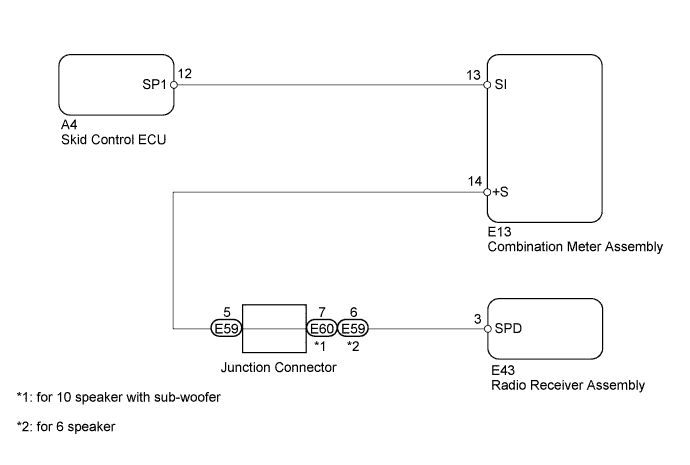
AUDIO AND VISUAL SYSTEM > Vehicle Speed Signal Circuit between Radio Receiver and Combination Meter |
| 1.INSPECT COMBINATION METER ASSEMBLY (OUTPUT WAVEFORM) |
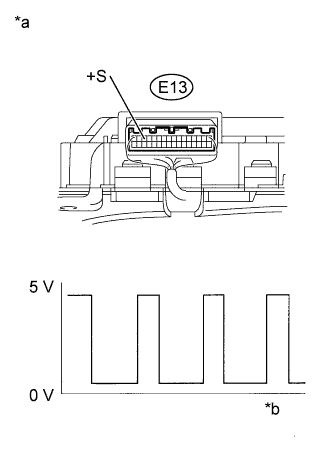 |
Check the output waveform.
Remove the combination meter assembly with the connector still connected (Click here).
Connect an oscilloscope to terminal E13-14 (+S) and body ground.
Turn the ignition switch ON.
Turn the wheel slowly.
Check the signal waveform according to the condition(s) in the table below.
| Item | Condition |
| Measurement terminal | E13-14 (+S) - Body ground |
| Tool setting | 5 V/DIV., 20 ms./DIV. |
| Vehicle condition | Driving at approx. 20 km/h (12 mph) |
| *a | Component with harness connected (Combination Meter Assembly) |
| *b | Turn wheel |
|
| ||||
| OK | |
 |
| 2.CHECK HARNESS AND CONNECTOR (RADIO RECEIVER ASSEMBLY - JUNCTION CONNECTOR) |
Disconnect the E43 radio receiver assembly and E59*1 or E60*2 junction connectors.
*1: for 10 speaker with sub-woofer
*2: for 6 speaker
Measure the resistance according to the value(s) in the table below.
| Tester Connection | Condition | Specified Condition |
| E43-3 (SPD) - E60-7 | Always | Below 1 Ω |
| Tester Connection | Condition | Specified Condition |
| E43-3 (SPD) - E59-6 | Always | Below 1 Ω |
|
| ||||
| OK | |
|
| 3.CHECK HARNESS AND CONNECTOR (JUNCTION CONNECTOR - COMBINATION METER ASSEMBLY) |
Disconnect the E59 junction connector and E13 combination meter connectors.
Measure the resistance according to the value(s) in the table below.
| Tester Connection | Condition | Specified Condition |
| E59-5 (SPD) - E13-14 (+S) | Always | Below 1 Ω |
|
| ||||
| OK | ||
 | ||
| ||
