INSTALLATION
Removal / installation · Vehicles built from Oct 2014
| 1. INSTALL TIMING GEAR CASE OR TIMING CHAIN CASE OIL SEAL |

Apply a bit of MP grease to a new oil seal's lip.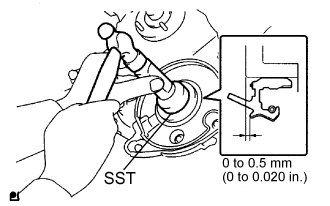

- NOTICE:
- Keep the lip clean. Do not bring dirt and dust on that area.
Using SST and a hammer, fit the oil seal.
- SST
- 09223-46011
- Acceptable depth from the top flat face of the timing gear case cover:
- 0 to 0.5 mm (0 to 0.020 in.)
- NOTICE:
- Be sure to make the oil seal horizontal when embedded.
| 2. INSTALL CRANKSHAFT PULLEY |
Tighten the bolt holding the crankshaft pulley with SST.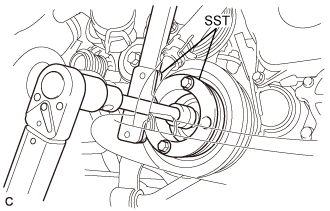
- SST
- 09213-58013
09330-00021
- Torque:
- 365 N*m{ 3,722 kgf*cm , 270 ft.*lbf }
Connect the oil pressure switching valve connector.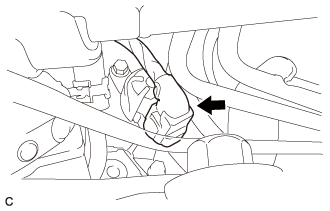
| 3. INSTALL FAN & GENERATOR V BELT |
Rotate the V-ribbed belt tensioner pulley clockwise, and then install the fan and generator V belt.
- NOTICE:
- Make sure that the fan and generator V belt is set properly on each pulley.
Check that the indicator mark of the V-ribbed belt tensioner (Click here).
| 4. INSTALL OIL COOLER OUTLET TUBE SUB-ASSEMBLY NO. 2 (for Automatic Transmission) |
Install the 2 bolts and oil cooler outlet tube sub-assembly No. 2.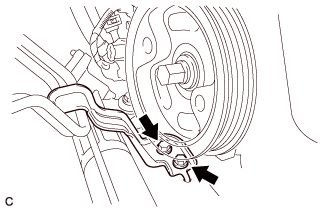
- Torque:
- 18 N*m{ 184 kgf*cm , 13 ft.*lbf }
| 5. INSTALL ENGINE SERVICE HOLE SUB COVER SUB-ASSEMBLY |
Install the engine service hole sub cover with the 5 bolts.
- Torque:
- 13 N*m{ 133 kgf*cm , 10 ft.*lbf }
| 6. INSTALL FRONT DOOR SCUFF PLATE RH |
| 7. INSTALL FRONT SEAT ASSEMBLY RH (for Hi-back Seat Type) |
| 8. INSTALL FRONT SEAT ASSEMBLY RH (for Low-back Seat Type) |
| 9. CHECK FOR ENGINE OIL LEAKS |
| 10. INSTALL ENGINE UNDER COVER NO.1 (w/ Engine Under Cover No.1) |
- Torque:
- 13 N*m{ 133 kgf*cm , 10 ft.*lbf }