INSTALLATION
Removal / installation · Vehicles built Oct 2014 – Mar 2016
Versions by build date: Oct 2014 – Mar 2016 Apr 2016 – Dec 2016 from Jan 2017
| 1. INSTALL WATER PUMP ASSEMBLY |

Install a new gasket and the water pump with the 5 bolts and 2 nuts.
- Torque:
- 13 N*m{ 133 kgf*cm , 10 ft.*lbf }
| 2. INSTALL NO. 2 TIMING BELT COVER |
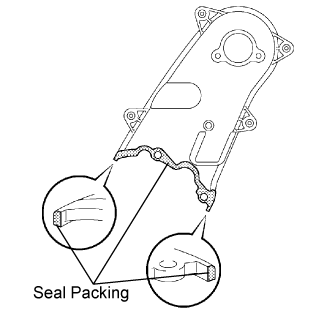  |
Apply seal packing (FIPG) to the areas shown in the illustration.
- Seal Packing:
- Toyota Genuine Seal Packing Black, Three Bond 1207B or equivalent
- NOTICE:
- After applying FIPG, install the No. 2 timing belt cover within 3 minutes and tighten the bolts and nut within 15 minutes.
Clean the bolts and their holes.
Apply adhesive to 2 or 3 threads at the end of 4 bolts.
- Adhesive:
- Toyota Genuine Adhesive 1324, Three Bond 1324 or equivalent
Install the No. 2 timing belt cover with the 4 bolts and nut.
- Torque:
- 10 N*m{ 102 kgf*cm , 7 ft.*lbf }
| 3. INSTALL CAMSHAFT TIMING PULLEY |
Install the camshaft timing pulley.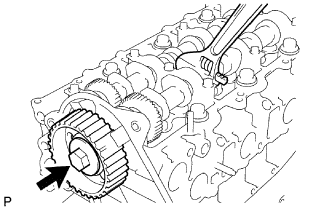
Install the bolt of the camshaft timing pulley while holding the camshaft with a wrench.
- Torque:
- 98 N*m{ 1000 kgf*cm , 72 ft.*lbf }
| 4. INSTALL NO. 1 TIMING BELT IDLER SUB-ASSEMBLY |
Using a 10 mm hexagon wrench, install a new washer and the No. 1 timing belt idler with the bolt.
- Torque:
- 35 N*m{ 357 kgf*cm , 26 ft.*lbf }
| 5. INSTALL CYLINDER HEAD COVER SUB-ASSEMBLY |
Install 4 new No. 3 cylinder head cover gaskets to the cylinder head cover as shown in the illustration.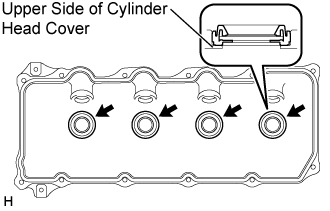
- NOTICE:
- Do not install the gaskets at an angle.
- Keep the lip of the gasket free from foreign materials.
- Do not install the gaskets at an angle.
Install a new cylinder head cover gasket to the cylinder head cover.
Remove any old seal packing (FIPG material) from the cylinder head.
Apply seal packing to the areas shown in the illustration.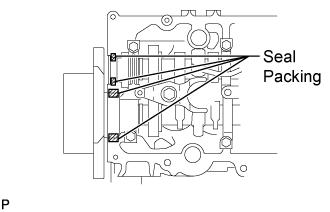
- Seal packing:
- Toyota Genuine Seal Packing Black, Three Bond 1207B or equivalent
- NOTICE:
- Remove any oil from the contact surface.
- Install the head cover within 3 minutes after applying seal packing.
- Do not start the engine for at least 2 hours after installing the cylinder head cover.
- Remove any oil from the contact surface.
Temporarily install the cylinder head cover with the 10 bolts and 2 nuts in the order shown in the illustration. Then, tighten the 10 bolts and 2 nuts in the order shown in the illustration in 2 progressive steps.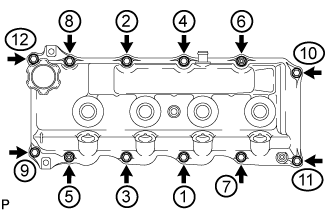
- Torque:
- 9.0 N*m{ 92 kgf*cm , 80 in.*lbf }
Connect the ventilation hose.
Install 4 new nozzle holder seals.
| 6. INSTALL NO. 1 CYLINDER HEAD COVER SILENCER (w/ DPF) |
Install the No. 1 cylinder head cover silencer to the cylinder head cover.
| 7. INSTALL NO. 1 INTAKE MANIFOLD INSULATOR (w/ DPF) |
| 8. INSTALL COMMON RAIL ASSEMBLY (w/ DPF) |
Install the common rail with the 2 bolts.
- Torque:
- 38 N*m{ 387 kgf*cm , 28 ft.*lbf }
| 9. INSTALL FUEL INLET PIPE SUB-ASSEMBLY (w/ DPF) |
- NOTICE:
- When replacing the fuel supply pump, common rail, cylinder block, cylinder head, cylinder head gasket or timing gear case, it is necessary to replace the fuel inlet pipe with a new one.
- Keep the fuel inlet pipe free of foreign matter.
- If a No. 1 injection pipe clamp is removed from the fuel inlet pipe, replace the No. 1 injection pipe clamp with a new one.
- When replacing the fuel supply pump, common rail, cylinder block, cylinder head, cylinder head gasket or timing gear case, it is necessary to replace the fuel inlet pipe with a new one.
Temporarily install the fuel inlet pipe with the union nuts.
Install the 2 No. 1 injection pipe clamps with the 2 bolts.
- Torque:
- 6.5 N*m{ 66 kgf*cm , 58 in.*lbf }
Using a 17 mm union nut wrench, tighten the fuel inlet pipe union nut on the common rail side.
- Torque:
- 35 N*m{ 357 kgf*cm , 26 ft.*lbf }
- NOTICE:
- Use the formula to calculate special torque values for situations where a union nut wrench is combined with a torque wrench (Click here).
Using a 17 mm union nut wrench, tighten the fuel inlet pipe union nut on the fuel supply pump side.
- Torque:
- 35 N*m{ 357 kgf*cm , 26 ft.*lbf }
- NOTICE:
- Use the formula to calculate special torque values for situations where a union nut wrench is combined with a torque wrench (Click here).
| 10. CONNECT NO. 5 WATER BY-PASS HOSE (w/ DPF) |
| 11. INSTALL VACUUM CONTROL VALVE SET (w/ DPF) |
Install the vacuum control valve set with the bolt.
- Torque:
- 20 N*m{ 204 kgf*cm , 15 ft.*lbf }
Connect the 2 vacuum hoses and vacuum control valve connector to the No. 3 vacuum transmitting pipe sub-assembly.
| 12. INSTALL INJECTION PIPE SUB-ASSEMBLY (w/ DPF) |
- NOTICE:
- When replacing an injector, it is necessary to replace the 4 injection pipes with new ones.
- Keep the joints of the injection pipe clean.
- When replacing an injector, it is necessary to replace the 4 injection pipes with new ones.
Temporarily install the 4 injection pipes with the union nuts.
Install the 3 No. 2 injection pipe clamps with the 3 bolts.
- Torque:
- 6.5 N*m{ 66 kgf*cm , 58 in.*lbf }
Using a 17 mm union nut wrench, tighten the injection pipe union nuts on the common rail side.
- Torque:
- 35 N*m{ 357 kgf*cm , 26 ft.*lbf }
- NOTICE:
- Use the formula to calculate special torque values for situations where a union nut wrench is combined with a torque wrench (Click here).
Using a 17 mm union nut wrench, tighten the injection pipe union nuts on the injector side.
- Torque:
- 35 N*m{ 357 kgf*cm , 26 ft.*lbf }
- NOTICE:
- Use the formula to calculate special torque values for situations where a union nut wrench is combined with a torque wrench (Click here).
| 13. CONNECT ENGINE WIRE (w/ DPF) |
Attach the 5 clamps.
Connect the 5 connectors.
Connect the ECM connector (Click here).
Attach the clamp.
Install the bolt.
- Torque:
- 9.0 N*m{ 92 kgf*cm , 80 in.*lbf }
Install the generator wire to terminal B with the nut.
- Torque:
- 9.8 N*m{ 100 kgf*cm , 87 in.*lbf }
Install the terminal cap.
Install the engine wire with the bolt.
- Torque:
- 13 N*m{ 133 kgf*cm , 10 ft.*lbf }
Connect the 4 connectors and attach the 3 clamps.
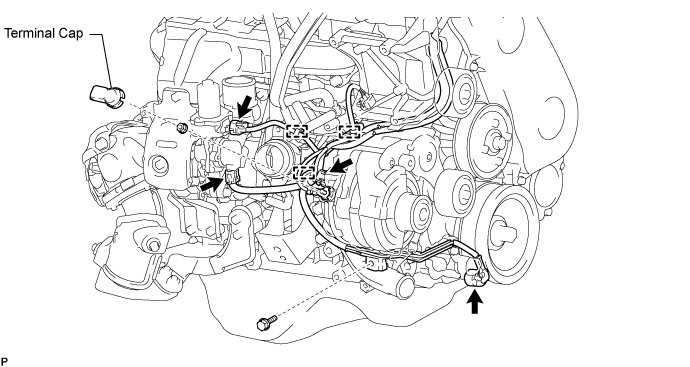
Connect the engine wire with the 7 bolts.
- Torque:
- for bolt A:
- 13 N*m{ 133 kgf*cm , 10 ft.*lbf }
- for bolt B:
- 9.0 N*m{ 92 kgf*cm , 80 in.*lbf }
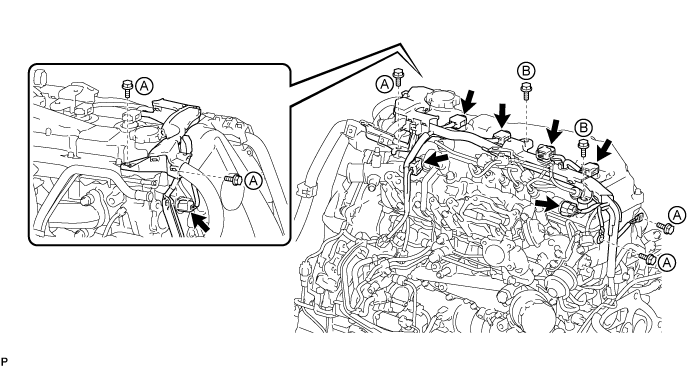
Connect the 7 connectors.
Attach the clamp and connect the engine wire to the No. 1 timing belt cover.
Connect the glow plug connector and attach the clamp.
Attach the 3 clamps and connect the water by-pass hose and oil return hose.
| 14. INSTALL DIESEL THROTTLE BODY ASSEMBLY (w/ DPF) |
| 15. INSTALL NO. 4 AIR HOSE (w/ DPF) |
Install the No. 4 air hose and tighten the 2 hose clamps.
- Torque:
- 6.0 N*m{ 61 kgf*cm , 53 in.*lbf }
| 16. INSTALL INJECTION PIPE SUB-ASSEMBLY (w/o DPF) |
- NOTICE:
- When replacing an injector, it is necessary to replace the 4 injection pipes with new ones.
- Keep the joints of the injection pipe clean.
- When replacing an injector, it is necessary to replace the 4 injection pipes with new ones.
Temporarily install the 4 injection pipes with the union nuts.
Install the 2 No. 2 injection pipe clamps with the 2 bolts.
- Torque:
- 5.0 N*m{ 51 kgf*cm , 44 in.*lbf }
Using a 17 mm union nut wrench, tighten the injection pipe union nuts on the common rail side.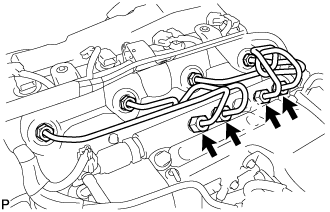
- Torque:
- 35 N*m{ 357 kgf*cm , 26 ft.*lbf }
- NOTICE:
- Use the formula to calculate special torque values for situations where a union nut wrench is combined with a torque wrench (Click here).
Using a 17 mm union nut wrench, tighten the injection pipe union nuts on the injector side.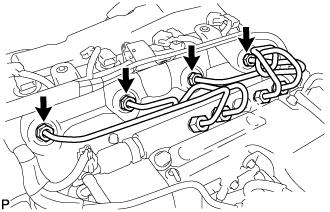
- Torque:
- 35 N*m{ 357 kgf*cm , 26 ft.*lbf }
- NOTICE:
- Use the formula to calculate special torque values for situations where a union nut wrench is combined with a torque wrench (Click here).
Attach the 3 clamps and install the wire harness with the 4 bolts.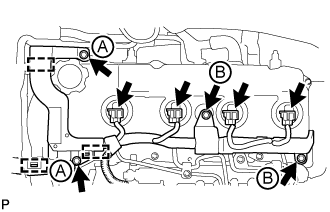
- Torque:
- for bolt A:
- 13 N*m{ 133 kgf*cm , 10 ft.*lbf }
- for bolt B:
- 9.0 N*m{ 92 kgf*cm , 80 in.*lbf }
Connect the 4 injector connectors.
| 17. INSTALL TIMING BELT |
Check that the timing marks are aligned as shown in the illustration.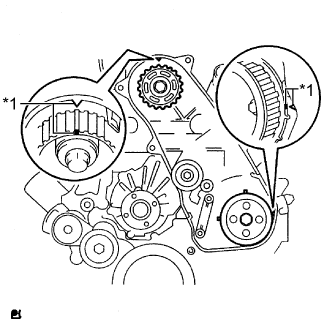
Text in Illustration *1
Timing Mark
- NOTICE:
- Make sure that the engine is cold.
- When turning the crankshaft, the valve heads will hit against the piston. Do not turn the crankshaft more than necessary.
- Make sure that the engine is cold.
- HINT:
- If reusing the timing belt, align the points marked during removal, and install the belt with the arrow pointing in the direction of crankshaft revolution.
Install the timing belt to the pump drive shaft pulley, camshaft timing pulley and No. 1 timing belt idler in sequence.
Place the tensioner upright. Then set a press on the top of the tensioner.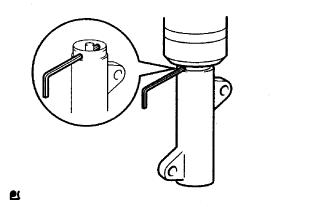
- NOTICE:
- Do not scratch or deform the rod end.
- Press in the tensioner rod.
- Protect the tip of the push rod with a cloth in order to prevent damage.
- Do not scratch or deform the rod end.
Using the press, slowly push in the push rod using 981 to 9800 N (100 to 999 kgf, 220 to 2203 lbf) of force.
- NOTICE:
- Do not apply a load of over 9800 N (999 kgf, 2203 lbf) to the push rod.
Align the holes of the push rod and housing. Then pass a 1.5 mm hexagon wrench through the holes to fix the push rod in place.
Temporarily install the timing belt tensioner with the 2 bolts while pushing the idler pulley toward the timing belt.
Tighten the 2 bolts.
- Torque:
- 13 N*m{ 133 kgf*cm , 10 ft.*lbf }
- NOTICE:
- Uniformly tighten the 2 bolts.
Remove the 1.5 mm hexagon wrench from the tensioner.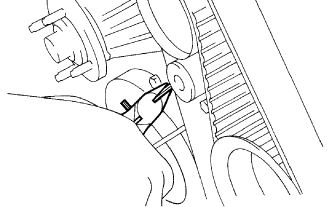
Turn the crankshaft clockwise 720° and check that the timing marks are aligned as shown in the illustration.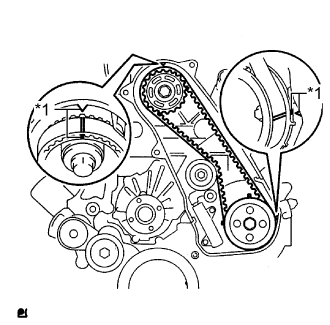
Text in Illustration *1
Timing Mark
| 18. INSTALL NO. 1 TIMING BELT COVER |
Install the timing belt cover and 6 washers with the 6 bolts.
- Torque:
- 6.0 N*m{ 61 kgf*cm , 53 in.*lbf }
Install the wire harness clamp.
| 19. INSTALL V-RIBBED BELT TENSIONER ASSEMBLY |
Temporarily install the V-ribbed belt tensioner with the 4 bolts.
Tighten the 4 bolts.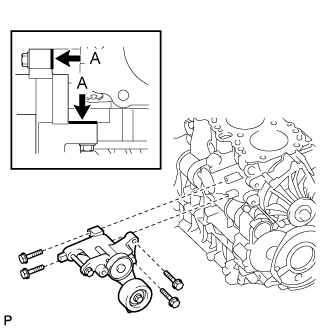
- Torque:
- 21 N*m{ 214 kgf*cm , 15 ft.*lbf }
- HINT:
- Firmly press and hold the V-ribbed belt tensioner against the cylinder block to eliminate any gaps in the areas labeled A in the illustration. Then uniformly tighten the 4 bolts.
| 20. INSTALL GENERATOR ASSEMBLY |
Install the generator with the bolt.
- Torque:
- 62 N*m{ 632 kgf*cm , 46 ft.*lbf }
Install the generator wire to terminal B with the nut.
- Torque:
- 9.8 N*m{ 100 kgf*cm , 87 in.*lbf }
Install the terminal cap.
Connect the generator connector.
| 21. INSTALL GENERATOR BRACKET |
Install the generator bracket with the 2 bolts.
- Torque:
- 36 N*m{ 367 kgf*cm , 27 ft.*lbf }
| 22. INSTALL NO. 2 IDLE PULLEY ASSEMBLY (w/ Air Conditioning System) |
Install the No. 2 idle pulley assembly and washer with the bolt.
- Torque:
- 45 N*m{ 459 kgf*cm , 33 ft.*lbf }
| 23. INSTALL NO. 1 COMPRESSOR MOUNTING BRACKET (w/ Air Conditioning System) |
Temporarily install the No. 1 compressor mounting bracket with the 4 bolts.
Tighten the 4 bolts in the order shown in the illustration.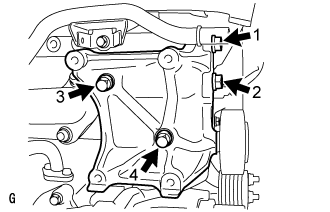
- Torque:
- 45 N*m{ 459 kgf*cm , 33 ft.*lbf }
- HINT:
- Make sure that the No. 1 compressor mounting bracket is in contact with the cylinder block.
| 24. INSTALL COMPRESSOR AND MAGNETIC CLUTCH (w/ Air Conditioning System) |
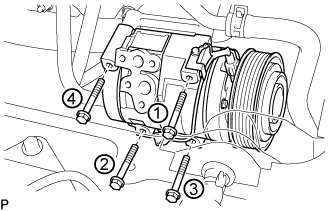 |
Provisionally tighten the compressor and magnetic clutch with the 4 bolts.
Tighten the compressor and magnetic clutch with the 4 bolts.
- Torque:
- 25 N*m{ 255 kgf*cm , 18 ft.*lbf }
- NOTICE:
- Tighten the bolts in the order shown in the illustration to install the compressor and magnetic clutch.
| 25. CONNECT NO. 1 COOLER REFRIGERANT SUCTION HOSE (w/ Air Conditioning System) |
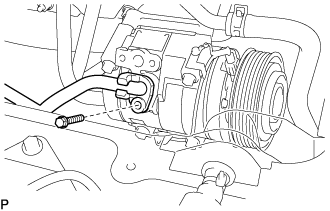 |
Remove the attached vinyl tape from the hose.
Apply sufficient compressor oil (ND-OIL 8) to a new O-ring and the fitting surface of the compressor and magnetic clutch.
- Compressor oil:
- ND-OIL 8 or equivalent
Install the O-ring onto the cooler refrigerant suction hose.
Install the cooler refrigerant suction hose onto the compressor and magnetic clutch with the bolt.
- Torque:
- 9.8 N*m{ 100 kgf*cm , 87 in.*lbf }
| 26. CONNECT NO. 1 COOLER REFRIGERANT DISCHARGE HOSE (w/ Air Conditioning System) |
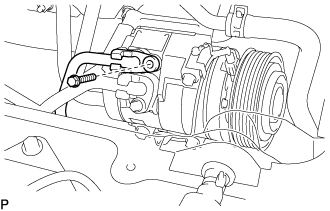 |
Remove the attached vinyl tape from the hose.
Apply sufficient compressor oil (ND-OIL 8) to a new O-ring and the fitting surface of the compressor and magnetic clutch.
- Compressor oil:
- ND-OIL 8 or equivalent
Install the O-ring onto the cooler refrigerant discharge hose.
Install the cooler refrigerant discharge hose onto the compressor and magnetic clutch with the bolt.
- Torque:
- 9.8 N*m{ 100 kgf*cm , 87 in.*lbf }
| 27. INSTALL COMPRESSOR OUTLET ELBOW |
Install the compressor outlet elbow with the 2 hose clamps and bolt.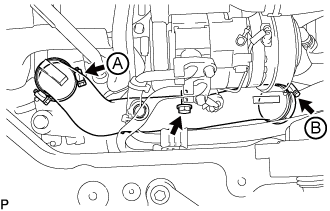
- Torque:
- for bolt:
- 12 N*m{ 122 kgf*cm , 9 ft.*lbf }
- for hose clamp A:
- 6.5 N*m{ 66 kgf*cm , 58 in.*lbf }
- for hose clamp B:
- 6.0 N*m{ 61 kgf*cm , 53 in.*lbf }
| 28. INSTALL AIR TUBE ASSEMBLY |
Install the air tube assembly and No. 1 air cleaner hose with the 2 bolts.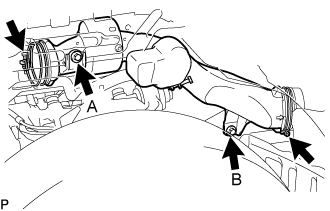
- Torque:
- for bolt A:
- 7.0 N*m{ 71 kgf*cm , 62 in.*lbf }
- for bolt B:
- 18 N*m{ 184 kgf*cm , 13 ft.*lbf }
Tighten the 2 hose clamps.
| 29. CONNECT NO. 1 AIR CLEANER HOSE |
Connect the No. 1 air cleaner hose to the compressor inlet elbow.
- NOTICE:
- Pull the hose to make sure that it is locked and securely connected.
| 30. TEMPORARILY INSTALL FAN PULLEY |
Temporarily install the fan pulley with the 4 nuts.
| 31. INSTALL FAN AND GENERATOR V BELT |
Rotate the V-ribbed belt tensioner pulley clockwise, and then install the fan and generator V belt.
- NOTICE:
- Make sure that the fan and generator V belt is set properly on each pulley.
Check that the indicator mark of the V-ribbed belt tensioner (Click here).
| 32. TIGHTEN FAN PULLEY |
Tighten the 4 nuts and install the fan pulley.
- Torque:
- 23 N*m{ 235 kgf*cm , 17 ft.*lbf }
| 33. CONNECT VANE PUMP OIL RESERVOIR ASSEMBLY |
Connect the vane pump oil reservoir with the 2 bolts.
- Torque:
- 8.0 N*m{ 82 kgf*cm , 71 in.*lbf }
| 34. INSTALL NO. 1 RADIATOR HOSE |
| 35. CONNECT CABLE TO NEGATIVE BATTERY TERMINAL |
| 36. ADD ENGINE COOLANT |
Firmly tighten the drain plugs.
Fill the radiator reservoir assembly with engine coolant to the top of the inlet.
- Standard Capacity:
Item
Specified Condition
w/o Heater
13.2 liters (13.9 US qts, 11.6 Imp. qts)
w/ Front Heater
14.2 liters (15.0 US qts, 12.5 Imp. qts)
w/ Front and Rear Heaters
16.2 liters (17.1 US qts, 14.3 Imp. qts)
- NOTICE:
- Do not substitute plain water for engine coolant.
- HINT:
- Use of improper coolants may damage the engine cooling system.
- Use only Toyota Super Long Life Coolant or similar high quality ethylene glycol based non-silicate, non-amine, non-nitrite, and non-borate coolant with long-life hybrid organic acid technology (coolant with long-life hybrid organic acid technology consists of a combination of low phosphates and organic acids).
- Use of improper coolants may damage the engine cooling system.
Loosen the bleeder plug of the outlet housing.
When air is bled and the engine coolant drains out, firmly tighten the bleeder plug.
- Torque:
- 8.0 N*m{ 82 kgf*cm , 71 in.*lbf }
Add engine coolant up to the B line mark in the radiator reservoir assembly and install the radiator reservoir cap sub-assembly.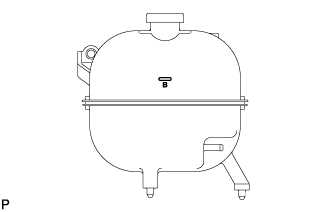
Warm up the engine until the thermostat opens.
While the thermostat is open, circulate the engine coolant for several minutes.
- HINT:
- The thermostat open timing can be confirmed by pressing the No. 3 radiator hose by hand, and checking when the engine coolant starts to flow inside the hose.
After the engine cools down, check that the engine coolant level is between the LOW and FULL level marks.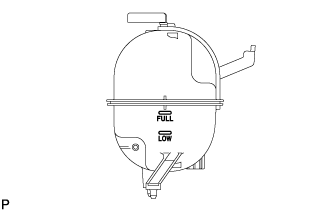
| 37. BLEED AIR FUEL LINE |
Using the hand pump mounted on the fuel filter cap, bleed air from the fuel system. Continue pumping until the pump resistance increases.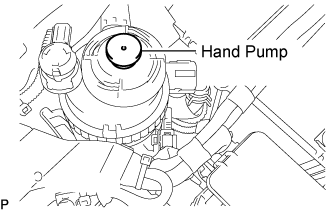
- NOTICE:
- Hand pump pumping speed: Max. 2 strokes/ sec.
- The hand pump must be pushed with a full stroke during pumping.
- When the fuel pressure at the supply pump inlet port reaches a saturated pressure, the hand pump resistance increases.
- If pumping is interrupted during the air bleeding process, fuel in the fuel line may return to the fuel tank. Continue pumping until the hand pump resistance increases.
- If the hand pump resistance does not increase despite consecutively pumping 200 times or more, there may be a fuel leak between the fuel tank and fuel filter, the hand pump may be malfunctioning, or the vehicle may have run out of fuel.
- If air bleeding using the hand pump is incomplete, the common rail pressure does not rise to the pressure range necessary for normal use, and the engine cannot be started.
- Hand pump pumping speed: Max. 2 strokes/ sec.
Check if the engine starts.
- NOTICE:
- Even if air bleeding using the hand pump has been completed, the starter may need to be cranked for 10 seconds or more to start the engine.
- Do not crank the engine continuously for more than 20 seconds. The battery may be discharged.
- Use a fully-charged battery.
- Even if air bleeding using the hand pump has been completed, the starter may need to be cranked for 10 seconds or more to start the engine.
When the engine can be started, proceed to the next step.
If the engine cannot be started, bleed air again using the hand pump until the hand pump resistance increases (refer to the procedures above). Then start the engine.
Turn the ignition switch off.
Connect the GTS to the DLC3.
Turn the ignition switch to ON and turn the GTS on.
Clear the DTCs.
- w/ DPF: (Click here)
- w/o DPF: (Click here)
- w/ DPF: (Click here)
Start the engine.*1
Enter the following menus: Powertrain / Engine and ECT / Active Test / Test the Fuel Leak.*2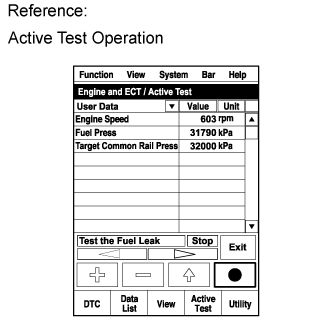
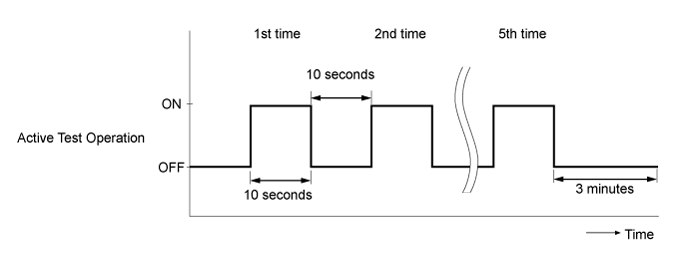
Perform the following test 5 times with on/off intervals of 10 seconds: Active Test / Test the Fuel Leak.*3
Allow the engine to idle for 3 minutes or more after performing the Active Test for the fifth time.
- HINT:
- When the Active Test "Test the Fuel Leak" is used to change the pump control mode, the actual fuel pressure inside the common rail drops below the target fuel pressure when the Active Test is off, but this is normal and does not indicate a pump malfunction.
Enter the following menus: Powertrain / Engine and ECT / DTC.
Read Current DTCs.
Clear the DTCs.
- w/ DPF: (Click here)
- w/o DPF: (Click here)
- HINT:
- It is necessary to clear the DTCs as DTC P1604 or P1605 may be stored when air is bled from the fuel system after replacing or repairing fuel system parts.
- w/ DPF: (Click here)
Repeat steps *1 to *3.
Enter the following menus: Powertrain / Engine and ECT / DTC.
Read Current DTCs.
- OK:
- No DTCs are output.
| 38. CHARGE REFRIGERANT (w/ Air Conditioning System) |
Perform vacuum purging using a vacuum pump.
Charge with refrigerant HFC-134a (R134a).
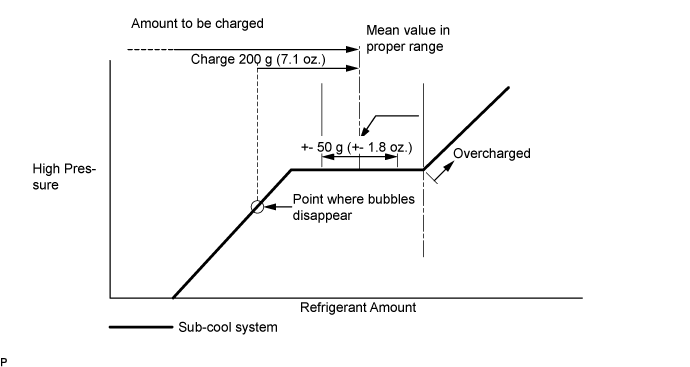
- Standard:
- Single A/C:
- 520 to 580g (18.3 to 20.5 oz.)
- Dual A/C:
- 670 to 730g (23.0 to 25.7 oz.)
- SST
- 07110-58060
(07117-58090, 07117-78050, 07117-58070, 07117-58060, 07117-58080, 07117-88060, 07117-88070, 07117-88080)
- NOTICE:
- Do not operate the cooler compressor before charging refrigerant as the cooler compressor does not work properly without any refrigerant, which causes the compressor to overheat.
- Approximately 100 g (3.5 oz.) of refrigerant may need to be charged after bubbles disappear. The refrigerant amount should be checked by quantity, and not with the sight glass.
- Do not operate the cooler compressor before charging refrigerant as the cooler compressor does not work properly without any refrigerant, which causes the compressor to overheat.
- HINT:
- Prepare a service can to recharge refrigerant if using the refrigerant gas collected with the freon collection/recycling device because the collective rate of the device is approximately 90%.
| 39. INSPECT FOR COOLANT LEAK |
- CAUTION:
- Do not remove the radiator cap while the engine and radiator are still hot. Hot, pressurized engine coolant and steam may be released and cause serious burns.
Fill the radiator with coolant and attach a radiator cap tester to the radiator.
Warm up the engine.
Using a radiator cap tester, increase the pressure inside the radiator to 137 kPa (1.4 kgf/cm2, 19.9 psi), and check that the pressure does not drop.
- HINT:
- If the pressure drops, check the hoses, radiator and water pump for leaks. If no external leaks are found, check the heater core, cylinder block and cylinder head.
| 40. INSPECT FOR FUEL LEAK |
Perform the Active Test.
Connect the GTS to the DLC3.
Turn the ignition switch to ON.
Turn the GTS on.
Enter the following menus: Powertrain / Engine and ECT / Active Test.
Perform the Active Test.
Tester Display
Test Part
Control Range
Diagnostic Notes
Test the Fuel Leak
Pressurize common rail interior and check for fuel leaks
Stop/Start
- Fuel pressure inside common rail increased to specified value and engine speed increased to 2000 rpm when Active Test is performed
- Above conditions preserved while Active Test is being performed
- Fuel pressure inside common rail increased to specified value and engine speed increased to 2000 rpm when Active Test is performed
| 41. INSPECT REFRIGERANT LEAK (w/ Air Conditioning System) |
After recharging refrigerant gas, check for leakage of refrigerant gas using a halogen leak detector.
Carry out the test under the following conditions:
- Stop the engine.
- Secure good ventilation (the gas leak detector may react to volatile gases which are not refrigerant, such as evaporated gasoline and exhaust gas).
- Repeat the test 2 or 3 times.
- Make sure that there is some refrigerant remaining in the refrigeration system.
When the compressor is off: approx. 392 to 588 kPa (4 to 6 kgf/cm2, 57 to 85 psi)
- Stop the engine.
Using a gas leak detector, check for leakage of the refrigerant line.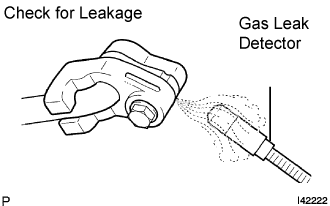
Bring the gas leak detector close to the drain hose with the detector's power off.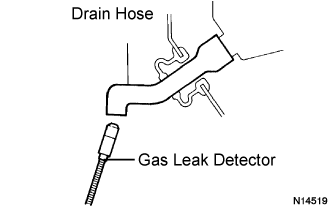
- HINT:
- After the blower motor has stopped, let the cooling unit stand for more than 15 minutes.
- Bring the gas leak detector sensor under the drain hose.
- When bringing the gas leak detector close to the drain hose, make sure that the gas leak detector does not react to volatile gases.
If such reaction is unavoidable, the vehicle must be lifted up.
- After the blower motor has stopped, let the cooling unit stand for more than 15 minutes.
If a gas leak is not detected on the drain hose, remove the blower motor control from the cooling unit. Insert the gas leak detector sensor into the unit and perform the test.
Disconnect the pressure switch connector and leave it for approximately 20 minutes. Bring the gas leak detector close to the pressure switch and perform the test.
| 42. INSTALL FENDER APRON MUDGUARD SEAL RH |
Engage the 3 clips and install the fender apron mudguard seal RH.
| 43. INSTALL NO. 2 ENGINE SERVICE HOLE COVER |
Install the No. 2 engine service hole cover with the 3 bolts.
- Torque:
- 9.0 N*m{ 92 kgf*cm , 80 in.*lbf }
Return the carpet to its original position and attach the clips.
| 44. INSTALL ENGINE SERVICE HOLE SUB COVER SUB-ASSEMBLY |
Install the engine service hole sub cover with the 5 bolts.
- Torque:
- 13 N*m{ 133 kgf*cm , 10 ft.*lbf }
| 45. INSTALL FRONT SEAT ASSEMBLY RH |
Connect the front seat inner belt assembly connector and install the front seat assembly.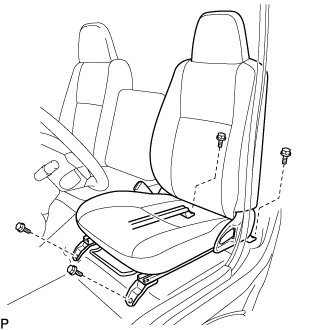
Align the front seat assembly adjuster pin with the holes in the body.
Move the front seat assembly to the rearmost position.
- NOTICE:
- Make sure that the front seat assembly is securely locked.
Temporarily tighten the 2 bolts on the front side of the front seat assembly.
Move the front seat assembly fully forward.
- NOTICE:
- Make sure that the front seat assembly is securely locked.
Temporarily tighten the 2 bolts on the rear side of the front seat assembly.
Move the front seat assembly to the rearmost position.
- NOTICE:
- Make sure that the front seat assembly is securely locked.
Fully tighten the 2 bolts on the front side of the front seat assembly in the order of outer and inner side.
- Torque:
- 39 N*m{ 398 kgf*cm , 29 ft.*lbf }
Move the front seat assembly fully forward.
- NOTICE:
- Make sure that the front seat assembly is securely locked.
Fully tighten the 2 bolts on the rear side of the front seat assembly in the order of outer and inner side.
- Torque:
- 39 N*m{ 398 kgf*cm , 29 ft.*lbf }
| 46. INSTALL FRONT DOOR SCUFF PLATE RH |
Engage the 5 clips and install the front door scuff plate RH.
| 47. INSTALL NO. 1 ENGINE UNDER COVER (for Cold Area Specification Vehicles) |
Install the No. 1 engine under cover with the 4 bolts.
- Torque:
- 13 N*m{ 133 kgf*cm , 10 ft.*lbf }