After turning the ignition switch off, waiting time may be required before disconnecting the cable from the battery terminal. Therefore, make sure to read the disconnecting the cable from the battery terminal notice before proceeding with work (Click here).
3.
DISCONNECT CABLE FROM NEGATIVE BATTERY TERMINAL
NOTICE:
When disconnecting the cable, some systems need to be initialized after the cable is reconnected (Click here).
4.
DRAIN ENGINE OIL
Remove the oil filler cap.
Remove the oil drain plug and drain the engine oil from the oil pan sub-assembly.
NOTICE:
Collect the oil in a disposable oil container.
Clean the oil pan drain plug and install it with a new gasket.
Torque:
38 N*m{
382 kgf*cm
, 28 ft.*lbf
}
5.
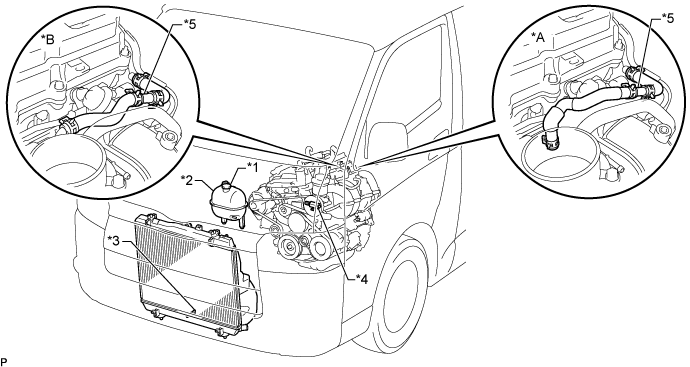
DRAIN ENGINE COOLANT
CAUTION:
Do not remove the radiator reservoir cap sub-assembly while the engine and radiator are still hot. Pressurized, hot engine coolant and steam may be released and cause serious burns.
HINT:
Collect the engine coolant in a container and dispose of it according to local regulations.
Loosen the radiator drain cock plug and drain the engine coolant.
Text in Illustration
*A
w/ Dual VVT-i
*B
w/o Dual VVT-i
*1
Radiator Reservoir Cap Sub-assembly
*2
Radiator Reservoir Assembly
*3
Radiator Drain Cock Plug
*4
Cylinder Block Water Drain Cock Plug
*5
2-Way
-
-
Remove the radiator reservoir cap sub-assembly.
Loosen the cylinder block water drain cock plug and drain the engine coolant from the engine.
Insert the blade of an oil pan seal cutter between the oil pan sub-assembly and No. 2 oil pan sub-assembly. Cut through the applied sealer and remove the No. 2 oil pan sub-assembly.
NOTICE:
Be careful not to damage the contact surfaces of the oil pan sub-assembly and No. 2 oil pan sub-assembly.
28.
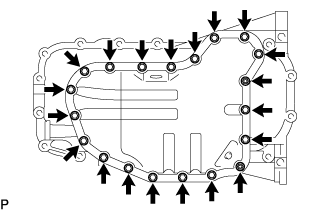
REMOVE OIL PAN SUB-ASSEMBLY
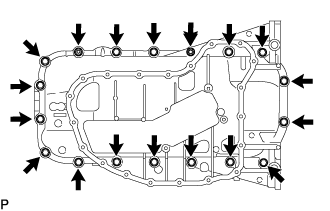
Remove the 16 bolts and 2 nuts.
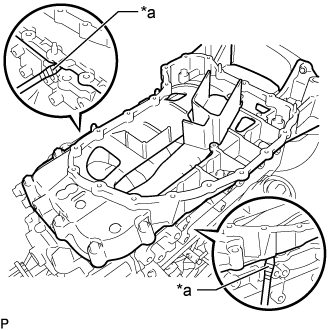
Using a screwdriver wrapped in protective tape, remove the oil pan sub-assembly by prying between the oil pan sub-assembly and cylinder block sub-assembly as shown in the illustration.
Text in Illustration
*a
Protective Tape
NOTICE:
Be careful not to damage the contact surfaces of the cylinder block sub-assembly and oil pan sub-assembly.
HINT:
Tape the screwdriver tip before use.
Remove the gasket.
29.
REMOVE WATER INLET
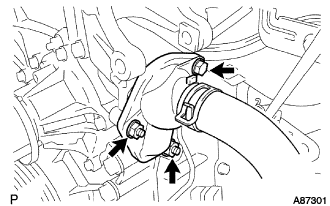
Remove the 2 nuts, bolt, water inlet and gasket.
30.
REMOVE THERMOSTAT
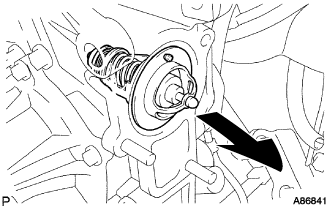
Remove the thermostat.
31.
REMOVE TIMING CHAIN OR BELT COVER SUB-ASSEMBLY
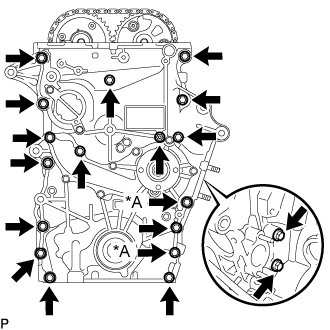
w/ Air Conditioning System: Remove the 16 bolts and nut shown in the illustration.
Text in Illustration
*A
w/o Air Conditioning System
w/o Air Conditioning System: Remove the 18 bolts and nut shown in the illustration.
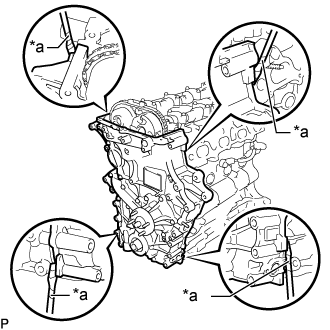
Using a screwdriver wrapped in protective tape, remove the timing chain or belt cover sub-assembly by prying the points in the illustration.
Text in Illustration
*a
Protective Tape
NOTICE:
Do not damage the surrounding parts.
HINT:
Tape the screwdriver tip before use.
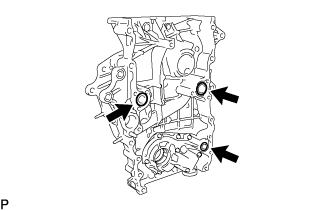
Remove the 3 O-rings from the timing chain or belt cover sub-assembly.
32.
REMOVE TIMING CHAIN CASE OIL SEAL
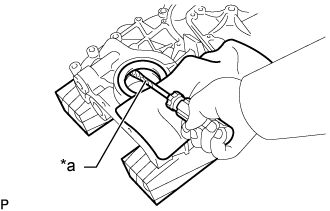
Using a screwdriver wrapped in protective tape, pry out the timing chain case oil seal from the timing chain or belt cover sub-assembly.
Text in Illustration
*a
Protective Tape
NOTICE:
Be careful not to damage the timing chain or belt cover sub-assembly.
HINT:
Tape the screwdriver tip before use.
33.
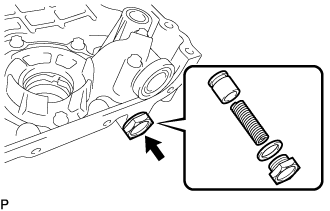
REMOVE OIL PUMP RELIEF VALVE
Using a 27 mm socket wrench, remove the oil pump relief valve plug and gasket.
Remove the oil pump relief valve spring and oil pump relief valve from the timing chain or belt cover sub-assembly.