Engine Difficult to Start or Stalling
Circuit diagnosis · Vehicles built Apr 2016 – Dec 2016
Versions by build date: Oct 2014 – Dec 2014 Jan 2015 – Mar 2016 Apr 2016 – Dec 2016 from Jan 2017
DESCRIPTION
| Faults and Symptoms of Common Rail Diesel Components |
Engine Control
Intake System Symptom and Corresponding Main Fault
- Lack of power (no black smoke) due to air filter blockage or crushed or leaking air duct
- Black smoke (no lack of power) due to leakage between the turbo and intake manifold
Data List
MAP
Turbocharger System Main fault
- Air leak in the turbocharged air passage
- ECM not operating well
- Turbocharger (turbine, bearing)
Symptoms
Lack of power (when vehicle is starting, under heavy load)
(Black smoke is not emitted when racing while vehicle is stopped)
Data List
MAP - With the ignition switch ON or during idling, MAP = atmospheric pressure (standard atmospheric pressure = 101 kPa). When the engine speed is about 1500 rpm or more, the turbocharger starts to take effect and MAP becomes higher than atmospheric pressure.
- Atmospheric pressure decreases by 1 kPa each time elevation increases by 100 m, and is also affected by the current weather conditions.
Exhaust System Main fault
Blockage
Symptoms
Lack of power (high engine speed, under heavy load)
Glow System Main fault
Open circuit, glow plug relay fault
Symptoms
Difficult to start, rough idle, knocking, white smoke (when cold)
Data List
Check the glow plug indicator light
Diagnostic Point
Measure the resistance of the glow plug
Battery Main fault
Battery is depleted
Symptoms
Difficult to start (cannot crank, crank speed is low), horn is quiet
Data List
Battery Voltage
When cranking, battery voltage is below 5 V.
Engine - 1 Main fault
Damaged, seized up
Symptoms
Cannot crank, crank speed is low, strange noise
Engine - 2 Main fault
Loss of compression
Symptoms
Rough idle (lack of power always)
Data List
Injection Feedback Val - When an Injector Feedback Val is more than 3 mm3/st, there may be a malfunction in the corresponding cylinder.
Start System Main fault
Starter system malfunction
Symptoms
Difficult to start
Data List
Starter Signal - Ignition switch (STA) output:
ON: Starter is operating
OFF: Starter is not operating
- Lack of power (no black smoke) due to air filter blockage or crushed or leaking air duct
Diesel Injection
Fuel Supply Pump Main fault
-
Symptoms
Difficult to start, engine stalling, rough idle, lack of power
Data List
Common Rail Pressure, Target Common Rail Pressure - Common Rail Pressure is within 5000 kPa of Target Common Rail Pressure during idling with the engine warmed up (engine coolant temperature is higher than 70°C (158°F)).
- If the fuel pressure is 20000 kPa below the target pressure, then a lack of power will be felt.
- If the fuel pressure is below 25000 kPa, then idling will be rough.
- HINT:
- The fuel pressure changes at engine start, but is approx. 25000 kPa at engine start after the engine is warmed up.
Diagnostic Trouble Code
Even if Common Rail Pressure is below Target Common Rail Pressure, a DTC will not be stored.
Fuel Filter Main fault
Blockage
Symptoms
Difficult to start, engine stalling, rough idle, lack of power
Data List
Common Rail Pressure, Target Common Rail Pressure - Common Rail Pressure is within 5000 kPa of Target Common Rail Pressure during idling with the engine warmed up (engine coolant temperature is higher than 70°C (158°F)).
- If the fuel pressure is 20000 kPa below the target pressure, then a lack of power will be felt.
- If the fuel pressure is below 25000 kPa, then idling will be rough.
- HINT:
- The fuel pressure changes at engine start, but is approx. 25000 kPa at engine start after the engine is warmed up.
Diagnostic Trouble Code
Even if Common Rail Pressure is below Target Common Rail Pressure, a DTC will not be stored.
Injector Assembly Main fault
Blockage
Symptoms
Rough idle, lack of power, black smoke, white smoke, knocking
Data List
Injection Feedback Val - When an Injector Feedback Val is more than 3 mm3/st, there may be a malfunction in the corresponding cylinder. This value can be read after idling for 1 minute.
Injector Driver Main fault
Circuit fault: The injector assembly does not open.
Symptoms
Difficult to start, rough idle, lack of power, black smoke, white smoke, knocking
Data List
Same as injector assembly
Diagnostic Trouble Code
When the injector driver has a fault, some DTCs may be stored.
Fuel Pressure Sensor Main fault
Open circuit, decrease in performance (foreign matter is stuck)
Symptoms
Difficult to start, rough idle, engine stall, lack of power
Data List
Common Rail Pressure, Target Common Rail Pressure - Slowly raise the engine speed from idling to 3000 rpm with the vehicle stopped, and check that Common Rail Pressure follows Target Common Rail Pressure. If the fuel pressure sensor malfunctions, the actual fuel pressure may deviate from the target fuel pressure. (However, the value may not deviate even when a malfunction is present).
Diagnostic Trouble Code
When the fuel pressure sensor has a fault, some DTCs may be stored.
Irregular Fuel Main fault
-
Symptoms
Difficult to start, rough idle (especially when cold)
- Common Rail Pressure is within 5000 kPa of Target Common Rail Pressure during idling with the engine warmed up (engine coolant temperature is higher than 70°C (158°F)).
Diesel EGR
EGR System Main fault
- Does not move smoothly
- Does not close completely
Symptoms
- Rough idle
- EGR valve stuck closed: A loud turbocharger sound.
- EGR valve stuck open: Difficult to start (does not stall), black smoke, lack of power (if there is an excess in the quantity of EGR and there is a heavy load, when the vehicle starts moving, a lack of power will be felt).
- Does not move smoothly
Diesel Throttle
Diesel Throttle System Main fault
Stuck, does not move smoothly
Symptoms
- Stuck closed: Lack of power, difficult to start, rough idle, engine stall, black smoke. These may occur when stuck almost fully closed.
- Stuck open: Turbocharger sound increases. When the engine is stopped, engine vibrations may occur.
- Stuck closed: Lack of power, difficult to start, rough idle, engine stall, black smoke. These may occur when stuck almost fully closed.
| Data List Related to Starting Trouble |
- MAP
- Intake Air
- Coolant Temp
- Battery Voltage
- Starter Signal
- Target Common Rail Pressure
- Common Rail Pressure
- Injection Feedback Val #1 (to #4)
- Injection Volume
INSPECTION PROCEDURE
| Explanation of Symptom |
| Starting Trouble |
For good starting it is essential to have:
With problems such as a depleted battery, the crankshaft speed can become low, or if the engine compression is poor due to leakage, the compression pressure will not rise and there will be difficulty starting. When the engine is cold, even if there is compression heat, it will escape from the combustion chamber. For this reason, when the engine is started when it is cold, the glow plugs heat the compressed air. Also, after starting the engine, by charging the glow plugs for a fixed time set according to the engine coolant temperature, diesel knocking and white smoke are prevented. The quantity of fuel injected is determined by the fuel pressure and also the amount of time the injector assembly is open. |
| Trouble Area Chart According to Problem Cause |
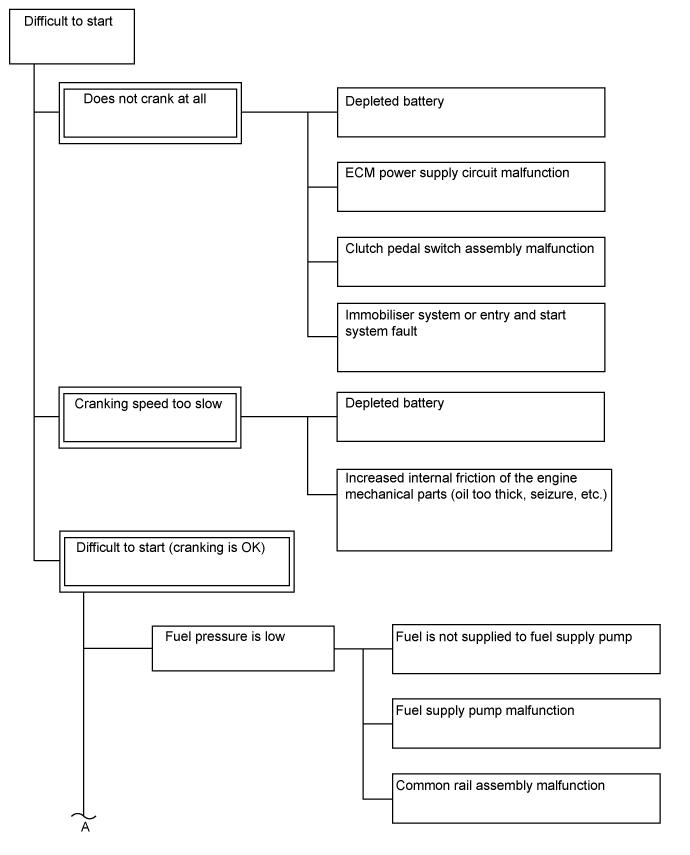

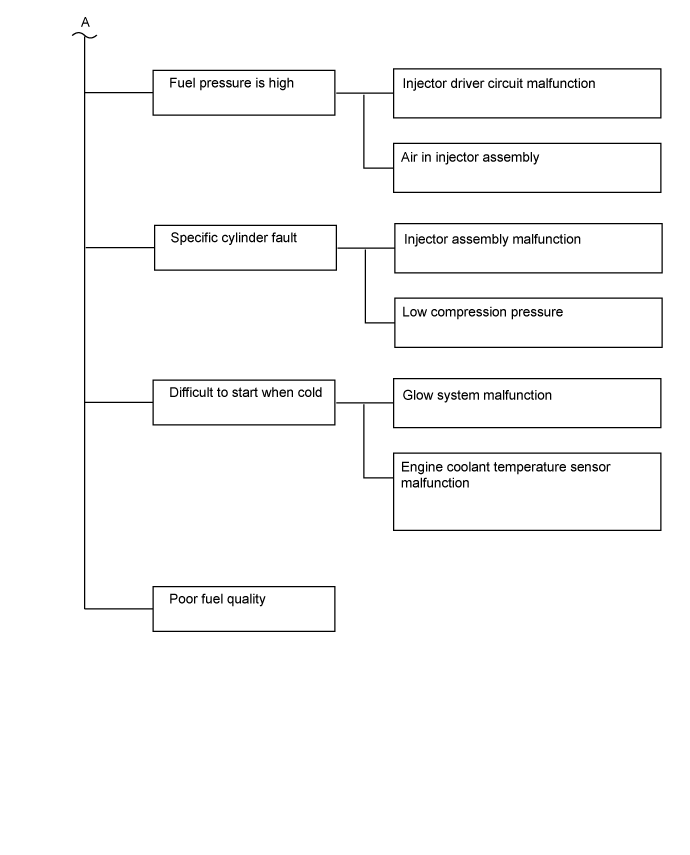
- NOTICE:
- After replacing the ECM, the new ECM needs registration (Click here) and initialization (Click here).
- After replacing the Fuel Supply Pump, the ECM needs initialization (Click here).
- After replacing an injector assembly, the ECM needs registration (Click here).
- After replacing the ECM, the new ECM needs registration (Click here) and initialization (Click here).
- HINT:
- Specified values in the following troubleshooting flowchart are for reference only. Variations in the Data List values may occur depending on the measuring conditions or the vehicle age. Do not assume the vehicle is normal when the Data List outputs standard values. There may be concealed factors of the malfunction.
| 1. CHECK ENGINE CRANKING CONDITION |

Check the engine cranking condition.
Result Result
Proceed to
Cranking is OK.
A
Low cranking speed. - HINT:
- When cranking speed is low, especially when the temperature is low, check if the engine oil grade matches the recommendation.
B
Does not crank at all.
C
|
|
||||
|
|
||||


| A | |
 |
| 2. READ ALL OUTPUT DTCS |
Connect the GTS to the DLC3.
Turn the ignition switch to ON and turn the GTS on.
Enter the following menus: System Select / Health Check.
Result Result
Proceed to
No DTC is output
A
DTCs related to engine are output
B
|
|
||||
| A | |
|
| 3. TAKE SNAPSHOT DURING STARTING AND IDLING (PROCEDURE 3) |
Connect the GTS to the DLC3.
Turn the ignition switch to ON and turn the GTS on.
Enter the following menus: Powertrain / Engine and ECT / Data List / Common rail (All).
Take a snapshot when idling with no load after the engine is warmed up and when starting trouble is occurring.
- HINT:
- A snapshot can be used to compare vehicle data from the time of the malfunction to normal data and is very useful for troubleshooting. The data in the illustration below is that of a normal vehicle, but as the data varies between individual vehicles, this data should only be used for reference.
- When there is trouble starting with a cold engine, take the snapshot when the engine is cold. Then warm up the engine (engine coolant temperature is 70°C (158°F) or higher) and after idling the vehicle for 1 minute (A/C off, electrical load off), take a snapshot of the data for 15 seconds while idling.
- Take a snapshot when the problem is occurring, such as when the engine is cold. However, if the problem does not reoccur, it is acceptable to only take a snapshot after the engine is warmed up and when the engine is started.
- A snapshot can be used to compare vehicle data from the time of the malfunction to normal data and is very useful for troubleshooting. The data in the illustration below is that of a normal vehicle, but as the data varies between individual vehicles, this data should only be used for reference.
| NEXT | |
|
| 4. CHECK SNAPSHOT (COMMON RAIL PRESSURE) |
Check Common Rail Pressure in the snapshot taken in procedure 3 when the engine was started.
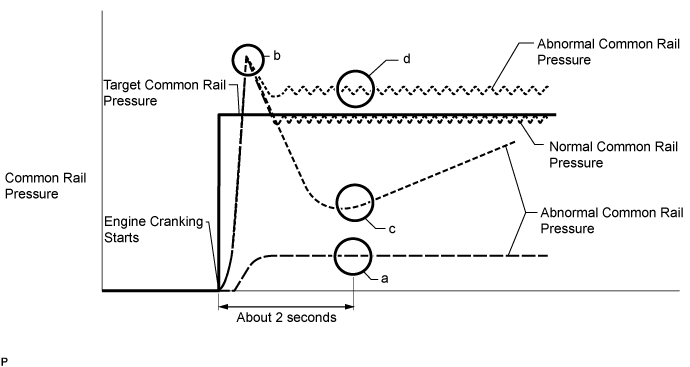
Result Result
Proceed to
At the point in the illustration labeled "a", Common Rail Pressure is less than 10000 kPa from the value of Common Rail Pressure when cranking started
A
At the point in the illustration labeled "c", Common Rail Pressure is below Target Common Rail Pressure by 15000 kPa or more
B
Common Rail Pressure increases to a value that is higher than Target Common Rail Pressure immediately after cranking, and, at the point in the illustration labeled "d", Common Rail Pressure is higher than Target Common Rail Pressure
C
Except above
D
- HINT:
- Even if Common Rail Pressure is temporarily higher than Target Common Rail Pressure, as shown at the point in the illustration labeled "b", the fuel supply pump is normal.
- Common Rail Pressure is about 25000 to 35000 kPa when the engine is cranking and the engine coolant temperature is 0°C (32°F) or higher.
- Common Rail Pressure increases rapidly during cranking.
- Even if Common Rail Pressure is temporarily higher than Target Common Rail Pressure, as shown at the point in the illustration labeled "b", the fuel supply pump is normal.
|
|
||||
|
|
||||
|
|
||||
| A | |
|
| 5. CHECK IF FUEL IS BEING SUPPLIED TO FUEL SUPPLY PUMP ASSEMBLY |
Disconnect the inlet hose from the fuel supply pump assembly.
Operate the priming pump and check that fuel is being supplied to the fuel supply pump assembly.
- OK:
- Fuel is properly supplied to the fuel supply pump assembly when the priming pump is operated.
- HINT:
- When there is a lack of fuel, Common Rail Pressure drops.
- Inspect for Fuel Filter clogging (check that the Fuel Filter is not clogged).
- When there is a lack of fuel, Common Rail Pressure drops.
Reconnect the inlet hose.
|
|
||||
| OK | |
|
| 6. CHECK HARNESS AND CONNECTOR (SUCTION CONTROL VALVE - ECM) |
Disconnect the suction control valve connector.
Disconnect the ECM connector.
Measure the resistance according to the value(s) in the table below.
- Standard Resistance:
Tester Connection
Condition
Specified Condition
D47-1 - D105-41 (PCV+)
Always
Below 1 Ω
D47-2 - D105-81 (PCV-)
Always
Below 1 Ω
D47-1 or D105-41 (PCV+) - Body ground
Always
10 kΩ or higher
D47-2 or D105-81 (PCV-) - Body ground
Always
10 kΩ or higher
|
|
||||
| OK | |
|
| 7. REPLACE SUCTION CONTROL VALVE |
Replace the suction control valve (Click here).
| NEXT | |
|
| 8. BLEED AIR FROM FUEL SYSTEM |
Bleed the air from the fuel system (Click here).
| NEXT | |
|
| 9. PERFORM FUEL SUPPLY PUMP INITIALIZATION |
Perform fuel supply pump initialization (Click here).
| NEXT | |
|
| 10. READ VALUE USING GTS (COMMON RAIL PRESSURE) |
Connect the GTS to the DLC3.
Turn the ignition switch to ON and turn the GTS on.
Enter the following menus: Powertrain / Engine and ECT / Data List / Common Rail Pressure.
Start the engine.
Read the Common Rail Pressure values while cranking and idling the engine.
Result Result
Proceed to
The engine cannot be started or the engine can be started but Common Rail Pressure is below 20000 kPa 2 seconds after the starter signal changes from OFF to ON
B
Except above
A
|
|
||||
| A | ||
 |
||
| ||
| 11. INSPECT INJECTOR ASSEMBLY (INSPECTION FOR VALVE CLOSING PROBLEM) |
Remove the glow plug assembly for all the cylinders (Click here).
Visually check if there is fuel on the glow plugs.
- HINT:
- If there is fuel on a glow plug, fuel may be leaking from an injector assembly.
- After replacing an injector assembly, make sure that the common rail pressure (fuel pressure) is within 5000 kPa of the target common rail pressure while cranking the engine.
- If there is fuel on a glow plug, fuel may have mixed with the engine oil. Check the engine oil amount and whether the engine oil smells of diesel fuel. If the oil level is above the full line or the engine oil smells of diesel fuel, replace the engine oil.
- If there is fuel on a glow plug, fuel may be leaking from an injector assembly.
Install the glow plug assembly (Click here).
|
|
||||
| 12. CHECK AND REPAIR OR REPLACE CLOGGED FUEL PIPE (INCLUDING FROZEN FUEL) (FUEL TANK - FUEL SUPPLY PUMP) |
Check and repair or replace the clogged fuel pipe.
| NEXT | |
|
| 13. BLEED AIR FROM FUEL SYSTEM |
Bleed the air from the fuel system (Click here).
|
|
||||
| 14. READ VALUE USING GTS (COMMON RAIL PRESSURE) |
Check Common Rail Pressure in the snapshot taken in procedure 3 when the engine was warmed up.
Result Result
Proceed to
Common Rail Pressure is more than 5000 kPa from Target Common Rail Pressure
A
Except above
B
|
|
||||
| A | |
|
| 15. REPLACE SUCTION CONTROL VALVE |
Replace the suction control valve (Click here).
| NEXT | |
|
| 16. PERFORM FUEL SUPPLY PUMP INITIALIZATION |
Perform fuel supply pump initialization (Click here).
| NEXT | |
|
| 17. REPLACE INJECTOR ASSEMBLIES OF ALL CYLINDERS |
Replace the injector assemblies (Click here).
- NOTICE:
- When replacing the injector assembly for a cylinder, always be sure to use a new injection pipe.
- Follow the procedure in the repair manual and temporarily install the injection pipes and nozzle leakage pipe, and then correctly position the injector assemblies. After that, tighten parts according to the torque specifications.
- If the installation procedure is not performed correctly, injector assemblies may become out of position, which may cause the injector assemblies to deteriorate, resulting in malfunctions.
- If an injector assembly deteriorates and malfunctions, other problems such as knocking, rough idle, etc. may occur.
- If an injector assembly becomes out of position, it is possible that the seal between the injector assembly and injection pipe may become incomplete, resulting in a fuel leak.
- When replacing the injector assembly for a cylinder, always be sure to use a new injection pipe.
|
|
||||
| 18. CHECK DATA LIST |
Check Injection Feedback Val # in the snapshot taken in procedure 3 when the engine was idling.
Result Result
Proceed to
Injection Feedback Val #1 to #4 are 3 mm3/st or less.
Injection Volume is more than 12 mm3/st.
A*
Injection Feedback Val for at least one cylinder is more than +3 mm3/st - HINT:
- There may be a malfunction in the corresponding cylinder.
B
Except above
C
- HINT:
- *: When this case occurs, usually symptoms may be noticeable, such as difficulty starting, lack of power.
- The shift lever should be in neutral and the A/C switch and all accessory switches should be off.
- *: When this case occurs, usually symptoms may be noticeable, such as difficulty starting, lack of power.
|
|
||||
|
|
||||
| A | |
|
| 19. REPLACE INJECTOR ASSEMBLIES OF ALL CYLINDERS |
Replace the injector assemblies (Click here).
- NOTICE:
- When replacing the injector assembly for a cylinder, always be sure to use a new injection pipe.
- Follow the procedure in the repair manual and temporarily install the injection pipes and nozzle leakage pipe, and then correctly position the injector assemblies. After that, tighten parts according to the torque specifications.
- If the installation procedure is not performed correctly, injector assemblies may become out of position, which may cause the injector assemblies to deteriorate, resulting in malfunctions.
- If an injector assembly deteriorates and malfunctions, other problems such as knocking, rough idle, etc. may occur.
- If an injector assembly becomes out of position, it is possible that the seal between the injector assembly and injection pipe may become incomplete, resulting in a fuel leak.
- When replacing the injector assembly for a cylinder, always be sure to use a new injection pipe.
|
|
||||
| 20. CHECK CYLINDER COMPRESSION PRESSURE |
Check the cylinder compression pressure (Click here).
- HINT:
- When compression is low, there may be cracks in the piston or the injector may be installed improperly.
|
|
||||
| OK | |
|
| 21. REPLACE INJECTOR ASSEMBLY OF MALFUNCTIONING CYLINDER |
- HINT:
- It can be determined that the injector assembly is faulty as the corresponding cylinder is malfunctioning, but has no compression loss.
Replace the injector assembly (Click here).
- NOTICE:
- When replacing the injector assembly for a cylinder, always be sure to use a new injection pipe.
- Follow the procedure in the repair manual and temporarily install the injection pipes and nozzle leakage pipe, and then correctly position the injector assemblies. After that, tighten parts according to the torque specifications.
- If the installation procedure is not performed correctly, injector assemblies may become out of position, which may cause the injector assemblies to deteriorate, resulting in malfunctions.
- If an injector assembly deteriorates and malfunctions, other problems such as knocking, rough idle, etc. may occur.
- If an injector assembly becomes out of position, it is possible that the seal between the injector assembly and injection pipe may become incomplete, resulting in a fuel leak.
- When replacing the injector assembly for a cylinder, always be sure to use a new injection pipe.
| NEXT | |
|
| 22. CLEAN FUEL FILTER CASE AND REPLACE FUEL FILTER |
Clean the fuel filter case and replace the fuel filter.
- HINT:
- Be sure to clean the inside of the fuel filter case as the fuel injectors may not operate properly if the fuel filter is installed with foreign matter remaining inside the fuel filter case.
| NEXT | |
|
| 23. BLEED AIR FROM FUEL SYSTEM |
Bleed the air from the fuel system (Click here).
| NEXT | |
|
| 24. PERFORM ECM INITIALIZATION AND REGISTER INJECTOR COMPENSATION CODE |
Perform the ECM initialization.
Connect terminals 13 (TC) and 4 (CG) of the DLC3.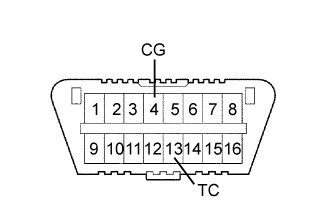
Turn the ignition switch to ON for 50 minutes or more.
- NOTICE:
- Perform ECM initialization only when the injectors for all the cylinders have been replaced.
- It is necessary to wait for 50 minutes or more. Otherwise, ECM initialization is not completed.
- Perform ECM initialization only when the injectors for all the cylinders have been replaced.
Turn the ignition switch off.
Disconnect terminals 13 (TC) and 4 (CG).
Register the injector compensation codes (Click here).
| NEXT | |
|
| 25. CONFIRM WHETHER MALFUNCTION HAS BEEN SUCCESSFULLY REPAIRED |
| NEXT | ||
|
||
| ||
| 26. INSPECT INJECTOR DRIVER |
Even in cases where DTC P0200 is not stored even though the engine cannot be started, perform the DTC P0200 troubleshooting procedure (Click here).
- HINT:
- When the engine cannot be started due to a malfunction in the injector driver system, once the DTCs are cleared, the system cannot store DTC P0200 even if it is confirmed that the engine cannot be started when trying to reproduce the problem symptoms.
As DTC P0200 cannot be stored when starting the engine, fuel injection signals are output by the ECM, but fuel is not actually injected. Therefore, an excessive amount of fuel is supplied to the common rail by the fuel supply pump assembly, and as a result, the fuel pressure is higher than the target common rail pressure in the data recorded at the time the engine was having trouble starting.
- If the problem cannot be determined even after performing the DTC P0200 troubleshooting procedure and the fuel pressure is higher than the target common rail pressure when attempting to start the engine, proceed to the next step.
- When the engine cannot be started due to a malfunction in the injector driver system, once the DTCs are cleared, the system cannot store DTC P0200 even if it is confirmed that the engine cannot be started when trying to reproduce the problem symptoms.
|
|
||||
| OK | |
|
| 27. INSPECT INJECTOR ASSEMBLY |
Inspect the injector assemblies (Click here).
- HINT:
- If there is no initial combustion during cranking, there may be air in the injector assemblies.
|
|
||||
| 28. CHECK TEMPERATURE WHEN STARTING TROUBLE OCCURS |
Check the temperature when starting trouble occurs.
| Result |
Proceed to |
| Difficult to start only for cold engine. |
A |
| Difficult to start both for cold and warmed up engine. |
B |
|
|
||||
| A | |
|
| 29. READ VALUE USING ENGINE COOLANT TEMPERATURE SENSOR (COOLANT TEMP) |
Connect the GTS to the DLC3.
Turn the ignition switch to ON and turn the GTS on.
Enter the following menus: Powertrain / Engine and ECT / Data List / Coolant Temp.
Read the value displayed on the GTS.
- OK:
- Coolant Temp is not high when the engine is cold, and not low after the engine is warmed up
|
|
||||
| OK | |
|
| 30. INSPECT GLOW PLUG ASSEMBLY (RESISTANCE) |
Inspect the glow plug (Click here).
|
|
||||
| OK | |
|
| 31. CHECK FUEL QUALITY |
Check that only diesel fuel is being used.
Check that the fuel does not contain any impurities.
|
|
||||
| 32. READ OUTPUT DTC (RELATED TO ENGINE) |
Connect the GTS to the DLC3.
Turn the ignition switch to ON and turn the GTS on.
Enter the following menus: Powertrain / Engine and ECT / Trouble Codes.
Read the DTCs.
Result Result
Proceed to
No DTC is output
A
DTCs related to engine are output
B
|
|
||||
| A | |
|
| 33. CHECK COMMUNICATION BETWEEN GTS AND ECM |
Connect the GTS to the DLC3.
Turn the ignition switch to ON and turn the GTS on.
Check if the normal starting screen appears (check whether communication with the ECM is possible).
- HINT:
- Use a GTS that is able to communicate with other vehicles.
- OK:
- Communication is possible (vehicle can be recognized).
|
|
||||
| OK | |
|
| 34. READ VALUE USING GTS (STARTER SIGNAL) |
Connect the GTS to the DLC3.
Turn the ignition switch to ON and turn the GTS on.
Enter the following menus: Powertrain / Engine and ECT / Data List / Starter Signal.
Read the value displayed on the GTS.
- OK:
Tester Display
Condition
Specified Condition
Starter Signal
Cranking
ON
|
|
||||
| OK | |
|
| 35. CHECK STARTING SYSTEM |
Inspect the starting system.
- HINT:
- Be sure to inspect the following areas:
- Starter relay
- Starter
- Starter relay
| NEXT | |
|
| 36. CONFIRM WHETHER MALFUNCTION HAS BEEN SUCCESSFULLY REPAIRED |
| NEXT | ||
|
||
| ||