INSTALLATION
Removal / installation · Vehicles built from Jan 2017
Versions by build date: Oct 2014 – Dec 2014 Jan 2015 – Mar 2016 Apr 2016 – Dec 2016 from Jan 2017
| 1. INSTALL WINDSHIELD WIPER SWITCH ASSEMBLY |

Attach the claw to install the windshield wiper switch assembly.
Connect the 2 connectors.
| 2. INSTALL STEERING COLUMN UPPER COVER |
Install the steering column upper cover to the steering column assembly.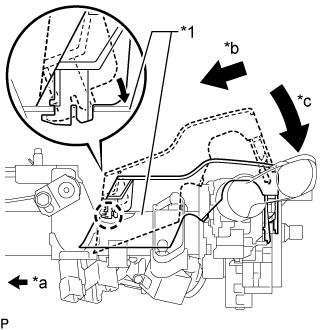

Text in Illustration *1
Column Tube
*a
Front of Vehicle
*b
Insert into the cutout of the column tube so that the claw of the steering column upper cover does not break
*c
Lower the backside of the steering column upper cover
| 3. INSTALL STEERING COLUMN LOWER COVER |
Attach the 2 claws to install the steering column lower cover to the steering column upper cover.
While turning the steering wheel to the right.
Using a T25 ''TORX'' socket wrench, install the ''TORX'' screw.
While turning the steering wheel to the left.
Using a T25 ''TORX'' socket wrench, install the ''TORX'' screw.
| 4. INSTALL NO. 2 STEERING COLUMN LOWER COVER (w/ Smart Entry and Start System) |
Install the 4 guide pins install the No. 2 steering column lower cover.
| 5. INSTALL INSTRUMENT PANEL FINISH PANEL LOWER |
Connect the fuel lid lock control cable and bonnet (hood) control cable assembly to the instrument panel finish lower.
Attach the 4 clips to install the instrument panel finish panel lower.
Install the 2 clips.
| 6. INSTALL COMBINATION METER ASSEMBLY |
Attach the wire harness clamp and connect the 2 connectors.
Attach the 2 claws to install the combination meter assembly.
Install the 2 screws.
| 7. INSTALL INSTRUMENT CLUSTER FINISH PANEL SUB-ASSEMBLY |
Attach the 6 claws and a hooks to install the instrument cluster finish panel sub-assembly.
| 8. INSTALL INSTRUMENT CLUSTER FINISH PANEL ASSEMBLY |
Attach the 4 claws to install the instrument cluster finish panel assembly.
| 9. INSTALL INSTRUMENT CLUSTER FINISH PANEL SUB-ASSEMBLY CENTER |
for Standard Body:
Attach the 14 claws to install the instrument cluster finish panel sub-assembly center.
for Wide Body:
Attach the 16 claws to install the instrument cluster finish panel sub-assembly center.
| 10. INSTALL INSTRUMENT CLUSTER FINISH PANEL GARNISH NO. 2 |
Attach the 3 claws to install the instrument cluster finish panel garnish No. 2.
| 11. INSTALL INSTRUMENT CLUSTER FINISH PANEL GARNISH NO. 1 |
Attach the 3 claws to install the instrument cluster finish panel garnish No. 1.
| 12. CONNECT CABLE TO NEGATIVE BATTERY TERMINAL |
- NOTICE:
- When disconnecting the cable, some systems need to be initialized after the cable is reconnected (Click here).