INSTALLATION
Removal / installation · Vehicles built Oct 2014 – Dec 2014
Versions by build date: Oct 2014 – Dec 2014 Jan 2015 – Mar 2016 Apr 2016 – Dec 2016 from Jan 2017
| 1. INSTALL THROTTLE BODY ASSEMBLY |

Install a new gasket onto the intake manifold.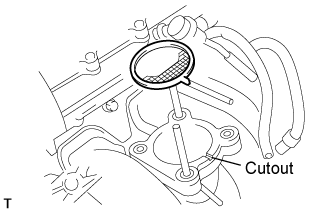

- HINT:
- Fit the gasket to the cutout of the intake manifold.
for Type A: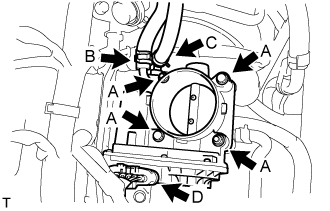
Install the throttle body assembly with the 2 bolts and 2 nuts. (A)- Torque:
- 9.0 N*m{ 92 kgf*cm , 80 in.*lbf }
for Type B:
Install the throttle body assembly with the 4 bolts. (A)- Torque:
- 9.0 N*m{ 92 kgf*cm , 80 in.*lbf }
Connect the water by-pass hose, and slide the clamp to secure it. (B)
Connect the No. 2 water by-pass hose, and slide the clamp to secure it. (C)
Connect the throttle motor connector. (D)
| 2. INSTALL INTAKE AIR CONNECTOR |
Temporarily install the intake air connector to the throttle body assembly.
Connect the No. 2 ventilation hose and vacuum hose, and slide the clamp to secure it. (A)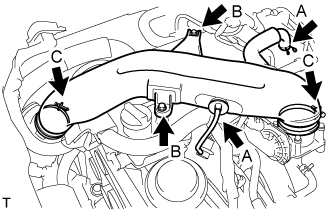
Install the intake air connector with the 2 bolts. (B)
- Torque:
- 8.0 N*m{ 82 kgf*cm , 71 in.*lbf }
Tighten the 2 hose clamp bolts. (C)
- Torque:
- 5.0 N*m{ 51 kgf*cm , 44 in.*lbf }
| 3. ADD ENGINE COOLANT |
Tighten the radiator drain cock plug by hand.
Tighten the cylinder block water drain cock plug.
- Torque:
- 13 N*m{ 130 kgf*cm , 9 ft.*lbf }
Fill the radiator reservoir assembly with engine coolant to the top of the inlet.
- Standard Capacity:
Item
Specified Condition
w/o Rear Heater
11.2 liters (11.8 US qts, 9.9 Imp. qts)
w/ Rear Heater
13.2 liters (13.9 US qts, 11.6 Imp. qts)
- NOTICE:
- Never use water as a substitute for engine coolant.
- HINT:
- TOYOTA vehicles are filled with TOYOTA SLLC at the factory. In order to avoid damage to the engine cooling system and other technical problems, only use TOYOTA SLLC or similar high quality ethylene glycol based non-silicate, non-amine, non-nitrite, non-borate coolant with long-life hybrid organic acid technology (coolant with long-life hybrid organic acid technology is a combination of low phosphates and organic acids).
Remove the 2-way that is located near the throttle body assembly.
When air is bled and the engine coolant drains out, install the 2-way.
Add coolant through the radiator reservoir assembly filler opening until the coolant reaches the B line and install the radiator reservoir cap sub-assembly. [*1]
Warm up the engine until the thermostat opens. While the thermostat is open, circulate the coolant for several minutes. [*2]
- CAUTION:
- Wear protective gloves.
- Be careful as the radiator hoses are hot.
- Keep your hands away from the radiator fans.
- Wear protective gloves.
- NOTICE:
- Immediately after starting the engine, if the radiator reservoir assembly does not have any engine coolant, perform the following: 1) stop the engine, 2) wait until the engine coolant has cooled down, and 3) add engine coolant.
- Do not start the engine when there is no engine coolant in the radiator reservoir assembly.
- Make sure that the needle does not show an abnormally high temperature.
- If there is not enough engine coolant, the engine may overheat.
- Immediately after starting the engine, if the radiator reservoir assembly does not have any engine coolant, perform the following: 1) stop the engine, 2) wait until the engine coolant has cooled down, and 3) add engine coolant.
- HINT:
- Press the No. 2 and No. 3 radiator hoses several times by hand, and then check the level of the engine coolant.
- The thermostat open timing can be confirmed by pressing the No. 3 radiator hose by hand, and checking when the engine coolant starts to flow inside the hose.
- Press the No. 2 and No. 3 radiator hoses several times by hand, and then check the level of the engine coolant.
Stop the engine, and wait until the engine coolant cools down to ambient temperature. [*3]
Check the engine coolant level in the radiator reservoir assembly. [*4]
- HINT:
- If the engine coolant level is below the LOW line, repeat step *1 through *4.
- If the engine coolant level is above the FULL line, drain engine coolant until the engine coolant level is between the FULL and LOW lines.
- If the engine coolant level is below the LOW line, repeat step *1 through *4.
| 4. INSTALL ENGINE SERVICE HOLE SUB COVER SUB-ASSEMBLY |
Install the engine service hole sub cover with the 5 bolts.
- Torque:
- 13 N*m{ 133 kgf*cm , 10 ft.*lbf }
| 5. INSTALL FRONT DOOR SCUFF PLATE RH |
| 6. INSTALL FRONT SEAT ASSEMBLY RH (for Hi-back Seat Type) |
| 7. INSTALL FRONT SEAT ASSEMBLY RH (for Low-back Seat Type) |
| 8. INSTALL ENGINE UNDER COVER NO. 1 (w/ Engine Under Cover No. 1) |
- Torque:
- 13 N*m{ 133 kgf*cm , 10 ft.*lbf }
| 9. CONNECT CABLE TO NEGATIVE BATTERY TERMINAL |
| 10. INSPECT THROTTLE BODY ASSEMBLY |
| 11. INSPECT FOR COOLANT LEAK |
| 12. PERFORM INITIALIZATION |