TC and CG Terminal Circuit
Circuit diagnosis · Vehicles built Jan 2017 – Nov 2017
Versions by build date: Jan 2015 – Mar 2016 Apr 2016 – Dec 2016 Jan 2017 – Nov 2017
DESCRIPTION
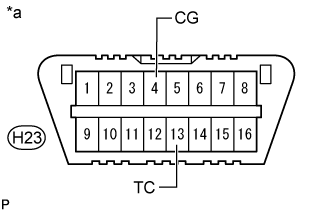
Connecting terminals TC and CG of the DLC3 causes the ECU to display the DTC by blinking the ABS warning light and slip indicator light.WIRING DIAGRAM
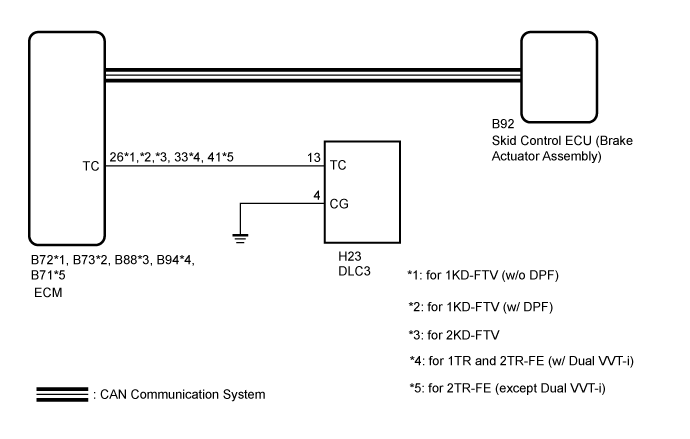

INSPECTION PROCEDURE
- NOTICE:
- When replacing the skid control ECU (brake actuator assembly), perform zero point calibration and store system information (Click here).
| 1. CHECK CAN COMMUNICATION LINE
|
 |
Check if CAN communication system DTCs are output (Click here).
- Result:
Result
|
Proceed to
|
DTC is not output
|
A
|
DTC is output
|
B
|
|
B |
 |
|
|
|
| A |
|
 |
|
| 2. INSPECT DLC3 |
|
- Turn the ignition switch to ON.
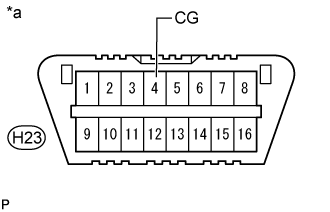
Measure the voltage according to the value(s) in the table below.
- Standard Voltage:
Tester Connection
|
Condition
|
Specified Condition
|
H23-13 (TC) - H23-4 (CG)
|
Ignition switch ON
|
11 to 14 V
|
Text in Illustration
*a
|
Front view of DLC3
|
|
NG |
 |
|
|
|
| OK |
|
|
|
| 3. REPLACE ECM |
|
- SST
- 09843-18040
Turn the ignition switch to ON.
Replace the ECM.
- Using SST, connect terminals 13 (TC) and 4 (CG) of the DLC3.
Text in Illustration
*a
|
Front view of DLC3
|
Check that the ABS warning and slip indicator lights are blinking.
- OK:
- The ABS warning and slip indicator lights are blinking.
|
NG |
|
|
|
|
| OK |
|
 |
|
|
| 4. CHECK HARNESS AND CONNECTOR (TC of DLC3 - ECM) |
|
Turn the ignition switch off.
for 1KD-FTV (w/o DPF):
Disconnect the B72 ECM connector.
for 1KD-FTV (w/ DPF):
Disconnect the B73 ECM connector.
for 2KD-FTV:
Disconnect the B88 ECM connector.
for 1TR or 2TR-FE (w/ Dual VVT-i):
Disconnect the B94 ECM connector.
for 2TR-FE (except Dual VVT-i):
Disconnect the B71 ECM connector.
Measure the resistance according to the value(s) in the table below.
- Standard Resistance:
for 1KD-FTV (w/o DPF):
Tester Connection
|
Condition
|
Specified Condition
|
B72-26 (TC) - H23-13 (TC)
|
Always
|
Below 1 Ω
|
B72-26 (TC) or H23-13 (TC) - Body ground
|
Always
|
10 kΩ or higher
|
for 1KD-FTV (w/ DPF):
Tester Connection
|
Condition
|
Specified Condition
|
B73-26 (TC) - H23-13 (TC)
|
Always
|
Below 1 Ω
|
B73-26 (TC) or H23-13 (TC) - Body ground
|
Always
|
10 kΩ or higher
|
for 2KD-FTV:
Tester Connection
|
Condition
|
Specified Condition
|
B88-26 (TC) - H23-13 (TC)
|
Always
|
Below 1 Ω
|
B88-26 (TC) or H23-13 (TC) - Body ground
|
Always
|
10 kΩ or higher
|
for 1TR or 2TR-FE (w/ Dual VVT-i):
Tester Connection
|
Condition
|
Specified Condition
|
B94-33 (TC) - H23-13 (TC)
|
Always
|
Below 1 Ω
|
B94-33 (TC) or H23-13 (TC) - Body ground
|
Always
|
10 kΩ or higher
|
for 2TR-FE (except Dual VVT-i):
Tester Connection
|
Condition
|
Specified Condition
|
B71-41 (TC) - H23-13 (TC)
|
Always
|
Below 1 Ω
|
B71-41 (TC) or H23-13 (TC) - Body ground
|
Always
|
10 kΩ or higher
|
|
NG |
|
|
| REPAIR OR REPLACE HARNESS OR CONNECTOR |
|
|
| OK |
|
|
|
| 5. CHECK HARNESS AND CONNECTOR (CG of DLC3 - BODY GROUND) |
|
- Measure the resistance according to the value(s) in the table below.
- Standard Resistance:
Tester Connection
|
Condition
|
Specified Condition
|
H23-4 (CG) - Body ground
|
Always
|
Below 1 Ω
|
Text in Illustration
*a
|
Front view of DLC3
|
|
NG |
|
|
| REPAIR OR REPLACE HARNESS OR CONNECTOR |
|
|
| OK |
|
|
|
| 6. REPLACE ECM |
|
- SST
- 09843-18040
Turn the ignition switch to ON.
Replace the ECM.
- Using SST, connect terminals 13 (TC) and 4 (CG) of the DLC3.
Text in Illustration
*a
|
Front view of DLC3
|
Check that the ABS warning and slip indicator lights are blinking.
- OK:
- The ABS warning and slip indicator lights are blinking.
|
NG |
|
|
|
|
| OK |
|
|
|
|