P115D Intake Manifold Runner Control Circuit Low (Bank 2)
Diagnostic trouble codes · Vehicles built Apr 2016 – Dec 2016
Also covers:
- P115E Intake Manifold Runner Control Circuit High (Bank 2)
Versions by build date: Oct 2014 – Dec 2014 Jan 2015 – Nov 2015 Dec 2015 – Mar 2016 Apr 2016 – Dec 2016 from Jan 2017
DESCRIPTION
Refer to DTC P2006 (Click here).| DTC Detection Drive Pattern |
DTC Detection Condition |
Trouble Area |
| 2 seconds after engine is started, race engine for 1 second |
Open in vacuum switching valve (for No. 2 swirl control valve) circuit for 0.5 seconds (2 trip detection logic). |
|
| DTC Detection Drive Pattern |
DTC Detection Condition |
Trouble Area |
| 2 seconds after engine is started, race engine for 1 second |
Short in vacuum switching valve (for No. 2 swirl control valve) circuit for 0.5 seconds (2 trip detection logic). |
|
WIRING DIAGRAM
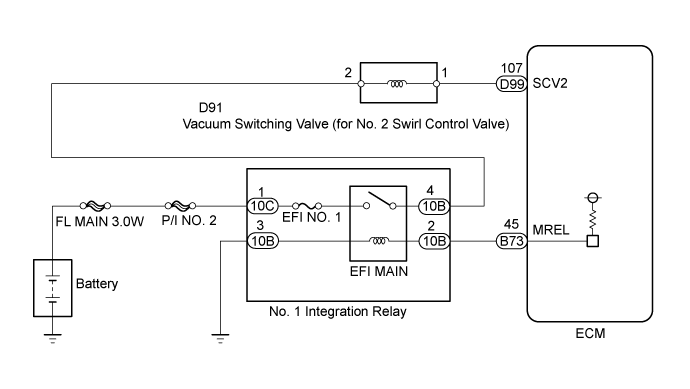

INSPECTION PROCEDURE
- NOTICE:
- Inspect the fuses of circuits related to this system before performing the following inspection procedure.
- After replacing the ECM, the new ECM needs registration (Click here) and initialization (Click here).
- After replacing the fuel supply pump assembly, the ECM needs initialization (Click here).
- After replacing an injector assembly, the ECM needs registration (Click here).
- Inspect the fuses of circuits related to this system before performing the following inspection procedure.
- HINT:
- Read freeze frame data using the GTS. Freeze frame data records the engine condition when malfunctions are detected. When troubleshooting, freeze frame data can help determine if the vehicle was moving or stationary, if the engine was warmed up or not, and other data from the time the malfunction occurred.
| 1. INSPECT VACUUM SWITCHING VALVE FOR NO. 2 SWIRL CONTROL VALVE (RESISTANCE) |

Inspect the vacuum switching valve (for No. 2 swirl control valve) (Click here).
|
|
||||

| OK | |
 |
| 2. INSPECT VACUUM SWITCHING VALVE (FOR SWIRL CONTROL VALVE) (POWER SOURCE VOLTAGE) |
Disconnect the vacuum switching valve (for No. 2 swirl control valve) connector.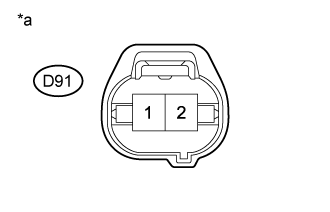
Measure the voltage according to the value(s) in the table below.
- Standard Voltage:
Tester Connection
Switch Condition
Specified Condition
D91-2 - Body ground
Ignition switch ON
11 to 14 V
Text in Illustration *a
Front view of wire harness connector
(to Vacuum Switching Valve (for No. 2 Swirl Control Valve))
|
|
||||
| OK | |
|
| 3. CHECK HARNESS AND CONNECTOR (VACUUM SWITCHING VALVE (FOR SWIRL CONTROL VALVE) - ECM) |
Disconnect the vacuum switching valve (for No. 2 swirl control valve) connector.
Disconnect the ECM connector.
Measure the resistance of the wire harness side connectors.
- Standard Resistance:
Tester Connection
Condition
Specified Condition
D91-1 - D99-107 (SCV2)
Always
Below 1 Ω
D91-1 or D99-107 (SCV2) - Body ground
Always
10 kΩ or higher
Reconnect the vacuum switching valve (for No. 2 swirl control valve) connector.
Reconnect the ECM connector.
|
|
||||
| OK | |
|
| 4. REPLACE ECM |
Replace the ECM (Click here).
|
|
||||
| 5. CHECK HARNESS AND CONNECTOR (VACUUM SWITCHING VALVE (FOR NO. 2 SWIRL CONTROL VALVE) - NO. 1 INTEGRATION RELAY) |
Remove the No. 1 integration relay from the No. 1 engine room relay block and junction block assembly.
Disconnect the vacuum switching valve (for No. 2 swirl control valve) connector.
Measure the resistance of the wire harness side connectors.
- Standard Resistance:
Tester Connection
Condition
Specified Condition
10B-4 - D91-2
Always
Below 1 Ω
10B-4 or D91-2 - Body ground
Always
10 kΩ or higher
Reinstall the No. 1 integration relay.
Reconnect the vacuum switching valve (for No. 2 swirl control valve) connector.
|
|
||||
| OK | |
|
| 6. CHECK ECM POWER SOURCE CIRCUIT |
Check the ECM power source circuit (Click here).
|
|
||||
| 7. REPLACE VACUUM SWITCHING VALVE (FOR NO. 2 SWIRL CONTROL VALVE) |
Replace the vacuum switching valve (for No. 2 swirl control valve).
|
|
||||
| 8. REPAIR OR REPLACE HARNESS OR CONNECTOR |
Repair or replace harness or connector.
| NEXT | |
|
| 9. CONFIRM WHETHER MALFUNCTION HAS BEEN SUCCESSFULLY REPAIRED |
Connect the GTS to the DLC3.
Clear the DTCs (Click here).
Start the engine and wait for 3 seconds or more.
Enter the following menus: Powertrain / Engine and ECT / Trouble Codes.
Confirm that the DTC is not output again.
| NEXT | ||
 |
||
| ||