INSTALLATION
Removal / installation · Vehicles built from Oct 2014
| 1. INSTALL NO. 2 EGR PIPE SUB-ASSEMBLY |

Install a new gasket and the No. 2 EGR pipe with the 2 nuts.
- Torque:
- 13 N*m{ 133 kgf*cm , 10 ft.*lbf }
| 2. INSTALL ELECTRIC EGR CONTROL VALVE ASSEMBLY |
Install the vacuum regulating valve with the 2 bolts.
- Torque:
- 20 N*m{ 204 kgf*cm , 15 ft.*lbf }
Install a new gasket and the electric EGR valve to the intake air connector.
Install 2 new gaskets and the electric EGR valve together with the intake air connector to the intake manifold with the bolt and 2 nuts.
- Torque:
- 20 N*m{ 204 kgf*cm , 15 ft.*lbf }
Connect the 2 vacuum hoses to the vacuum regulating valve.
Connect the vacuum regulating valve connector.
| 3. INSTALL MANIFOLD STAY |
Install the manifold stay with the 2 bolts.
- Torque:
- 19 N*m{ 194 kgf*cm , 14 ft.*lbf }
| 4. INSTALL INTAKE AIR TEMPERATURE SENSOR |
Install a new gasket to the intake air temperature sensor.
Using a 22 mm ball joint lock nut wrench, install the intake air temperature sensor.
- Torque:
- 34 N*m{ 350 kgf*cm , 25 ft.*lbf }
- NOTICE:
- Use the formula to calculate special torque values for situations where a ball joint lock nut wrench is combined with a torque wrench (Click here).
Connect the intake air temperature sensor connector.
| 5. INSTALL MANIFOLD ABSOLUTE PRESSURE SENSOR |
Install the manifold absolute pressure sensor with the 2 bolts and connect the vacuum hose.
- Torque:
- 8.0 N*m{ 82 kgf*cm , 71 in.*lbf }
| 6. INSTALL VACUUM SWITCHING VALVE ASSEMBLY |
Install the vacuum switching valve with the bolt.
- Torque:
- 20 N*m{ 204 kgf*cm , 15 ft.*lbf }
Connect the connector and vacuum hose to the vacuum switching valve.
Attach the clamp and wire harness.
Connect the connector to the electric EGR control valve.
| 7. CONNECT NO. 1 GAS FILTER |
Connect the vacuum hose together with the gas filter.
Install the bolt.
- Torque:
- 8.0 N*m{ 82 kgf*cm , 71 in.*lbf }
| 8. INSTALL ENGINE OIL LEVEL DIPSTICK GUIDE |
Install a new O-ring to the engine oil level dipstick guide.
Apply a small amount of clean engine oil to the O-ring.
Install the engine oil level dipstick guide with the bolt.
- Torque:
- 8.0 N*m{ 82 kgf*cm , 72 in.*lbf }
| 9. INSTALL TRANSMISSION OIL FILLER TUBE SUB-ASSEMBLY (for Automatic Transmission) |
Coat a new O-ring with ATF and install it onto the oil filler tube sub-assembly.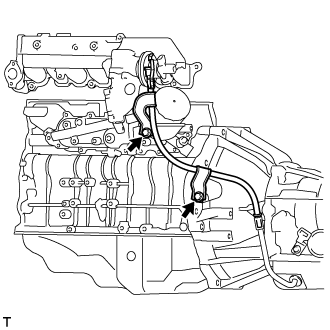

Install the oil filler tube sub-assembly with the 2 bolts.
- Torque:
- 12 N*m{ 122 kgf*cm , 9 ft.*lbf }
| 10. INSTALL DIESEL THROTTLE BODY ASSEMBLY |
| 11. INSPECT FOR EXHAUST GAS LEAK |
| 12. INSTALL NO. 2 ENGINE SERVICE HOLE COVER (for Standard Body) |
Install the No. 2 engine service hole cover with the 3 bolts.
- Torque:
- 9.0 N*m{ 92 kgf*cm , 80 in.*lbf }
Return the carpet to its original position and attach the clips.
| 13. INSTALL NO. 2 ENGINE UNDER COVER (for Cold Area Specification Vehicles) |
Install the No. 2 engine under cover with the 6 bolts.
- Torque:
- 13 N*m{ 133 kgf*cm , 10 ft.*lbf }
| 14. INSTALL NO. 1 ENGINE UNDER COVER (for Cold Area Specification Vehicles) |
Install the No. 1 engine under cover with the 4 bolts.
- Torque:
- 13 N*m{ 133 kgf*cm , 10 ft.*lbf }