INSPECTION
Inspection · Vehicles built Oct 2014 – Dec 2014
| INSPECT EXTENSION HOUSING SUB-ASSEMBLY |

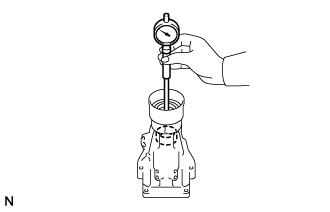  |
Using a cylinder gauge, measure the inside diameter of the extension housing sub-assembly bush.
- Maximum inside diameter:
- 38.09 mm (1.50 in.)
| INSPECT AUTOMATIC TRANSMISSION OIL PAN SUB-ASSEMBLY |
Remove the 2 automatic transmission oil cleaner magnets and use them to collect steel particles. Carefully look at the foreign matter and particles in the automatic transmission oil pan sub-assembly and on the 2 automatic transmission oil cleaner magnets to determine the type of wear you will find in the automatic transmission assembly.
Steel (magnetic): bearing, gear and clutch plate wear
Brass (non-magnetic): bush wear
| INSPECT OVERDRIVE ONE-WAY CLUTCH |
Hold the overdrive direct clutch drum sub-assembly and turn the overdrive planetary gear assembly. Check that the overdrive planetary gear assembly can be turned clockwise but cannot be turned counterclockwise.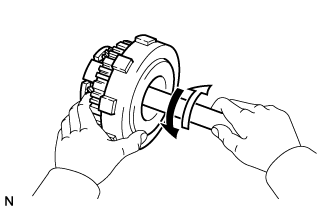
Text in Illustration 
Lock

Free
| INSPECT PISTON STROKE OF OVERDRIVE DIRECT CLUTCH PISTON SUB-ASSEMBLY |
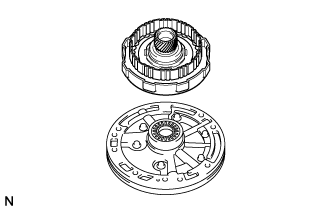 |
Place the overdrive direct clutch drum sub-assembly onto the oil pump assembly.
Using a dial indicator, measure the overdrive direct clutch piston sub-assembly stroke by applying and releasing compressed air (392 kPa (4.0 kgf/cm2, 57 psi)) as shown in the illustration.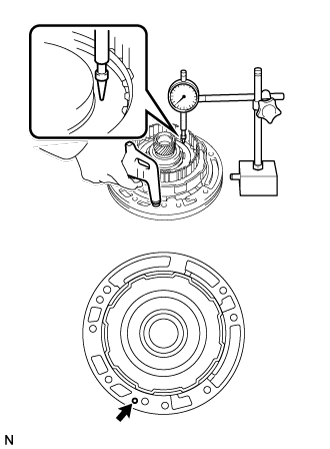
- Standard piston stroke:
- 1.74 to 2.44 mm (0.0686 to 0.0960 in.)
Remove the overdrive direct clutch drum sub-assembly from the oil pump assembly.
| INSPECT OVERDRIVE CLUTCH DISC |
Check whether the sliding surfaces of the overdrive clutch disc and overdrive clutch flange are worn or burnt.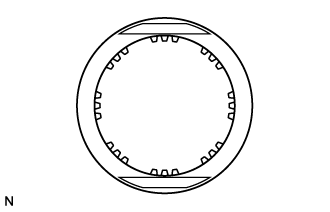
If necessary, replace the disc and flange.- NOTICE:
- If the lining of the overdrive clutch disc is peeled off or discolored, or if any part of the printed numbers are damaged, replace the disc.
- Before assembling a new disc, soak it in ATF for at least 15 minutes.
- If the lining of the overdrive clutch disc is peeled off or discolored, or if any part of the printed numbers are damaged, replace the disc.
| INSPECT OVERDRIVE DIRECT CLUTCH PISTON SUB-ASSEMBLY |
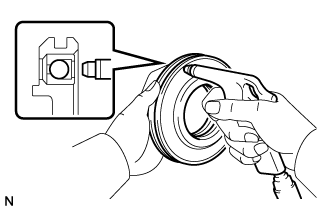 |
Check that the check ball is free by shaking the overdrive direct clutch piston.
Check that the valve does not have leaks by applying low-pressure compressed air.
| INSPECT OVERDRIVE DIRECT CLUTCH DRUM SUB-ASSEMBLY |
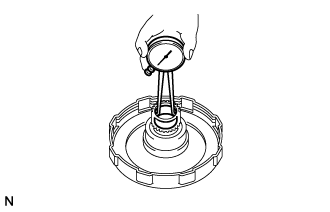 |
Using a caliper gauge, measure the inside diameter of the overdrive direct clutch drum sub-assembly bush.
- Maximum inside diameter:
- 23.14 mm (0.911 in.)
| INSPECT OVERDRIVE PLANETARY GEAR ASSEMBLY |
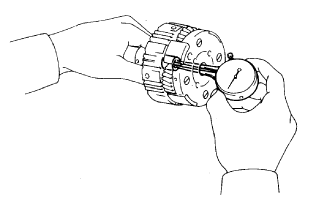 |
Using a caliper gauge, measure the inside diameter of the overdrive planetary gear assembly bush.
- Maximum inside diameter:
- 11.27 mm (0.444 in.)
Using a feeler gauge, measure the planetary pinion gear thrust clearance.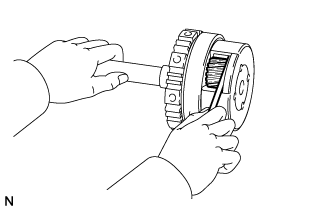
- Standard clearance:
- 0.20 to 0.50 mm (0.00788 to 0.0196 in.)
| INSPECT PISTON STROKE OF OVERDRIVE BRAKE PISTON |
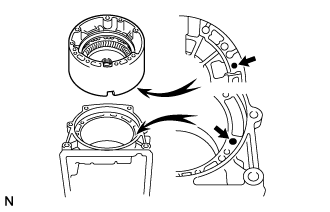 |
Place the overdrive case sub-assembly onto the transmission case with the cutout of the overdrive case sub-assembly facing downward.
- HINT:
- Make sure that the oil hole of the overdrive case sub-assembly is aligned with the oil hole of the transmission case.
Using a dial indicator, measure the overdrive brake disc set pack clearance by applying and releasing compressed air (392 kPa (4.0 kgf/cm2, 57 psi)) as shown in the illustration.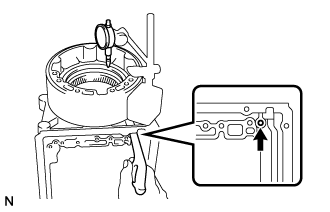
- Standard pack clearance:
- 0.75 to 1.25 mm (0.0296 to 0.0492 in.)
- HINT:
- If the piston stroke is still not as specified, replace the plates with ones of a different thickness.
- There are 2 types of plates that can be used to adjust the pack clearance. Select the one with the most appropriate thickness.
- If the piston stroke is still not as specified, replace the plates with ones of a different thickness.
- Plate Thickness:
Part No.
Thickness
35634-30080
1.95 to 2.05 mm (0.0768 to 0.0807 in.)
34634-30010
2.25 to 2.35 mm (0.0886 to 0.0925 in.)
Remove the overdrive case sub-assembly from the transmission case.
| INSPECT OVERDRIVE BRAKE DISC |
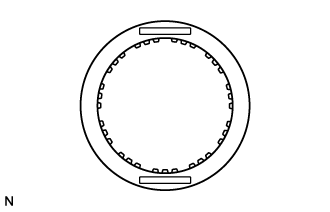 |
Check whether the sliding surfaces of the overdrive brake discs, plates and flange are worn or burnt.
If necessary, replace the overdrive brake discs, plates and flange.- NOTICE:
- If the lining of an overdrive brake disc is peeled off or discolored, or if any part of the printed numbers are damaged, replace all the overdrive brake discs.
- Before assembling new overdrive brake discs, soak them in ATF for at least 15 minutes.
- If the lining of an overdrive brake disc is peeled off or discolored, or if any part of the printed numbers are damaged, replace all the overdrive brake discs.
| INSPECT PISTON STROKE OF FRONT CLUTCH PISTON SUB-ASSEMBLY |
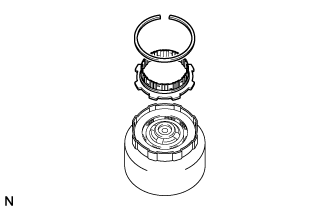 |
In order to check the piston stroke, install the rear clutch hub.
Install the snap ring.
Using SST and a dial indicator, measure the front clutch piston sub-assembly stroke by applying and releasing compressed air (392 kPa (4.0 kgf/cm2, 57 psi)) as shown in the illustration.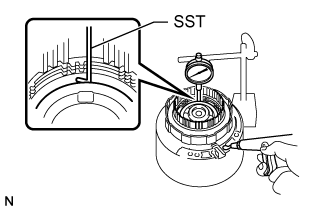
- SST
- 09350-20015
(09350-06120)
- Standard piston stroke:
- 1.40 to 1.60 mm (0.0552 to 0.0629 in.)
- HINT:
- If the piston stroke is still not as specified, replace the plates with ones of a different thickness.
- There are 2 types of plates that can be used to adjust the pack clearance. Select the one with the most appropriate thickness.
- Plate Thickness:
Part No.
Thickness
35634-22040
1.75 to 1.85 mm (0.0689 to 0.0728 in.)
34634-30070
1.95 to 2.05 mm (0.0768 to 0.0807 in.)
- If the piston stroke is still not as specified, replace the plates with ones of a different thickness.
| INSPECT FRONT CLUTCH DISC |
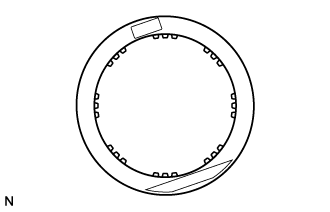 |
Check whether the sliding surfaces of the front clutch discs and plates are worn or burnt.
If necessary, replace them.- NOTICE:
- If the lining of a disc is peeled off or discolored, or if any part of the printed numbers are damaged, replace all the front clutch discs.
- Before assembling new front clutch discs, soak them in ATF for at least 15 minutes.
- If the lining of a disc is peeled off or discolored, or if any part of the printed numbers are damaged, replace all the front clutch discs.
| INSPECT FRONT CLUTCH PISTON SUB-ASSEMBLY |
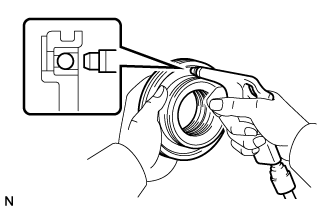 |
Check that the check ball is free by shaking the front clutch piston sub-assembly.
Check that the valve does not have leaks by applying low-pressure compressed air.
| INSPECT PISTON STROKE OF REAR CLUTCH PISTON SUB-ASSEMBLY |
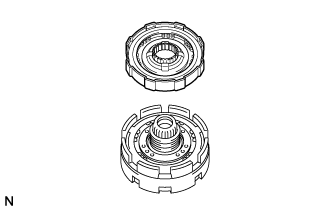 |
Place the rear clutch drum onto the center support sub-assembly.
Using a dial indicator, measure the rear clutch piston stroke by applying and releasing compressed air (392 kPa (4.0 kgf/cm2, 57 psi)) as shown in the illustration.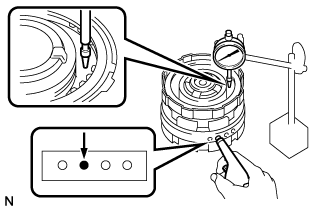
- Standard piston stroke:
- 0.90 to 1.30 mm (0.0355 to 0.0511 in.)
- HINT:
- If the piston stroke is still not as specified, replace the flange with one of a different thickness.
- There are 3 types of flanges that can be used to adjust the pack clearance. Select the one with the most appropriate thickness.
- Flange Thickness:
Part No.
Mark
Thickness
35675-22120
A
3.475 to 3.600 mm (0.137 to 0.141 in.)
35675-22130
B
3.675 to 3.800 mm (0.145 to 0.149 in.)
35675-22140
-
3.925 to 4.050 mm (0.155 to 0.159 in.)
- If the piston stroke is still not as specified, replace the flange with one of a different thickness.
| INSPECT REAR CLUTCH DISC |
|
|
Check whether the sliding surfaces of the rear clutch discs, plates and rear clutch flange are worn or burnt.
If necessary, replace them.- NOTICE:
- If the lining of a rear clutch disc is peeled off or discolored, or if any part of the printed numbers are damaged, replace all the rear clutch discs.
- Before assembling new rear clutch discs, soak them in ATF for at least 15 minutes.
- If the lining of a rear clutch disc is peeled off or discolored, or if any part of the printed numbers are damaged, replace all the rear clutch discs.
| INSPECT REAR CLUTCH PISTON SUB-ASSEMBLY |
|
|
Check that the check ball is free by shaking the rear clutch piston sub-assembly.
Check that the valve does not have leaks by applying low-pressure compressed air.
| INSPECT PISTON STROKE OF NO. 1 BRAKE PISTON |
Using a dial indicator, measure the No. 1 brake piston stroke by applying and releasing compressed air (392 kPa (4.0 kgf/cm2, 57 psi)) as shown in the illustration.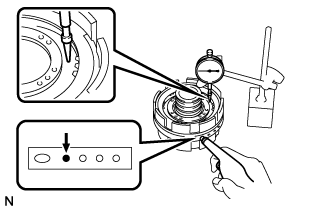
- Standard piston stroke:
- 0.75 to 1.35 mm (0.0296 to 0.0531 in.)
| INSPECT NO. 1 BRAKE DISC |
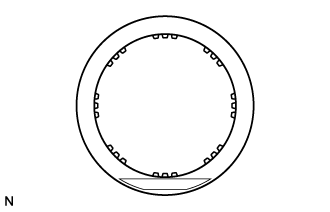 |
Check whether the sliding surfaces of the No. 1 brake discs, plates and flange are worn or burnt.
If necessary, replace them.- NOTICE:
- If the lining of a No. 1 brake disc is peeled off or discolored, or if any part of the printed numbers are damaged, replace all the No. 1 brake discs.
- Before assembling new No. 1 brake discs, soak them in ATF for at least 15 minutes.
- If the lining of a No. 1 brake disc is peeled off or discolored, or if any part of the printed numbers are damaged, replace all the No. 1 brake discs.
| INSPECT CENTER SUPPORT SUB-ASSEMBLY |
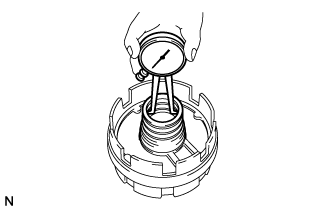 |
Using a caliper gauge, measure the inside diameter of the center support sub-assembly bush.
- Maximum inside diameter:
- 36.41 mm (1.43 in.)
| INSPECT PISTON STROKE OF NO. 2 BRAKE PISTON |
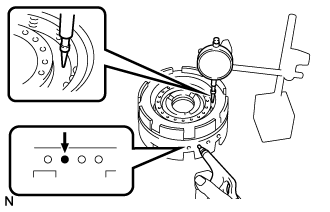 |
Using a dial indicator, measure the No. 2 brake piston stroke by applying and releasing compressed air (392 kPa (4.0 kgf/cm2, 57 psi)) as shown in the illustration.
- Standard piston stroke:
- 0.98 to 1.71 mm (0.0386 to 0.0673 in.)
| INSPECT NO. 2 BRAKE DISC |
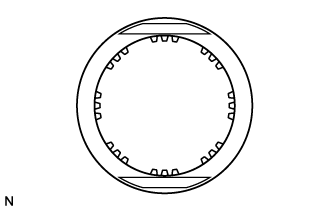 |
Check whether the sliding surfaces of the No. 2 brake discs, plates and No. 2 brake flange are worn or burnt.
If necessary, replace them.- NOTICE:
- If the lining of a No. 2 brake disc is peeled off or discolored, or if any part of the printed numbers are damaged, replace all the No. 2 brake discs.
- Before assembling new No. 2 brake discs, soak them in ATF for at least 15 minutes.
- If the lining of a No. 2 brake disc is peeled off or discolored, or if any part of the printed numbers are damaged, replace all the No. 2 brake discs.
| INSPECT NO. 1 ONE-WAY CLUTCH |
Hold the No. 1 one-way clutch and turn the planetary sun gear sub-assembly. Check that the planetary sun gear sub-assembly can be turned counterclockwise but cannot be turned clockwise.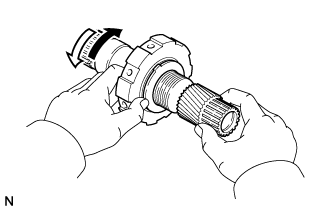
Text in Illustration
Lock
Free
| INSPECT PLANETARY SUN GEAR SUB-ASSEMBLY |
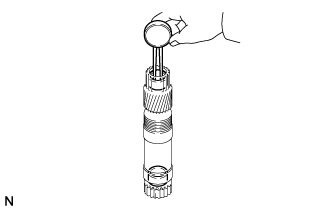 |
Using a caliper gauge, measure the inside diameter of the planetary sun gear sub-assembly bush.
- Maximum inside diameter:
- 21.53 mm (0.848 in.)
| INSPECT NO. 2 ONE-WAY CLUTCH |
Hold the No. 2 one-way clutch inner race sub-assembly and turn the front planetary gear sub-assembly. Check that the front planetary gear sub-assembly can be turned counterclockwise but cannot be turned clockwise.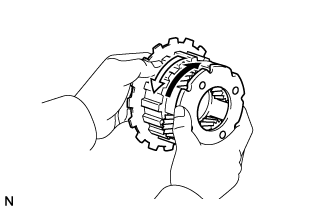
Text in Illustration
Lock
Free
| INSPECT FRONT PLANETARY GEAR SUB-ASSEMBLY |
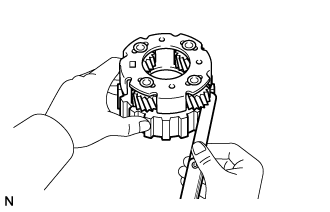 |
Using a feeler gauge, measure the planetary pinion gear thrust clearance.
- Standard clearance:
- 0.20 to 0.50 mm (0.00788 to 0.0196 in.)
| INSPECT OUTPUT SHAFT ASSEMBLY |
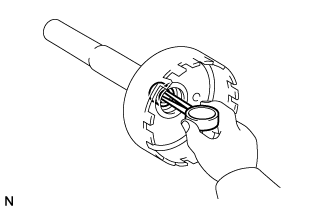 |
Using a caliper gauge, measure the inside diameter of the output shaft assembly bush.
- Maximum inside diameter:
- 18.03 mm (0.710 in.)
| INSPECT REAR PLANETARY GEAR ASSEMBLY |
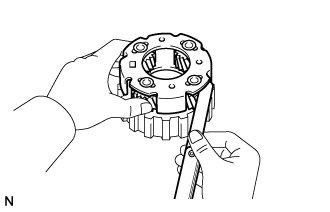 |
Using a feeler gauge, measure the planetary pinion gear thrust clearance.
- Standard clearance:
- 0.20 to 0.50 mm (0.00788 to 0.0196 in.)
| INSPECT PACK CLEARANCE OF NO. 3 BRAKE DISC SET |
Using a vernier caliper, measure the clearance between the No. 3 brake disc and transmission case as shown in the illustration.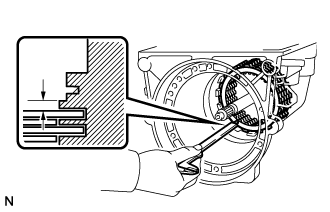
- Standard pack clearance:
- 0.52 to 1.27 mm (0.0205 to 0.0499 in.)
- HINT:
- If the result is not as specified, replace the pressure plate with one of a different thickness.
- There are 6 types of pressure plates that can be used to adjust the pack clearance. Select the one with the most appropriate thickness.
- If the result is not as specified, replace the pressure plate with one of a different thickness.
- Pressure Plate Thickness:
Part No.
Mark
Thickness
35639-22010
-
2.95 to 3.05 mm (0.117 to 0.120 in.)
35639-22020
325
3.20 to 3.30 mm (0.126 to 0.129 in.)
35639-22030
350
3.45 to 3.55 mm (0.136 to 0.139 in.)
35639-22040
375
3.70 to 3.80 mm (0.146 to 0.149 in.)
35639-22050
400
3.95 to 4.05 mm (0.156 to 0.159 in.)
35639-22060
425
4.20 to 4.30 mm (0.166 to 0.169 in.)
| INSPECT NO. 3 BRAKE DISC |
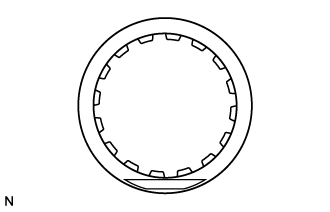 |
Check whether the sliding surfaces of the No. 3 brake discs and plates are worn or burnt.
If necessary, replace them.- NOTICE:
- If the lining of a No. 3 brake disc is peeled off or discolored, or if any part of the printed numbers are damaged, replace all the No. 3 brake discs.
- Before assembling new No. 3 brake discs, soak them in ATF for at least 15 minutes.
- If the lining of a No. 3 brake disc is peeled off or discolored, or if any part of the printed numbers are damaged, replace all the No. 3 brake discs.
| INSPECT NO. 3 BRAKE PISTON MOVEMENT |
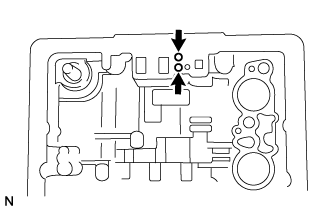 |
Check that the No. 3 brake pistons move smoothly when applying compressed air into and releasing compressed air from the transmission case.
| INSPECT TRANSMISSION CASE |
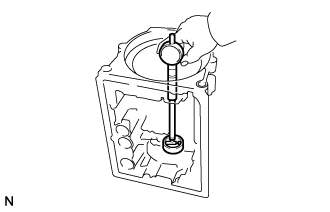 |
Using a cylinder gauge, measure the inside diameter of the transmission case bush.
- Maximum inside diameter:
- 38.19 mm (1.50 in.)
| INSPECT OUTPUT SHAFT ASSEMBLY |
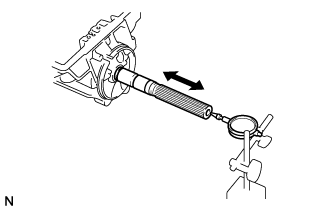 |
Using a dial indicator, measure the end play of the output shaft assembly while moving the output shaft assembly by hand.
- Standard end play:
- 0.3 to 0.9 mm (0.0119 to 0.0354 in.)
Check that the output shaft assembly rotates smoothly.