INSTALLATION
Removal / installation · Vehicles built from Oct 2014
| 1. INSTALL SUCTION CONTROL VALVE ASSEMBLY |

- NOTICE:
- Before replacing the suction control valve, be sure to clean the surrounding area.
- When replacing the suction control valve, make sure that your hands are clean and do not use gloves, etc.
- Be careful as the installation procedure differs depending on the type of suction control valve.
- Before replacing the suction control valve, be sure to clean the surrounding area.
- HINT:
- There are different types of suction control valve assemblies as shown in the illustration. Therefore, be sure to refer to the replacement table below when replacing the suction control valve assembly.
-
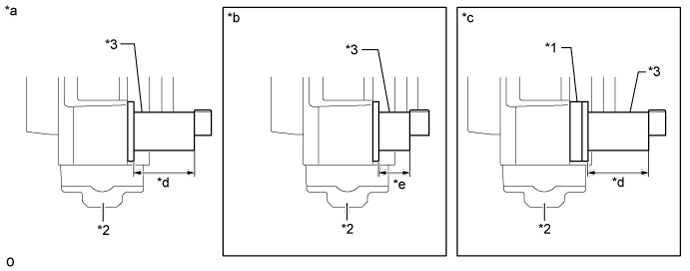

Text in Illustration *1
Attachment
*2
Injection Pump
*3
Suction Control Valve
-
-
*a
SV1 Type
*b
SV2 Type
*c
SV1 Type with Attachment
*d
45 mm (1.77 in.)
*e
23 mm (0.906 in.)
-
-
Suction Control Valve Assembly Replacement Table Suction Control Valve Assembly Currently Installed on Vehicle
Replacement Part to Use
SV1 Type
SV1 Type
SV2 Type
SV1 Type with Attachment
SV1 Type with Attachment
SV1 Type with Attachment
Apply engine oil to a new O-ring.
- NOTICE:
- Be sure to use clean engine oil.
- As the type of O-ring differs depending on the type of suction control valve, be sure to check the following table before installation.
- Be sure to use clean engine oil.
Type of Suction Control Valve Assembly
O-ring Inner Diameter
SV1 Type
22.8 mm (0.898 in.)
SV1 Type with Attachment
19.8 mm (0.780 in.)
Install the O-ring to the O-ring groove of the injection pump.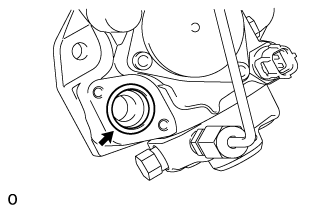
- NOTICE:
- Make sure that the O-ring and O-ring groove are free of foreign matter and are not damaged.
Install guide pins used for the insertion of the suction control valve to the bolt holes.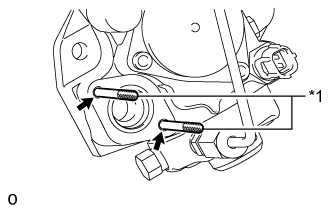
Text in Illustration *1
Guide Pin
- HINT:
- When installing the guide pins, it is sufficient to fix them lightly in place by hand.
- The guide pins are used to make sure that the suction control valve remains perpendicular to the injection pump when it is inserted.
- When installing the guide pins, it is sufficient to fix them lightly in place by hand.
Apply engine oil to the O-ring at the end of the suction control valve.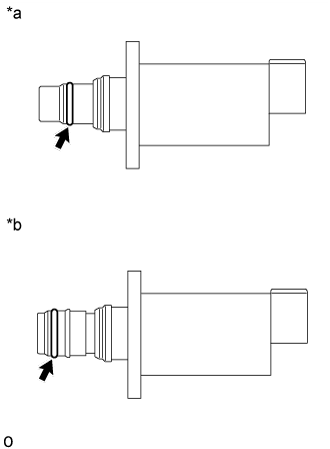
Text in Illustration *a
SV1 Type
*b
SV1 Type with Attachment
- NOTICE:
- Be sure to use clean engine oil.
SV1 Type:
While making sure that the suction control valve and injection pump remain perpendicular to each other, slide the suction control valve along the guide pins and insert it into the injection pump as shown in the illustration.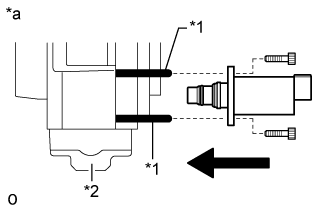
Text in Illustration *1
Guide Pin
*2
Injection Pump
*a
SV1 Type
- NOTICE:
- Make sure that the contact surfaces of the injection pump and suction control valve are free of foreign matter and are not damaged.
- Do not insert the suction control valve at an angle.
- Make sure that the O-ring does not get pinched between the parts. If it does, replace it with a new one.
- Insert the suction control valve until it contacts the injection pump.
- Make sure that the contact surfaces of the injection pump and suction control valve are free of foreign matter and are not damaged.
While holding the suction control valve in place, remove the guide pins, temporarily install 2 new bolts and uniformly tighten them by hand.
- NOTICE:
- Do not use tools. Tighten the bolts by hand until the surfaces of the suction control valve and injection pump contact each other.
Using a 5 mm hexagon wrench, uniformly tighten the 2 bolts.
- Torque:
- 9.0 N*m{ 92 kgf*cm , 80 in.*lbf }
Connect the connector to the suction control valve.
- NOTICE:
- Make sure that there is not excessive slack or tension in the wire harness of the suction control valve.
SV1 Type with Attachment:
Apply engine oil to a new O-ring.
- NOTICE:
- Be sure to use clean engine oil.
- HINT:
- The inner diameter of the O-ring is 22.8 mm (0.898 in.).
Install the O-ring to the deep O-ring groove on the attachment, and then temporarily install the attachment to the suction control valve.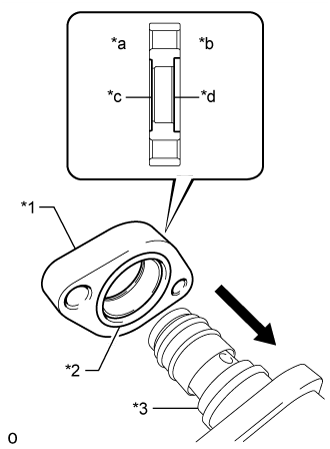
Text in Illustration *1
Attachment
*2
New O-ring
*3
Suction Control Valve (SV1 Type with Attachment)
*a
Injection Pump Side
*b
Suction Control Valve Side
*c
O-ring Groove (Shallow)
*d
O-ring Groove (Deep)
- NOTICE:
- When installing the attachment, make sure that the deep O-ring groove is facing the suction control valve.
- Make sure that the O-ring and O-ring groove are free of foreign matter and are not damaged.
- Make sure that the contact surfaces of the suction control valve and attachment are free of foreign matter and are not damaged.
- When installing the attachment, make sure that the deep O-ring groove is facing the suction control valve.
While making sure that the suction control valve and injection pump remain perpendicular to each other, slide the suction control valve and attachment together as a set along the guide pins and insert the suction control valve into the injection pump as shown in the illustration.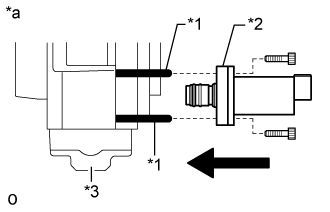
Text in Illustration *1
Guide Pin
*2
Attachment
*3
Injection Pump
*a
SV1 Type with Attachment
- NOTICE:
- Make sure that the contact surfaces of the injection pump and attachment are free of foreign matter and are not damaged.
- Do not insert the suction control valve at an angle.
- Make sure that the O-ring does not get pinched between the parts. If it does, replace it with a new one.
- Insert the suction control valve until the attachment contacts the injection pump.
- Make sure that the contact surfaces of the injection pump and attachment are free of foreign matter and are not damaged.
While holding the suction control valve in place, remove the guide pins, temporarily install 2 new bolts and uniformly tighten them by hand.
- NOTICE:
- Do not use tools. Tighten the bolts by hand until the surfaces of the suction control valve and attachment, and the surfaces of the attachment and injection pump contact each other.
Using a 5 mm hexagon wrench, uniformly tighten the 2 bolts.
- Torque:
- 9.0 N*m{ 92 kgf*cm , 80 in.*lbf }
Connect the connector to the suction control valve.
- NOTICE:
- Make sure that there is not excessive slack or tension in the wire harness of the suction control valve.
| 2. INSTALL FUEL SUPPLY PUMP ASSEMBLY |
| 3. BLEED AIR FROM FUEL SYSTEM |
Using the hand pump mounted on the fuel filter cap, bleed air from the fuel system. Continue pumping until the pump resistance increases.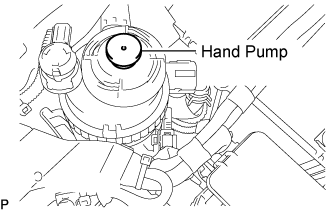
- NOTICE:
- Hand pump pumping speed: Max. 2 strokes/ sec.
- The hand pump must be pushed with a full stroke during pumping.
- When the fuel pressure at the supply pump inlet port reaches a saturated pressure, the hand pump resistance increases.
- If pumping is interrupted during the air bleeding process, fuel in the fuel line may return to the fuel tank. Continue pumping until the hand pump resistance increases.
- If the hand pump resistance does not increase despite consecutively pumping 200 times or more, there may be a fuel leak between the fuel tank and fuel filter, the hand pump may be malfunctioning, or the vehicle may have run out of fuel.
- If air bleeding using the hand pump is incomplete, the common rail pressure does not rise to the pressure range necessary for normal use, and the engine cannot be started.
- Hand pump pumping speed: Max. 2 strokes/ sec.
Check if the engine starts.
- NOTICE:
- Even if air bleeding using the hand pump has been completed, the starter may need to be cranked for 10 seconds or more to start the engine.
- Do not crank the engine continuously for more than 20 seconds. The battery may be discharged.
- Use a fully-charged battery.
- Even if air bleeding using the hand pump has been completed, the starter may need to be cranked for 10 seconds or more to start the engine.
When the engine can be started, proceed to the next step.
If the engine cannot be started, bleed air again using the hand pump until the hand pump resistance increases (refer to the procedures above). Then start the engine.
Turn the ignition switch off.
Connect the GTS to the DLC3.
Turn the ignition switch to ON and turn the GTS on.
Clear the DTCs.
- w/ DPF: (Click here)
- w/o DPF: (Click here)
- w/ DPF: (Click here)
Start the engine.*1
Enter the following menus: Powertrain / Engine and ECT / Active Test / Test the Fuel Leak.*2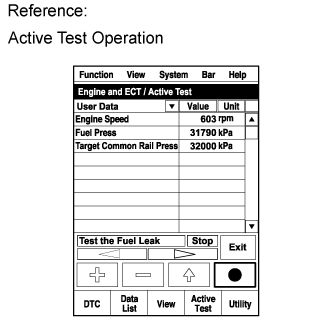
Perform the following test 5 times with on/off intervals of 10 seconds: Active Test / Test the Fuel Leak.*3
Allow the engine to idle for 3 minutes or more after performing the Active Test for the fifth time.
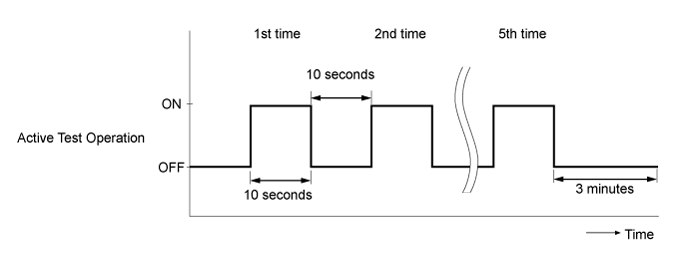
- HINT:
- When the Active Test "Test the Fuel Leak" is used to change the pump control mode, the actual fuel pressure inside the common rail drops below the target fuel pressure when the Active Test is off, but this is normal and does not indicate a pump malfunction.
Enter the following menus: Powertrain / Engine and ECT / DTC.
Read Current DTCs.
Clear the DTCs.
- w/ DPF: (Click here)
- w/o DPF: (Click here)
- HINT:
- It is necessary to clear the DTCs as DTC P1604 or P1605 may be stored when air is bled from the fuel system after replacing or repairing fuel system parts.
- w/ DPF: (Click here)
Repeat steps *1 to *3.
Enter the following menus: Powertrain / Engine and ECT / DTC.
Read Current DTCs.
- OK:
- No DTCs are output.
| 4. SUPPLY PUMP INITIALIZATION PROCEDURE |
- w/ DPF: (Click here)
- w/o DPF: (Click here)
| 5. INSPECT FOR FUEL LEAK |
Perform the Active Test.
Connect the GTS to the DLC3.
Turn the ignition switch to ON.
Turn the GTS on.
Enter the following menus: Powertrain / Engine and ECT / Active Test.
Perform the Active Test.
Tester Display
Test Part
Control Range
Diagnostic Notes
Test the Fuel Leak
Pressurize common rail interior and check for fuel leaks
Stop/Start
- Fuel pressure inside common rail increased to specified value and engine speed increased to 2000 rpm when Active Test is performed
- Above conditions preserved while Active Test is being performed
- Fuel pressure inside common rail increased to specified value and engine speed increased to 2000 rpm when Active Test is performed