REMOVAL
Removal / installation · Vehicles built from Jan 2017
- NOTICE:
- When replacing the parts in the following chart (A), replace the No. 1 injection pipe sub-assembly, No. 2 injection pipe sub-assembly and/or fuel inlet pipe sub-assembly with new ones.
Replaced Parts (A)
Pipes Requiring New Replacement
Injector assembly (including shuffling the injector assemblies between the cylinders)
- No. 1 injection pipe sub-assembly
- No. 2 injection pipe sub-assembly
Supply pump assembly
Fuel inlet pipe sub-assembly
- Common rail assembly
- Cylinder block sub-assembly
- Cylinder head sub-assembly
- Cylinder head gasket
- Timing chain case assembly
- No. 1 injection pipe sub-assembly
- No. 2 injection pipe sub-assembly
- Fuel inlet pipe sub-assembly
- No. 1 injection pipe sub-assembly
- After removing the No. 1 injection pipe sub-assembly, No. 2 injection pipe sub-assembly and/or fuel inlet pipe sub-assembly, clean them with a brush and compressed air.
- The injector assembly is a precision instrument. Do not use the injector assembly if it is struck or dropped.
- The supply pump assembly is a precision instrument. Do not use the supply pump assembly if it is struck or dropped.
- The common rail assembly is a precision instrument. Do not use the common rail assembly if it is struck or dropped.
- Hold the supply pump assembly itself during removal and installation. Do not hold the pre-stroke control valve or fuel pipe, etc.
- Hold the common rail assembly itself during removal and installation. Do not hold the pressure discharge valve or fuel pressure sensor, etc.
- Make sure foreign matter does not enter the fuel path.
- When replacing the parts in the following chart (A), replace the No. 1 injection pipe sub-assembly, No. 2 injection pipe sub-assembly and/or fuel inlet pipe sub-assembly with new ones.
| 1. REMOVE ENGINE WIRE |
| 2. REMOVE INTERCOOLER AIR TUBE |

Remove the 2 bolts and air tube support bracket.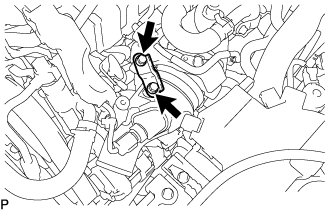

Disconnect the connector from the intake air temperature sensor.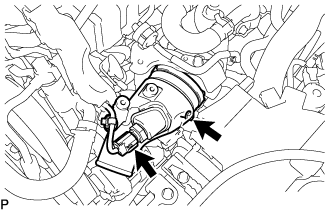
Loosen the hose clamp and remove the intercooler air tube from the diesel throttle body assembly.
| 3. REMOVE GAS FILTER |
Disconnect the 2 vacuum hoses from the turbo pressure sensor and intake manifold.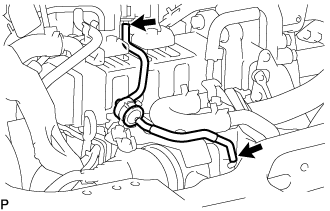
Remove the gas filter from the gas filter bracket.
| 4. REMOVE GAS FILTER BRACKET |
Remove the bolt and gas filter bracket from the diesel throttle body assembly.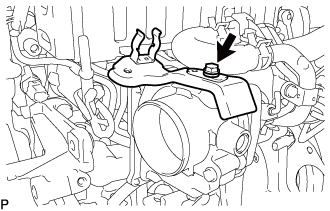
| 5. REMOVE DIESEL THROTTLE BODY ASSEMBLY |
Disconnect the connector and clamp.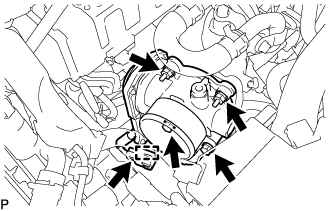
Remove the 2 bolts, 2 nuts, diesel throttle body and gasket.
Disconnect the connector to remove the emission control valve wire from the diesel throttle body assembly.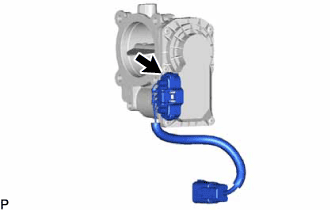
| 6. REMOVE NO. 2 WATER BY-PASS PIPE |
Remove the 2 bolts and No. 2 water by-pass pipe.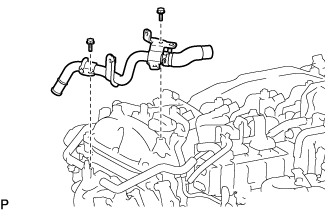
| 7. REMOVE DIFFERENTIAL PRESSURE SENSOR |
Disconnect the connector from the differential pressure sensor.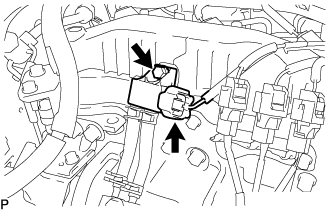
Remove the bolt and differential pressure sensor from the pipe clamp.
Slide the 2 clamps and disconnect the 2 air hoses from the No. 1 vacuum pipe and No. 2 vacuum pipe.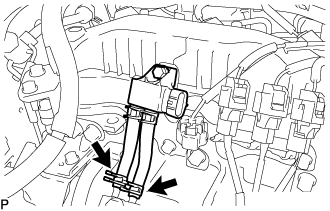
Slide the 2 clamps and remove the 2 air hoses from the differential pressure sensor.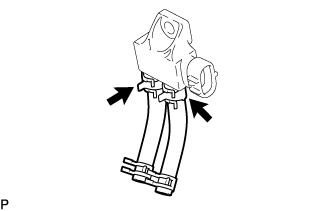
| 8. REMOVE EXHAUST GAS TEMPERATURE SENSOR |
- CAUTION:
- To prevent burns, do not touch the engine, exhaust manifold or other high temperature components while the engine is hot.
Disconnect the 3 connectors from the 3 exhaust gas temperature sensors.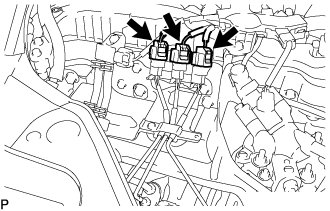
Remove the nut and disconnect the No. 3 exhaust gas temperature sensor from the No. 1 vacuum pipe.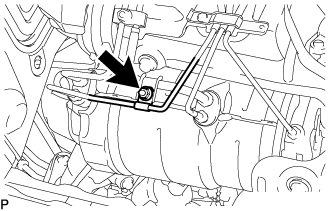
Remove the bolt and open the clamp of the pipe clamp.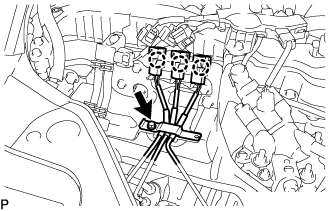
Detach the 3 connectors from the pipe clamp.
Using a 14 mm union nut wrench, remove the exhaust gas temperature sensor from the exhaust manifold converter sub-assembly.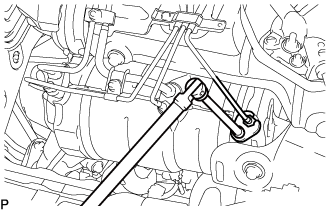
Using a 14 mm union nut wrench, remove the No. 2 exhaust gas temperature sensor from the exhaust manifold converter sub-assembly.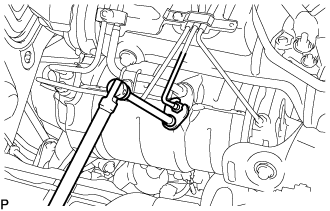
Using a 14 mm union nut wrench, remove the No. 3 exhaust gas temperature sensor from the exhaust manifold converter sub-assembly.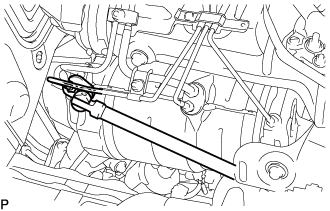
| 9. REMOVE NO. 1 VACUUM PIPE |
Remove the nut and clamp from the No. 1 vacuum pipe and No. 2 vacuum pipe.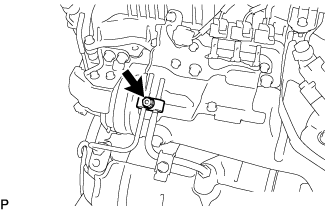
Using a 17 mm union nut wrench, remove the No. 1 vacuum pipe from the exhaust manifold converter sub-assembly.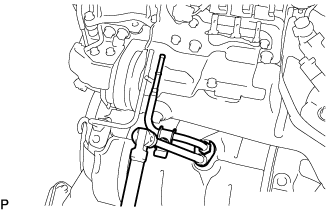
| 10. REMOVE NO. 2 VACUUM PIPE |
Using a 17 mm union nut wrench, remove the No. 2 vacuum pipe from the exhaust manifold converter sub-assembly.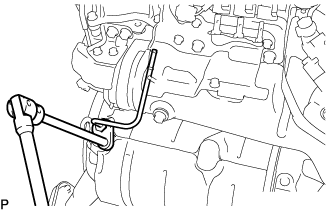
Remove the clamp from the pipe clamp.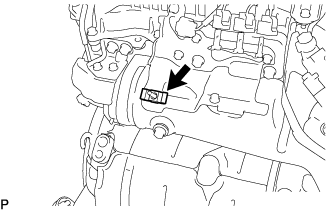
| 11. REMOVE PIPE CLAMP |
Remove the 3 bolts and pipe clamp from the engine cover bracket.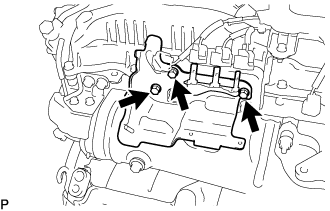
| 12. REMOVE ENGINE COVER BRACKET |
Remove the 2 bolts and engine cover bracket from the cylinder head sub-assembly.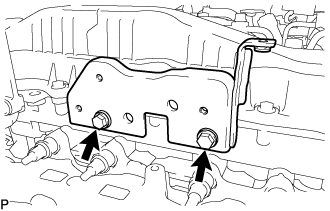
| 13. REMOVE DIESEL TURBO PRESSURE SENSOR |
Disconnect the diesel turbo pressure sensor connector.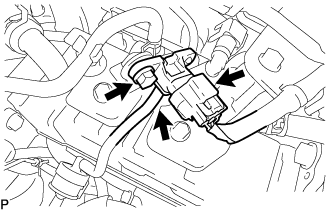
Remove the bolt and diesel turbo pressure sensor.
Disconnect the vacuum hose from the diesel turbo pressure sensor.
| 14. REMOVE EGR VALVE BRACKET |
Remove the bolt, nut and EGR valve bracket from the electric EGR control valve assembly and intake manifold.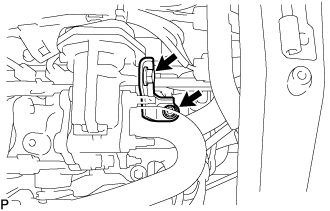
| 15. REMOVE NO. 2 EGR PIPE |
Remove the bolt, 4 nuts and No. 2 EGR pipe from the electric EGR control valve assembly and intake manifold.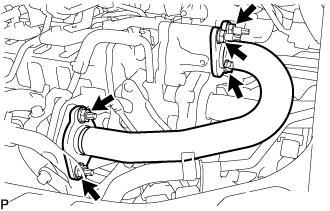
Remove the 2 gaskets.
| 16. REMOVE NO. 3 WATER BY-PASS PIPE SUB-ASSEMBLY |
Disconnect the No. 4 fuel hose from the No. 3 water by-pass pipe sub-assembly.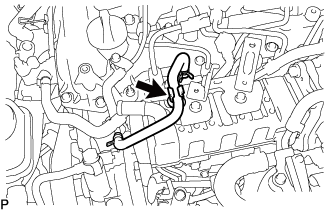
Slide the clamp and disconnect the No. 8 water by-pass hose from the No. 3 water by-pass pipe sub-assembly.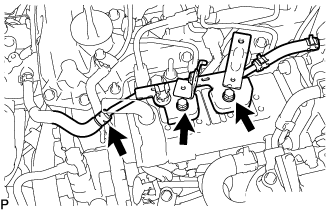
Remove the 2 bolts and No. 3 water by-pass pipe sub-assembly from the No. 1 EGR cooler.
| 17. REMOVE CONNECTING WIRE |
Disconnect the connector from the common rail assembly.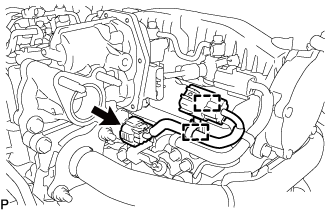
Detach the 2 clamps and remove the connecting wire from the bracket.
| 18. REMOVE NO. 1 EGR PIPE SUB-ASSEMBLY |
Remove the 4 nuts, bolt and No. 1 EGR pipe sub-assembly from the exhaust manifold, electric EGR control valve assembly and No. 1 vacuum transmitting pipe sub-assembly.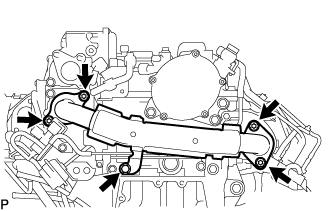
Remove the 2 gaskets from the exhaust manifold and electric EGR control valve assembly.
Using an E8 "TORX" socket wrench, remove the 2 stud bolts from the exhaust manifold.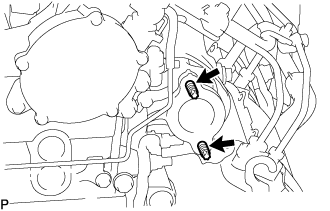
| 19. REMOVE VACUUM CONTROL VALVE SET |
Disconnect the connector from the vacuum control valve set.
Disconnect the 2 vacuum hoses from the vacuum control valve set and No. 2 EGR valve assembly.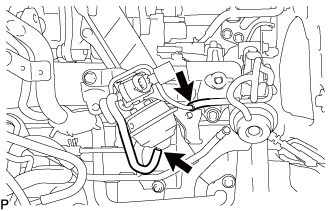
Remove the 2 bolts and vacuum control valve set from the intake manifold.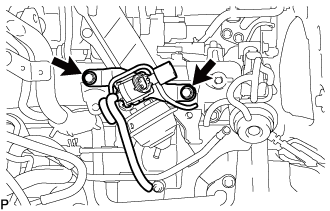
| 20. REMOVE NO. 4 WATER BY-PASS PIPE SUB-ASSEMBLY |
Slide the clamp and disconnect the No. 6 water by-pass hose from the No. 4 water by-pass pipe sub-assembly.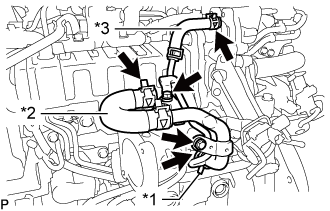
Text in Illustration *1
No. 6 Water By-pass Hose
*2
No. 7 Water By-pass Hose
*3
Water Hose
Slide the clamp and disconnect the No. 7 water by-pass hose from the No. 4 water by-pass pipe sub-assembly.
Slide the clamp and disconnect the water hose from the No. 2 EGR valve assembly.
Remove the 2 bolts and No. 4 water by-pass pipe sub-assembly from the intake manifold.
| 21. REMOVE NO. 1 EGR COOLER AND NO. 2 EGR VALVE ASSEMBLY WITH ELECTRIC EGR CONTROL VALVE ASSEMBLY |
Remove the 4 bolts and No. 1 EGR cooler and No. 2 EGR valve assembly with electric EGR control valve assembly from the intake manifold.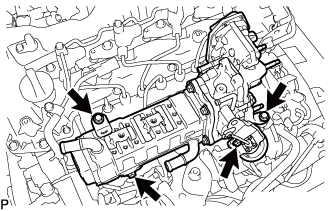
| 22. REMOVE ENGINE OIL LEVEL DIPSTICK GUIDE |
w/ No. 2 Fuel Pipe Clamp: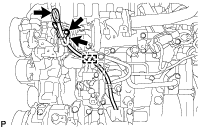
Detach the No. 2 fuel pipe clamp from the engine oil level dipstick guide.
Remove the engine oil level dipstick.
Slide the clip and disconnect vacuum hose from the intake manifold.
Remove the bolt and engine oil level dipstick guide.
Remove the O-ring and grommet from the engine oil level dipstick guide.
| 23. REMOVE NO. 2 FUEL PIPE |
Slide the clamp and disconnect the No. 1 fuel hose from the No. 2 fuel pipe.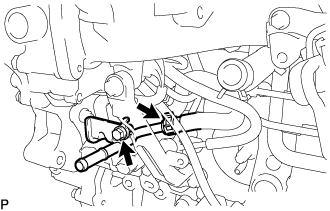
Remove the bolt and No. 2 fuel pipe from the manifold stay.
| 24. REMOVE WIRING HARNESS CLAMP BRACKET |
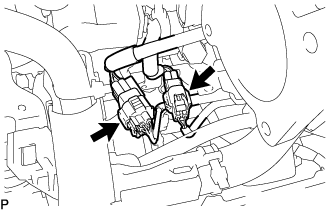 |
Disconnect the diesel throttle body assembly connector and pre-stroke control valve connector.
Detach the 2 wire harness clamps.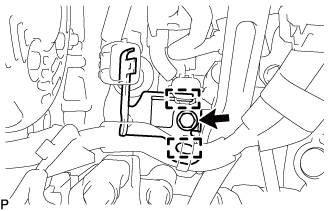
Remove the bolt and wiring harness clamp bracket.
| 25. REMOVE MANIFOLD STAY |
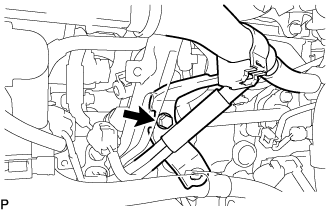 |
Remove the bolt and disconnect the wiring harness clamp bracket from the manifold stay.
Remove the 2 bolts and manifold stay.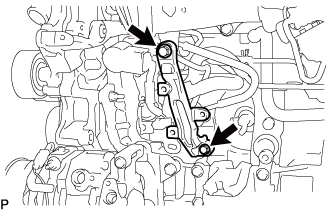
| 26. REMOVE FUEL INJECTION PUMP COVER SUB-ASSEMBLY |
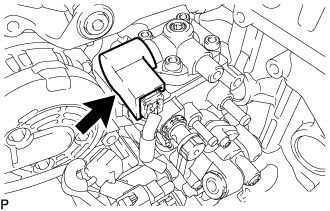 |
Remove the fuel injection pump cover sub-assembly from the supply pump assembly.
| 27. REMOVE FUEL PUMP MOTOR WIRE |
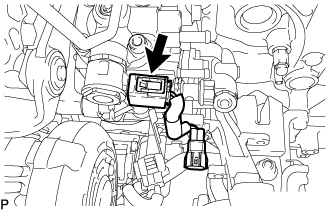 |
Disconnect the fuel pump motor wire connector and remove the fuel pump motor wire.
| 28. REMOVE NO. 4 FUEL PIPE SUB-ASSEMBLY |
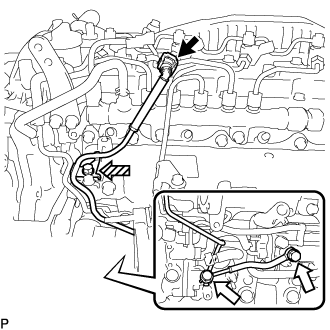 |
Disconnect the No. 4 fuel pipe sub-assembly from the No. 1 fuel pipe (Click here).
Text in Illustration 
Union Bolt

Bolt
Remove the bolt from the intake manifold.
Remove the 2 union bolts and 2 gaskets from the supply pump assembly and fuel filter.
| 29. REMOVE NO. 3 FUEL PIPE |
| 30. REMOVE NO. 2 FUEL HOSE |
Slide the 2 clips and remove the No. 2 fuel hose from the supply pump assembly and No. 3 nozzle leakage pipe assembly.
| 31. REMOVE NO. 1 FUEL HOSE |
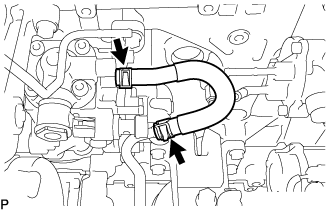 |
Slide the 2 clips and remove the No. 1 fuel hose from the supply pump assembly and No. 2 fuel pipe.
| 32. REMOVE FUEL INLET PIPE SUB-ASSEMBLY |
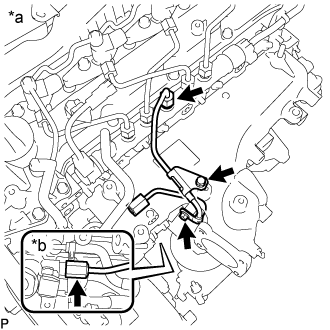 |
| *a |
Common Rail Assembly Side |
| *b |
Fuel Supply Pump Assembly Side |
Remove the 2 bolts, No. 1 injection pipe clamp and No. 2 injection pipe clamp.
Using SST, loosen the fuel inlet pipe sub-assembly union nut of the common rail assembly side.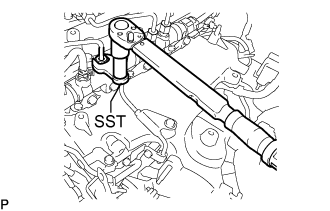
- SST
- 09245-11010
- NOTICE:
- If the No. 1 or No. 2 injection pipe clamp is removed from the inlet pipe sub-assembly, replace the No. 1 or No. 2 injection clamp with a new one.
Using a 19 mm union nut wrench, loosen the inlet pipe sub-assembly union nut of the fuel supply pump assembly side.
| 33. REMOVE NO. 2 NOZZLE LEAKAGE PIPE ASSEMBLY |
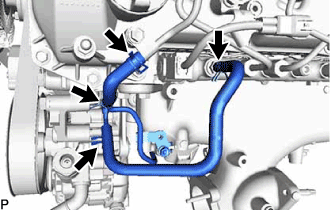 |
Slide the 2 clamps and remove the No. 4 fuel hose from the No. 2 nozzle leakage pipe assembly and common rail assembly.
Slide the 2 clamps and remove the No. 5 fuel hose from the No. 1 nozzle leakage pipe assembly and No. 2 nozzle leakage pipe assembly.
Slide the clamp and disconnect the No. 6 fuel hose from the No. 3 nozzle leakage pipe assembly.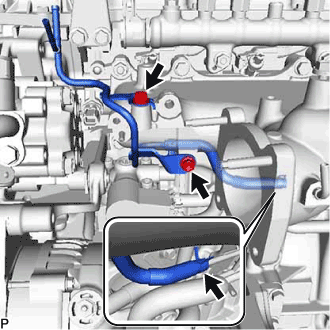
Remove the 2 bolts and No. 2 nozzle leakage pipe assembly.
| 34. REMOVE INTAKE MANIFOLD |
Remove the bolt and disconnect the wire harness bracket.
Remove the 7 bolts, 2 nuts, intake manifold and gasket.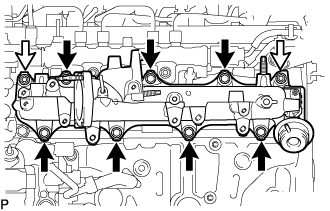
Text in Illustration 
Bolt
Nut
| 35. REMOVE WIRING HARNESS CLAMP BRACKET |
Disconnect the pressure discharge valve connector from the common rail assembly.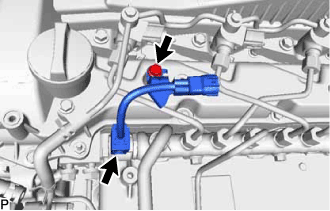
Remove the bolt and wiring harness clamp bracket from the cylinder head cover sub-assembly.
| 36. REMOVE NO. 1 FUEL PIPE |
Remove the bolt, union bolt and gasket and disconnect the No. 1 fuel pipe from the cylinder head cover sub-assembly and exhaust fuel addition injector assembly.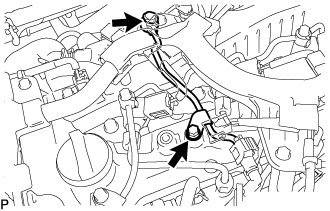
Disconnect the No. 4 fuel pipe and remove the No. 1 fuel pipe (Click here).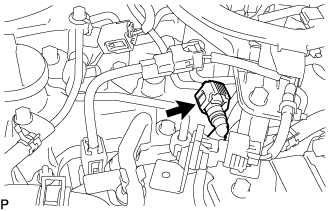
| 37. REMOVE NOZZLE LEAKAGE PIPE ASSEMBLY |
Slide the clamp and disconnect the No. 5 fuel hose from the nozzle leakage pipe assembly.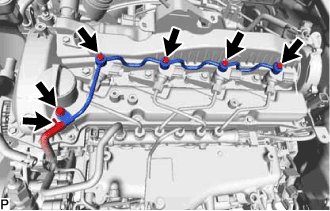
Remove the 4 union bolts and 4 gaskets.
Remove the bolt and nozzle leakage pipe assembly.
| 38. REMOVE WIRING HARNESS CLAMP BRACKET |
for Upper Side: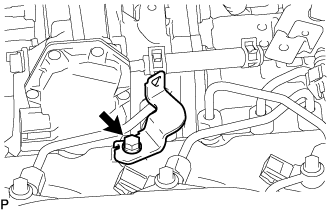
Remove the bolt and wiring harness clamp bracket from the cylinder head cover sub-assembly.
for Rear Side: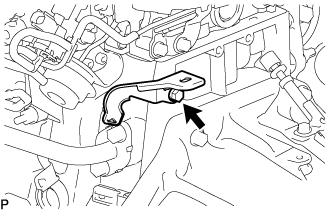
Remove the bolt and wiring harness clamp bracket from the cylinder block sub-assembly.
| 39. REMOVE NO. 1 AND NO. 2 INJECTION PIPE SUB-ASSEMBLY |
- NOTICE:
- After removing the No. 1 and No. 2 injection pipe sub-assemblies, cover the common rail assembly with electrical tape to prevent dirt or foreign objects from entering the pipe inlet. Also, protect the injector inlets with electrical tape or plastic bags.
Using SST, loosen the No. 1 and No. 2 injection pipe sub-assemblies and 8 union nuts of the fuel injector assembly side and common rail assembly side.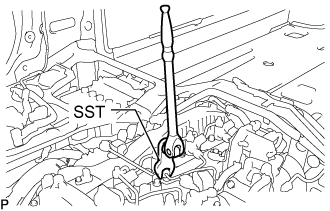
- SST
- 09245-11010
Remove the 2 No. 1 injection pipe sub-assemblies and 2 No. 2 injection pipe sub-assemblies.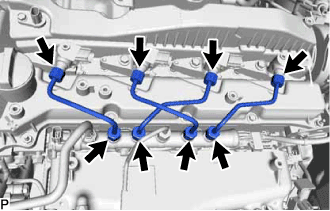
- NOTICE:
- When removing the No. 1 injection pipe sub-assembly and No. 2 injection pipe sub-assembly, store the injector assemblies in the correct order so that they can be returned to their original locations when reassembling.
| 40. REMOVE COMMON RAIL ASSEMBLY |
Detach the wire harness clamp.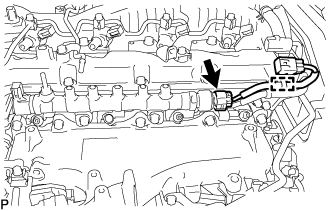
Disconnect the fuel pressure sensor connector from the common rail assembly.
Remove the 2 nuts and common rail assembly.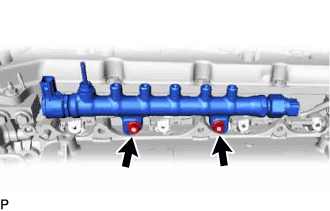
- NOTICE:
- Do not remove the pressure discharge valve or fuel pressure sensor.
| 41. REMOVE NO. 1 GLOW PLUG CONNECTOR |
- CAUTION:
- Make sure to wear protective gloves when performing work to avoid burns.
Using an E8 "TORX" socket wrench, remove the stud bolt from the intake manifold.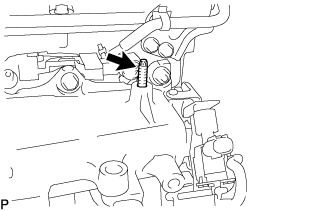
Remove the 4 glow plug screw grommets.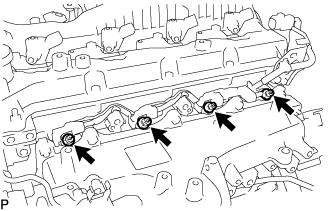
Remove the 4 nuts and No. 1 glow plug connector.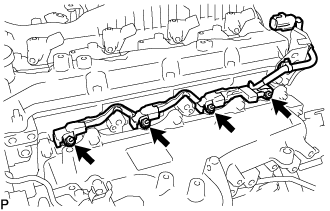
| 42. REMOVE GLOW PLUG ASSEMBLY |
- CAUTION:
- Make sure to wear protective gloves when performing work to avoid burns.
Using a 10 mm deep socket wrench, remove the 4 glow plug assemblies.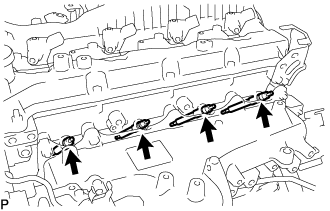
| 43. REMOVE BRACKET |
Remove the 2 bolts and bracket from the cylinder head sub-assembly.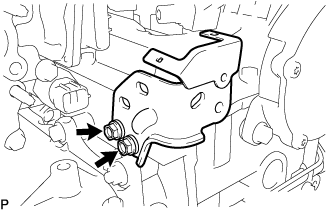
| 44. REMOVE FUEL FILTER (for Cylinder Block Side) |
Remove the 2 nuts and diesel fuel filter assembly from the cylinder block sub-assembly.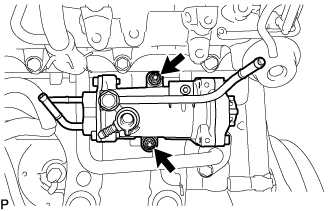
| 45. REMOVE NO. 5 WATER BY-PASS PIPE SUB-ASSEMBLY |
Remove the 3 bolts, No. 5 water by-pass pipe sub-assembly and gasket from the cylinder block sub-assembly.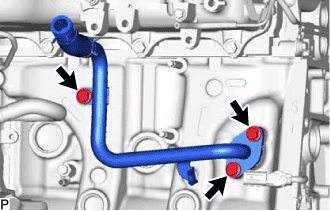
| 46. REMOVE COOLER COMPRESSOR ASSEMBLY |
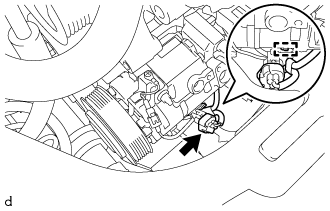 |
Detach the clamp and disconnect the connector.
Remove the 2 bolts and 2 nuts.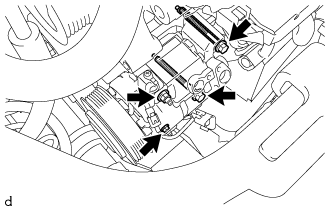
Using an E8 "TORX" socket wrench, remove the 2 stud bolts and cooler compressor assembly.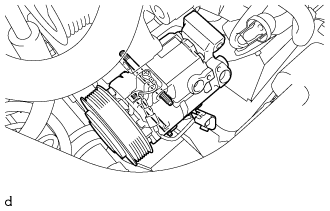
| 47. REMOVE NO. 1 IDLER PULLEY SUB-ASSEMBLY |
Remove the bolt and No. 1 idler pulley sub-assembly from the No. 1 compressor mounting bracket.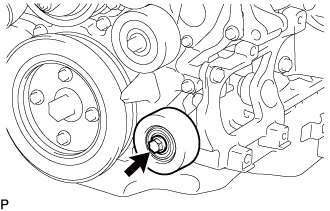
| 48. REMOVE NO. 1 COMPRESSOR MOUNTING BRACKET |
Remove the 4 bolts and No. 1 compressor mounting bracket from the cylinder block sub-assembly, timing chain case assembly and timing chain cover sub-assembly.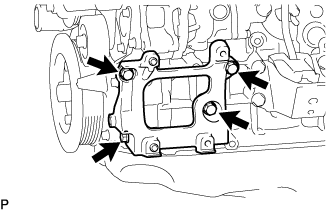
| 49. REMOVE ENGINE COOLANT TEMPERATURE SENSOR |
Disconnect the engine coolant temperature sensor connector.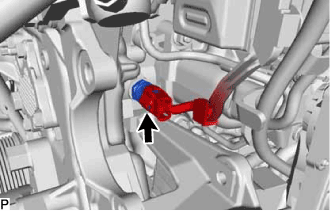
Using SST, remove the engine coolant temperature sensor and gasket from the cylinder head sub-assembly.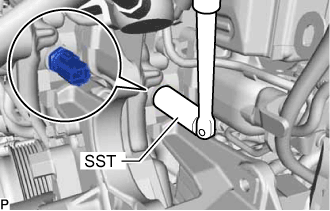
- SST
- 09817-33191
| 50. REMOVE PCV HOSE |
Slide the 2 clips, detach the clamp and remove the PCV hose.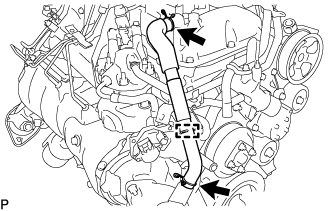
| 51. REMOVE NO. 5 WATER BY-PASS HOSE |
Slide the 2 clamps and disconnect the No. 5 water by-pass hose from the No. 1 injector holder and water outlet sub-assembly.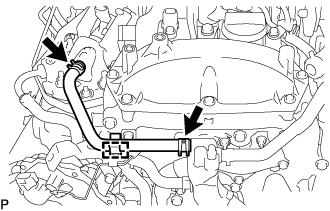
Detach the clamp and remove the No. 5 water by-pass hose from the hose clamp.
| 52. DISCONNECT NO. 4 WATER BY-PASS HOSE |
Slide the clamp and disconnect the No. 4 water by-pass hose from the No. 1 injector holder.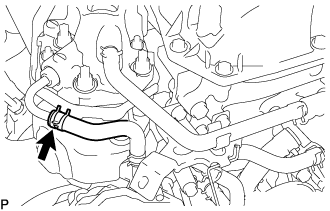
| 53. REMOVE NO. 1 INJECTOR HOLDER |
Disconnect the connector from the exhaust fuel addition injector assembly.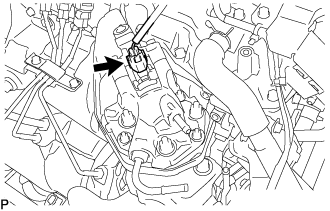
Remove the 3 nuts and No. 1 injector holder from the exhaust manifold.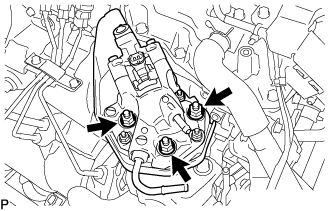
| 54. REMOVE NO. 2 EXHAUST MANIFOLD HEAT INSULATOR |
Remove the 3 nuts and No. 2 exhaust manifold heat insulator from the No. 1 injector holder.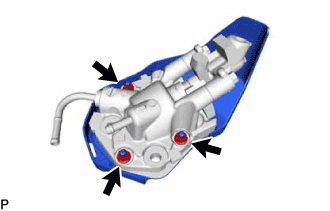
Remove the gasket.
| 55. REMOVE AIR FUEL RATIO SENSOR |
- CAUTION:
- To prevent burns, do not touch the engine, exhaust manifold or other high temperature components while the engine is hot.
Disconnect the connector.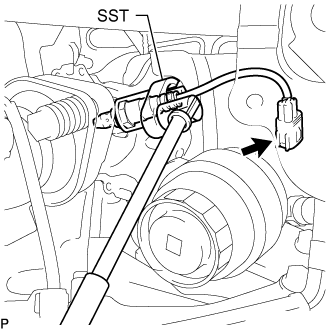
Using SST, remove the air fuel ratio sensor.
- SST
- 09224-00012
| 56. REMOVE NO. 1 EXHAUST MANIFOLD HEAT INSULATOR |
Remove the 3 bolts and No. 1 exhaust manifold heat insulator from the exhaust manifold.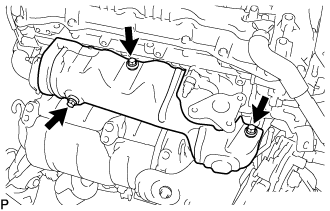
| 57. REMOVE NO. 1 TURBO INSULATOR |
Remove the 3 bolts and No. 1 turbo insulator from the exhaust manifold and turbocharger sub-assembly.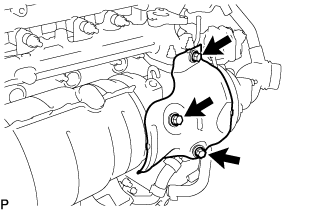
| 58. REMOVE NO. 2 EXHAUST PIPE SUPPORT STAY |
Remove the bolt, 2 nuts and No. 2 exhaust pipe support stay from the cylinder block sub-assembly and exhaust manifold converter sub-assembly.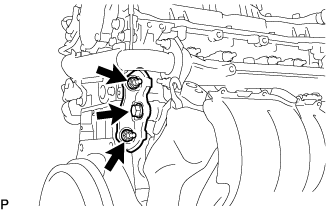
| 59. REMOVE EXHAUST PIPE SUPPORT STAY |
Remove the 3 bolts and exhaust pipe support stay from the cylinder block sub-assembly and exhaust manifold converter sub-assembly.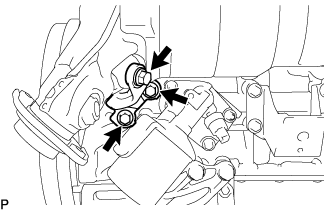
| 60. REMOVE EXHAUST MANIFOLD CONVERTER SUB-ASSEMBLY |
Remove the nut, exhaust pipe clamp and exhaust manifold converter sub-assembly from the turbocharger sub-assembly.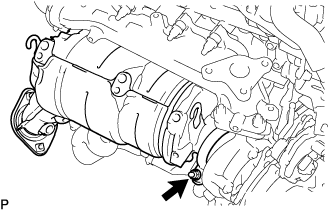
Remove the gasket.
| 61. REMOVE FRONT ENGINE MOUNTING INSULATOR RH |
Remove the nut and front engine mounting insulator RH from the engine mounting stabilizer.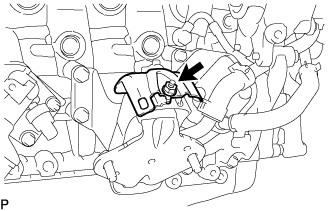
| 62. REMOVE FRONT ENGINE MOUNTING INSULATOR |
Remove the nut, front engine mounting insulator RH and engine mounting stabilizer from the front No. 1 engine mounting bracket RH.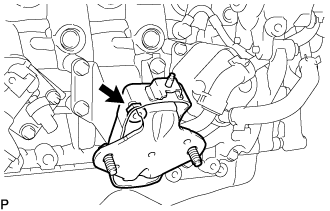
| 63. REMOVE NO. 1 WATER BY-PASS PIPE |
Remove the 2 bolts, No. 1 water by-pass pipe and gasket from the timing chain cover sub-assembly.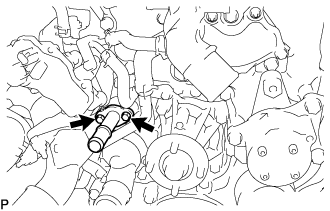
| 64. DISCONNECT NO. 1 AND NO. 2 TURBO WATER HOSE |
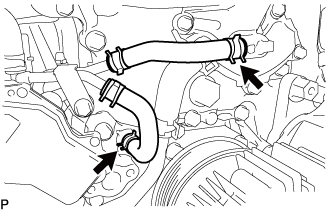 |
Slide the clip and disconnect the No. 1 turbo water hose from the water pump assembly.
Slide the clip and disconnect the No. 2 turbo water hose from the water outlet sub-assembly.
| 65. REMOVE TURBOCHARGER STAY |
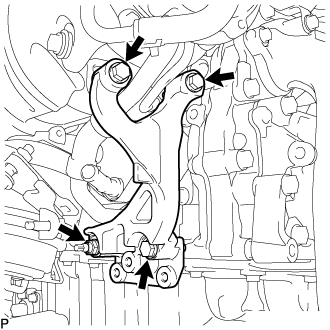 |
Remove the 3 bolts, nut and turbocharger stay.
| 66. REMOVE TURBO OIL OUTLET PIPE |
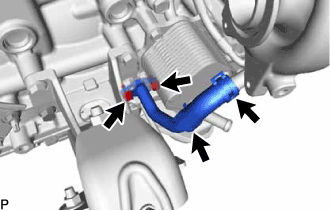 |
Slide the 2 clips and disconnect the turbo oil outlet hose from the turbo oil outlet pipe.
Remove the 2 bolts, turbo oil outlet pipe and gasket.
| 67. REMOVE TURBO OIL INLET PIPE SUB-ASSEMBLY |
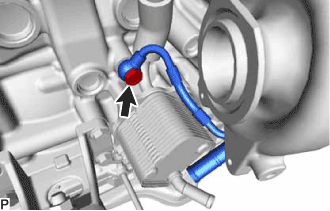 |
Remove the union bolt and gasket.
Remove the 2 nuts and turbo oil inlet pipe sub-assembly.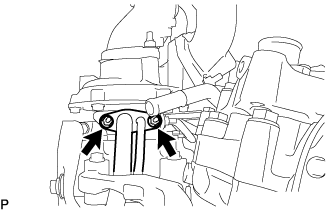
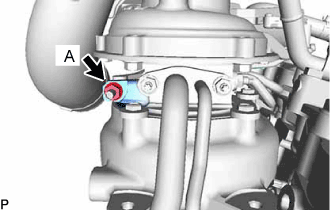
- NOTICE:
- Do not loosen the nut labeled A.
Remove the gasket.
| 68. REMOVE TURBOCHARGER SUB-ASSEMBLY |
Remove the 3 nuts and turbocharger sub-assembly.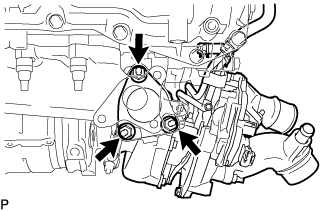
Remove the gasket from the turbocharger sub-assembly.
| 69. REMOVE EXHAUST MANIFOLD |
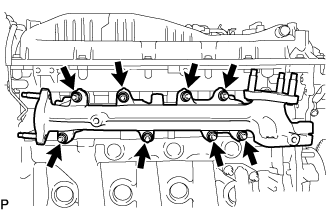 |
Remove the 8 nuts, 8 plate washers, 8 collars and exhaust manifold.
Remove the gasket.
| 70. REMOVE ENGINE OIL PRESSURE SWITCH ASSEMBLY |
Using SST and a 24 mm deep socket wrench, remove the engine oil pressure switch assembly from the oil filter bracket.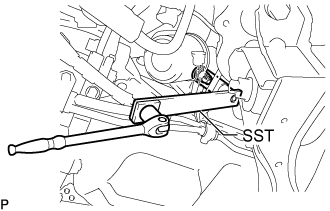
- SST
- 09961-01270
| 71. REMOVE NO. 2 WATER BY-PASS PIPE SUB-ASSEMBLY |
Slide the clamp and disconnect the No. 3 water by-pass hose from the water outlet sub-assembly.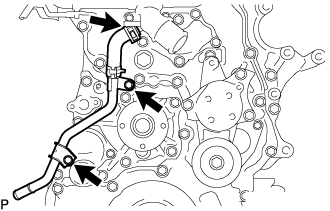
Remove the 2 bolts and No. 2 water by-pass pipe sub-assembly from the engine water pump assembly and water inlet.
| 72. REMOVE WATER OUTLET SUB-ASSEMBLY |
Remove the 4 bolts, 2 nuts and water outlet sub-assembly from the timing chain cover sub-assembly.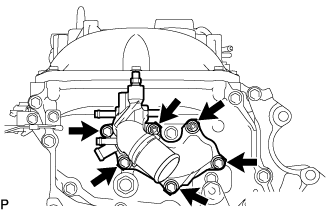
Remove the gasket from the timing chain cover sub-assembly.
| 73. REMOVE WATER INLET |
Remove the 2 bolts and water inlet from the engine water pump assembly.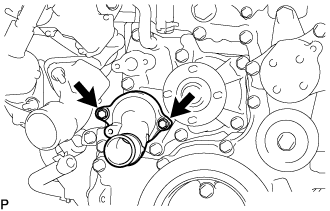
| 74. REMOVE THERMOSTAT |
Remove the thermostat from the engine water pump assembly.
Remove the gasket from the thermostat.
| 75. REMOVE NO. 1 IDLER PULLEY SUB-ASSEMBLY |
Remove the bolt and No. 1 idler pulley sub-assembly from the generator bracket sub-assembly.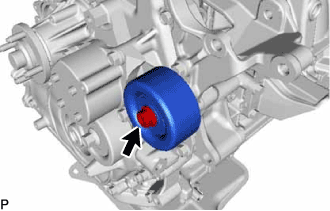
| 76. REMOVE V-RIBBED BELT TENSIONER ASSEMBLY |
Remove the 3 bolts and V-ribbed belt tensioner assembly from the timing chain cover sub-assembly.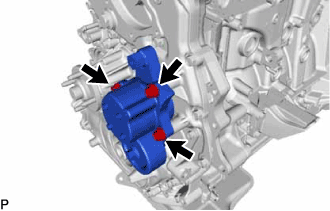
| 77. REMOVE VACUUM PUMP ASSEMBLY |
Disconnect the No. 1 vacuum transmitting hose sub-assembly from the vacuum pump assembly.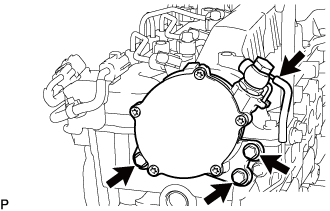
Remove the 3 bolts and vacuum pump assembly from the cylinder head sub-assembly.
Remove the 2 O-rings from the vacuum pump assembly.
| 78. REMOVE NO. 1 VACUUM TRANSMITTING PIPE SUB-ASSEMBLY |
Remove the 3 bolts and No. 1 vacuum transmitting pipe sub-assembly from the cylinder head sub-assembly.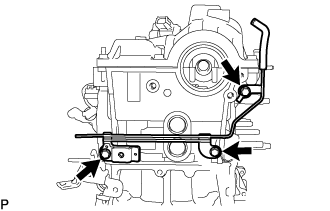
| 79. REMOVE CAMSHAFT OIL SEAL RETAINER |
Remove the camshaft oil seal retainer from the No. 3 camshaft bearing cap and cylinder head sub-assembly.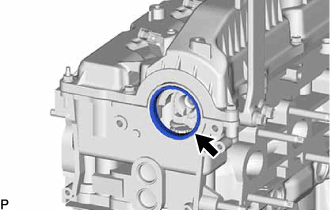
| 80. REMOVE CRANKSHAFT PULLEY COVER |
Remove the 4 bolts and crankshaft pulley cover from the crankshaft pulley.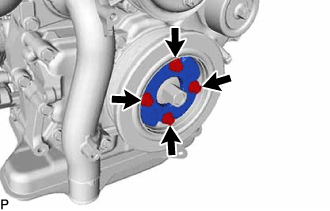
| 81. REMOVE CRANKSHAFT PULLEY |
Using SST, hold the crankshaft pulley and loosen the pulley bolt.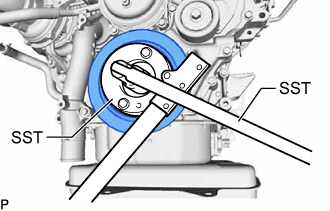
- SST
- 09213-58014
(91551-80840)
09330-00021
- HINT:
- Make sure to leave the pulley bolt screwed into the crankshaft by 2 or 3 threads.
Using SST, remove the pulley bolt and crankshaft pulley from the crankshaft.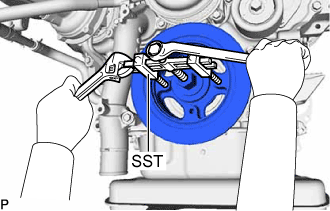
- SST
- 09950-50013
(09951-05010, 09952-05010, 09953-05020, 09954-05021)
| 82. REMOVE PCV HOSE CLAMP |
Remove the 2 bolts and PCV hose clamp from the timing chain case assembly and timing chain cover sub-assembly.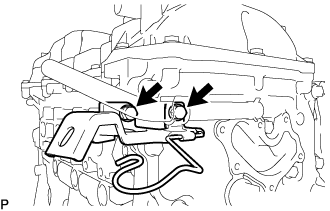
| 83. REMOVE FAN PULLEY |
Remove the 4 nuts the fan pulley and water pump spacer from the engine water pump assembly.