DISASSEMBLY
Removal / installation · Vehicles built from Jan 2017
| 1. REMOVE NO. 1 ENGINE HANGER |

Remove the 2 bolts and No. 1 engine hanger from the cylinder head sub-assembly.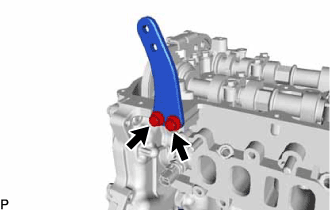

| 2. REMOVE NO. 2 CYLINDER BLOCK INSULATOR |
Remove the No. 2 cylinder block insulator from the front No. 1 engine mounting bracket LH.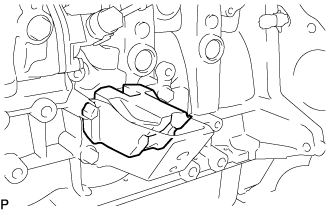
| 3. REMOVE FRONT NO. 1 ENGINE MOUNTING BRACKET LH |
Remove the 4 bolts and front No. 1 engine mounting bracket LH from the cylinder block sub-assembly.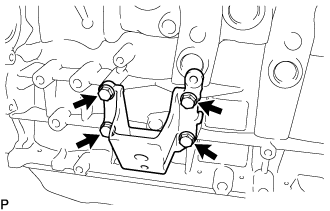
| 4. REMOVE NO. 3 CYLINDER BLOCK INSULATOR |
Remove the No. 3 cylinder block insulator from the cylinder block sub-assembly.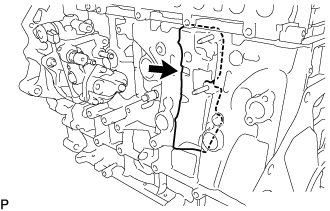
| 5. REMOVE GENERATOR BRACKET SUB-ASSEMBLY |
Remove the 4 bolts and generator bracket sub-assembly from the cylinder head sub-assembly and timing chain case assembly.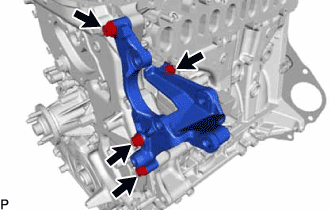
| 6. REMOVE FRONT NO. 1 ENGINE MOUNTING BRACKET RH |
Remove the 4 bolts and front No. 1 engine mounting bracket RH from the cylinder block sub-assembly.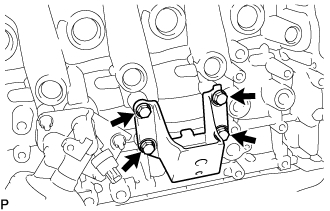
| 7. REMOVE ENGINE OIL COOLER SET |
Remove the 5 nuts and bolt from the engine oil cooler set.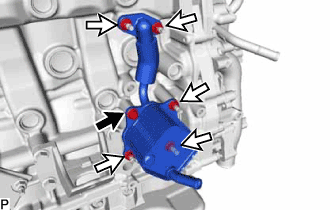
Text in Illustration 
Bolt

Nut
Remove the engine oil cooler set and water outlet pipe gasket from the cylinder block sub-assembly.
Remove the 2 O-rings from the cylinder block sub-assembly.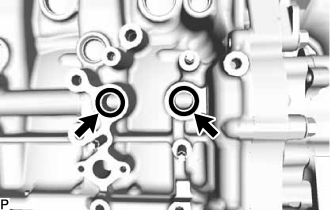
| 8. REMOVE OIL FILTER SUB-ASSEMBLY |
Using SST, remove the oil filter sub-assembly.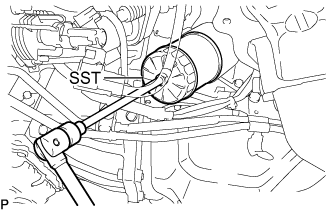
- SST
- 09228-07502
- HINT:
- Before removing the oil filter sub-assembly, place cloth where the oil may splash.
- Before removing the oil filter sub-assembly, place cloth where the oil may splash.
- Use a container to catch the draining engine oil.
- Use a container to catch the draining engine oil.
| 9. REMOVE OIL FILTER UNION |
Using a 27 mm deep socket wrench, remove the oil filter union from the oil filter bracket.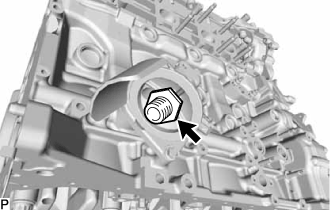
| 10. REMOVE OIL FILTER BRACKET |
Remove the bolt, 2 nuts and oil filter bracket from the cylinder block sub-assembly.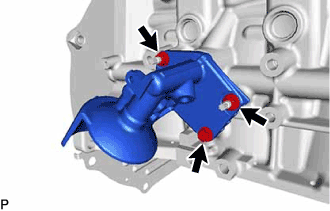
Remove the 2 O-rings from the cylinder block sub-assembly.
| 11. REMOVE INJECTOR ASSEMBLY |
Remove the 4 nozzle holder clamp bolts, 4 washers and 4 nozzle holder clamps.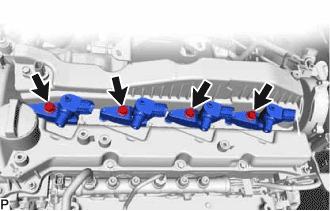
Remove the 4 fuel injector assemblies and 4 injection nozzle seats from the cylinder head sub-assembly.
- NOTICE:
- When removing the injector assembly, store the injector assemblies in the correct order so that they can be returned to their original locations when reassembling.
Remove the O-ring from each injector assembly.
| 12. REMOVE NOZZLE HOLDER GASKET |
Remove the 4 nozzle holder gaskets from the cylinder head cover sub-assembly.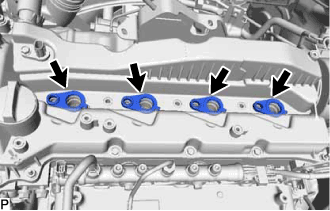
| 13. REMOVE CAMSHAFT POSITION SENSOR |
Disconnect the camshaft position sensor connector.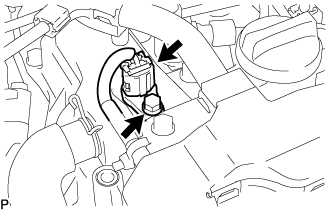
Remove the bolt and camshaft position sensor from the cylinder head cover sub-assembly.
| 14. REMOVE OIL FILLER CAP SUB-ASSEMBLY |
Remove the oil filler cap sub-assembly from the cylinder head cover sub-assembly.
| 15. REMOVE OIL FILLER CAP GASKET |
Remove the oil filler cap gasket from the oil filler cap sub-assembly.
| 16. REMOVE CYLINDER HEAD COVER SUB-ASSEMBLY |
Remove the 14 bolts, 4 nozzle holder clamp seats, 2 nuts and cylinder head cover sub-assembly from the cylinder head sub-assembly.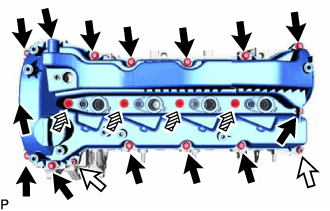
Text in Illustration
Bolt
Nut
Nozzle Holder Clamp Seat
Remove the cylinder head cover gasket, No. 2 cylinder head cover gasket and 2 camshaft bearing cap oil hole gaskets from the cylinder head cover sub-assembly.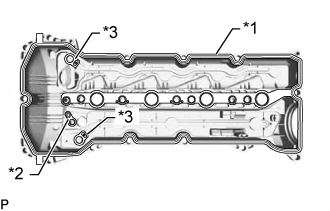
Text in Illustration *1
Cylinder Head Cover Gasket
*2
No. 2 Cylinder Head Cover Gasket
*3
Camshaft Bearing Cap Oil Hole Gasket
| 17. REMOVE NO. 5 CYLINDER BLOCK INSULATOR |
Remove the No. 5 cylinder block insulator from the cylinder block sub-assembly.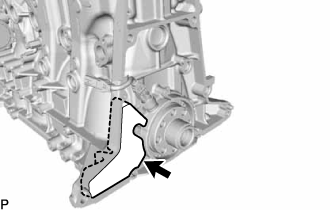
| 18. REMOVE NO. 1 CYLINDER BLOCK INSULATOR |
Remove the No. 1 cylinder block insulator from the cylinder block sub-assembly.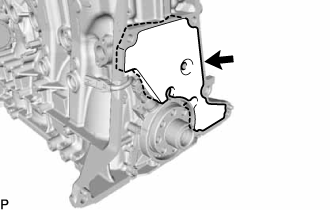
| 19. REMOVE CRANKSHAFT POSITION SENSOR HARNESS BRACKET |
Disconnect the crankshaft position sensor connector.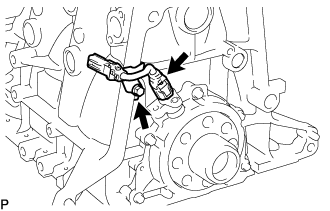
Remove the bolt and crankshaft position sensor harness bracket from the cylinder block sub-assembly.
| 20. REMOVE CRANKSHAFT POSITION SENSOR |
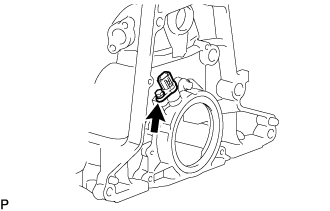 |
Remove the bolt and crankshaft position sensor from the rear oil seal retainer.
| 21. REMOVE ENGINE OIL LEVEL SENSOR |
Disconnect the engine oil level sensor connector.
Remove the 4 bolts and engine oil level sensor from the oil pan sub-assembly.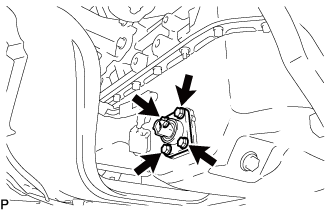
| 22. REMOVE OIL PAN SUB-ASSEMBLY |
Remove the 2 nuts and 23 bolts.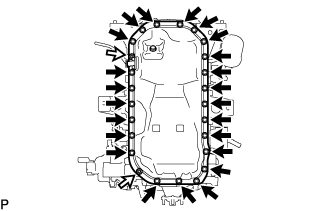
Text in Illustration
Bolt
Nut
Insert the blade of an oil pan seal cutter between the oil pan sub-assembly and cylinder block sub-assembly, cut off the applied sealer and remove the oil pan sub-assembly.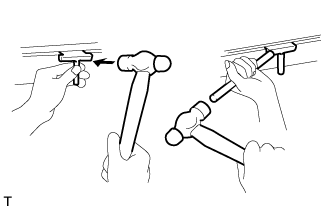
- NOTICE:
- Be careful not to damage the contact surfaces of the oil pan sub-assembly and cylinder block sub-assembly.
- Be careful not to damage the cylinder block sub-assembly flange.
- Be careful not to damage the contact surfaces of the oil pan sub-assembly and cylinder block sub-assembly.
| 23. REMOVE OIL STRAINER SUB-ASSEMBLY |
Remove the 5 bolts, oil strainer sub-assembly and gasket from the cylinder block sub-assembly.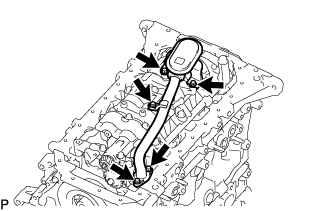
| 24. REMOVE REAR ENGINE OIL SEAL RETAINER |
Remove the 5 bolts.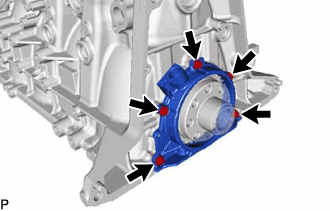
Remove the rear engine oil seal retainer by prying between the rear engine oil seal retainer and cylinder block sub-assembly with a screwdriver.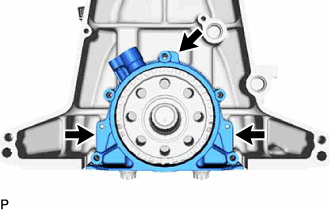
- NOTICE:
- Be careful not to damage the contact surfaces of the cylinder block sub-assembly.
- HINT:
- Tape the screwdriver tip before use.
| 25. REMOVE REAR ENGINE OIL SEAL |
Place the rear engine oil seal retainer on wooden blocks.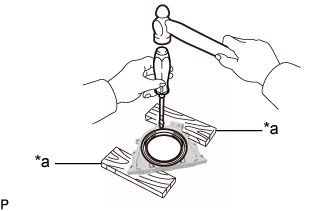
Text in Illustration *a
Wooden Block
Using a screwdriver, tap out the rear engine oil seal from the rear engine oil seal retainer.
- NOTICE:
- Do not damage the surface of the rear engine oil seal press fit hole.
- HINT:
- Tape the screwdriver tip before use.
| 26. REMOVE ENGINE WATER PUMP ASSEMBLY |
Remove the 8 bolts, engine water pump assembly and gasket from the timing chain case assembly.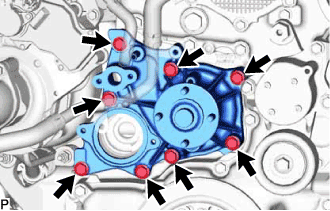
| 27. SET NO. 1 CYLINDER TO TDC/COMPRESSION |
Temporarily install the crankshaft pulley and crankshaft pulley set bolt to the crankshaft.
Align the timing mark of the crankshaft pulley and timing chain cover sub-assembly by rotating the crankshaft clockwise.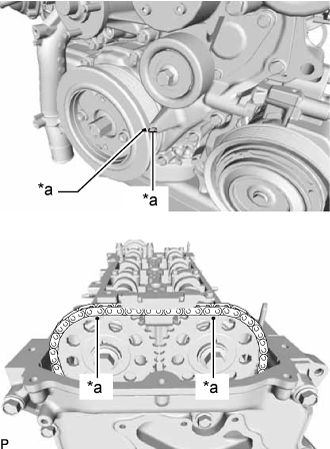
Text in Illustration *a
Timing Mark
Make sure that the timing mark of the camshaft timing sprocket is at the top.
- HINT:
- If the timing mark is not at the top, turn the crankshaft pulley 1 revolution so that the timing mark is at the top (set the No. 1 piston to TDC/compression).
| 28. REMOVE TIMING CHAIN COVER PLATE |
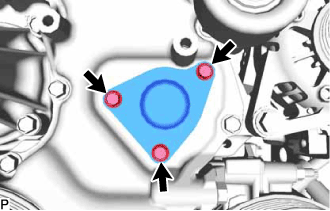 |
Remove the 3 bolts and timing chain cover plate.
Remove the gasket.
| 29. REMOVE SUPPLY PUMP ASSEMBLY |
- NOTICE:
-
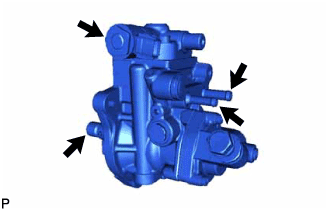
- Do not hold the supply pump assembly by the parts indicated by the arrows in the illustration.
Using SST, hold the crankshaft pulley and loosen the supply pump shaft nut.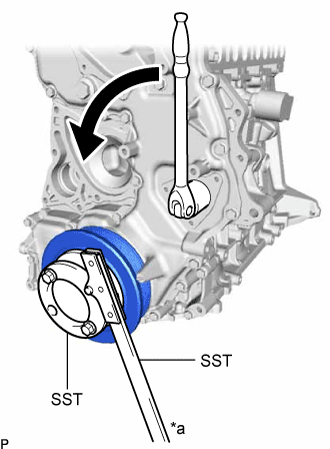
- SST
- 09213-58014
(91551-80840)
09330-00021
Text in Illustration *a
Hold
Turn
- NOTICE:
- Do not excessively loosen the supply pump shaft nut, otherwise SST cannot be installed.
- HINT:
- Rotate the supply pump shaft nut once to loosen it.
Install SST to the timing chain cover sub-assembly with the 3 bolts.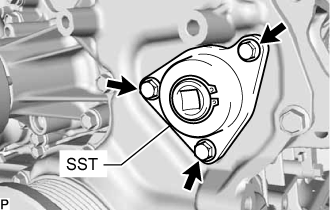
- SST
- 09241-11010
- Torque:
- 10 N*m{ 102 kgf*cm , 7 ft.*lbf }
- HINT:
- Make sure that the installation direction of SST is as shown in the illustration.
-
Align the hexagonal portion of SST with the supply pump shaft nut to install SST.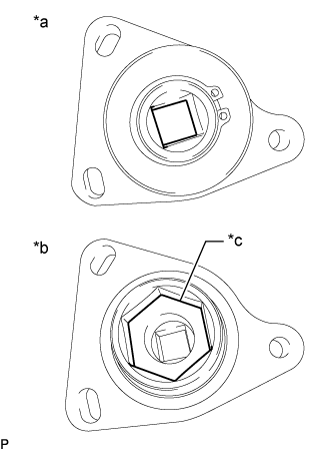
- Make sure that the installation direction of SST is as shown in the illustration.
Text in Illustration *a
Engine Front Side
*b
Engine Rear Side
*c
Hexagonal Portion
Remove the 2 bolts and No. 1 fuel pump bracket from the cylinder block sub-assembly and supply pump assembly.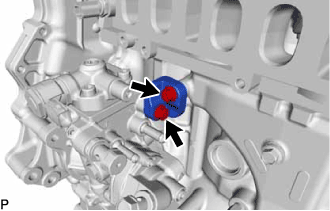
Loosen the 3 nuts to the ends of the stud bolts.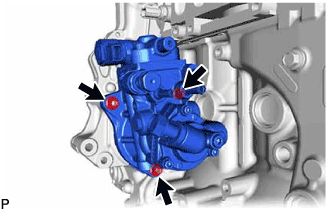
- NOTICE:
- Do not completely remove the nuts. Otherwise, the supply pump assembly may fall off.
Using SST, loosen the supply pump shaft nut and detach the supply pump assembly and injection pump drive gear.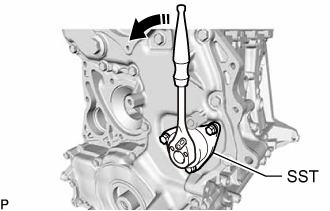
Remove the 3 nuts from the stud bolts.
Remove the O-ring from the supply pump assembly.
Remove SST from the timing chain cover sub-assembly.
Remove the supply pump shaft nut from the timing chain cover sub-assembly service hole.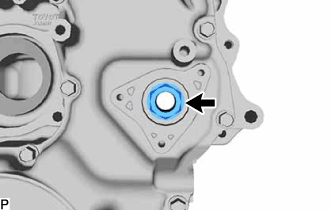
Remove the crankshaft pulley set bolt and crankshaft pulley from the crankshaft.
| 30. REMOVE INJECTION PUMP INSULATOR |
Remove the injection pump insulator from the cylinder block sub-assembly.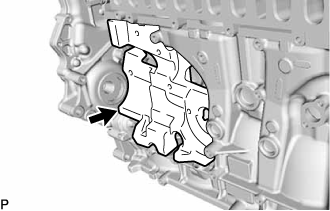
| 31. REMOVE TIMING CHAIN COVER SUB-ASSEMBLY |
Remove the 20 bolts from the timing chain cover sub-assembly.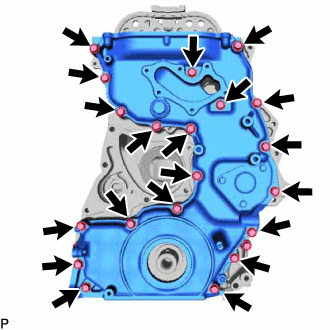
Using a screwdriver wrapped in protective tape, remove the timing chain cover sub-assembly by prying the points in the illustration.
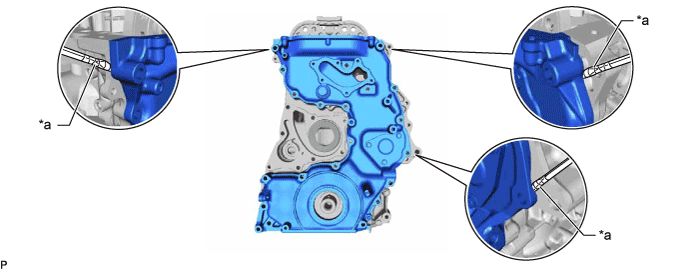
Text in Illustration *a
Protective Tape
-
-
- NOTICE:
- Do not damage the contacting surfaces of the timing chain cover sub-assembly and timing chain case assembly.
Remove the timing chain case gasket from the timing chain case assembly.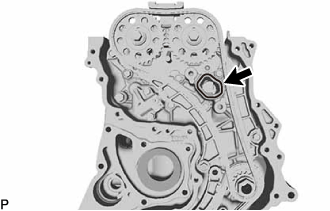
| 32. REMOVE FRONT CRANKSHAFT OIL SEAL |
Using a screwdriver and wooden block, pull out the front crankshaft oil seal.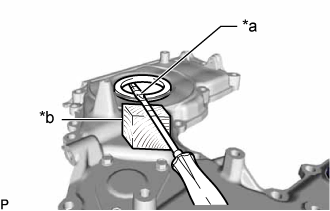
Text in Illustration *a
Protective Tape
*b
Wooden Block
- NOTICE:
- Do not damage the surface of the front crankshaft oil seal press fit hole.
| 33. REMOVE OIL PUMP RELIEF VALVE PLUG |
Remove the oil pump relief valve plug and gasket from the timing chain cover sub-assembly.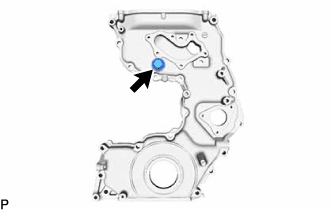
| 34. INSPECT BACKLASH OF OIL PUMP GEAR TO OIL PUMP DRIVE GEAR |
Using a dial indicator, measure the backlash.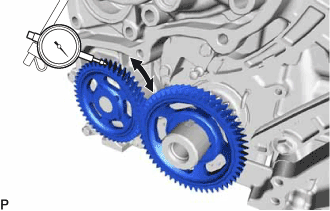
- Standard gear backlash:
- 0.02 to 0.3 mm (0.000787 to 0.0118 in.)
- Maximum gear backlash:
- 0.42 mm (0.0165 in.)
| 35. REMOVE OIL PUMP DRIVE GEAR |
Remove the oil pump drive gear from the crankshaft.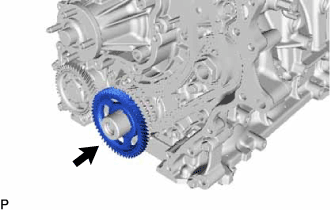
| 36. REMOVE NO. 3 CHAIN TENSIONER ASSEMBLY |
- NOTICE:
- When the pin is removed from the No. 3 chain tensioner assembly, the plunger and 2 springs may come off of the No. 3 chain tensioner assembly body, but this is not a malfunction.
-
Before installing the plunger and 2 springs to the No. 3 chain tensioner assembly body, check that they are free of foreign matter and not damaged.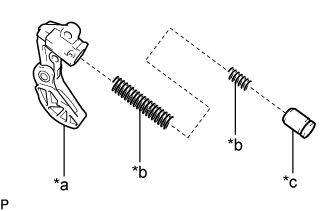
- When the pin is removed from the No. 3 chain tensioner assembly, the plunger and 2 springs may come off of the No. 3 chain tensioner assembly body, but this is not a malfunction.
| *a |
No. 3 Chain Tensioner Assembly Body |
| *b |
Spring |
| *c |
Plunger |
Fully insert the plunger, align the No. 3 chain tensioner assembly body hole with the plunger groove and insert the pin as shown in the illustration.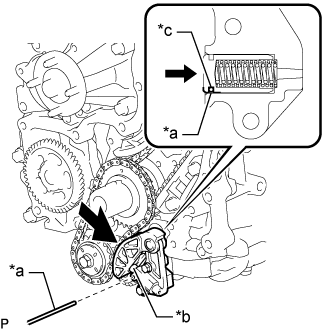
Text in Illustration *a
Pin
*b
Plunger
*c
Plunger Groove
Remove the 2 bolts, No. 3 chain tensioner assembly and gasket from the engine balancer assembly.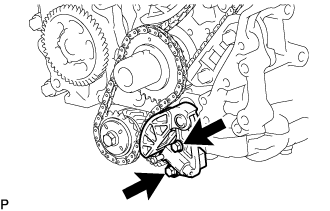
| 37. REMOVE NO. 1 BALANCE SHAFT THRUST PLATE |
Remove the bolt and No. 1 balance shaft thrust plate from the balance shaft gear sub-assembly.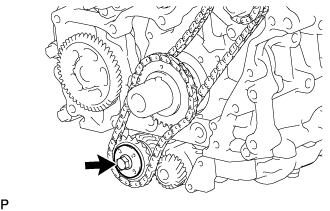
| 38. REMOVE BALANCE SHAFT TIMING SPROCKET, BALANCE SHAFT GEAR SUB-ASSEMBLY WITH NO. 3 CHAIN SUB-ASSEMBLY |
Remove the balance shaft timing sprocket, balance shaft gear sub-assembly with No. 3 chain sub-assembly from the crankshaft and engine balancer assembly.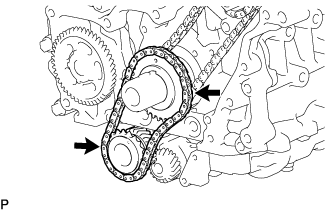
| 39. REMOVE ENGINE BALANCER ASSEMBLY |
Remove the 8 bolts and engine balancer assembly from the cylinder block sub-assembly.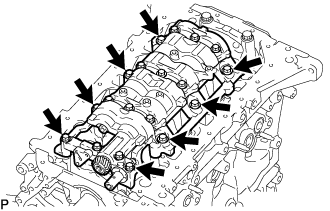
| 40. REMOVE TIMING CHAIN GUIDE |
Remove the bolt and timing chain guide from the cylinder head sub-assembly.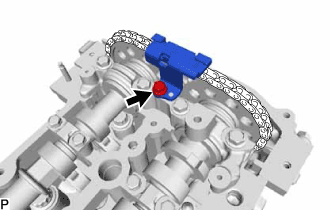
| 41. REMOVE NO. 2 CHAIN TENSIONER ASSEMBLY |
Allow the plunger to extend slightly, and then rotate the stopper plate clockwise to release the lock. Once the lock is released, push the plunger into the No. 2 chain tensioner assembly.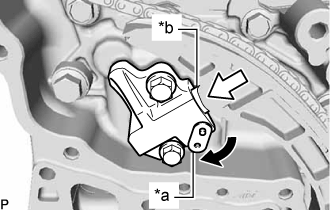
Text in Illustration *a
Stopper Plate
*b
Plunger
Move the stopper plate counter clockwise to set the lock, and then insert a pin into the stopper plate hole.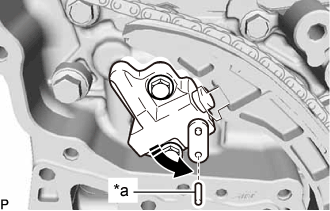
Text in Illustration *a
Pin
Remove the 2 bolts and No. 2 chain tensioner assembly from the timing chain case assembly.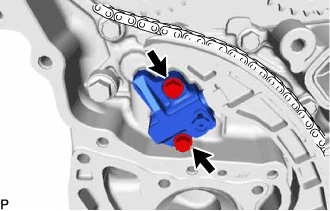
| 42. REMOVE NO. 2 CHAIN TENSIONER SLIPPER |
Remove the bolt and No. 2 chain tensioner slipper from the timing chain case assembly.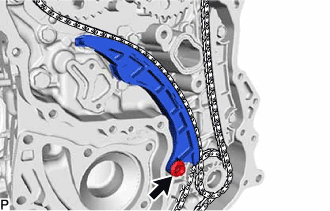
| 43. REMOVE NO. 2 CHAIN VIBRATION DAMPER |
Remove the 2 bolts and No. 2 chain vibration damper from the timing chain case assembly.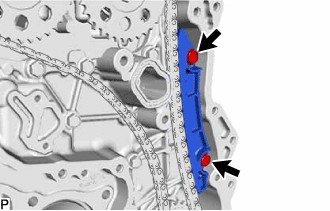
| 44. REMOVE NO. 2 CHAIN SUB-ASSEMBLY |
Remove the No. 2 chain sub-assembly from the camshaft timing sprockets and injection pump drive gear.
| 45. REMOVE NO. 1 CHAIN TENSIONER ASSEMBLY |
- NOTICE:
- When the pin is removed from the No. 1 chain tensioner assembly, the plunger and spring may come off of the No. 1 chain tensioner assembly body, but this is not a malfunction.
-
Before installing the plunger and spring to the No. 1 chain tensioner assembly body, check that they are free of foreign matter and not damaged.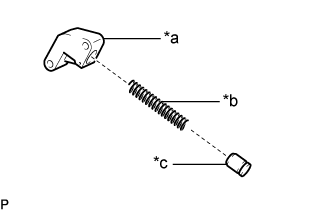
- When the pin is removed from the No. 1 chain tensioner assembly, the plunger and spring may come off of the No. 1 chain tensioner assembly body, but this is not a malfunction.
| *a |
No. 1 Chain Tensioner Assembly Body |
| *b |
Spring |
| *c |
Plunger |
Fully insert the plunger, align the No. 1 chain tensioner assembly body hole with the plunger groove and insert the pin as shown in the illustration.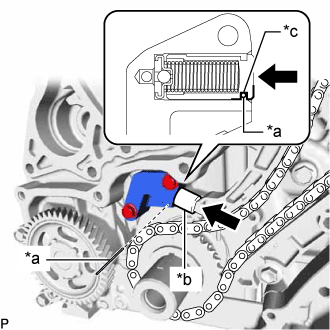
Text in Illustration *a
Pin
*b
Plunger
*c
Plunger Groove
Remove the 2 bolts, No. 1 chain tensioner assembly and gasket from the cylinder block sub-assembly.
| 46. REMOVE NO. 1 CHAIN TENSIONER SLIPPER |
Remove the No. 1 chain tensioner slipper from the straight pin.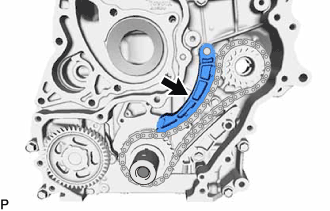
| 47. REMOVE NO. 1 CHAIN VIBRATION DAMPER |
Remove the bolt and No. 1 chain vibration damper from the cylinder block sub-assembly.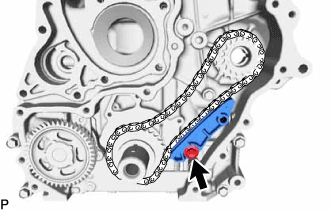
| 48. REMOVE CRANKSHAFT TIMING SPROCKET, INJECTION PUMP DRIVE GEAR WITH NO. 1 CHAIN SUB-ASSEMBLY |
Remove the crankshaft timing sprocket, injection pump drive gear with No. 1 chain sub-assembly from the crankshaft and supply pump shaft.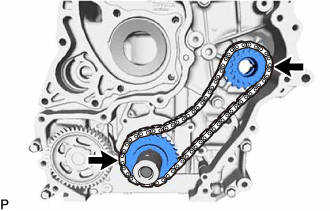
| 49. REMOVE CAMSHAFT TIMING SPROCKET |
for Exhaust Side:
Hold the hexagonal portion of the No. 2 camshaft with a wrench and remove the camshaft timing sprocket bolt and camshaft timing sprocket from the No. 2 camshaft.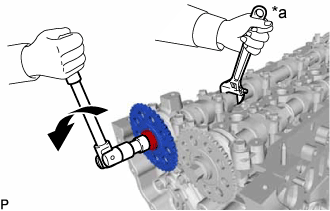
Text in Illustration *a
Hold
Turn
- NOTICE:
- Be careful not to damage the No. 2 camshaft or cylinder head sub-assembly with the wrench.
for Intake Side:
Hold the hexagonal portion of the camshaft with a wrench and remove the camshaft timing sprocket bolt and camshaft timing sprocket from the camshaft.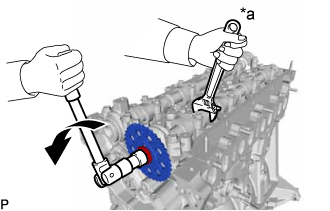
Text in Illustration *a
Hold
Turn
- NOTICE:
- Be careful not to damage the camshaft or cylinder head sub-assembly with the wrench.
| 50. REMOVE TIMING CHAIN CASE ASSEMBLY |
Remove the 15 bolts from the timing chain case assembly.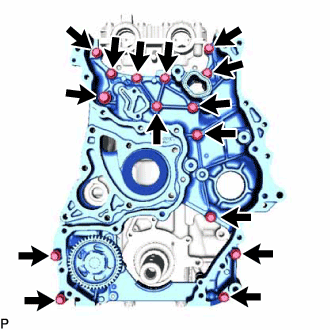
Using a screwdriver wrapped in protective tape, remove the timing chain case assembly by prying the points in the illustration.
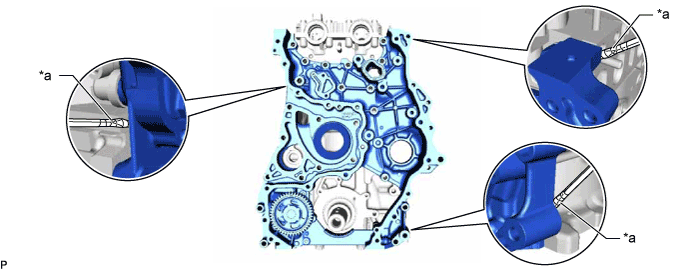
Text in Illustration *a
Protective Tape
-
-
- NOTICE:
- Do not damage the contacting surfaces of the timing chain case assembly, cylinder head sub-assembly and cylinder block sub-assembly.
Remove the 4 O-rings from the cylinder head sub-assembly and cylinder block sub-assembly.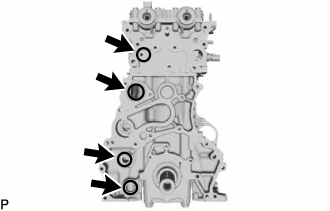
Remove the No. 2 water pump gasket from the timing chain case assembly.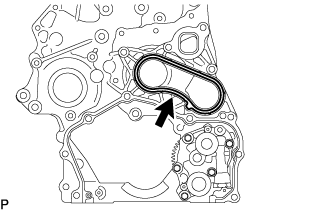
| 51. REMOVE NO. 3 CAMSHAFT BEARING CAP |
Remove the 2 camshaft bearing cap bolts and No. 3 camshaft bearing cap from the cylinder head sub-assembly.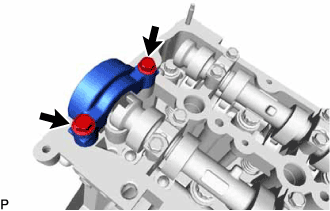
| 52. REMOVE NO. 1 AND NO. 2 CAMSHAFT BEARING CAP |
Remove the 20 camshaft bearing cap bolts in the sequence shown in the illustration.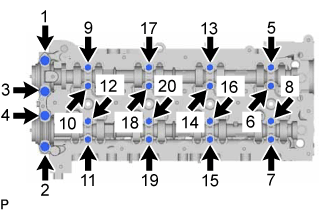
Remove the No. 1 camshaft bearing cap and 8 No. 2 camshaft bearing caps from the cylinder head sub-assembly.
- HINT:
- Arrange the removed parts in the correct order.
| 53. REMOVE CAMSHAFT |
Remove the camshaft from the cylinder head sub-assembly.
| 54. REMOVE NO. 2 CAMSHAFT |
Remove the No. 2 camshaft from the cylinder head sub-assembly.
| 55. REMOVE NO. 1 VALVE ROCKER ARM SUB-ASSEMBLY |
Remove the 16 No. 1 valve rocker arm sub-assemblies from the 16 valve lash adjuster assemblies.
| 56. REMOVE VALVE LASH ADJUSTER ASSEMBLY |
Remove the 16 valve lash adjuster assemblies from the cylinder head sub-assembly.
| 57. REMOVE CYLINDER HEAD SUB-ASSEMBLY |
Uniformly loosen the 10 cylinder head set bolts in several passes in the sequence shown in the illustration. Then remove the 10 cylinder head set bolts and 6 cylinder head set bolt spacers.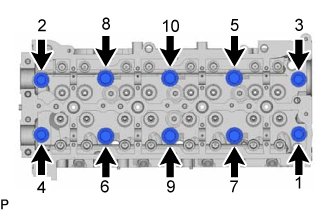
- NOTICE:
- Cylinder head sub-assembly warpage or cracking could result from removing bolts in the incorrect order.
- Be careful not to drop the cylinder head set bolt spacers into the cylinder head sub-assembly.
- Cylinder head sub-assembly warpage or cracking could result from removing bolts in the incorrect order.
Lift the cylinder head sub-assembly from the ring pins on the cylinder block sub-assembly, and place the cylinder head sub-assembly on wooden blocks on a bench.
- NOTICE:
- Be careful not to damage the contact surfaces of the cylinder head sub-assembly and cylinder block sub-assembly.
- HINT:
- If the cylinder head sub-assembly is difficult to remove, use a screwdriver to pry between the cylinder head sub-assembly and cylinder block sub-assembly.
| 58. REMOVE CYLINDER HEAD GASKET |
Remove the cylinder head gasket from the cylinder block sub-assembly.
| 59. REMOVE LOCK PLATE |
Remove the bolt and lock plate from the cylinder block sub-assembly.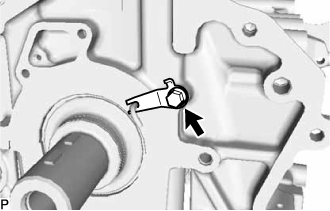
| 60. REMOVE STUD BOLT |
- NOTICE:
- If a stud bolt is deformed or its threads are damaged, replace it.
| 61. REMOVE STRAIGHT PIN |
- NOTICE:
- It is not necessary to remove the straight pin unless it is being replaced.