INSTALLATION
Removal / installation · Vehicles built from Jan 2017
- NOTICE:
- When replacing the parts in the following chart (A), replace the No. 1 injection pipe sub-assembly, No. 2 injection pipe sub-assembly and/or fuel inlet pipe sub-assembly with new ones.
Replaced Parts (A)
Pipes Requiring New Replacement
- Injector assembly (including shuffling the injector assemblies between the cylinders)
- Common rail assembly
- Injection pipe sub-assembly or supply pump assembly
- No. 1 injection pipe sub-assembly
- No. 2 injection pipe sub-assembly
Common rail assembly
Fuel inlet pipe sub-assembly
- Injection pipe sub-assembly or supply pump assembly
- Cylinder block sub-assembly
- Cylinder head sub-assembly
- Cylinder head gasket
- Timing chain case assembly or belt cover sub-assembly
- No. 1 injection pipe sub-assembly
- No. 2 injection pipe sub-assembly
- Fuel inlet pipe sub-assembly
- Injector assembly (including shuffling the injector assemblies between the cylinders)
- After removing the No. 1 injection pipe sub-assembly, No. 2 injection pipe sub-assembly and/or fuel inlet pipe sub-assembly, clean them with a brush and compressed air.
- When replacing the parts in the following chart (A), replace the No. 1 injection pipe sub-assembly, No. 2 injection pipe sub-assembly and/or fuel inlet pipe sub-assembly with new ones.
| 1. INSTALL INTAKE MANIFOLD |

Install a new gasket to the cylinder head sub-assembly.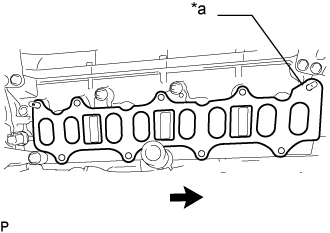

- HINT:
- Install the gasket with the protrusion facing the rear side of the vehicle as shown in the illustration.
Text in Illustration *a
Protrusion

Rear side
Temporarily install the intake manifold with the 7 bolts and 2 nuts.
Tighten the 7 bolts and 2 nuts in the order shown in the illustration.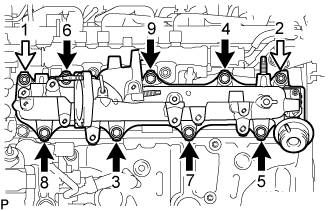
- Torque:
- 23 N*m{ 235 kgf*cm , 17 ft.*lbf }
Text in Illustration
Bolt

Nut
Connect the wire harness bracket with the bolt.
- Torque:
- 13 N*m{ 130 kgf*cm , 9 ft.*lbf }
| 2. INSTALL VACUUM CONTROL VALVE SET |
Install the vacuum control valve set to the intake manifold with the bolt.
- Torque:
- 10 N*m{ 102 kgf*cm , 7 ft.*lbf }
Connect the 2 vacuum hoses to the swirl control valve actuator and vacuum transmitting pipe sub-assembly.
Connect the wire harness clamp and vacuum control valve set connector.
| 3. INSTALL NO. 2 NOZZLE LEAKAGE PIPE ASSEMBLY |
Install the No. 2 nozzle leakage pipe assembly with the 2 bolts.
- Torque:
- 10 N*m{ 102 kgf*cm , 7 ft.*lbf }
Connect the No. 6 fuel hose to the No. 3 nozzle leakage pipe assembly, and slide the clamp to secure the hose.
Install the No. 4 fuel hose to the No. 2 nozzle leakage pipe assembly, common rail assembly and slide the 2 clamps to secure the hoses.
Install the No. 5 fuel hose to the No. 2 nozzle leakage pipe assembly, No. 1 nozzle leakage pipe assembly and slide the 2clamps to secure the hoses.
| 4. INSTALL FUEL INLET PIPE SUB-ASSEMBLY |
- NOTICE:
- When replacing the fuel supply pump assembly, it is necessary to replace the fuel inlet pipe sub-assembly, No. 1 injection pipe clamp and No. 2 injection pipe clamp with a new one. Keep the fuel inlet pipe sub-assembly free of foreign matter.
Temporarily install the fuel inlet pipe sub-assembly.
Install a new No. 1 injection pipe clamp and No. 2 injection pipe clamp with the 2 bolts.
- Torque:
- 10 N*m{ 102 kgf*cm , 7 ft.*lbf }
Using SST, tighten the fuel inlet pipe sub-assembly union nut on the common rail side sub-assembly.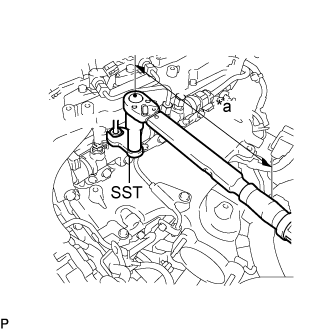
- SST
- 09245-11010
- Torque:
- Specified tightening torque:
- 40 N*m{ 408 kgf*cm , 30 ft.*lbf }
Text in Illustration *a
Torque Wrench Fulcrum Length
- HINT:
- Calculate the torque wrench reading when changing the fulcrum length of the torque wrench.
- When using a union nut wrench (fulcrum length of 50 mm (1.97 in.)) + torque wrench (fulcrum length of 180 mm (7.09 in.)): 31 N*m (316 kgf*cm, 23 ft.*lbf)
- Calculate the torque wrench reading when changing the fulcrum length of the torque wrench.
Using a 19 mm union nut wrench, tighten the fuel inlet pipe sub-assembly union nut on the fuel supply pump assembly side.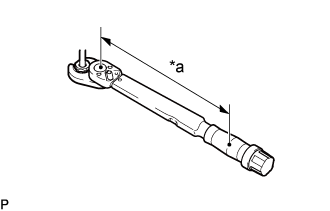
- Torque:
- Specified tightening torque:
- 48 N*m{ 489 kgf*cm , 35 ft.*lbf }
Text in Illustration *a
Torque Wrench Fulcrum Length
- HINT:
- Calculate the torque wrench reading when changing the fulcrum length of the torque wrench.
- When using a union nut wrench (fulcrum length of 30 mm (1.18 in.)) + torque wrench (fulcrum length of 180 mm (7.09 in.)): 41 N*m (418 kgf*cm, 30 ft.*lbf)
- Calculate the torque wrench reading when changing the fulcrum length of the torque wrench.
| 5. INSTALL NO. 3 FUEL PIPE |
Temporarily install the No. 3 fuel pipe and 2 new gaskets with the union bolt and supply pump hollow screw.
Tighten the union bolt and supply pump hollow screw.
- Torque:
- 42 N*m{ 428 kgf*cm , 31 ft.*lbf }
Install the fuel pipe clamp to the fuel filter assembly and No. 3 fuel pipe.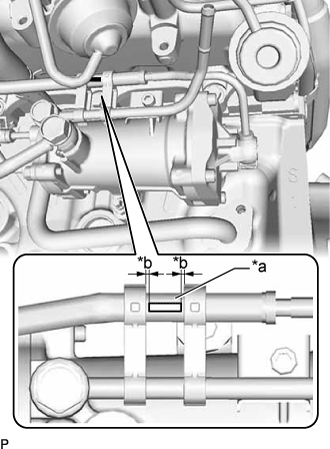
- NOTICE:
- Be careful that the fuel pipe clamp and No. 4 fuel pipe sub-assembly do not interfere with each other.
- HINT:
- Make sure the fuel pipe clamp is oriented as shown in the illustration.
| 6. INSTALL NO. 4 FUEL PIPE SUB-ASSEMBLY |
Temporarily install the No. 4 fuel pipe sub-assembly and 2 new gaskets with the 2 union bolts and bolt.
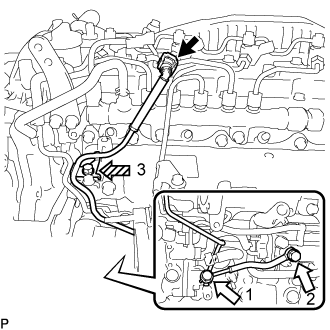
Tighten the union bolt and bolt in the order shown in the illustration.Text in Illustration
Union Bolt

Bolt
- Torque:
- union bolt:
- 42 N*m{ 428 kgf*cm , 31 ft.*lbf }
- bolt:
- 10 N*m{ 102 kgf*cm , 7 ft.*lbf }
Connect the No. 4 fuel pipe sub-assembly to the No. 1 fuel pipe (Click here).
| 7. INSTALL MANIFOLD STAY |
Install the manifold stay with the 2 bolts.
- Torque:
- 21 N*m{ 214 kgf*cm , 15 ft.*lbf }
Install the wiring harness clamp bracket with the bolt.
- Torque:
- 13 N*m{ 128 kgf*cm , 9 ft.*lbf }
| 8. INSTALL WIRING HARNESS CLAMP BRACKET |
Install the wiring harness clamp bracket with the bolt.
- Torque:
- 10 N*m{ 102 kgf*cm , 7 ft.*lbf }
Attach the 2 wire harness clamps.
Connect the diesel throttle body assembly connector and pre-stroke control valve connector.
| 9. INSTALL NO. 2 FUEL PIPE |
Connect the No. 2 fuel pipe with the bolt.
- Torque:
- 10 N*m{ 102 kgf*cm , 7 ft.*lbf }
| 10. INSTALL ENGINE OIL LEVEL DIPSTICK GUIDE |
Apply a light coat of engine oil to a new O-ring and new grommet.
Install the O-ring and grommet to the engine oil level dipstick guide.
Install the engine oil level dipstick guide with the bolt.
- Torque:
- 10 N*m{ 102 kgf*cm , 7 ft.*lbf }
Connect the vacuum hose to the intake manifold, and slide the clip to secure the hose.
Install the engine oil level dipstick.
w/ No. 2 Fuel Pipe Clamp:
Attach the No. 2 fuel pipe clamp to the engine oil level dipstick guide.
| 11. INSTALL EGR COOLER ASSEMBLY |
| 12. CONNECT CABLE TO NEGATIVE BATTERY TERMINAL |
- NOTICE:
- When disconnecting the cable, some systems need to be initialized after the cable is reconnected (Click here).
| 13. ADD ENGINE COOLANT |
Firmly tighten the drain plugs.
Fill the radiator reserve tank assembly with engine coolant to the top of the inlet.
- Standard capacity:
- 13.9 liters (14.6 US qts, 12.2 Imp qts)
- NOTICE:
- Do not substitute plain water for engine coolant.
- HINT:
- Use of improper coolants may damage the engine cooling system.
- Use only TOYOTA Super Long Life Coolant (SLLC) or similar high quality ethylene glycol based non-silicate, non-amine, non-nitrite, and non-borate coolant with long-life hybrid organic acid technology (coolant with long-life hybrid organic acid technology consists of a combination of low phosphates and organic acids).
- Use of improper coolants may damage the engine cooling system.
Loosen the bleeder plug of the water outlet sub-assembly.
When air is bled and the engine coolant drains out, firmly tighten the bleeder plug.
- Torque:
- 8.0 N*m{ 82 kgf*cm , 71 in.*lbf }
Add engine coolant up to the B line mark in the radiator reserve tank assembly and install the radiator cap sub-assembly.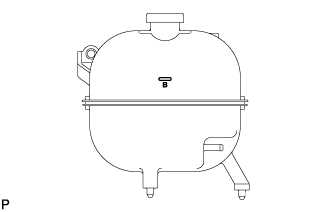
Warm up the engine until the thermostat opens.
While the thermostat is open, circulate the engine coolant for several minutes.
- HINT:
- The thermostat open timing can be confirmed by pressing the No. 3 radiator hose by hand, and checking when the engine coolant starts to flow inside the hose.
After the engine cools down, check that the engine coolant level is between the LOW and FULL line.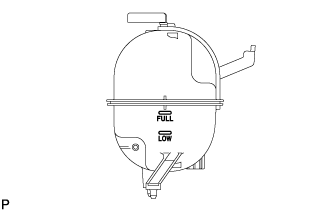
| 14. BLEED AIR FROM FUEL SYSTEM |
Using the hand pump mounted on the fuel filter cap, bleed air from the fuel system. Continue pumping until the pump resistance increases.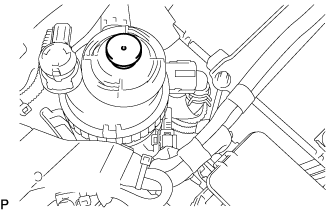
- NOTICE:
- The maximum hand pump pumping speed is 2 strokes per second.
- The hand pump must be pushed with a full stroke during pumping.
- When the fuel pressure at the supply pump inlet port reaches a saturated pressure, the hand pump resistance increases.
- If pumping is interrupted during the air bleeding process, fuel in the fuel line may return to the fuel tank. Continue pumping until the hand pump resistance increases.
- If the hand pump resistance does not increase despite consecutively pumping 200 times or more, there may be a fuel leak between the fuel tank and fuel filter, the hand pump may be malfunctioning, or the vehicle may have run out of fuel.
- If air bleeding using the hand pump is incomplete, the common rail pressure does not rise to the pressure range necessary for normal use and the engine cannot be started.
- The maximum hand pump pumping speed is 2 strokes per second.
Check if the engine starts.
- NOTICE:
- Even if air bleeding using the hand pump has been completed, the starter may need to be cranked for 10 seconds or more to start the engine.
- Do not crank the engine continuously for more than 20 seconds. The battery may be discharged.
- Use a fully-charged battery.
- Even if air bleeding using the hand pump has been completed, the starter may need to be cranked for 10 seconds or more to start the engine.
When the engine can be started, proceed to the next step.
If the engine cannot be started, bleed air again using the hand pump until the hand pump resistance increases (refer to the procedures above). Then start the engine.
Turn the ignition switch off.
Connect the GTS to the DLC3.
Turn the ignition switch to ON and turn the GTS on.
Clear the DTCs (Click here).
Start the engine.*1
Enter the following menus: Powertrain / Engine and ECT / Active Test / Test the Fuel Leak.*2
Perform the following test 5 times with on/off intervals of 10 seconds: Active Test / Test the Fuel Leak.*3
Allow the engine to idle for 3 minutes or more after performing the Active Test for the 5th time.
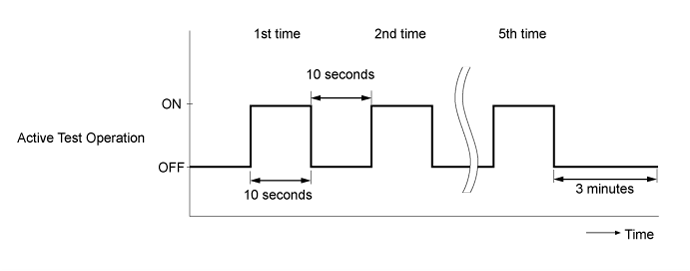
- HINT:
- When the Active Test "Test the Fuel Leak" is used to change the pump control mode, the actual fuel pressure inside the common rail drops below the target fuel pressure when the Active Test is off, but this is normal and does not indicate a pump malfunction.
Enter the following menus: Powertrain / Engine and ECT /Trouble Codes.
Read Current DTCs.
Clear the DTCs (Click here).
- HINT:
- It is necessary to clear the DTCs as DTC P1604 or P1605 may be stored when air is bled from the fuel system after replacing or repairing fuel system parts.
Repeat steps *1 to *3.
Enter the following menus: Powertrain / Engine and ECT / Trouble Codes.
Read Current DTCs.
- OK:
- No DTCs are output.