INSTALLATION
Removal / installation · Vehicles built from Jan 2017
- NOTICE:
- When replacing the parts in the following chart (A), replace the No. 1 injection pipe sub-assembly, No. 2 injection pipe sub-assembly and/or fuel inlet pipe sub-assembly with new ones.
Replaced Parts (A)
Pipes Requiring New Replacement
- Injector assembly (including shuffling the injector assemblies between the cylinders)
- Common rail assembly
- Cylinder head sub-assembly
- No. 1 injection pipe sub-assembly
- No. 2 injection pipe sub-assembly
Supply pump assembly
Fuel inlet pipe sub-assembly
- Common rail assembly
- Cylinder block sub-assembly
- Cylinder head sub-assembly
- Cylinder head gasket
- Timing chain case assembly
- No. 1 injection pipe sub-assembly
- No. 2 injection pipe sub-assembly
- Fuel inlet pipe sub-assembly
- Injector assembly (including shuffling the injector assemblies between the cylinders)
- After removing the No. 1 injection pipe sub-assembly, No. 2 injection pipe sub-assembly and/or fuel inlet pipe sub-assembly, clean them with a brush and compressed air.
- The injector assembly is a precision instrument. Do not use the injector assembly if it is struck or dropped.
- Make sure foreign matter does not enter the fuel path.
- When replacing the parts in the following chart (A), replace the No. 1 injection pipe sub-assembly, No. 2 injection pipe sub-assembly and/or fuel inlet pipe sub-assembly with new ones.
| 1. INSTALL COMMON RAIL ASSEMBLY |

Install the common rail assembly with the 2 nuts.
- Torque:
- 21 N*m{ 214 kgf*cm , 15 ft.*lbf }
Connect the fuel pressure sensor connector to the common rail assembly.
Attach the wire harness clamp.
| 2. INSTALL NO. 4 FUEL HOSE |
Connect the No. 4 fuel hose to the common rail assembly, and slide the clamp to secure it.
| 3. TEMPORARILY INSTALL NO. 1 AND NO. 2 INJECTION PIPE SUB-ASSEMBLY |
Temporarily install the 2 No. 2 injection pipe sub-assemblies with the 4 union nuts.
Temporarily install the 2 No. 1 injection pipe sub-assemblies with the 4 union nuts.
| 4. TIGHTEN NO. 1 AND NO. 2 INJECTION PIPE SUB-ASSEMBLY |
Using SST, tighten the 8 union nuts of the No. 1 and No. 2 injection pipe sub-assemblies.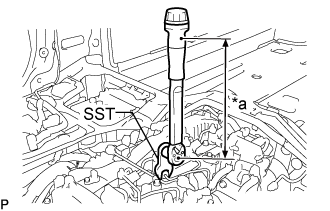

Text in Illustration *a
Torque Wrench Fulcrum Length
- Torque:
- Specified tightening torque:
- 40 N*m{ 408 kgf*cm , 30 ft.*lbf }
- HINT:
- Calculate the torque wrench reading when changing the fulcrum length of the torque wrench.
- When using SST (fulcrum length of 50 mm (1.97 in.)) + torque wrench (fulcrum length of 180 mm (7.09 in.)): 31 N*m (316 kgf*cm, 23 ft.*lbf)
- Calculate the torque wrench reading when changing the fulcrum length of the torque wrench.
| 5. INSTALL FUEL INLET PIPE SUB-ASSEMBLY |
- NOTICE:
- When replacing the fuel supply pump assembly, it is necessary to replace the fuel inlet pipe sub-assembly, No. 1 injection pipe clamp and No. 2 injection pipe clamp with a new one. Keep the fuel inlet pipe sub-assembly free of foreign matter.
Temporarily install the fuel inlet pipe sub-assembly.
Install a new No. 1 injection pipe clamp and No. 2 injection pipe clamp with the 2 bolts.
- Torque:
- 10 N*m{ 102 kgf*cm , 7 ft.*lbf }
Using SST, tighten the fuel inlet pipe sub-assembly union nut on the common rail side sub-assembly.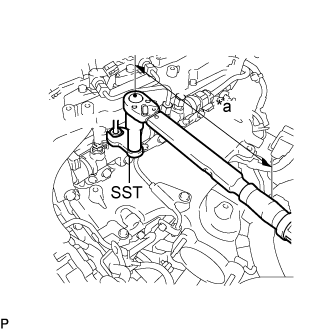
- SST
- 09245-11010
- Torque:
- Specified tightening torque:
- 40 N*m{ 408 kgf*cm , 30 ft.*lbf }
Text in Illustration *a
Torque Wrench Fulcrum Length
- HINT:
- Calculate the torque wrench reading when changing the fulcrum length of the torque wrench.
- When using a union nut wrench (fulcrum length of 50 mm (1.97 in.)) + torque wrench (fulcrum length of 180 mm (7.09 in.)): 31 N*m (316 kgf*cm, 23 ft.*lbf)
- Calculate the torque wrench reading when changing the fulcrum length of the torque wrench.
Using a 19 mm union nut wrench, tighten the fuel inlet pipe sub-assembly union nut on the fuel supply pump assembly side.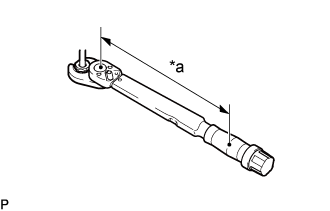
- Torque:
- Specified tightening torque:
- 48 N*m{ 489 kgf*cm , 35 ft.*lbf }
Text in Illustration *a
Torque Wrench Fulcrum Length
- HINT:
- Calculate the torque wrench reading when changing the fulcrum length of the torque wrench.
- When using a union nut wrench (fulcrum length of 30 mm (1.18 in.)) + torque wrench (fulcrum length of 180 mm (7.09 in.)): 41 N*m (418 kgf*cm, 30 ft.*lbf)
- Calculate the torque wrench reading when changing the fulcrum length of the torque wrench.
| 6. INSTALL NO. 4 FUEL PIPE SUB-ASSEMBLY |
Temporarily install the No. 4 fuel pipe sub-assembly and 2 new gaskets with the 2 union bolts and bolt.
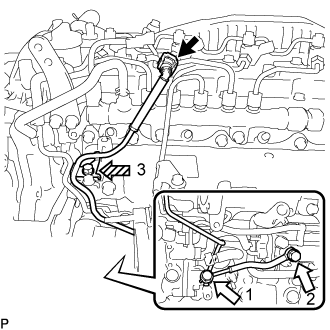
Tighten the union bolt and bolt in the order shown in the illustration.Text in Illustration 
Union Bolt

Bolt
- Torque:
- union bolt:
- 42 N*m{ 428 kgf*cm , 31 ft.*lbf }
- bolt:
- 10 N*m{ 102 kgf*cm , 7 ft.*lbf }
Connect the No. 4 fuel pipe sub-assembly to the No. 1 fuel pipe (Click here).
| 7. INSTALL WIRING HARNESS CLAMP BRACKET |
Install the wiring harness clamp bracket the cylinder head cover sub-assembly with the bolt.
- Torque:
- 10 N*m{ 102 kgf*cm , 7 ft.*lbf }
Connect the pressure discharge valve connector to the common rail assembly.
| 8. INSTALL EGR COOLER ASSEMBLY |
| 9. CONNECT CABLE TO NEGATIVE BATTERY TERMINAL |
- NOTICE:
- When disconnecting the cable, some systems need to be initialized after the cable is reconnected (Click here).
| 10. BLEED AIR FROM FUEL SYSTEM |
| 11. INSPECT FOR FUEL LEAK |