INSTALLATION
Removal / installation · Vehicles built from Jan 2017
| 1. INSTALL EXHAUST MANIFOLD CONVERTER SUB-ASSEMBLY |

Set a new gasket and the exhaust manifold converter sub-assembly to the turbocharger sub-assembly.
Temporarily install the exhaust pipe support stay to the cylinder block sub-assembly and exhaust manifold converter sub-assembly with the 3 bolts.
Install a new exhaust pipe clamp to the exhaust manifold converter sub-assembly with a new nut.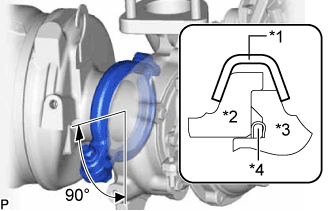

- Torque:
- 18 N*m{ 184 kgf*cm , 13 ft.*lbf }
Text in Illustration *1
Exhaust Pipe Clamp
*2
Exhaust Manifold Converter
*3
Turbocharger Sub-assembly
*4
Gasket
Tighten the 3 bolts and install the exhaust pipe support stay to the cylinder block sub-assembly and exhaust manifold converter sub-assembly.
- Torque:
- 38 N*m{ 387 kgf*cm , 28 ft.*lbf }
| 2. INSTALL NO. 2 EXHAUST PIPE SUPPORT STAY |
Install the No. 2 exhaust pipe support stay to the cylinder block sub-assembly and exhaust manifold converter sub-assembly with the bolt and 2 new nuts.
- Torque:
- 38 N*m{ 387 kgf*cm , 28 ft.*lbf }
| 3. INSTALL NO. 1 TURBO INSULATOR |
Install the No. 1 turbo insulator to the exhaust manifold and turbocharger sub-assembly with the 3 bolts.
- Torque:
- 12 N*m{ 122 kgf*cm , 9 ft.*lbf }
| 4. INSTALL NO. 1 EXHAUST MANIFOLD HEAT INSULATOR |
Install the No. 1 exhaust manifold heat insulator to the exhaust manifold with the 3 bolts.
- Torque:
- 12 N*m{ 122 kgf*cm , 9 ft.*lbf }
| 5. INSTALL AIR FUEL RATIO SENSOR |
- HINT:
- Perform "Inspection After Repairs" after replacing the air fuel ratio sensor (Click here).
Using SST, install the air fuel ratio sensor to the front exhaust pipe.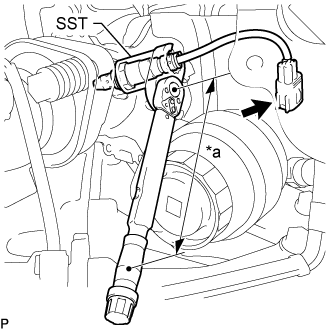
- SST
- 09224-00012
- Torque:
- Specified tightening torque:
- 44 N*m{ 449 kgf*cm , 32 ft.*lbf }
Text in Illustration *a
Torque Wrench Fulcrum Length
- HINT:
- Calculate the torque wrench reading when changing the fulcrum length of the torque wrench (Click here).
- When using SST (fulcrum length of 30 mm (1.18 in.)) + torque wrench (fulcrum length of 180 mm (7.09 in.)): 38 N*m (384 kgf*cm, 28 ft.*lbf)
- Calculate the torque wrench reading when changing the fulcrum length of the torque wrench (Click here).
Connect the connector.
| 6. INSTALL ENGINE COVER BRACKET |
Install the engine cover bracket to the cylinder head sub-assembly with the 2 bolts.
- Torque:
- 21 N*m{ 214 kgf*cm , 15 ft.*lbf }
Connect the engine wire to the cylinder head sub-assembly with the bolt.
- Torque:
- 10 N*m{ 102 kgf*cm , 7 ft.*lbf }
| 7. INSTALL PIPE CLAMP |
Install the pipe clamp to the engine cover bracket with the 3 bolts.
- Torque:
- 10 N*m{ 102 kgf*cm , 7 ft.*lbf }
| 8. TEMPORARILY INSTALL NO. 2 VACUUM PIPE |
Install a new clamp to the pipe clamp.
Temporarily install the No. 2 vacuum pipe to the exhaust manifold converter sub-assembly.
| 9. TEMPORARILY INSTALL NO. 1 VACUUM PIPE |
Temporarily install the No. 1 vacuum pipe to the exhaust manifold converter sub-assembly.
Install a new clamp to the No. 1 vacuum pipe and No. 2 vacuum pipe with the nut.
- Torque:
- 6.0 N*m{ 61 kgf*cm , 53 in.*lbf }
| 10. TIGHTEN NO. 2 VACUUM PIPE |
Using a 17 mm union nut wrench, tighten the No. 2 vacuum pipe.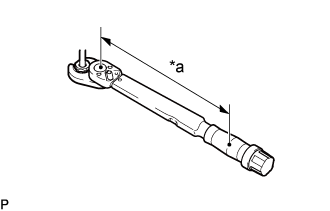
- Torque:
- Specified tightening torque
- 48 N*m {489 kgf*cm, 35 ft.*lbf}
Text in Illustration *a
Torque Wrench Fulcrum Length
- HINT:
- Calculate the torque wrench reading when changing the fulcrum length of the torque wrench (Click here).
- When using a union nut wrench (fulcrum length of 30 mm (1.18 in.)) + torque wrench (fulcrum length of 255 mm (10.0 in.)): 43 N*m (437 kgf*cm, 32 ft.*lbf)
- Calculate the torque wrench reading when changing the fulcrum length of the torque wrench (Click here).
| 11. TIGHTEN NO. 1 VACUUM PIPE |
Using a 17 mm union nut wrench, tighten the No. 1 vacuum pipe.
- Torque:
- Specified tightening torque
- 48 N*m {489 kgf*cm, 35 ft.*lbf}
Text in Illustration *a
Torque Wrench Fulcrum Length
- HINT:
- Calculate the torque wrench reading when changing the fulcrum length of the torque wrench (Click here).
- When using a union nut wrench (fulcrum length of 30 mm (1.18 in.)) + torque wrench (fulcrum length of 255 mm (10.0 in.)): 43 N*m (437 kgf*cm, 32 ft.*lbf)
- Calculate the torque wrench reading when changing the fulcrum length of the torque wrench (Click here).
| 12. INSTALL EXHAUST GAS TEMPERATURE SENSOR |
Using a 14 mm union nut wrench, install the No. 3 exhaust gas temperature sensor to the exhaust manifold converter sub-assembly.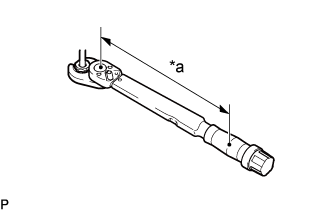
- Torque:
- Specified tightening torque
- 30 N*m {306 kgf*cm, 22 ft.*lbf}
Text in Illustration *a
Torque Wrench Fulcrum Length
- NOTICE:
- If the No. 3 exhaust gas temperature sensor is dropped, replace it with a new.
- When reusing the No. 3 exhaust gas temperature sensors, clean the screws and apply anti-seize compound before installing the No. 3 exhaust gas temperature sensor.
- If the No. 3 exhaust gas temperature sensor is dropped, replace it with a new.
- HINT:
- The connector color of the No. 3 exhaust gas temperature sensor is gray.
- Calculate the torque wrench reading when changing the fulcrum length of the torque wrench (Click here).
- When using a union nut wrench (fulcrum length of 25 mm (0.984 in.)) + torque wrench (fulcrum length of 180 mm (7.09 in.)): 26 N*m (268 kgf*cm, 19 ft.*lbf)
- The connector color of the No. 3 exhaust gas temperature sensor is gray.
Using a 14 mm union nut wrench, install the No. 2 exhaust gas temperature sensor to the exhaust manifold converter sub-assembly.
- Torque:
- Specified tightening torque
- 30 N*m {306 kgf*cm, 22 ft.*lbf}
Text in Illustration *a
Torque Wrench Fulcrum Length
- NOTICE:
- If the No. 2 exhaust gas temperature sensor is dropped, replace it with a new.
- When reusing the No. 2 exhaust gas temperature sensors, clean the screws and apply anti-seize compound before installing the No. 2 exhaust gas temperature sensor.
- If the No. 2 exhaust gas temperature sensor is dropped, replace it with a new.
- HINT:
- The connector color of the No. 2 exhaust gas temperature sensor is black.
- Calculate the torque wrench reading when changing the fulcrum length of the torque wrench (Click here).
- When using a union nut wrench (fulcrum length of 25 mm (0.984 in.)) + torque wrench (fulcrum length of 180 mm (7.09 in.)): 26 N*m (268 kgf*cm, 19 ft.*lbf)
- The connector color of the No. 2 exhaust gas temperature sensor is black.
Using a 14 mm union nut wrench, install the exhaust gas temperature sensor to the exhaust manifold converter sub-assembly.
- Torque:
- Specified tightening torque
- 30 N*m {306 kgf*cm, 22 ft.*lbf}
Text in Illustration *a
Torque Wrench Fulcrum Length
- NOTICE:
- If the exhaust gas temperature sensor is dropped, replace it with a new.
- When reusing the exhaust gas temperature sensors, clean the screws and apply anti-seize compound before installing the exhaust gas temperature sensor.
- If the exhaust gas temperature sensor is dropped, replace it with a new.
- HINT:
- The connector color of the exhaust gas temperature sensor is white.
- Calculate the torque wrench reading when changing the fulcrum length of the torque wrench (Click here).
- When using a union nut wrench (fulcrum length of 25 mm (0.984 in.)) + torque wrench (fulcrum length of 180 mm (7.09 in.)): 26 N*m (268 kgf*cm, 19 ft.*lbf)
- The connector color of the exhaust gas temperature sensor is white.
Attach the 3 colored connectors to the pipe clamp in the positions shown in the illustration.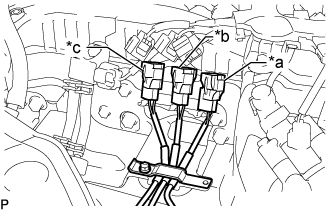
Text in Illustration *a
White
*b
Black
*c
Gray
Close the clamp of the pipe clamp, and install the bolt.
- Torque:
- 10 N*m{ 102 kgf*cm , 7 ft.*lbf }
- NOTICE:
- Arrange the exhaust gas temperature sensor wires so that they do not contact each other.
Connect the No. 3 exhaust gas temperature sensor to the No. 1 vacuum pipe.
- Torque:
- 10 N*m{ 102 kgf*cm , 7 ft.*lbf }
Connect the 3 connectors to the 3 exhaust gas temperature sensors.
| 13. INSTALL DIFFERENTIAL PRESSURE SENSOR |
Install the 2 air hoses to the differential pressure sensor, and slide the 2 clamps to secure the 2 hoses.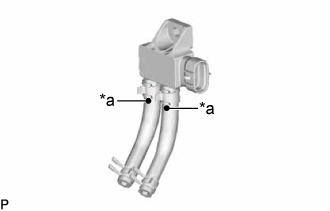
Text in Illustration *a
Paint Mark
- HINT:
- Make sure the paint mark of the air hose side the differential pressure sensor.
Connect the 2 air hoses to the No. 1 vacuum pipe and No. 2 vacuum pipe, and slide the 2 clamps to secure the 2 hoses.
Install the differential pressure sensor to the pipe clamp with the bolt.
- Torque:
- 10 N*m{ 102 kgf*cm , 7 ft.*lbf }
Connect the connector to the differential pressure sensor.
| 14. INSTALL ENGINE ASSEMBLY |