REMOVAL
Removal / installation · Vehicles built from Jan 2017
- NOTICE:
- When replacing the parts in the following chart (A), replace the No. 1 injection pipe sub-assembly, No. 2 injection pipe sub-assembly and/or fuel inlet pipe sub-assembly with new ones.
Replaced Parts (A)
Pipes Requiring New Replacement
Injector assembly (including shuffling the injector assemblies between the cylinders)
- No. 1 injection pipe sub-assembly
- No. 2 injection pipe sub-assembly
Supply pump assembly
Fuel inlet pipe sub-assembly
- Common rail assembly
- Cylinder block sub-assembly
- Cylinder head sub-assembly
- Cylinder head gasket
- Timing chain case assembly
- No. 1 injection pipe sub-assembly
- No. 2 injection pipe sub-assembly
- Fuel inlet pipe sub-assembly
- No. 1 injection pipe sub-assembly
- After removing the No. 1 injection pipe sub-assembly, No. 2 injection pipe sub-assembly and/or fuel inlet pipe sub-assembly, clean them with a brush and compressed air.
- The injector assembly is a precision instrument. Do not use the injector assembly if it is struck or dropped.
- The supply pump assembly is a precision instrument. Do not use the supply pump assembly if it is struck or dropped.
- Hold the supply pump assembly itself during removal and installation. Do not hold the pre-stroke control valve or fuel pipe, etc.
- Make sure foreign matter does not enter the fuel path.
- When replacing the parts in the following chart (A), replace the No. 1 injection pipe sub-assembly, No. 2 injection pipe sub-assembly and/or fuel inlet pipe sub-assembly with new ones.
| 1. REMOVE CAMSHAFT |

| 2. REMOVE TIMING CHAIN COVER ASSEMBLY |
| 3. REMOVE NO. 1 VALVE ROCKER ARM SUB-ASSEMBLY |
Remove the 16 No. 1 valve rocker arm sub-assemblies from the 16 valve lash adjuster assemblies.
| 4. REMOVE VALVE LASH ADJUSTER ASSEMBLY |
Remove the 16 valve lash adjuster assemblies from the cylinder head sub-assembly.
| 5. REMOVE CYLINDER HEAD SUB-ASSEMBLY |
Uniformly loosen the 10 cylinder head set bolts in several passes in the sequence shown in the illustration. Then remove the 10 cylinder head set bolts and 6 cylinder head set bolt spacers.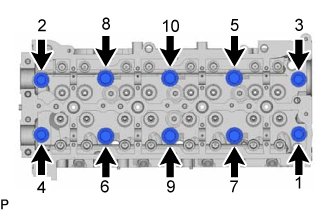

- NOTICE:
- Cylinder head sub-assembly warpage or cracking could result from removing bolts in the incorrect order.
- Be careful not to drop the cylinder head set bolt spacers into the cylinder head sub-assembly.
- Cylinder head sub-assembly warpage or cracking could result from removing bolts in the incorrect order.
Lift the cylinder head sub-assembly from the ring pins on the cylinder block sub-assembly, and place the cylinder head sub-assembly on wooden blocks on a bench.
- NOTICE:
- Be careful not to damage the contact surfaces of the cylinder head sub-assembly and cylinder block sub-assembly.
- HINT:
- If the cylinder head sub-assembly is difficult to remove, use a screwdriver to pry between the cylinder head sub-assembly and cylinder block sub-assembly.
| 6. REMOVE CYLINDER HEAD GASKET |
Remove the cylinder head gasket from the cylinder block sub-assembly.
| 7. INSPECT CYLINDER HEAD SET BOLT |
w/ Washer:
Using a vernier caliper, measure the thread outside diameter of the cylinder head set bolt.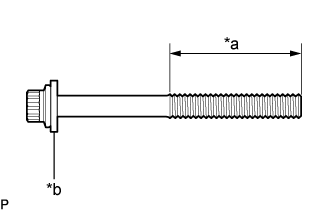
- Minimum diameter:
- 11.4 mm (0.449 in.)
If the diameter is less than the minimum, replace the cylinder head set bolt.Text in Illustration *a
Measuring Area
*b
Washer
w/o Washer:
Using a vernier caliper, measure the thread outside diameter of the cylinder head set bolt.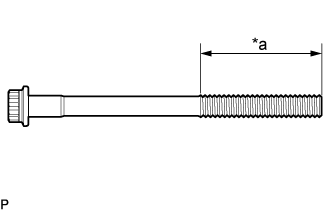
- Minimum diameter:
- 12.8 mm (0.504 in.)
If the diameter is less than the minimum, replace the cylinder head set bolt and cylinder head set bolt spacer.Text in Illustration *a
Measuring Area