RC60J MANUAL TRANSMISSION / TRANSAXLE MANUAL TRANSMISSION UNIT REASSEMBLY
PROCEDURE

 1.INSTALL STRAIGHT PIN AND RING PIN
- NOTICE:
-
It is not necessary to remove the straight pin and ring pin unless it is being replaced.
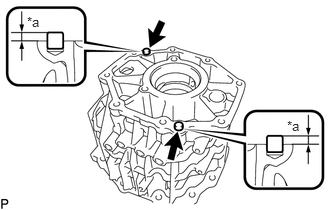
| *a | Protrusion Height |
Using a plastic-faced hammer, tap 2 new straight pins into the rear transmission case.
- Protrusion Height:
5.5 to 6.5 mm (0.217 to 0.255 in.)
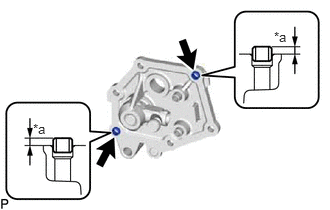
| *a | Protrusion Height |
Using a plastic-faced hammer, tap 2 new ring pins into the shift lever with seal housing sub-assembly.
- Protrusion Height:
3.5 to 4.5 mm (0.138 to 0.177 in.)
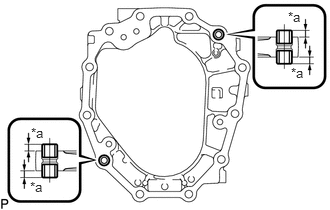
| *a | Protrusion Height |
Using a plastic-faced hammer, tap 4 new ring pins into the transmission intermediate plate.
- Protrusion Height:
5.5 to 7.5 mm (0.217 to 0.295 in.)
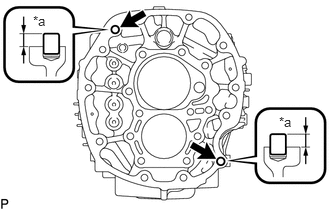
| *a | Protrusion Height |
Using a plastic-faced hammer, tap 2 new straight pins into the transmission case.
- Protrusion Height:
9.5 to 10.5 mm (0.374 to 0.414 in.)
33244D
2.INSTALL NO. 3 GEAR SHIFT FORK SHAFT
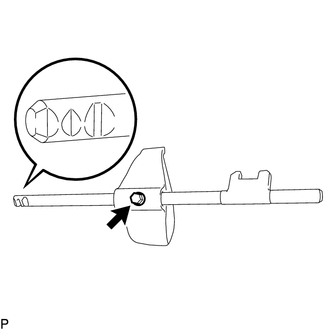
Install the No. 3 gear shift fork to the No. 3 gear shift fork shaft with a new bolt.
- Torque:
- 19.5 N*m (199 kgf*cm, 14 ft.*lbf)
- NOTICE:
-
Secure the No. 3 gear shift fork with the bolt from the side as shown in the illustration.
33242
3.INSTALL NO. 1 GEAR SHIFT FORK SHAFT
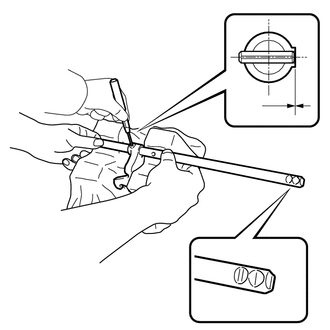
Pass the No. 1 gear shift fork shaft through the No. 1 gear shift fork head, set the shaft on the cloth that was placed on the 2 V-blocks, and then hold the shaft in place as shown in the illustration.
- CAUTION:
- ·
Make sure to perform this procedure with 2 people and firmly hold the No. 1 gear shift fork shaft in place.
·Make sure to protect the No. 1 gear shift fork shaft with a cloth before performing this procedure. If the No. 1 gear shift fork shaft is damaged, shifting operations will worsen.
Using a 5 mm pin punch and hammer, tap a new slotted spring pin into the No. 1 gear shift head and No. 1 gear shift fork shaft.
- Standard Depth:
0 to 0.5 mm (0 to 0.0196 in.)
- NOTICE:
-
Secure the No. 1 gear shift fork head with the new slotted spring pin from the side as shown in the illustration.
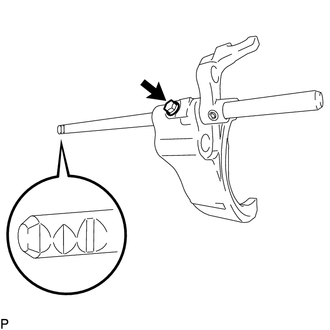
Install the No. 1 gear shift fork to the No. 1 gear shift fork shaft with a new bolt.
- Torque:
- 19.5 N*m (199 kgf*cm, 14 ft.*lbf)
- NOTICE:
-
Secure the No. 1 gear shift fork with the bolt from the side as shown in the illustration.
33245G
4.INSTALL NO. 4 GEAR SHIFT FORK SHAFT
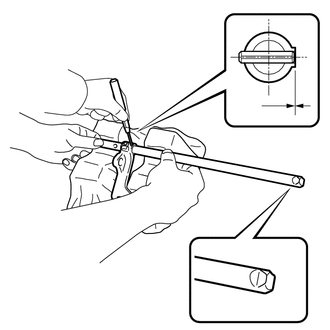
Pass the No. 4 gear shift fork shaft through the No. 4 gear shift fork head, set the shaft on the cloth that was placed on the 2 V-blocks, and then hold the shaft in place as shown in the illustration.
- CAUTION:
- ·
Make sure to perform this procedure with 2 people and firmly hold the No. 4 gear shift fork shaft in place.
·Make sure to protect the No. 4 gear shift fork shaft with a cloth before performing this procedure. If the No. 4 gear shift fork shaft is damaged, shifting operations will worsen.
Using a 5 mm pin punch and hammer, tap a new slotted spring pin into the No. 4 gear shift head and No. 4 gear shift fork shaft.
- Standard Depth:
0 to 0.5 mm (0 to 0.0196 in.)
- NOTICE:
-
Secure the No. 4 gear shift fork head with the new slotted spring pin from the side as shown in the illustration.
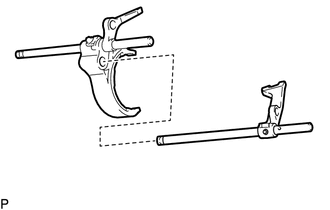
Install the No. 4 gear shift fork shaft to the No. 1 gear shift fork shaft.
33243A
5.INSTALL NO. 2 GEAR SHIFT FORK SHAFT
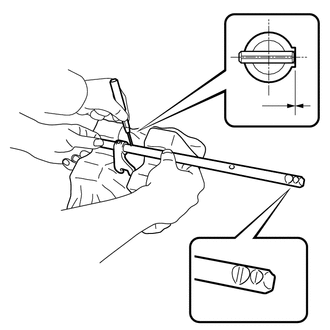
Pass the No. 2 gear shift fork shaft through the No. 2 gear shift fork head, set the shaft on the cloth that was placed on the 2 V-blocks, and then hold the shaft in place as shown in the illustration.
- CAUTION:
- ·
Make sure to perform this procedure with 2 people and firmly hold the No. 2 gear shift fork shaft in place.
·Make sure to protect the No. 2 gear shift fork shaft with a cloth before performing this procedure. If the No. 2 gear shift fork shaft is damaged, shifting operations will worsen.
Using a 5 mm pin punch and hammer, tap a new slotted spring pin into the No. 2 gear shift head and No. 2 gear shift fork shaft.
- Standard Depth:
0 to 0.5 mm (0 to 0.0196 in.)
- NOTICE:
-
Secure the No. 2 gear shift fork head with the new slotted spring pin from the side as shown in the illustration.
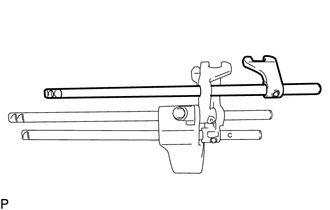
Install the No. 2 gear shift fork shaft to the No. 1 gear shift fork head.
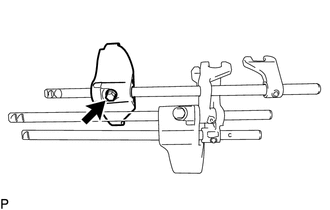
Install the No. 2 gear shift fork to the No. 2 gear shift fork shaft with a new bolt.
- Torque:
- 19.5 N*m (199 kgf*cm, 14 ft.*lbf)
- NOTICE:
-
Secure the No. 2 gear shift fork with the bolt from the side as shown in the illustration.
33261C
6.INSTALL SHIFT AND SELECT LEVER SHAFT
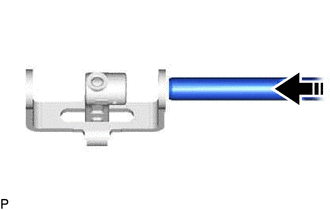

|
Install in this direction |
Install the shift and select lever shaft to the shift interlock plate sub-assembly and inner select lever.
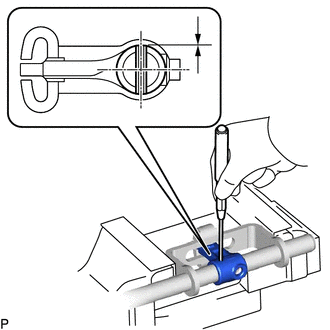
Using a 5 mm pin punch and hammer, tap a new slotted spring pin into the inner select lever and shift and select lever shaft.
- Standard Depth:
0 to 0.5 mm (0 to 0.0196 in.)
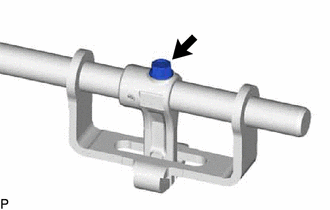
Install a new bolt.
- Torque:
- 50.1 N*m (511 kgf*cm, 37 ft.*lbf)
33242L
7.INSTALL SHIFT FORK SHAFT BEARING
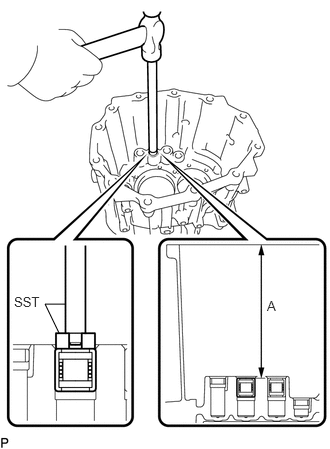
Using SST and a hammer, tap 2 new shift fork shaft bearings (front side) into the manual transmission case sub-assembly so that dimension A in the illustration is as specified.
- SST
- 09950-70010 (09951-07360)
09950-60011 (09951-00180)
- Dimension A:
147.7 to 148.7 mm (5.815 to 5.854 in.)
- NOTICE:
-
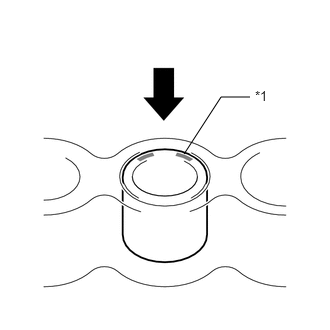 1.917,1.604 2.302,1.01 2.302,1.01 2.604,1.01 false 2.656,0.917 2.969,1.073 0.313,0.156 10 false *1
*1 Engraved Surface 
Press
-
Press the engraved surface to install the shift fork shaft bearing.
33261K
8.INSTALL SHIFT AND SELECT LEVER SHAFT NEEDLE ROLLER BEARING
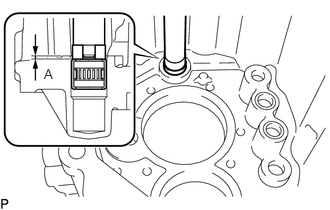
Using SST and a hammer, tap a new shift and select lever shaft needle roller bearing (front side) into the manual transmission case so that dimension A in the illustration is as specified.
- SST
- 09950-70010 (09951-07360)
09950-60011 (09951-00230)
- Dimension A:
0.5 to 1.5 mm (0.0197 to 0.0590 in.)
- NOTICE:
-
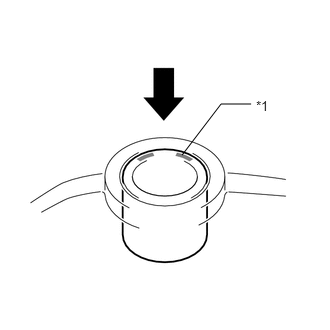 1.896,1.615 2.302,1.083 2.302,1.083 2.615,1.083 false 2.667,1.021 2.979,1.177 0.313,0.156 10 false *1
*1 Engraved Surface
Press
-
Press the engraved surface to install the shift and select lever shaft needle roller bearing.
33242L
9.INSTALL SHIFT FORK SHAFT BEARING
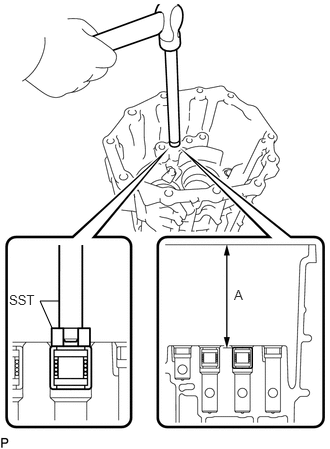
Using SST and a hammer, tap 2 new shift fork shaft bearings (rear side) into the rear transmission case so that dimension A in the illustration is as specified.
- SST
- 09950-70010 (09951-07360)
09950-60011 (09951-00180)
- Dimension A:
106.9 to 107.9 mm (4.209 to 4.248 in.)
- NOTICE:
-
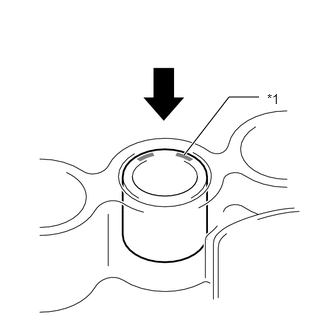 1.917,1.615 2.385,1.01 2.385,1.01 2.698,1.01 true 2.781,0.948 3.094,1.104 0.313,0.156 10 true *1
*1 Engraved Surface
Press
-
Press the engraved surface to install the shift fork shaft bearing.
33321N
10.INSTALL FRONT OUTPUT SHAFT BEARING (OUTER RACE)
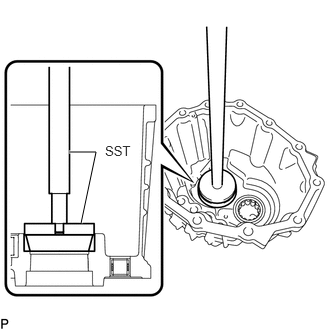
Using SST and a press, install a new front output shaft bearing (outer) to the rear transmission case.
- SST
- 09950-70010 (09951-07360)
09951-00850
33261K
11.INSTALL SHIFT AND SELECT LEVER SHAFT NEEDLE ROLLER BEARING
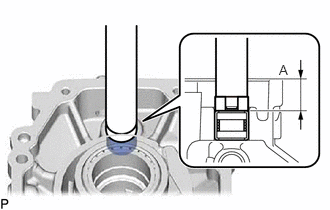
Using SST and a hammer, install a new shift and select lever shaft needle roller bearing into the extension housing sub-assembly so that dimension A in the illustration is as specified.
- SST
- 09950-70010 (09951-07360)
09950-60011 (09951-00230)
- Dimension A:
22.4 to 23.4 mm (0.882 to 0.921 in.)
- NOTICE:
-
1.896,1.615 2.302,1.083 2.302,1.083 2.615,1.083 false 2.667,1.021 2.979,1.177 0.313,0.156 10 false *1
*1 Engraved Surface
Press
-
Press the engraved surface to install the shift and select lever shaft needle roller bearing.
33321A
12.INSTALL REAR OUTPUT SHAFT BEARING (OUTER RACE)
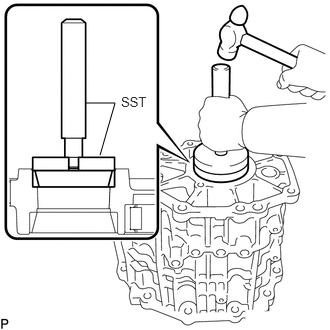
Using SST and a hammer, install a new rear output shaft bearing (outer race) to the rear transmission case.
- SST
- 09950-70010 (09951-07100)
09950-60021 (09951-00790)
33411H
13.INSTALL REAR COUNTER GEAR BEARING OR ROLLER
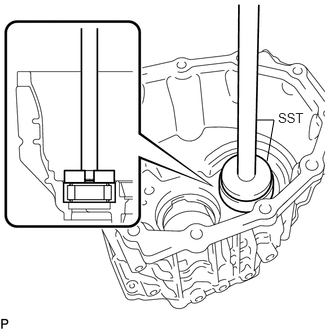
Coat a new rear counter gear bearing or roller (outer race) with gear oil, and then using SST and a press, install it to the rear transmission case.
- SST
- 09950-70010 (09951-07360)
09950-60011 (09951-00180)
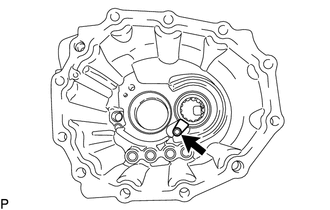
Install the bolt and bearing lock plate.
- Torque:
- 11.3 N*m (115 kgf*cm, 8 ft.*lbf)
14.INSPECT PRELOAD
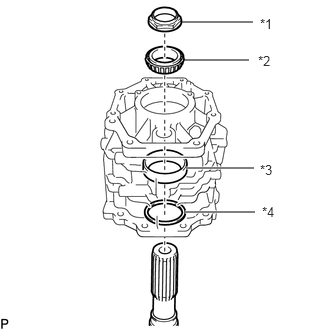
| *1 | Manual Transmission Output Shaft Rear Set Nut |
| *2 | Rear Output Shaft Bearing |
| *3 | Output Shaft Spacer |
| *4 | Rear Output Shaft Bearing Shim |
Temporarily install the output shaft, new rear output shaft bearing shim, output shaft spacer, new rear output shaft bearing and a new manual transmission output shaft rear set nut to the rear transmission case sub-assembly.
- NOTICE:
- ·
Do not apply gear oil to a new rear output shaft bearing and front output shaft bearing. If applied, the turning torque cannot be accurately measured.
·If the turning torque is not properly measured, the output shaft bearing may generate abnormal noise and become damaged.
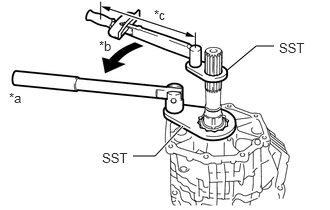
| *a | Hold |
| *b | Turn |
| *c | Torque Wrench Fulcrum Length |
Temporarily install the manual transmission output shaft rear set nut to the output shaft.
- SST
- 09326-35020
09326-71010
- Torque:
- 50 N*m (510 kgf*cm, 37 ft.*lbf)
- NOTICE:
-
If the nut is not temporarily installed, the position of the rear output shaft bearing will be unstable causing the preload to be unstable.
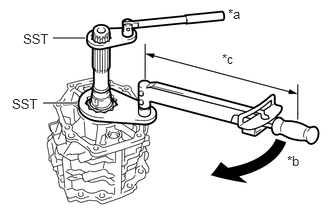
| *a | Hold |
| *b | Turn |
| *c | Torque Wrench Fulcrum Length |
Using SST and a torque wrench, tighten the manual transmission output shaft rear set nut.
- SST
- 09326-35020
09326-71010
- Torque:
- Specified tightening torque : 187 N*m (1907 kgf*cm, 138 ft.*lbf)
- HINT:
- ·
Calculate the torque wrench reading when changing the fulcrum length of the torque wrench.
Click hereGeneral>INTRODUCTION>REPAIR INSTRUCTION>PRECAUTION
·When using SST (fulcrum length of 50 mm (1.9685 in.)) + torque wrench (fulcrum length of 1055 mm (41.5354 in.)): 178.5 N*m (1820 kgf*cm, 132 ft.*lbf)
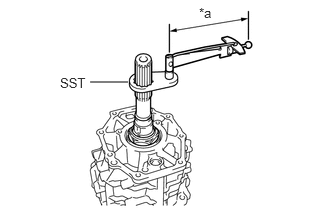
| *a | Torque Wrench Fulcrum Length |
Using SST and a torque wrench, measure the turning torque of the output shaft bearing while rotating SST at 60 rpm.
- Standard turning torque at 60 rpm:
- New output shaft bearing:
0.21 to 1.32 N*m (2.14 to 13.46 kgf*cm, 1.86 to 11.68 in.*lbf)
- NOTICE:
- ·
Do not apply gear oil to a new rear output shaft bearing and front output shaft bearing. If applied, the turning torque cannot be accurately measured.
·If the turning torque is not properly measured, the output shaft bearing may generate abnormal noise and become damaged.
- HINT:
- ·
Calculate the torque wrench reading when changing the fulcrum length of the torque wrench.
Click hereGeneral>INTRODUCTION>REPAIR INSTRUCTION>PRECAUTION
·New output shaft bearing:
When using SST (fulcrum length of 50 mm (1.969 in.)) + torque wrench (fulcrum length of 160 mm (6.299 in.)): 0.16 to 1.00 N*m (1.64 to 10.19 kgf*cm, 1.42 to 8.85 in.*lbf)
If the torque is more than the standard, replace the output shaft shim.
- HINT:
-
New output shaft bearing:
-
When the thickness of the shim is increased by 0.016 mm (0.000630 in.), the preload is reduced by 0.45 N*m (4.59 kgf*cm, 3.98 in.*lbf).
- Standard Shim Thickness:
Part No. Mark Thickness Part No. Mark Thickness 90564-T0020 01 2.214 to 2.230 mm (0.0872 to 0.0877 in.) 90564-T0044 25 2.598 to 2.614 mm (0.1023 to 0.1029 in.) 90564-T0021 02 2.230 to 2.246 mm (0.0878 to 0.0884 in.) 90564-T0045 26 2.614 to 2.630 mm (0.1030 to 0.1035 in.) 90564-T0022 03 2.246 to 2.262 mm (0.0885 to 0.0890 in.) 90564-T0046 27 2.630 to 2.646 mm (0.1036 to 0.1041 in.) 90564-T0023 04 2.262 to 2.278 mm (0.0891 to 0.0896 in.) 90564-T0047 28 2.646 to 2.662 mm (0.1042 to 0.1048 in.) 90564-T0024 05 2.278 to 2.294 mm (0.0897 to 0.0903 in.) 90564-T0048 29 2.662 to 2.678 mm (0.1049 to 0.1054 in.) 90564-T0025 06 2.294 to 2.310 mm (0.0904 to 0.0909 in.) 90564-T0049 30 2.678 to 2.694 mm (0.1055 to 0.1060 in.) 90564-T0026 07 2.310 to 2.326 mm (0.0910 to 0.0915 in.) 90564-T0050 31 2.694 to 2.710 mm (0.1061 to 0.1066 in.) 90564-T0027 08 2.326 to 2.342 mm (0.0916 to 0.0922 in.) 90564-T0051 32 2.710 to 2.726 mm (0.1067 to 0.1073 in.) 90564-T0028 09 2.342 to 2.358 mm (0.0923 to 0.0928 in.) 90564-T0052 33 2.726 to 2.742 mm (0.1074 to 0.1079 in.) 90564-T0029 10 2.358 to 2.374 mm (0.0929 to 0.0934 in.) 90564-T0053 34 2.742 to 2.758 mm (0.1080 to 0.1085 in.) 90564-T0030 11 2.374 to 2.390 mm (0.0935 to 0.0940 in.) 90564-T0054 35 2.758 to 2.774 mm (0.1086 to 0.1092 in.) 90564-T0031 12 2.390 to 2.406 mm (0.0941 to 0.0947 in.) 90564-T0055 36 2.774 to 2.790 mm (0.1093 to 0.1098 in.) 90564-T0032 13 2.406 to 2.422 mm (0.0948 to 0.0953 in.) 90564-T0056 37 2.790 to 2.806 mm (0.1099 to 0.1104 in.) 90564-T0033 14 2.422 to 2.438 mm (0.0954 to 0.0959 in.) 90564-T0057 38 2.806 to 2.822 mm (0.1105 to 0.1111 in.) 90564-T0034 15 2.438 to 2.454 mm (0.0960 to 0.0966 in.) 90564-T0058 39 2.822 to 2.838 mm (0.1112 to 0.1117 in.) 90564-T0035 16 2.454 to 2.470 mm (0.0967 to 0.0972 in.) 90564-T0059 40 2.838 to 2.854 mm (0.1118 to 0.1123 in.) 90564-T0036 17 2.470 to 2.486 mm (0.0973 to 0.0978 in.) 90564-T0060 41 2.854 to 2.870 mm (0.1124 to 0.1129 in.) 90564-T0037 18 2.486 to 2.502 mm (0.0979 to 0.0985 in.) 90564-T0061 42 2.870 to 2.886 mm (0.1130 to 0.1136 in.) 90564-T0038 19 2.502 to 2.518 mm (0.0986 to 0.0991 in.) 90564-T0062 43 2.886 to 2.902 mm (0.1137 to 0.1142 in.) 90564-T0039 20 2.518 to 2.534 mm (0.0992 to 0.0997 in.) 90564-T0063 44 2.902 to 2.918 mm (0.1143 to 0.1148 in.) 90564-T0040 21 2.534 to 2.550 mm (0.0998 to 0.1003 in.) 90564-T0064 45 2.918 to 2.934 mm (0.1149 to 0.1155 in.) 90564-T0041 22 2.550 to 2.566 mm (0.1004 to 0.1010 in.) 90564-T0065 46 2.934 to 2.950 mm (0.1156 to 0.1161 in.) 90564-T0042 23 2.566 to 2.582 mm (0.1011 to 0.1016 in.) 90564-T0066 47 2.950 to 2.966 mm (0.1162 to 0.1167 in.) 90564-T0043 24 2.582 to 2.598 mm (0.1017 to 0.1022 in.) - - -
33421
15.INSTALL COUNTER GEAR
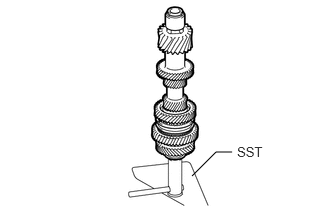
Install the counter gear to SST.
- SST
- 09310-71011
33311
16.INSTALL INPUT SHAFT
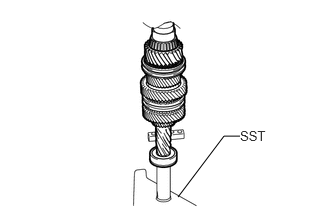
Install the input shaft to SST.
- SST
- 09310-71011
33369B
17.INSTALL NO. 4 SYNCHRONIZER RING
Coat the No. 4 synchronizer ring with the gear oil.
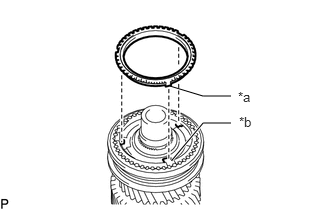
| *a | Protrusion |
| *b | Groove |
Install the No. 4 synchronizer ring to the input shaft.
- HINT:
-
Align the protrusion of the No. 4 synchronizer ring with the groove of the No. 2 transmission clutch hub.
33311D
18.INSTALL INPUT SHAFT BEARING
Coat the input shaft bearing with the gear oil.
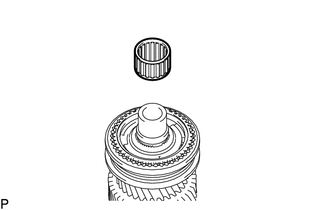
Install the input shaft bearing to the input shaft.
33321
19.INSTALL OUTPUT SHAFT SUB-ASSEMBLY
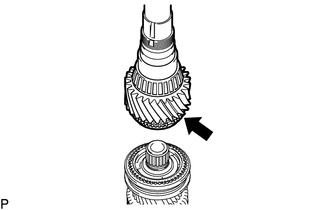
|
|
Gear Oil |
Coat the output shaft with the gear oil as shown in the illustration.
Install the output shaft to the input shaft.
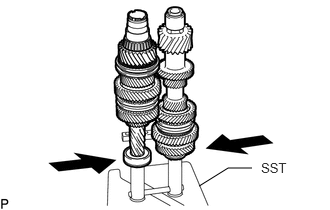
Contract SST and connect the input shaft to the counter gear.
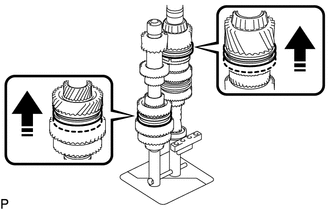
20.INSTALL GEAR SHIFT FORK AND GEAR SHIFT FORK SHAFT ASSEMBLY
|
|
Install in this direction |
Move the 2 sleeves shown in the illustration in the direction indicated by the arrows.
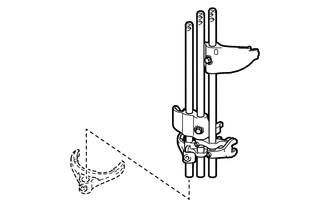
Temporarily install the No. 4 gear shift fork to the No. 4 gear shift fork shaft.
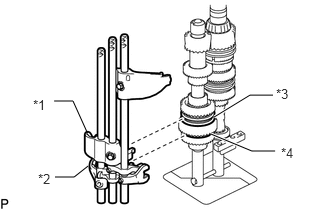
| *1 | No. 1 Gear Shift Fork |
| *2 | No. 4 Gear Shift Fork |
| *3 | No. 1 Transmission Hub Sleeve |
| *4 | No. 4 Transmission Hub Sleeve |
Set the No. 1 gear shift fork onto the No. 1 transmission hub sleeve, and the No. 4 gear shift fork onto the No. 4 transmission hub sleeve.
- NOTICE:
-
Do not drop the No. 4 gear shift fork.
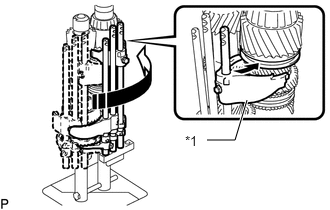
| *1 | No. 2 Gear Shift Fork |
|
|
Install in this direction |
Move the part as shown in the illustration and set the No. 2 gear shift fork onto the No. 2 transmission hub sleeve.
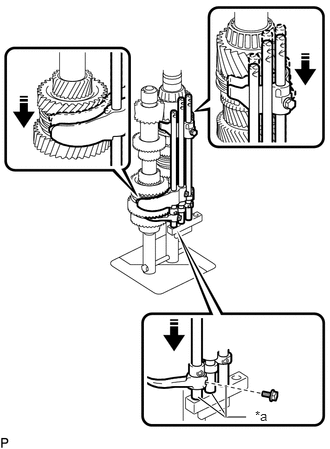
| *a | Depression of SST |
|
|
Install in this direction |
Install the No. 4 gear shift fork shaft to the depression of SST.
Install the No. 4 gear shift fork to the No. 4 gear shift fork shaft with a new bolt.
- Torque:
- 19.5 N*m (199 kgf*cm, 14 ft.*lbf)
- NOTICE:
-
Securely install the No. 4 gear shift fork with a new bolt from the side of the shaft as shown in the illustration.
|
|
Install in this direction |
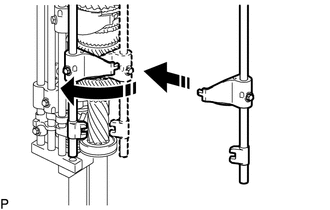
Install the No. 3 gear shift fork to the No. 3 transmission hub sleeve, and then move it as shown in the illustration.
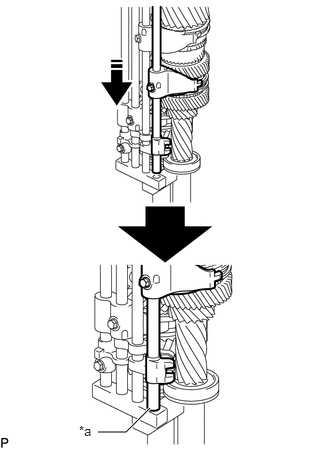
| *a | Depression of SST |
|
|
Install in this direction |
Install the No. 3 gear shift fork shaft to the depression of SST.
33461
21.INSTALL REVERSE IDLER GEAR
- NOTICE:
-
There are types with a reverse idler gear shaft spacer and types without a reverse idler gear shaft spacer.
-
Always install the reverse idler gear shaft spacer even on a type without a reverse idler gear shaft spacer, as the service part of the reverse idler gear bearing includes the reverse idler gear shaft spacer.
Coat the reverse idler gear with the gear oil.
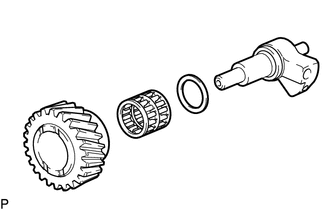
w/ Reverse Idler Gear Shaft Spacer:
Install the reverse idler gear and reverse idler gear shaft spacer, reverse idler gear bearing to the reverse idler gear shaft.
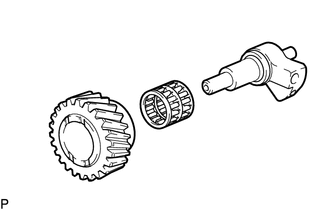
w/o Reverse Idler Gear Shaft Spacer:
Install the reverse idler gear and reverse idler gear bearing to the reverse idler gear shaft.
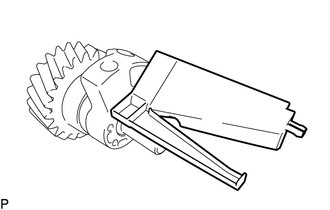
Install the No. 2 oil receiver pipe (MTM) to the reverse idler gear shaft.
33124L
22.INSTALL NO. 3 OIL RECEIVER PIPE (MTM)
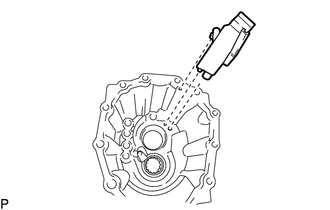
Install the No. 3 oil receiver pipe (MTM) to the rear transmission case.
33101
23.INSTALL MANUAL TRANSMISSION CASE SUB-ASSEMBLY
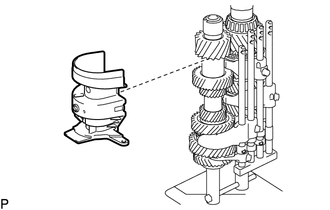
Install the manual transmission oil separator sub-assembly (rear side) to the transmission unit.
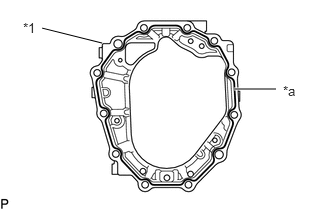
| *1 | Transmission Intermediate Plate Sub-assembly |
| *a | Seal Packing |
Apply seal packing to the transmission intermediate plate sub-assembly shown in the illustration.
- Seal Packing:
Toyota Genuine Seal Packing 1281, Three Bond 1281 or equivalent
- Standard Seal Diameter:
1.2 mm (0.0472 in.)
- NOTICE:
-
Parts must be assembled within 10 minutes of application. Otherwise, the seal packing (FIPG material) must be removed and reapplied.
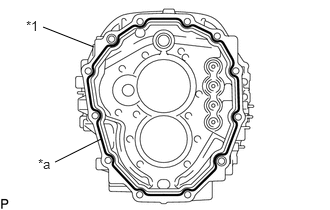
| *1 | Manual Transmission Case Sub-assembly |
| *a | Seal Packing |
Apply seal packing to the manual transmission case sub-assembly shown in the illustration.
- Seal Packing:
Toyota Genuine Seal Packing 1281, Three Bond 1281 or equivalent
- Standard Seal Diameter:
1.2 mm (0.0472 in.)
- NOTICE:
-
Parts must be assembled within 10 minutes of application. Otherwise, the seal packing (FIPG material) must be removed and reapplied.
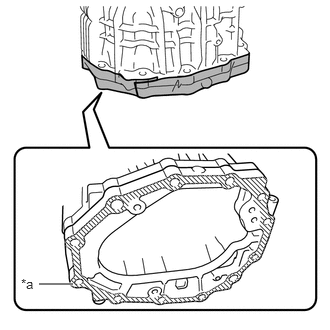
| *a | Tape Application Prohibited |
Install the rear transmission case and transmission intermediate plate sub-assembly.
- NOTICE:
- ·
Secure the rear transmission case and intermediate plate sub-assembly with tape.
·Make sure that the tape does not contact the seal packing application surface of the manual transmission case sub-assembly.
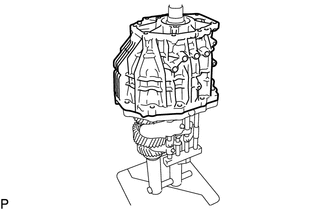
Install the rear transmission case.
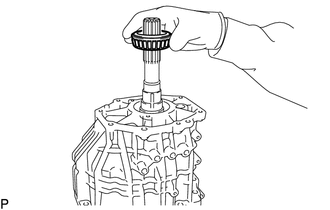
Install the rear output shaft bearing to the transmission unit.
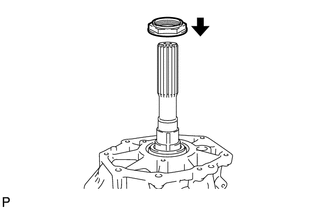
Temporarily install the manual transmission output shaft rear set nut to the transmission unit.
| *a | Hold |
| *b | Turn |
| *c | Torque Wrench Fulcrum Length |
Temporarily install the manual transmission output shaft rear set nut.
- SST
- 09326-35020
09326-71010
- Torque:
- 50 N*m (510 kgf*cm, 37 ft.*lbf)
- CAUTION:
-
Since the manual transmission unit is very heavy, perform these procedures with 2 people.
- NOTICE:
-
If the nut is not temporarily installed, the position of the rear output shaft will be unstable causing the preload to be unstable.
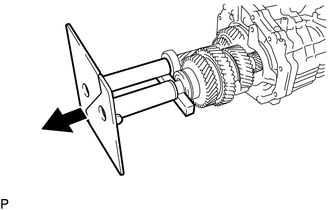
Lay the transmission unit on its side, and then remove SST from the transmission unit as shown in the illustration.
- CAUTION:
-
Since the manual transmission unit is very heavy, perform these procedures with 2 people.
- NOTICE:
-
Lay the transmission unit on its side so that the gear shift fork shaft sub-assembly is on the bottom.
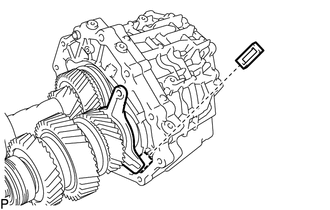
Install the transmission magnet to the transmission intermediate plate.
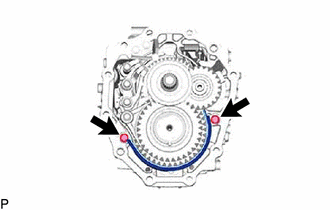
Install the manual transmission oil separator sub-assembly (front side) to the transmission unit with the 2 bolts.
- Torque:
- 18 N*m (184 kgf*cm, 13 ft.*lbf)
- CAUTION:
-
Since the manual transmission unit is very heavy, perform these procedures with 2 people.
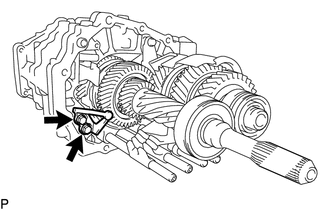
Install the shift interlock plate stopper to the transmission unit with the 2 bolts.
- Torque:
- 23.8 N*m (243 kgf*cm, 18 ft.*lbf)
- CAUTION:
-
Since the manual transmission unit is very heavy, perform these procedures with 2 people.
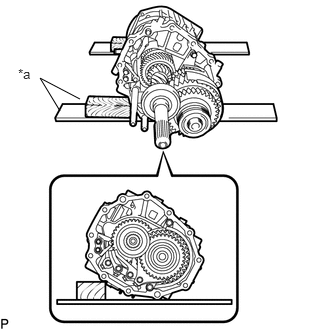
| *a | Wooden Block |
Use wooden blocks or other objects to support the corners of the transmission unit as shown in the illustration before conducting work.
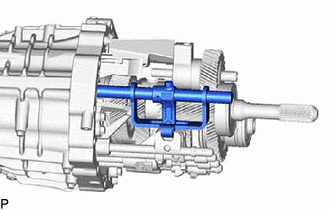
Install the shift and select lever shaft to the rear transmission case.
- CAUTION:
-
Since the manual transmission unit is very heavy, perform these procedures with 2 people.
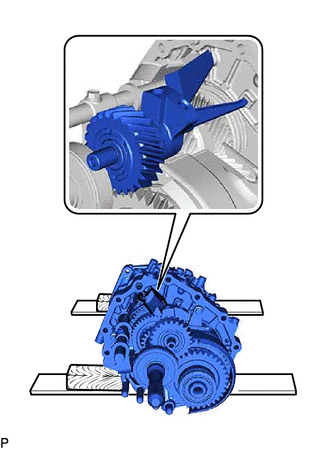
Install the reverse idler gear as shown in the illustration.
- CAUTION:
-
Since the manual transmission unit is very heavy, perform these procedures with 2 people.
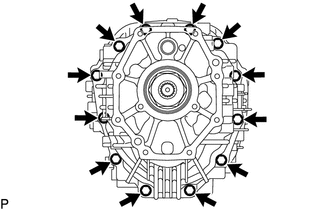
Install the manual transmission case sub-assembly with the 12 bolts.
- Torque:
- 37 N*m (377 kgf*cm, 27 ft.*lbf)
- CAUTION:
-
Since the manual transmission unit is very heavy, perform these procedures with 2 people.
33451H
24.INSTALL REVERSE IDLER GEAR SHAFT BOLT
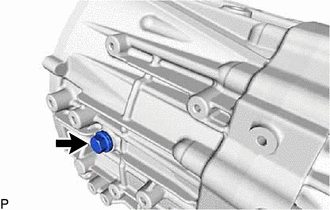
Install the reverse idler gear shaft bolt and a new gasket to the reverse idler gear shaft.
- Torque:
- 25 N*m (255 kgf*cm, 18 ft.*lbf)
- CAUTION:
-
Since the manual transmission unit is very heavy, perform these procedures with 2 people.
33311G
25.INSTALL FRONT BEARING SHAFT SNAP RING
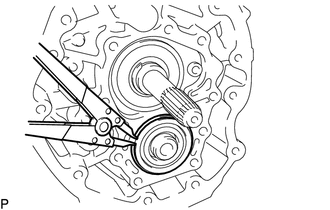
Using a snap ring expander, install a new front bearing shaft snap ring.
33311T
26.INSTALL INPUT SHAFT SHAFT SNAP RING
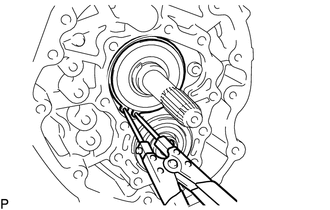
Using snap ring pliers, install a new input shaft shaft snap ring.
33411E
27.INSTALL COUNTER GEAR SHAFT NUT
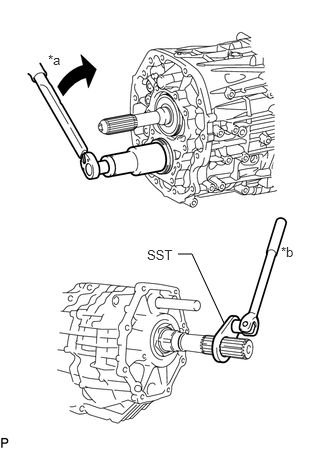
| *a | Turn |
| *b | Hold |
Using SST, secure the output shaft.
- SST
- 09326-35020
Using a 41 mm socket wrench, install a new counter gear shaft nut.
- Torque:
- 40 N*m (408 kgf*cm, 30 ft.*lbf)
- CAUTION:
-
Since the manual transmission unit is very heavy, perform these procedures with 2 people.
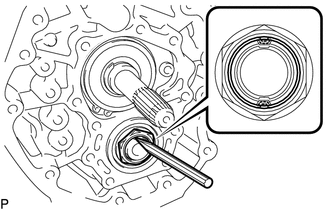
Using a chisel and hammer, stake the counter gear shaft nut.
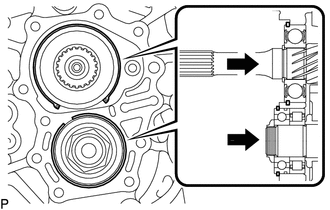
|
|
Push |
Push in the input shaft and counter gear so that the 2 snap rings are firmly pressed into the manual transmission case sub-assembly.
33131A
28.INSTALL FRONT TRANSMISSION BEARING RETAINER OIL SEAL
33124C
29.INSTALL NO. 1 OIL RECEIVER PIPE (MTM)
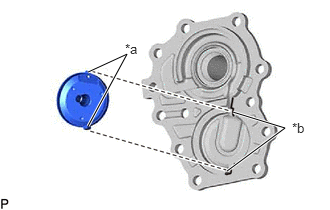
| *a | Protrusion |
| *b | Groove |
Install the No. 1 oil receiver pipe (MTM) to the front bearing retainer.
- HINT:
-
Align the protrusion of the No. 1 oil receiver pipe (MTM) with the groove of the front bearing retainer.
33131D
30.INSTALL FRONT BEARING RETAINER
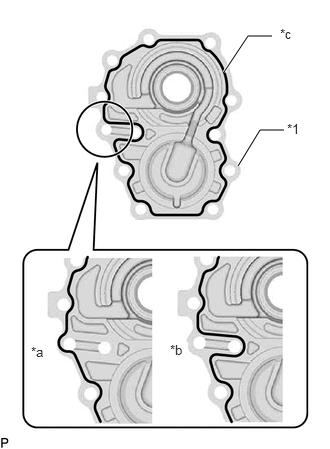
| *1 | Front Bearing Retainer |
| *a | Incorrect |
| *b | Correct |
| *c | Seal Packing |
Apply seal packing to the front bearing retainer shown in the illustration.
- Seal Packing:
Toyota Genuine Seal Packing 1281, Three Bond 1281 or equivalent
- Standard Seal Diameter:
1.2 mm (0.0472 in.)
- NOTICE:
-
Parts must be assembled within 10 minutes of application. Otherwise, the seal packing (FIPG material) must be removed and reapplied.
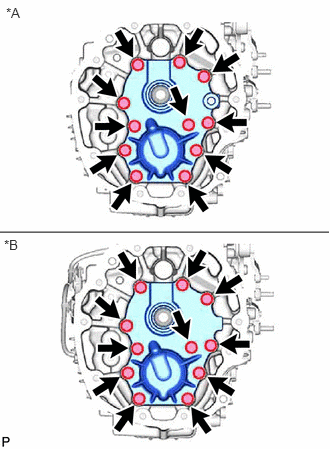
| *A | for 1GD-FTV |
| *B | for 7GR-FKS |
Install the front bearing retainer to the manual transmission case with 11 new bolts.
- Torque:
- 40 N*m (408 kgf*cm, 30 ft.*lbf)
- CAUTION:
-
Since the manual transmission unit is very heavy, perform these procedures with 2 people.
31111
31.INSTALL CLUTCH HOUSING
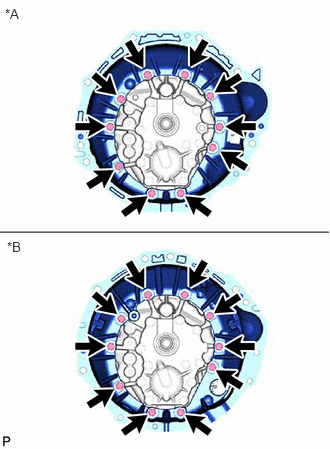
| *A | for 1GD-FTV |
| *B | for 7GR-FKS |
Install the clutch housing to the manual transmission case sub-assembly with the 10 bolts.
- Torque:
- 36 N*m (367 kgf*cm, 27 ft.*lbf)
- CAUTION:
-
Since the manual transmission unit is very heavy, perform these procedures with 2 people.
33321G
32.TIGHTEN MANUAL TRANSMISSION OUTPUT SHAFT REAR SET NUT
- CAUTION:
-
Since the manual transmission unit is very heavy, perform these procedures with 2 people.
Engage the gear, and then secure the input shaft using SST.
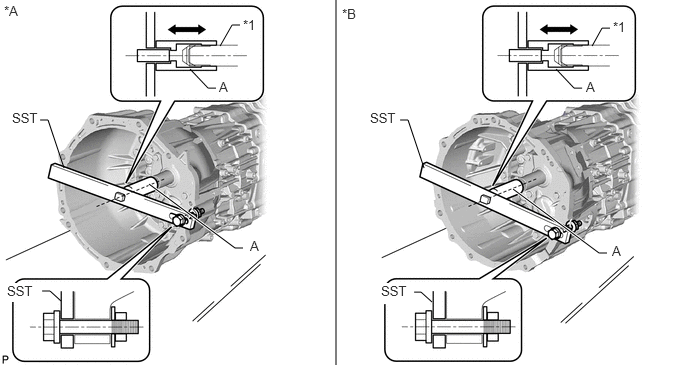
| *A | for 1GD-FTV | *B | for 7GR-FKS |
| *1 | Input Shaft | - | - |
- SST
- 09322-35010 (09322-03010, 09322-03020, 09322-03030, 90105-12087, 90170-12030, 94622-51200)
- HINT:
- ·
Install SST securely so that the part labeled A is in-line with the input shaft.
·Make sure that the part labeled A moves back and forth by hand after installing SST.
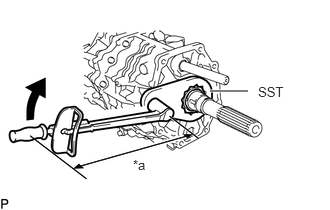
| *a | Torque Wrench Fulcrum Length |
Using an L-type handle and SST, install the manual transmission output shaft rear set nut to the output shaft sub-assembly.
- SST
- 09326-35020
- Torque:
- Specified tightening torque : 187 N*m (1907 kgf*cm, 138 ft.*lbf)
- HINT:
- ·
Calculate the torque wrench reading when changing the fulcrum length of the torque wrench.
Click hereGeneral>INTRODUCTION>REPAIR INSTRUCTION>PRECAUTION
·When using SST (fulcrum length of 50 mm (1.9685 in.)) + torque wrench (fulcrum length of 1055 mm (41.5354 in.)): 178.5 N*m (1820 kgf*cm, 132 ft.*lbf)
33321G
33.STAKE MANUAL TRANSMISSION OUTPUT SHAFT REAR SET NUT
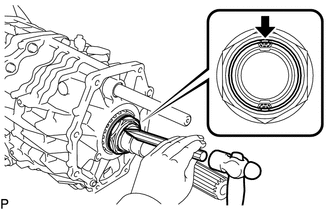
Using a chisel and hammer, stake the manual transmission output shaft rear set nut.
33127
34.INSTALL TRANSMISSION OIL RUNNER
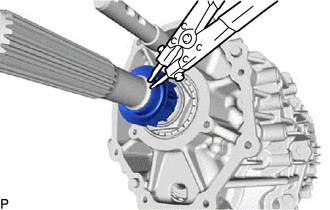
Install the transmission oil runner to the output shaft sub-assembly.
Using a snap ring expander, install a new snap ring to the output shaft sub-assembly.
33176B
35.INSTALL TRANSMISSION OIL SEPARATOR
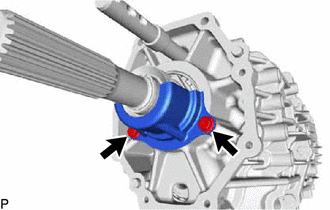
Install the transmission oil separator to the rear transmission case with the 2 bolts.
- Torque:
- 11.3 N*m (115 kgf*cm, 8 ft.*lbf)
33103R
36.INSTALL MANUAL TRANSMISSION EXTENSION HOUSING OIL SEAL
33124M
37.INSTALL NO. 4 OIL RECEIVER PIPE (MTM)
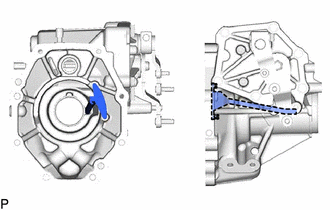
Install the No. 4 oil receiver pipe (MTM) to the extension housing sub-assembly.
33103
38.INSTALL EXTENSION HOUSING SUB-ASSEMBLY
- CAUTION:
-
Since the manual transmission unit is very heavy, perform these procedures with 2 people.
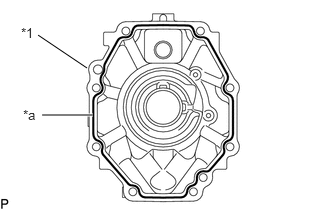
| *1 | Extension Housing Sub-assembly |
| *a | Seal Packing |
Apply seal packing to the extension housing sub-assembly shown in the illustration.
- Seal Packing:
Toyota Genuine Seal Packing 1281, Three Bond 1281 or equivalent
- Standard Seal Diameter:
1.2 mm (0.0472 in.)
- NOTICE:
-
Parts must be assembled within 10 minutes of application. Otherwise, the seal packing (FIPG material) must be removed and reapplied.
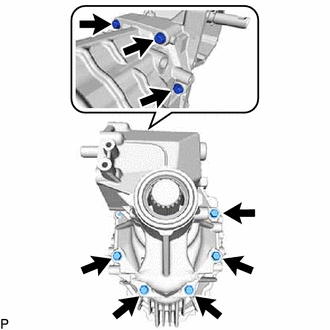
Install the extension housing sub-assembly and shift lever shaft, shift and select lever shaft to the rear transmission case with the 8 bolts.
- Torque:
- 29 N*m (296 kgf*cm, 21 ft.*lbf)
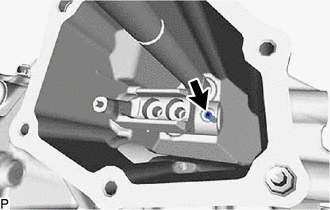
Using a 5 mm pin punch and hammer, install the slotted spring pin to the shift and select rever shaft head and shift and select lever shaft.
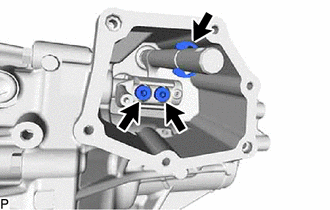
Install a new E-ring to the shift lever shaft.
Using a 6 mm hexagon socket wrench, install the 2 hexagon bolts.
- Torque:
- 28 N*m (286 kgf*cm, 21 ft.*lbf)
33207A
39.INSTALL CONTROL SHAFT OIL SEAL
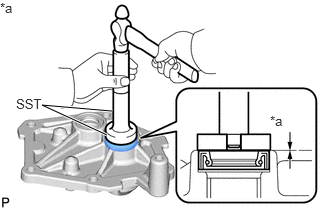
| *a | Protrusion Height |
Using SST and a hammer, install the control shaft oil seal to the shift lever with seal housing sub-assembly.
- SST
- 09950-60011 (09951-00260, 09951-00310)
09950-70010 (09951-07100)
- Control Shaft Oil Seal Installation Depth:
0 to 1.0 mm (0 to 0.0393 in.)
33207B
40.INSTALL SHIFT LEVER SHAFT OIL SEAL
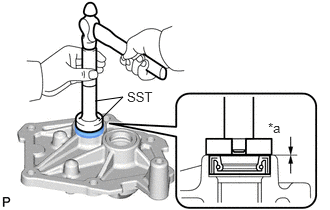
| *a | Protrusion Height |
Using SST and a hammer, install the shift lever shaft oil seal to the shift lever with seal housing sub-assembly.
- SST
- 09950-60011 (09951-00260)
09950-70010 (09951-07100)
- Shift Lever Shaft Oil Seal Installation Depth:
0 to 0.5 mm (0 to 0.0197 in.)
33257
41.INSTALL OUTER SELECT LEVER
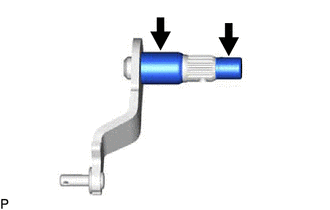
Coat the outer select lever with the gear oil.
Install the inner select lever and outer select lever to the shift lever with seal housing sub-assembly.
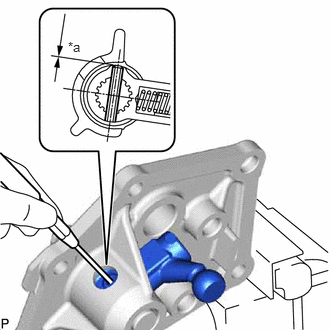
| *a | Protrusion Height |
Using a 5 mm pin punch and hammer, tap a new slotted spring pin into the shift lever with seal housing sub-assembly.
- Standard Depth:
0 to 0.5 mm (0 to 0.0196 in.)
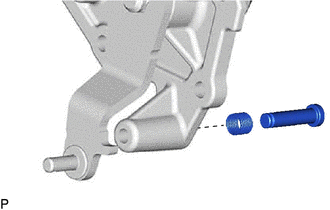
Coat the pin with the gear oil.
Install the compression spring and pin.
- NOTICE:
-
After installing the pin, make sure that the applied gear oil does not drip from the pin.
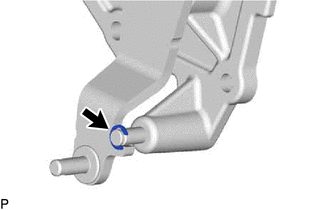
Install a new E-ring.
33292A
42.INSTALL LOCK BALL PIN
Coat the lock ball pin with the gear oil.
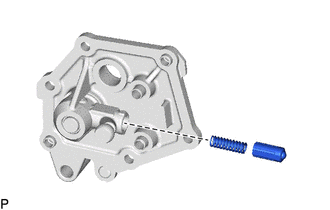
Install the compression spring and lock ball pin to the shift lever with seal housing sub-assembly.
33267A
43.INSTALL SHIFT GATE PLATE
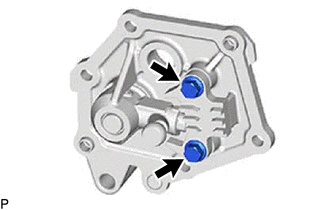
Install the shift gate plate to the shift lever with seal housing sub-assembly with the 2 bolts.
- Torque:
- 23.2 N*m (237 kgf*cm, 17 ft.*lbf)
33207
44.INSTALL SHIFT LEVER WITH SEAL HOUSING SUB-ASSEMBLY
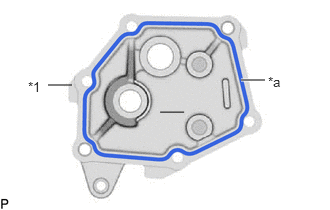
| *1 | Shift Lever with Seal Housing Sub-assembly |
| *a | Seal Packing |
Apply seal packing to the shift lever with seal housing sub-assembly shown in the illustration.
- Seal Packing:
Toyota Genuine Seal Packing 1281, Three Bond 1281 or equivalent
- Standard Seal Diameter:
1.2 mm (0.0472 in.)
- NOTICE:
-
Parts must be assembled within 10 minutes of application. Otherwise, the seal packing (FIPG material) must be removed and reapplied.
Coat the shift lever shaft with the gear oil.
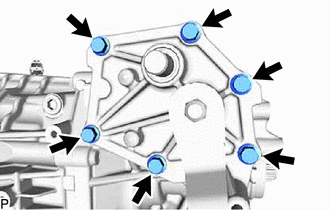
Install the shift lever with seal housing sub-assembly to the extension housing sub-assembly with the 6 bolts.
- Torque:
- 20 N*m (204 kgf*cm, 15 ft.*lbf)
33253B
45.INSTALL OUTER SHIFT LEVER
Install the outer shift lever to the shift lever with seal housing sub-assembly.
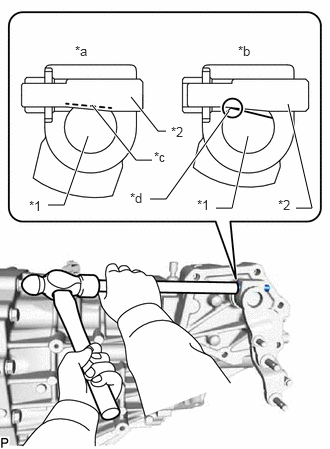
| *1 | Outer Shift Lever |
| *2 | No. 2 Lever Lock Pin |
| *a | Correct |
| *b | Incorrect |
| *c | Outer Shift Lever and No. 2 Lever Lock Pin Contact Surfaces |
| *d | Outer Shift Lever Corner |
Using a brass bar and hammer, install the No. 2 lever lock pin to the shift lever with seal housing sub-assembly as shown in the illustration.
- NOTICE:
- ·
Make sure that the contact surfaces of the outer shift lever and No. 2 lever lock pin are parallel.
·Make sure that the corner of the outer shift lever does not contact the contact surface of the No. 2 lever lock pin.
Install the spring washer and nut to the outer shift lever.
- Torque:
- 11.5 N*m (117 kgf*cm, 8 ft.*lbf)
33292A
46.INSTALL LOCK BALL PIN
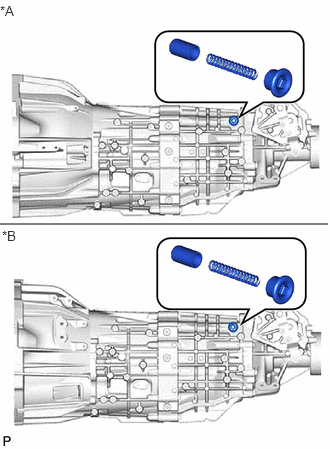
| *A | for 1GD-FTV |
| *B | for 7GR-FKS |
Install the lock ball pin and the compression spring to the rear transmission case.
Using a 10 mm hexagon socket wrench, install a new No. 2 with head straight screw plug to the rear transmission case.
- Torque:
- 24.5 N*m (250 kgf*cm, 18 ft.*lbf)
33275B
47.INSTALL SHAFT DETENT BALL
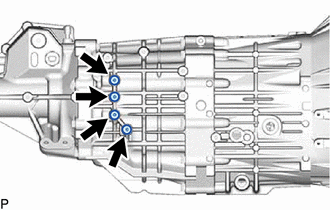
Install the 4 shaft detent balls and 4 shaft detent ball low side compression springs to the rear transmission case.
Using a 6 mm hexagon socket wrench, install the 4 new shift detent ball plugs to the rear transmission case.
- Torque:
- 22 N*m (224 kgf*cm, 16 ft.*lbf)
33104
48.INSTALL DRAIN PLUG SUB-ASSEMBLY
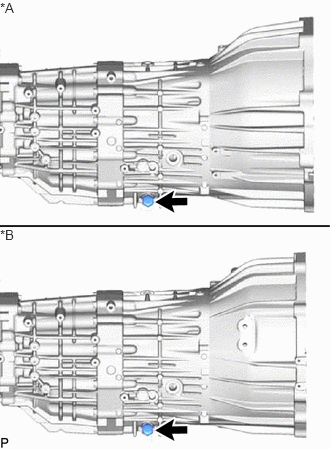
| *A | for 1GD-FTV |
| *B | for 7GR-FKS |
Install a new gasket and the drain plug sub-assembly to the manual transmission case sub-assembly.
- Torque:
- 37 N*m (377 kgf*cm, 27 ft.*lbf)
33101A
49.INSTALL MANUAL TRANSMISSION FILLER PLUG
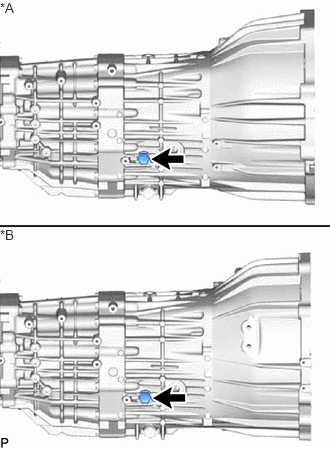
| *A | for 1GD-FTV |
| *B | for 7GR-FKS |
Install a new gasket and the manual transmission filler plug to the manual transmission case sub-assembly.
- Torque:
- 37 N*m (377 kgf*cm, 27 ft.*lbf)
84545
50.INSTALL NEUTRAL POSITION SWITCH (w/ Stop And Start System)
89413B
51.INSTALL TRANSMISSION REVOLUTION SENSOR (w/ Sensor)
52.INSTALL BREATHER PLUG SUB-ASSEMBLY
- HINT:
-
Perform this procedure only when replacement of the breather plug sub-assembly is necessary.
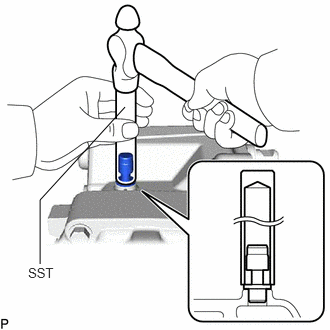
Using SST and a hammer, install the breather plug sub-assembly to the extension housing sub-assembly.
- SST
- 09350-30020 (09350-07110)
53.INSTALL BACK-UP LIGHT SWITCH BRACKET
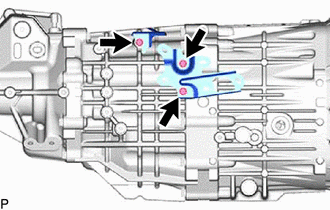
Install the 2 back-up light switch brackets with the 3 bolts.
- Torque:
- 12.6 N*m (128 kgf*cm, 9 ft.*lbf)
84210
54.INSTALL BACK-UP LIGHT SWITCH ASSEMBLY
31236B
55.INSTALL RELEASE FORK SUPPORT
31230
56.INSTALL CLUTCH RELEASE BEARING ASSEMBLY
31126
57.INSTALL CLUTCH RELEASE FORK BOOT (for 1GD-FTV)