1GD-FTV ENGINE CONTROL ECD SYSTEM(w/ Urea SCR System) P020112 Cylinder 1 Injector "A" Circuit Short to Battery P020114 Cylinder 1 Injector "A" Circuit Short to Ground or Open P020212 Cylinder 2 Injector "A" Circuit Short to Battery P020214 Cylinder 2 Injector "A" Circuit Short to Ground or Open P020312 Cylinder 3 Injector "A" Circuit Short to Battery P020314 Cylinder 3 Injector "A" Circuit Short to Ground or Open P020412 Cylinder 4 Injector "A" Circuit Short to Battery P020414 Cylinder 4 Injector "A" Circuit Short to Ground or Open P062D96 Fuel Injector Driver Circuit Performance Bank 1 Component Internal Failure
DESCRIPTION
The injector assemblies are installed in the cylinder head and inject fuel into the cylinders based on the signals from the ECM.
| DTC No. | Detection Item | DTC Detection Condition | Trouble Area | MIL | Memory | Note |
|---|---|---|---|---|---|---|
| P020112 | Cylinder 1 Injector "A" Circuit Short to Battery | Short in injector circuit occurs a certain number of times (a maximum of approx. 0.5 seconds) (1 trip detection logic). | ·
Short in No. 1 injector assembly circuit ·
No. 1 injector assembly ·
ECM |
Comes on | DTC stored | SAE Code: P0262 |
| P020114 | Cylinder 1 Injector "A" Circuit Short to Ground or Open | Open in injector circuit occurs a certain number of times (a maximum of approx. 0.5 seconds) (1 trip detection logic). | ·
Open in No. 1 injector assembly circuit ·
No. 1 injector assembly ·
ECM |
Comes on | DTC stored | SAE Code: P0261 |
| P020212 | Cylinder 2 Injector "A" Circuit Short to Battery | Short in injector circuit occurs a certain number of times (a maximum of approx. 0.5 seconds) (1 trip detection logic). | ·
Short in No. 2 injector assembly circuit ·
No. 2 injector assembly ·
ECM |
Comes on | DTC stored | SAE Code: P0265 |
| P020214 | Cylinder 2 Injector "A" Circuit Short to Ground or Open | Open in injector circuit occurs a certain number of times (a maximum of approx. 0.5 seconds) (1 trip detection logic). | ·
Open in No. 2 injector assembly circuit ·
No. 2 injector assembly ·
ECM |
Comes on | DTC stored | SAE Code: P0264 |
| P020312 | Cylinder 3 Injector "A" Circuit Short to Battery | Short in injector circuit occurs a certain number of times (a maximum of approx. 0.5 seconds) (1 trip detection logic). | ·
Short in No. 3 injector assembly circuit ·
No. 3 injector assembly ·
ECM |
Comes on | DTC stored | SAE Code: P0268 |
| P020314 | Cylinder 3 Injector "A" Circuit Short to Ground or Open | Open in injector circuit occurs a certain number of times (a maximum of approx. 0.5 seconds) (1 trip detection logic). | ·
Open in No. 3 injector assembly circuit ·
No. 3 injector assembly ·
ECM |
Comes on | DTC stored | SAE Code: P0267 |
| P020412 | Cylinder 4 Injector "A" Circuit Short to Battery | Short in injector circuit occurs a certain number of times (a maximum of approx. 0.5 seconds) (1 trip detection logic). | ·
Short in No. 4 injector assembly circuit ·
No. 4 injector assembly ·
ECM |
Comes on | DTC stored | SAE Code: P0271 |
| P020414 | Cylinder 4 Injector "A" Circuit Short to Ground or Open | Open in injector circuit occurs a certain number of times (a maximum of approx. 0.5 seconds) (1 trip detection logic). | ·
Open in No. 4 injector assembly circuit ·
No. 4 injector assembly ·
ECM |
Comes on | DTC stored | SAE Code: P0270 |
| P062D96 | Fuel Injector Driver Circuit Performance Bank 1 Component Internal Failure | ECM internal error (1 trip detection logic). | ECM | Comes on | DTC stored | SAE Code: P062D |
CONFIRMATION DRIVING PATTERN
| DTC No. | DTC Detection Drive Pattern |
|---|---|
| P020112
P020114 P020212 P020214 P020312 P020314 P020412 P020414 P062D96 |
Idling for 5 seconds or more |
WIRING DIAGRAM
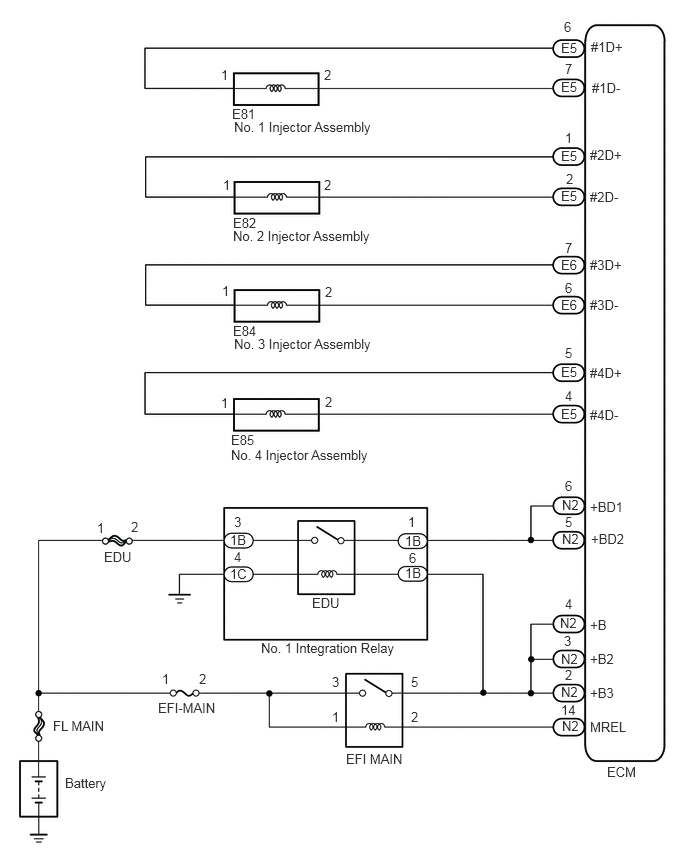
CAUTION / NOTICE / HINT
- NOTICE:
- ·
Inspect the fuses of circuits related to this system before performing the following inspection procedure.
·After replacing the ECM, the new ECM needs registration (Click here Engine / Hybrid System>1GD-FTV (ENGINE CONTROL)>ECD SYSTEM (w/ Urea SCR System)>REGISTRATION) and initialization (Click here Engine / Hybrid System>1GD-FTV (ENGINE CONTROL)>ECD SYSTEM (w/ Urea SCR System)>INITIALIZATION).
·After replacing an injector assembly, the ECM needs registration (Click here Engine / Hybrid System>1GD-FTV (ENGINE CONTROL)>ECD SYSTEM (w/ Urea SCR System)>REGISTRATION).
- HINT:
-
Read freeze frame data using the GTS. Freeze frame data records the engine condition when malfunctions are detected. When troubleshooting, freeze frame data can help determine if the vehicle was moving or stationary, if the engine was warmed up or not, and other data from the time the malfunction occurred.
PROCEDURE
Connect the GTS to the DLC3.
Turn the ignition switch to ON and turn the GTS on.
Enter the following menus: Powertrain / Engine / Trouble Codes.
- Powertrain > Engine > Trouble Codes
- 50001 372
Read the DTCs.
- Result:
Result Proceed to DTC P020112, P020114, P020212, P020214, P020312, P020314, P020412 or P020414 is output A DTC P062D96 is output B
B
A
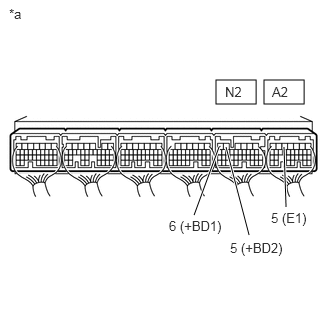
| *a | Component with harness connected
(ECM) |
Measure the voltage according to the value(s) in the table below.
- Standard Voltage:
Tester Connection Switch Condition Specified Condition N2-6 (+BD1) - A2-5 (E1) Ignition switch ON 11 to 14 V N2-5 (+BD2) - A2-5 (E1) Ignition switch ON 11 to 14 V
- Result:
Proceed to OK NG
OK
NG
Replace the ECM.
Click hereEngine / Hybrid System>1GD-FTV (ENGINE CONTROL)>ECM>REMOVAL
- Result:
Proceed to NEXT
NEXT
Inspect the No. 1 integration relay (EDU relay).
Click hereEngine / Hybrid System>1GD-FTV (ENGINE CONTROL)>RELAY>ON-VEHICLE INSPECTION
- Result:
Proceed to OK NG
OK
NG
Remove the No. 1 integration relay from the No. 1 engine room relay block and junction block assembly.
Disconnect the ECM connector.
Measure the resistance according to the value(s) in the table below.
- Standard Resistance:
Tester Connection Condition Specified Condition 1B-1 - N2-6 (+BD1) Always Below 1 Ω 1B-1 - N2-5 (+BD2) Always Below 1 Ω 1B-1 or N2-6 (+BD1) - Body ground and other terminals Always 10 kΩ or higher 1B-1 or N2-5 (+BD2) - Body ground and other terminals Always 10 kΩ or higher
- Result:
Proceed to OK NG
OK
NG
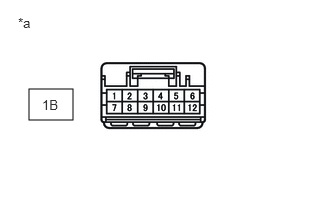
| *a | Front view of wire harness connector
(to No. 1 Integration Relay) |
Remove the No. 1 integration relay from the No. 1 engine room relay block and junction block assembly.
Measure the voltage according to the value(s) in the table below.
- Standard Voltage:
Tester Connection Condition Specified Condition 1B-3 - Body ground Always 11 to 14 V
- Result:
Proceed to OK NG
OK
NG
Remove the No. 1 integration relay from the No. 1 engine room relay block and junction block assembly.
Measure the resistance according to the value(s) in the table below.
- Standard Resistance:
Tester Connection Condition Specified Condition 1C-4 - Body ground Always Below 1 Ω
- Result:
Proceed to OK NG
OK
NG
Remove the No. 1 integration relay from the No. 1 engine room relay block and junction block assembly.
Remove the EFI MAIN relay from the No. 1 engine room relay block and junction block assembly.
Measure the resistance according to the value(s) in the table below.
- Standard Resistance:
Tester Connection Condition Specified Condition 1B-6 - EFI MAIN relay terminal 5 Always Below 1 Ω 1B-6 or EFI MAIN relay terminal 5 - Body ground and other terminals Always 10 kΩ or higher
- Result:
Proceed to OK NG
OK
NG
Check the ECM power source circuit.
- Result:
Proceed to NEXT
NEXT
Repair or replace the harness or connector.
- Result:
Proceed to NEXT
NEXT
Replace the No. 1 integration relay (EDU relay).
- Result:
Proceed to NEXT
NEXT
Connect the GTS to the DLC3.
Turn the ignition switch to ON and turn the GTS on.
Clear the DTCs.
- Powertrain > Engine > Clear DTCs
- 50002 372
Turn the ignition switch off for 30 seconds.
Start the engine and idle it for 5 seconds or more.
Enter the following menus: Powertrain / Engine / Trouble Codes.
- Powertrain > Engine > Trouble Codes
- 50001 372
Check the DTCs output on the GTS.
- HINT:
- ·
The cylinder with the malfunctioning injector assembly can be determined based on the output DTCs.
·If the DTC P020112 or P020114 is output, check the No. 1 injector assembly circuit.
·If the DTC P020212 or P020214 is output, check the No. 2 injector assembly circuit.
·If the DTC P020312 or P020314 is output, check the No. 3 injector assembly circuit.
·If the DTC P020412 or P020414 is output, check the No. 4 injector assembly circuit.
- Result:
Proceed to NEXT
NEXT
Disconnect the injector assembly connectors for all cylinders.
- NOTICE:
-
If only the injector assembly connector of the malfunctioning cylinder is disconnected, the engine will start and there will be rough idling. Therefore, disconnect all injector assembly connectors before inspecting the waveform.
Start the engine.
Check the waveform of the injector assembly connectors using an oscilloscope.
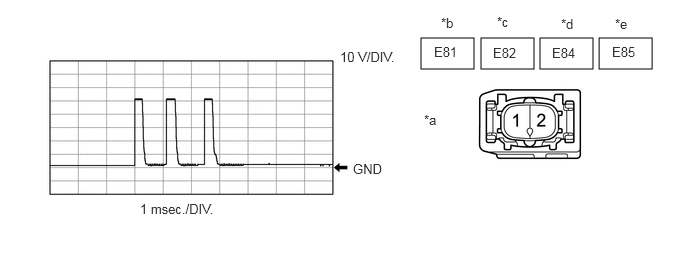
| *a | Front view of wire harness connector
(Injector Assembly) |
*b | No. 1 Injector Assembly Connector |
| *c | No. 2 Injector Assembly Connector | *d | No. 3 Injector Assembly Connector |
| *e | No. 4 Injector Assembly Connector | - | - |
- OK:
Tester Connection Condition Specified Condition E81-1 - E81-2 Cranking Correct waveform is as shown E82-1 - E82-2 Cranking Correct waveform is as shown E84-1 - E84-2 Cranking Correct waveform is as shown E85-1 - E85-2 Cranking Correct waveform is as shown
Reconnect the injector assembly connectors for all cylinders.
- Result:
Proceed to OK NG
OK
NG
Inspect the injector assembly of the cylinder relevant to the DTC.
Click hereEngine / Hybrid System>1GD-FTV (FUEL)>FUEL INJECTOR>INSPECTION
- Result:
Proceed to OK NG
OK
NG
Replace the injector assembly of the cylinder relevant to the DTC.
Click hereEngine / Hybrid System>1GD-FTV (FUEL)>FUEL INJECTOR>REMOVAL
- NOTICE:
- ·
When replacing the injector assembly for a cylinder, always be sure to use a new No. 1 injection pipe sub-assembly and a new No. 2 injection pipe sub-assembly.
·Follow the procedure in the repair manual and temporarily install the No. 1 injection pipe sub-assembly, No. 2 injection pipe sub-assembly and No. 1 nozzle leakage pipe assembly pipe, and then correctly position the injector assemblies. After that, tighten parts according to the torque specifications.
·If the installation procedure is not performed correctly, injector assemblies may become out of position, which may cause the injector assemblies to deteriorate, resulting in malfunctions.
·If an injector assembly deteriorates and malfunctions, other problems such as knocking, rough idle, etc. may occur.
·If an injector assembly becomes out of position, it is possible that the seal between the injector assembly and injection pipe sub-assembly may become incomplete, resulting in a fuel leak.
- Result:
Proceed to NEXT
NEXT
Bleed the air from the fuel system.
Click hereEngine / Hybrid System>1GD-FTV (FUEL)>FUEL SYSTEM>ON-VEHICLE INSPECTION
- Result:
Proceed to NEXT
NEXT
Register the injector compensation code.
Click hereEngine / Hybrid System>1GD-FTV (ENGINE CONTROL)>ECD SYSTEM (w/ Urea SCR System)>REGISTRATION
- Powertrain > Engine > Utility
-
Tester Display Injector Compensation - 50005 372 4596
Perform the injector pilot quantity learning.
Click hereEngine / Hybrid System>1GD-FTV (ENGINE CONTROL)>ECD SYSTEM (w/ Urea SCR System)>REGISTRATION
- Powertrain > Engine > Utility
-
Tester Display Pilot Quantity Learning - 50005 372 4569
- Result:
Proceed to NEXT
NEXT
Disconnect the injector assembly connectors for all cylinders.
- NOTICE:
-
If only the injector assembly connector of the malfunctioning cylinder is disconnected, the engine will start and there will be rough idling. Therefore, disconnect all injector assembly connectors before inspecting the waveform.
Start the engine.
Check the waveform of the injector assembly connectors using an oscilloscope.
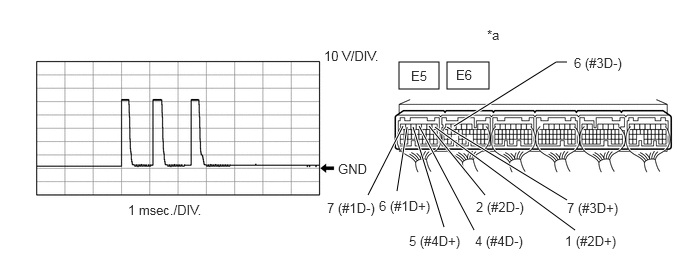
| *a | Component with harness connected
(ECM) |
- | - |
- OK:
Tester Connection Condition Specified Condition E5-6 (#1D+) - E5-7 (#1D-) Cranking Correct waveform is as shown E5-1 (#2D+) - E5-2 (#2D-) Cranking Correct waveform is as shown E6-7 (#3D+) - E6-6 (#3D-) Cranking Correct waveform is as shown E5-5 (#4D+) - E5-4 (#4D-) Cranking Correct waveform is as shown
Reconnect the injector assembly connectors for all cylinders.
- Result:
Proceed to OK NG
OK
NG
Repair or replace the harness or connector.
- Result:
Proceed to NEXT
NEXT
Connect the GTS to the DLC3.
Clear the DTCs.
- Powertrain > Engine > Clear DTCs
- 50002 372
Turn the ignition switch off for 30 seconds or more.
Start the engine and idle it for 5 seconds or more.
Enter the following menus: Powertrain / Engine / Trouble Codes.
- Powertrain > Engine > Trouble Codes
- 50001 372
Confirm that the DTC is not output again.
- Result:
Proceed to NEXT
NEXT
Replace the ECM.
Click hereEngine / Hybrid System>1GD-FTV (ENGINE CONTROL)>ECM>REMOVAL
- Result:
Proceed to NEXT
NEXT