1GD-FTV INTAKE / EXHAUST INTAKE MANIFOLD REMOVAL
CAUTION / NOTICE / HINT
The necessary procedures (adjustment, calibration, initialization or registration) that must be performed after parts are removed, installed or replaced during the intake manifold removal/installation are shown below.
| Replaced Part or Performed Procedure | Necessary Procedure | Effect/Inoperative Function when Necessary Procedure not Performed | Link |
|---|---|---|---|
| Battery terminal is disconnected/reconnected | Memorize steering angle neutral point | Parking assist monitor system | ( ) |
- HINT:
-
When the cable is disconnected / reconnected to the battery terminal, systems temporarily stop operating. However, each system has a function that completes learning the first time the system is used.
- ·
Learning completes when vehicle is driven
Effect/Inoperative when not Performed Necessary Procedures Link Stop and start system Drive the vehicle until stop and start control is permitted (approximately 5 to 60 minutes). ( )
Lane control system Drive the vehicle straight ahead at 15 km/h (10 mph) or more for 1 second or more. ( )
Pre-collision system
·Learning completes when vehicle is operated normally
Effect/Inoperative when not Performed Necessary Procedures Link Power slide door system Fully close the slide door by hand.
- HINT:
-
Initialization is not necessary if the above procedures are performed while the slide door is closed.
( )
Air conditioning system After the ignition switch is turned to ON, the servo motor standard position is recognized. -
- NOTICE:
- ·
When replacing the parts in the following chart (A), replace the No. 1 injection pipe sub-assembly, No. 2 injection pipe sub-assembly and/or fuel inlet pipe sub-assembly with new ones.
Replaced Parts (A) Pipes Requiring New Replacement ·Injector assembly (including shuffling the injector assemblies between the cylinders)
·No. 1 injection pipe sub-assembly
·No. 2 injection pipe sub-assembly
·Supply pump assembly
·Fuel inlet pipe sub-assembly
·Common rail assembly
·Cylinder block sub-assembly
·Cylinder head sub-assembly
·Timing chain case assembly
·No. 1 injection pipe sub-assembly
·No. 2 injection pipe sub-assembly
·Fuel inlet pipe sub-assembly
·After removing the No. 1 injection pipe sub-assembly, No. 2 injection pipe sub-assembly and/or fuel inlet pipe sub-assembly, clean them with a brush and compressed air.
PROCEDURE

 1. PRECAUTION
- NOTICE:
-
After turning the ignition switch is turned off, there may be a waiting time before disconnecting the negative (-) battery terminal.
-
Click hereGeneral>SETUP>WHEN DISCONNECTING OR RECONNECTING BATTERY TERMINAL>BEFORE DISCONNECTING BATTERY
2.DISCONNECT CABLE FROM NEGATIVE BATTERY TERMINAL
25800
3.REMOVE EGR COOLER SUB-ASSEMBLY AND NO. 2 EGR VALVE ASSEMBLY WITH ELECTRIC EGR CONTROL VALVE ASSEMBLY (w/ EGR System with EGR Cooler)
25800
4.REMOVE ELECTRIC EGR CONTROL VALVE ASSEMBLY (w/ EGR System without EGR Cooler)
25624
5.REMOVE EGR VALVE ADAPTER (w/o EGR Cooler)
- CAUTION:
-
To prevent burns, do not touch the engine, exhaust manifold or other high temperature components while the engine is hot.
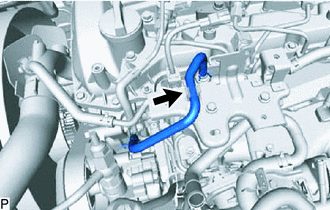
Disconnect the No. 4 fuel hose from the No. 3 water by-pass pipe sub-assembly.
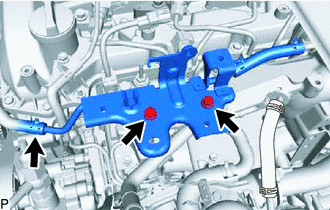
w/ EGR System:
Slide the clamp and disconnect the No. 8 water by-pass hose from the No. 3 water by-pass pipe sub-assembly.
Remove the 2 bolts and No. 3 water by-pass pipe sub-assembly from the EGR valve adapter.
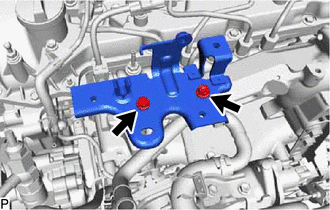
w/o EGR System:
Remove the 2 bolts and No. 3 water by-pass pipe sub-assembly from the EGR valve adapter.
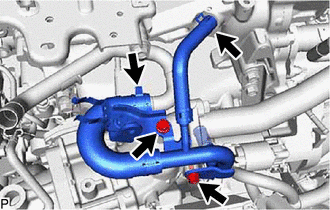
w/ EGR System:
Slide the clamp and disconnect the No. 7 water by-pass hose from the EGR pipe stay.
Slide the clamp and disconnect the water hose from the EGR valve adapter.
Remove the 2 bolts and disconnect the No. 4 water by-pass pipe sub-assembly from the intake manifold.
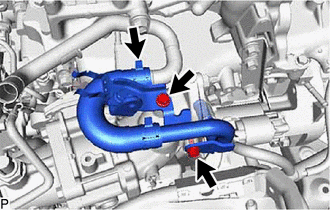
w/o EGR System:
Slide the clamp and disconnect the No. 7 water by-pass hose from the EGR pipe stay.
Remove the 2 bolts and disconnect the No. 4 water by-pass pipe sub-assembly from the intake manifold.
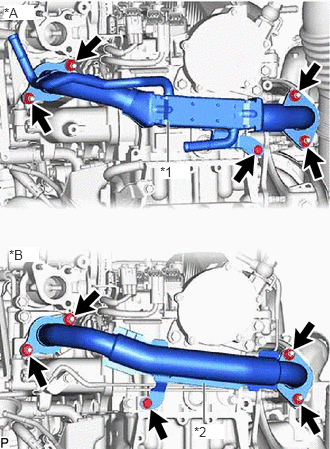
| *A | w/ EGR System without EGR Cooler |
| *B | w/ EGR System with EGR Cooler |
| *1 | EGR Pipe with Cooler Sub-assembly |
| *2 | No. 1 EGR Pipe Sub-assembly |
w/ EGR System:
Remove the 4 nuts, bolt and EGR pipe with cooler sub-assembly or No. 1 EGR pipe sub-assembly from the exhaust manifold, electric EGR control valve assembly and vacuum transmitting pipe sub-assembly.
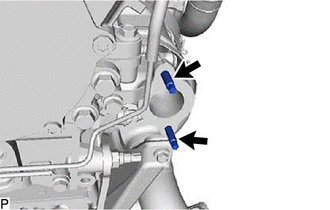
w/ EGR System:
Using an E8 "TORX" socket wrench, remove the 2 stud bolts from the exhaust manifold.
Remove the 4 bolts and EGR valve adapter from the intake manifold.
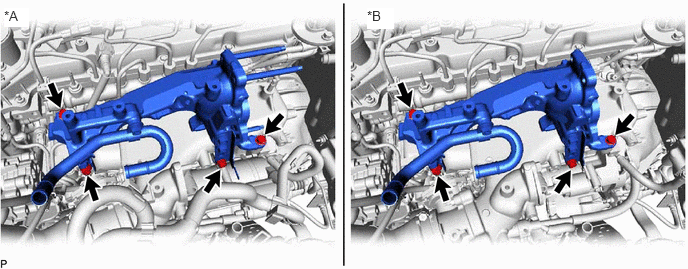
| *A | w/ EGR System | *B | w/o EGR System |
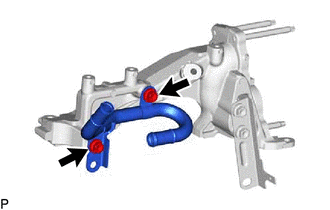
Remove the 2 bolts and EGR pipe stay from the EGR valve adapter.
11409
6.REMOVE ENGINE OIL LEVEL DIPSTICK GUIDE
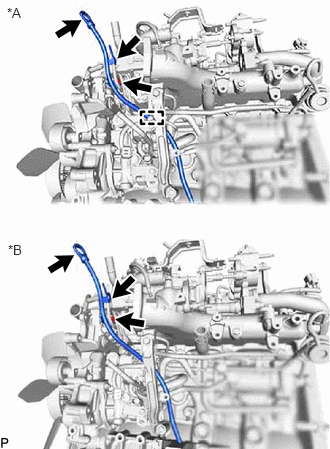
| *A | w/ DPF |
| *B | w/o DPF |
Detach the No. 2 fuel pipe clamp from the engine oil level dipstick guide.
Remove the engine oil level dipstick.
Disconnect the vacuum hose from the intake manifold.
Remove the bolt and engine oil level dipstick guide.
Remove the O-ring from the engine oil level dipstick guide.
23812D
7.DISCONNECT NO. 2 FUEL PIPE
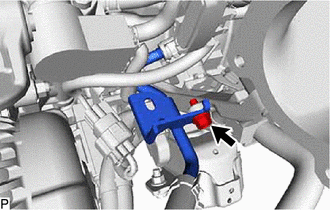
Remove the bolt and disconnect the No. 2 fuel pipe.
8.REMOVE WIRING HARNESS CLAMP BRACKET
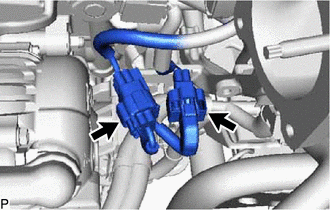
Disconnect the diesel throttle body assembly connector and pre-stroke control valve connector.
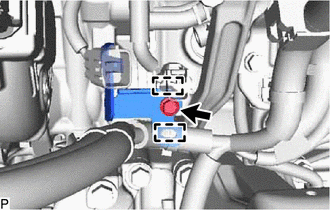
Detach the 2 wire harness clamps.
Remove the bolt and wiring harness clamp bracket.
17118
9.REMOVE MANIFOLD STAY
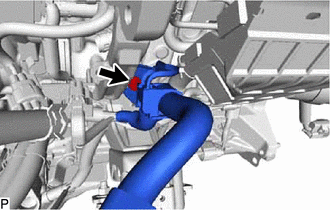
Remove the bolt and disconnect the wiring harness clamp bracket from the intake manifold stay.
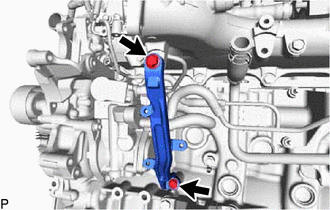
Remove the 2 bolts and manifold stay.
23804D
10.REMOVE NO. 4 FUEL PIPE SUB-ASSEMBLY (w/ DPF)
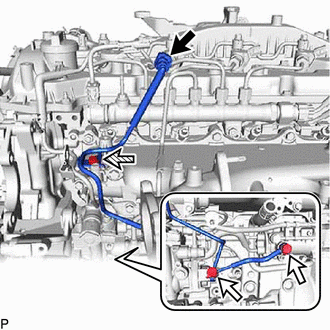

|
Union Bolt |

|
Bolt |
Disconnect the No. 4 fuel pipe sub-assembly from the No. 1 fuel pipe.
Click hereEngine / Hybrid System>1GD-FTV (FUEL)>FUEL SYSTEM>PRECAUTION
Remove the bolt from the intake manifold.
Remove the 2 union bolts and 2 gaskets from the supply pump assembly and fuel filter.
23815D
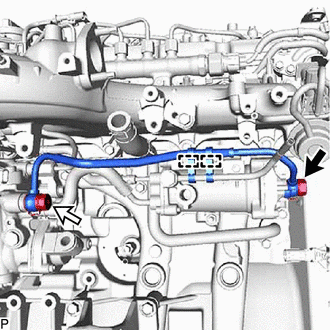
11.REMOVE NO. 3 FUEL PIPE (w/ DPF or Pressurized Fuel Filter)

|
Union Bolt |
|
|
Supply Pump Hollow Screw |
Remove the union bolts, supply pump hollow screw and 2 gaskets from the supply pump assembly and fuel filter.
Remove the 2 fuel pipe clamps from the No. 3 fuel pipe and fuel filter.
23804C
12.REMOVE FUEL INLET PIPE SUB-ASSEMBLY
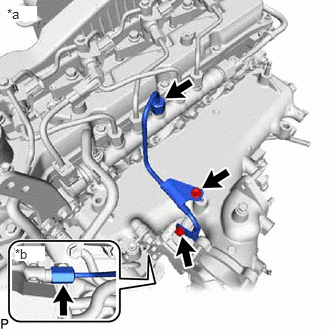
| *a | Common Rail Assembly Side |
| *b | Fuel Supply Pump Assembly Side |
Remove the 2 bolts, No. 1 injection pipe clamp and No. 2 injection pipe clamp.
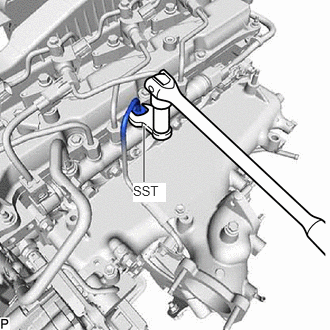
Using SST, loosen the fuel inlet pipe sub-assembly union nut of the common rail assembly side.
- SST
- 09245-11010
- NOTICE:
-
If the No. 1 or No. 2 injection pipe clamp is removed from the inlet pipe sub-assembly, replace the No. 1 or No. 2 injection clamp with a new one.
Using a 19 mm union nut wrench, loosen the inlet pipe sub-assembly union nut of the fuel supply pump assembly side.
23770
13.REMOVE NO. 2 NOZZLE LEAKAGE PIPE ASSEMBLY
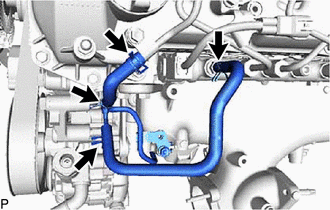
Slide the clamps and remove the No. 4 fuel hose from the No. 2 nozzle leakage pipe assembly and common rail assembly.
Slide the 2 clamps and remove the No. 5 fuel hose from the No. 1 nozzle leakage pipe assembly and No. 2 nozzle leakage pipe assembly.
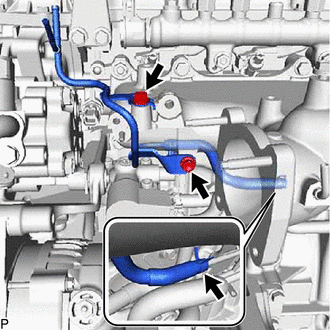
Slide the clamp and disconnect the No. 6 fuel hose from the No. 3 nozzle leakage pipe assembly.
Remove the 2 bolts and No. 2 nozzle leakage pipe assembly.
25804
14.REMOVE VACUUM CONTROL VALVE SET (w/ DPF)
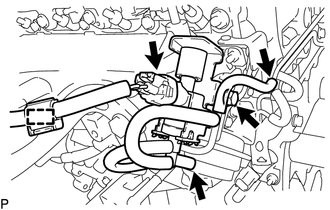
Disconnect the wire harness clamp and vacuum control valve set connector.
Disconnect the 2 vacuum hoses from the vacuum control valve set and vacuum transmitting pipe sub-assembly.
Remove the bolt and vacuum control valve set from the intake manifold.
17111
15.REMOVE INTAKE MANIFOLD
Remove the bolt and disconnect the wire harness bracket.
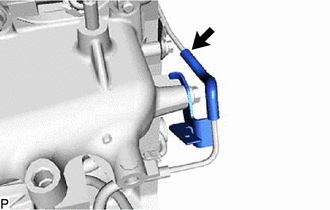
w/o DPF:
Disconnect the vacuum hose from the vacuum transmitting pipe sub-assembly.
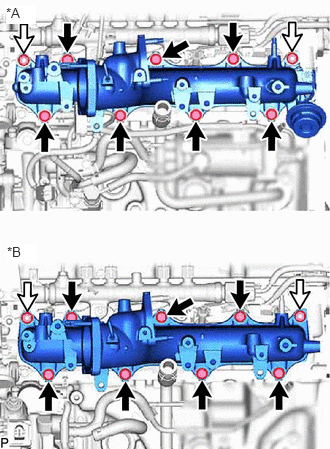
| *A | w/ DPF |
| *B | w/o DPF |
|
|
Bolt |
|
|
Nut |
Remove the 7 bolts, 2 nuts, intake manifold and gasket.