WINDOW / GLASS FRONT SIDE WINDOW GLASS INSTALLATION
CAUTION / NOTICE / HINT
- NOTICE:
-
Make sure to use Toyota Genuine Windshield Glass Adhesive (High Modulus Type) or equivalent.
- HINT:
- ·
Use the same procedure for the RH and LH sides.
·The procedure listed below is for the LH side.
PROCEDURE

 62720C
1.CLEAN FRONT SIDE WINDOW GLASS SUB-ASSEMBLY LH
When reusing the front side window glass sub-assembly LH:
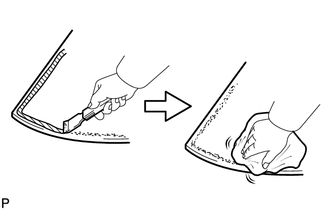
Using a gasket scraper, remove any remaining, spacer, moulding, adhesive dam, double-sided tape and adhesive residue from the front side window glass sub-assembly LH.
- NOTICE:
-
Be careful not to damage the front side window glass sub-assembly LH.
Clean the outer circumference of the front side window glass sub-assembly LH with a non-residue solvent.
- NOTICE:
- ·
Do not touch the front side window glass sub-assembly LH surface after cleaning it.
·Even if using a new front side window glass sub-assembly LH, clean the front side window glass sub-assembly LH with a non-residue solvent.
2.INSTALL NO. 1 QUARTER PANEL SPACER
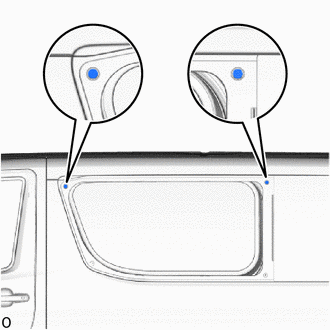
Install 2 new No. 1 quarter panel spacers to the body.
62785A
3.INSTALL QUARTER WINDOW GLASS SPACER
Using a brush or sponge, apply the glass primer to the quarter window glass spacer installation surface of the front side window glass sub-assembly LH.
- NOTICE:
-
Do not apply too much primer.
Remove the peeling paper from a new quarter window glass spacer.
- HINT:
-
After removing the peeling paper, keep the exposed adhesive free from foreign matter.
Install the quarter window glass spacer to the front side window glass sub-assembly LH as shown in the illustration.
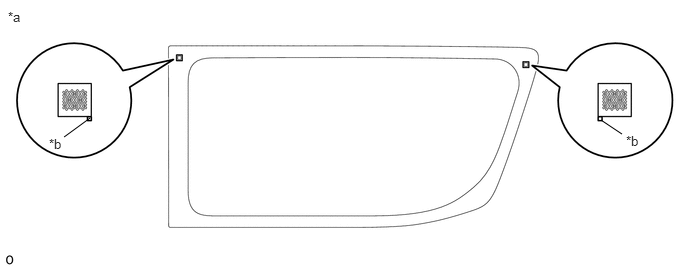
| *a | Backside | *b | Ceramic Notch |
- NOTICE:
-
Allow the primer to dry for 3 minutes or more.
62775E
4.INSTALL FRONT SIDE WINDOW CLIP LH
Using a brush or sponge, apply the glass primer to the front side window clip LH installation surface of the front side window glass sub-assembly LH.
- NOTICE:
-
Do not apply too much primer.
Remove the peeling paper from a new front side window clip LH.
- HINT:
-
After removing the peeling paper, keep the exposed adhesive free from foreign matter.
Install the front side window clip LH to the front side window glass sub-assembly LH as shown in the illustration.
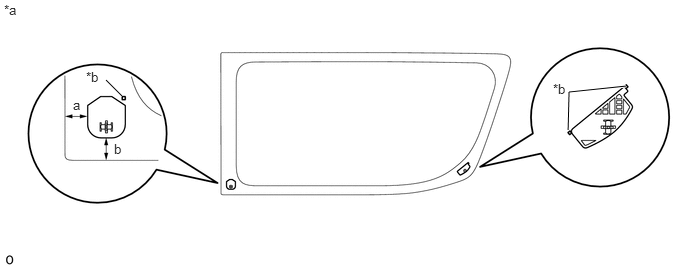
| *a | Backside | *b | Ceramic Notch |
- NOTICE:
-
Allow the primer to dry for 3 minutes or more.
- Standard Dimension:
Area Dimension a 22.5 mm (0.886 in.) b 23.1 mm (0.909 in.)
62267D
5.INSTALL NO. 1 FRONT SIDE WINDOW ADHESIVE DAM LH
Using a brush or sponge, apply the glass primer to the No. 1 front side window adhesive dam LH installation surface of the front side window glass sub-assembly LH.
- NOTICE:
-
Do not apply too much primer.
Remove the peeling paper from a new No. 1 front side window adhesive dam LH.
- HINT:
-
After removing the peeling paper, keep the exposed adhesive free from foreign matter.
Install the No. 1 front side window adhesive dam LH to the front side window glass sub-assembly LH as shown in the illustration.
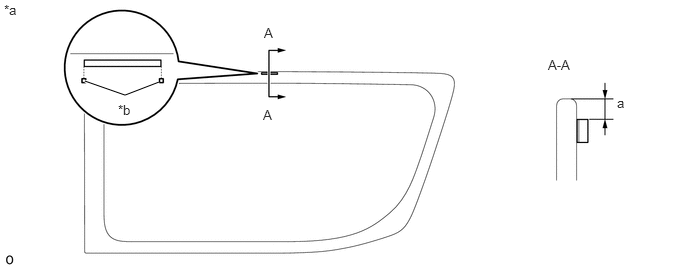
| *a | Backside | *b | Ceramic Notch |
- Standard Dimension:
Area Dimension a 3.0 mm (0.118 in.) to 5.0 mm (0.197 in.)
62267K
6.INSTALL NO. 2 FRONT SIDE WINDOW ADHESIVE DAM LH
Using a brush or sponge, apply the glass primer to the No. 2 front side window adhesive dam LH installation surface of the front side window glass sub-assembly LH.
- NOTICE:
-
Do not apply too much primer.
Remove the peeling paper from a new No. 2 front side window adhesive dam LH.
- HINT:
-
After removing the peeling paper, keep the exposed adhesive free from foreign matter.
Install the No. 2 front side window adhesive dam LH to the front side window glass sub-assembly LH as shown in the illustration.
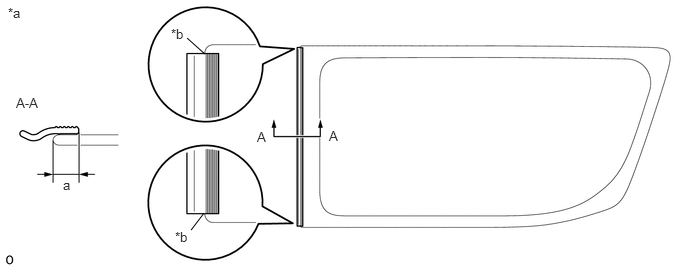
| *a | Backside | *b | R End |
- Standard Dimension:
Area Dimension a 8.0 mm (0.315 in.)
62267R
7.INSTALL NO. 3 FRONT SIDE WINDOW ADHESIVE DAM LH
except Slide Glass Type:
Using a brush or sponge, apply the glass primer to the No. 3 front side window adhesive dam LH installation surface of the front side window glass sub-assembly LH.
- NOTICE:
-
Do not apply too much primer.
Remove the peeling paper from a new No. 3 front side window adhesive dam LH.
- HINT:
-
After removing the peeling paper, keep the exposed adhesive free from foreign matter.
Install the No. 3 front side window adhesive dam LH to the front side window glass sub-assembly LH as shown in the illustration.
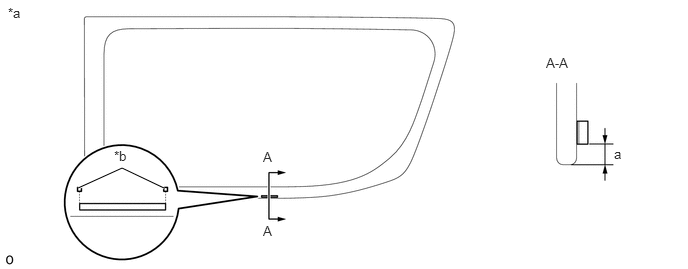
| *a | Backside | *b | Ceramic Notch |
- Standard Dimension:
Area Dimension a 3.0 mm (0.118 in.) to 5.0 mm (0.197 in.)
74526D
8.INSTALL NO. 2 EMERGENCY HAMMER CAUTION LABEL (w/Back Window Glass Hammer Assembly)
Apply the No. 2 emergency hammer caution label to the inner and outer sides of the front side window glass sub-assembly LH as shown in the illustration.
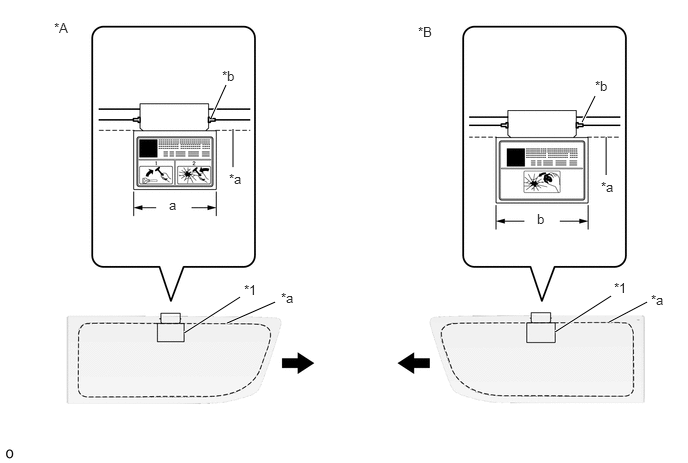
| *A | Inner Side | *B | Outer Side |
| *1 | No. 2 Emergency Hammer Caution Label | - | - |
| *a | Ceramic Line | *b | Ceramic Notch |

|
Front Side | - | - |
- Standard Dimension:
Area Dimension a 160 mm (0.525 ft.) b 180 mm (0.590 ft.)
62720C
9.INSTALL FRONT SIDE WINDOW GLASS SUB-ASSEMBLY LH
Clean and shape the contact surface of the vehicle body.
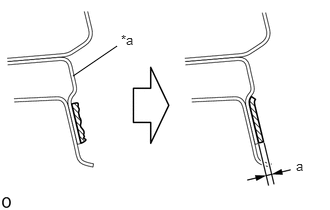
| *a | Vehicle Body |

|
Adhesive |
Using a knife, cut away excess adhesive on the contact surface of the vehicle body as shown in the illustration.
- Standard Dimension:
Area Dimension a 1.0 mm (0.0394 in.) to 3.0 mm (0.118 in.)
- NOTICE:
-
Be careful not to damage the vehicle body.
- HINT:
-
Leave approximately 1.0 mm (0.0394 in.) to 3.0 mm (0.118 in.) of adhesive on the vehicle body.
Clean the contact surface of the vehicle body with a piece of cloth saturated with non-residue solvent.
- HINT:
-
Even if all of the adhesive has been removed, clean the vehicle body.
Position the front side window glass sub-assembly LH.
Using suction cups, place the front side window glass sub-assembly LH in the correct position.
Check that the entire contact surface of the glass rim is perfectly even.
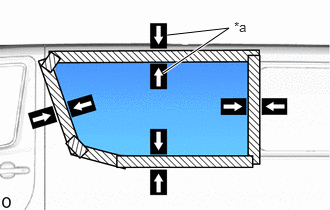
| *a | Matchmarks |
When using a new front side window glass sub-assembly LH:
Place matchmarks on the front side window glass sub-assembly LH and vehicle body at the locations indicated in the illustration.
- NOTICE:
- ·
Check that the quarter window glass spacer is attached to the No. 1 quarter panel spacer correctly.
·Check that the front side window clip LH is attached to the vehicle body correctly.
- HINT:
-
When reusing a front side window glass sub-assembly LH, check the position of the matchmarks and make adjustments.
Using suction cups, remove the front side window glass sub-assembly LH.
Using a brush or sponge, apply the body primer to the exposed part of the vehicle body.
- NOTICE:
- ·
Do not apply too much primer.
·Do not apply primer to the adhesive.
·When applying the primer, take care of the seams of the panel and spot welds.
Using a brush or sponge, apply the glass primer as shown in the illustration.
for Standard Roof:
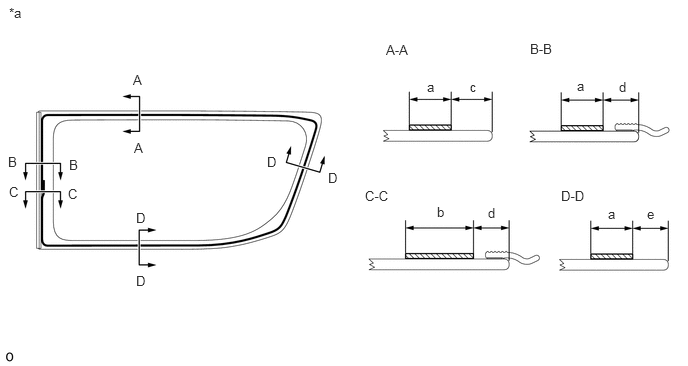
| *a | Backside | - | - |
|
|
Glass Primer | - | - |
- NOTICE:
-
Do not apply too much primer.
- Standard Dimension:
Area Dimension a 9.0 mm (0.354 in.) b 17 mm (0.669 in.) c 13.1 mm (0.516 in.) d 10.2 mm (0.402 in.) e 11.5 mm (0.453 in.)
for High Roof:
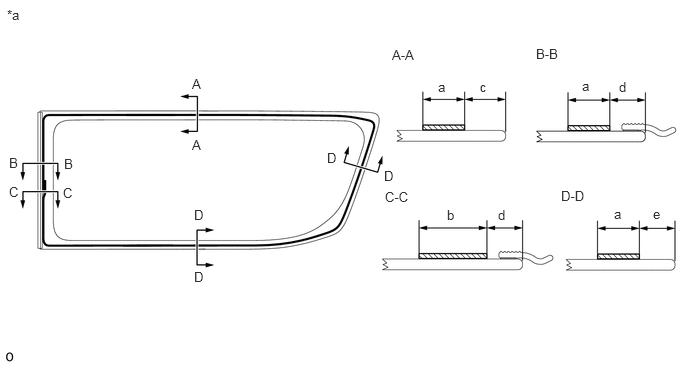
| *a | Backside | - | - |
|
|
Glass Primer | - | - |
- NOTICE:
-
Do not apply too much primer.
- Standard Dimension:
Area Dimension a 9.0 mm (0.354 in.) b 17 mm (0.669 in.) c 13.1 mm (0.516 in.) d 8.5 mm (0.335 in.) e 11.5 mm (0.453 in.)
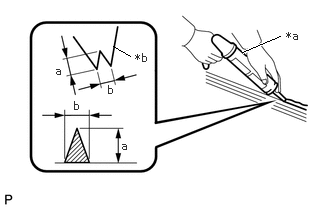
| *a | Sealer Gun |
| *b | Nozzle |
|
|
Adhesive |
Cut off the tip of the cartridge nozzle as shown in the illustration.
- Standard Dimension:
Area Dimension a 12 mm (0.472 in.) to 15 mm (0.591 in.) b 8.0 mm (0.315 in.) to 11 mm (0.433 in.)
Load the sealer gun with the cartridge.
Apply adhesive to the glass as shown in the illustration.
for Standard Roof:
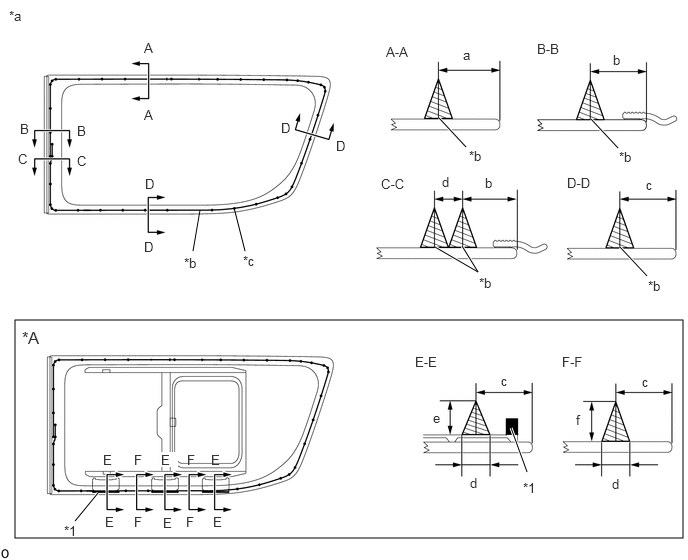
| *A | for Slide Glass Type | - | - |
| *1 | EPT Sealer | - | - |
| *a | Backside | *b | Adhesive Positioning Center |
| *c | Ceramic Notch | - | - |
|
|
Adhesive | - | - |
- NOTICE:
- ·
Allow the primer to dry for 3 minutes or more.
·Apply adhesive at a constant height, even above the EPT sealer area. (for Slide Glass Type)
·Do not apply sealant beyond the EPT sealer area. (for Slide Glass Type)
- Adhesive:
Toyota Genuine Windshield Glass Adhesive (High modulus type) or equivalent
- Standard Dimension:
Area Dimension a 17.6 mm (0.692 in.) b 14.7 mm (0.579 in.) c 16 mm (0.630 in.) d 8.0 mm (0.315 in.) e 10.3 mm (0.406 in.) f 12 mm (0.472 in.)
for High Roof:
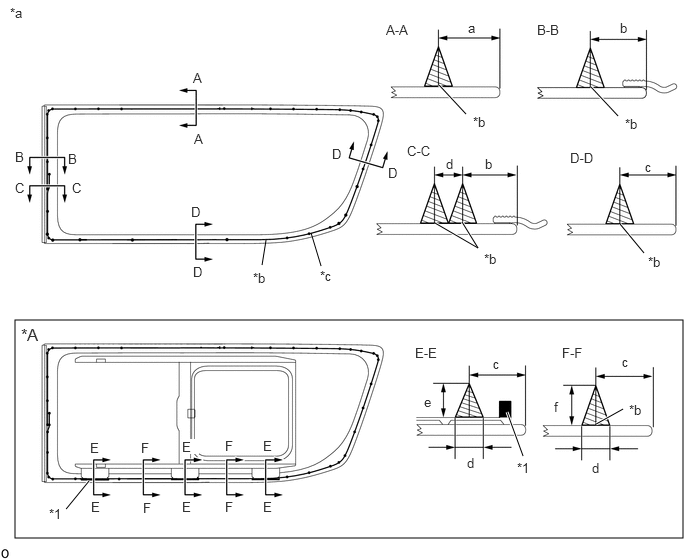
| *A | for Slide Glass Type | - | - |
| *1 | EPT Sealer | - | - |
| *a | Backside | *b | Adhesive Positioning Center |
| *c | Ceramic Notch | - | - |
|
|
Adhesive | - | - |
- NOTICE:
- ·
Allow the primer to dry for 3 minutes or more.
·Apply adhesive at a constant height, even above the EPT sealer area. (for Slide Glass Type)
·Do not apply sealant beyond the EPT sealer area. (for Slide Glass Type)
- Adhesive:
Toyota Genuine Windshield Glass Adhesive (High modulus type) or equivalent
- Standard Dimension:
Area Dimension a 17.6 mm (0.692 in.) b 13 mm (0.512 in.) c 16 mm (0.630 in.) d 8.0 mm (0.315 in.) e 10.3 mm (0.406 in.) f 12 mm (0.472 in.)
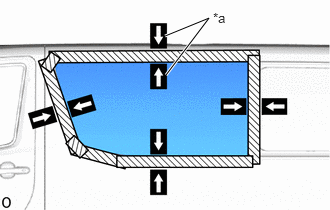
| *a | Matchmarks |
Install the front side window glass sub-assembly LH to the vehicle body.
Using suction cups, position the front side window glass sub-assembly LH so that the matchmarks are aligned.
- NOTICE:
- ·
Check that the quarter window glass spacer is attached to the No. 1 quarter panel spacer correctly.
·Check that the front side window clip LH is attached to the vehicle body correctly.
Press it in gently along the rim.
- HINT:
-
Press the glass with force of 98 N (10 kgf, 22.0 lbf) or more.
Using a gasket scraper, remove any excess or protruding adhesive.
- NOTICE:
-
Apply adhesive up to the edge of the front side window glass sub-assembly LH.
Hold the front side window glass sub-assembly LH using protective tape until the applied adhesive becomes hard.
- NOTICE:
-
Do not drive the vehicle for the time described in the table below.
- Minimum Time:
Temperature Minimum Time Prior to Driving Vehicle 35°C (95°F) 1 hour and 30 minutes 20°C (68°F) 5 hours 5°C (41°F) 24 hours
10.INSTALL ROOF HEADLINING ASSEMBLY (for Semi-trim, for High Roof, w/ Rear Air Duct)
62440D
11.INSTALL FRONT ROOF SIDE RAIL GARNISH ASSEMBLY LH (for Full-trim)
62460A
12.INSTALL REAR ROOF SIDE RAIL GARNISH ASSEMBLY LH (for Full-trim)
62412
13.INSTALL CENTER PILLAR GARNISH ASSEMBLY LH (for Full-trim)
62639A
14.INSTALL QUARTER PILLAR GARNISH LH (for Full-trim, for High Roof)
- HINT:
-
Use the same procedure for the quarter pillar garnish RH.
62639A
15.INSTALL QUARTER PILLAR GARNISH LH (for Full-trim)
62472D
16.INSTALL REAR UPPER PILLAR GARNISH LH (for Full-trim)
62520B
17.INSTALL QUARTER TRIM PANEL ASSEMBLY LH (for Full-trim)
62620K
18.INSTALL SIDE TRIM BOARD ASSEMBLY LH (for Full-trim, for High Roof)
62640M
19.INSTALL REAR QUARTER TRIM BOARD ASSEMBLY LH (for Full-trim)
67935
20.INSTALL BACK DOOR SCUFF PLATE (for Full-trim)
58777A
21.INSTALL TOOL BAG HOLDER (for Full-trim)
73370E
22.INSTALL REAR SEAT OUTER BELT ASSEMBLY LH (for Full-trim, w/ Seat Belt)
73220
23.INSTALL FRONT SEAT OUTER BELT ASSEMBLY LH (for Full-trim)
73233
24.INSTALL OUTER LAP BELT ANCHOR COVER (for Full-trim)
73178C
25.INSTALL SEAT BELT ANCHOR COVER CAP (for Full-trim)
67914B
26.INSTALL FRONT DOOR SCUFF PLATE LH (for Full-trim)
67912A
27.INSTALL FRONT DOOR OUTSIDE SCUFF PLATE LH (for Full-trim)
28.INSTALL REAR SEAT ASSEMBLY
for Folding Type:
Click hereVehicle Interior>SEAT>REAR SEAT ASSEMBLY (for Folding Type)>INSTALLATION
for Commuter, 3-Passenger Seat with 2-Point Type Seat Belt:
for Commuter, 3-Passenger Seat with 3-Point Type Seat Belt:
for Commuter, 4-Passenger Seat:
Click hereVehicle Interior>SEAT>REAR SEAT ASSEMBLY (for Commuter, 4-Passenger Seat)>INSTALLATION
for Commuter, Single-Passenger Seat with 2-Point Type Seat Belt:
for Commuter, Single-Passenger Seat with 3-Point Type Seat Belt:
for Commuter, 2-Passenger Seat with 2-Point Type Seat Belt:
for Commuter, 2-Passenger Seat with 2-Point Type Seat Belt and Headrest:
for Commuter, 2-Passenger Seat with 2-Point Type Seat Belt without Headrest: