INTERIOR PANELS / TRIM ROOF HEADLINING(for Full-trim) INSTALLATION
CAUTION / NOTICE / HINT
- HINT:
- ·
Use the same procedure for RHD and LHD vehicles.
·The procedure listed below is for LHD vehicles.
·A bolt without a torque specification is shown in the standard bolt chart.
Click hereGeneral>SPECIFICATIONS>STANDARD BOLT>SPECIFIED TORQUE FOR STANDARD BOLTS
PROCEDURE

 1.INSTALL ROOF HEADLINING ASSEMBLY (for Standard Roof)
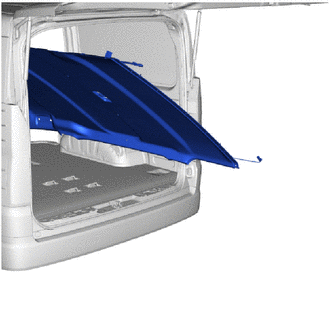
Tilt the roof headlining assembly vertically and carry it onto the vehicle through the back door.
- NOTICE:
- ·
Installation of the roof headlining assembly must be performed by multiple people to prevent deformation of the roof headlining assembly.
·Check that the corners of the roof headlining are not folded, twisted or otherwise deformed and that none of the mounted parts have fallen off.
·Make sure that the roof headlining does not get caught on anything as it may become bent or damaged.
·Do not damage the roof headlining or vehicle interior.
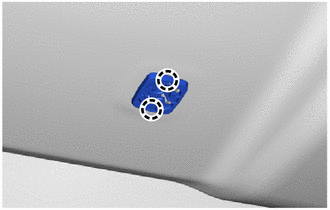
Attach the claw to install the visor holder base.
- HINT:
-
Use the same procedure for the opposite side.
Attach the fastener.
Install the roof headlining assembly with the 10 clips and 2 plates.
- HINT:
-
When installing the clips indicated by the white arrow, make sure to install the plate between the roof headlining assembly.
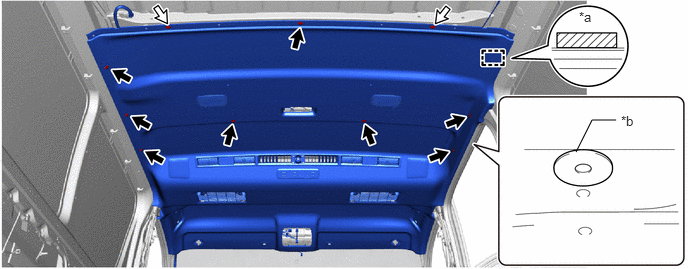
| *a | Fastener | *b | Plate |

|
w/ Plate | - | - |
Install the 5 bolts.
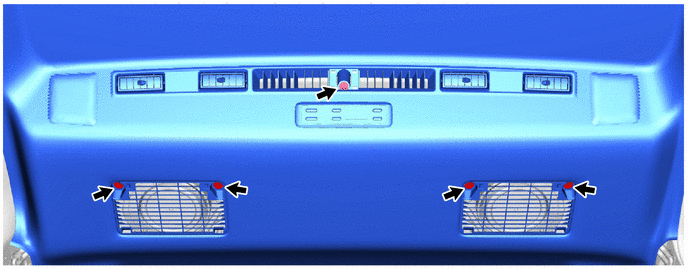
for Rear Roof RH Side, w/ Digital Inner Mirror:
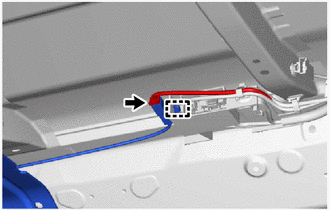
Attach the clamp and connect the connector.
for Rear Roof LH Side:
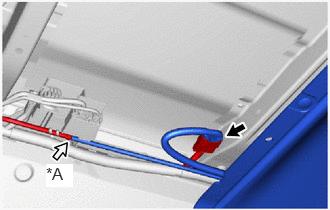
| *A | w/ Rear Wiper or w/ Digital Inner Mirror |

|
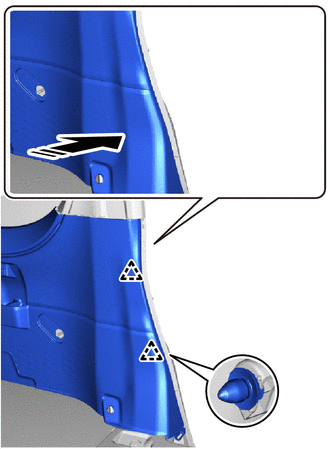
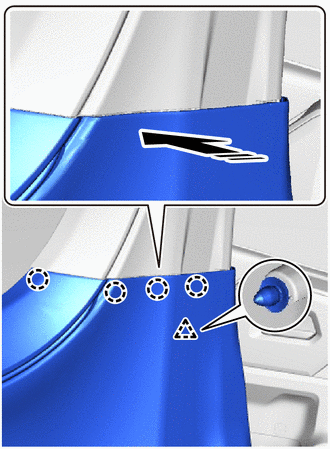
Connector |
|
|
Washer Hose |
Connect the connector.
w/ Rear Wiper or w/ Digital Inner Mirror:
Connect the washer hose.
for Front Pillar LH Side:
w/ Curtain Shield Airbag:
Remove the protective cover installed to the front pillar LH.
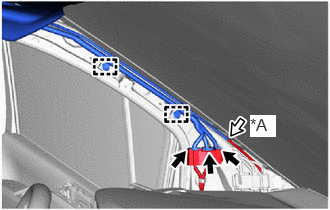
| *A | w/ Rear Wiper or w/ Digital Inner Mirror |
|
|
Connector |
|
|
Washer Hose |
w/ Rear Wiper or w/ Digital Inner Mirror:
Connect the washer hose.
Attach the wire harness clamp.
Connect the 3 connectors.
w/ Curtain Shield Airbag:
Install the protective cover to the front pillar LH.
for Windshield Glass Side:
Connect each connector.
2.INSTALL ROOF HEADLINING ASSEMBLY (for High Roof)
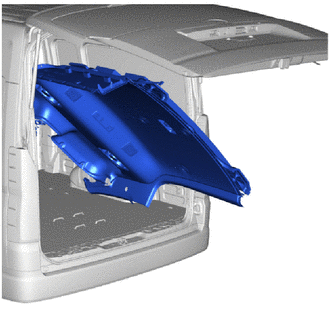
Tilt the roof headlining assembly vertically and carry it onto the vehicle through the back door.
- NOTICE:
- ·
Installation of the roof headlining assembly must be performed by multiple people to prevent deformation of the roof headlining assembly.
·Check that the corners of the roof headlining are not folded, twisted or otherwise deformed and that none of the mounted parts have fallen off.
·Make sure that the roof headlining does not get caught on anything as it may become bent or damaged.
·Do not damage the roof headlining or vehicle interior.
Install the roof headlining assembly with the 14 clips and 2 plates.
- HINT:
-
When installing the clips indicated by the white arrow, make sure to install the plate between the roof headlining assembly.
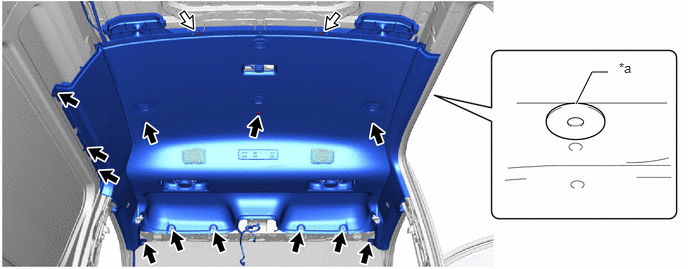
| *a | Plate | - | - |
|
|
w/ Plate | - | - |
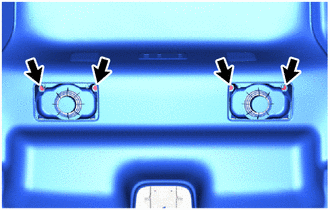
Install the 4 bolts.
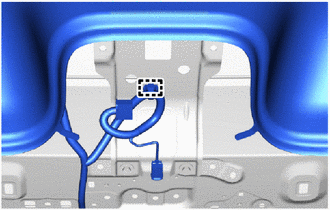
for Roof Headlining Front Side:
w/o Wire Harness Protector:
Attach the clamp.
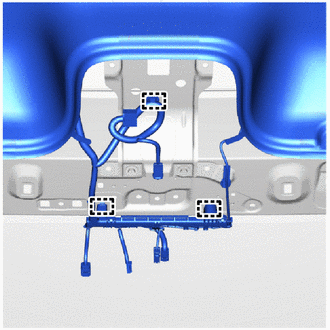
w/ Wire Harness Protector:
Attach the clamp.
for Rear Roof RH Side, w/ Digital Inner Mirror:
Attach the clamp and connect the connector.
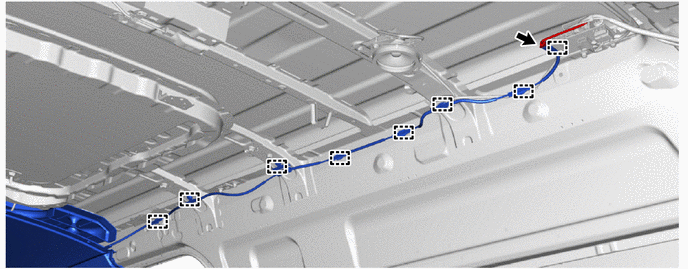
for Rear Roof LH Side:
w/ Rear Wiper or w/ Digital Inner Mirror:
Attach the clamp and connect the washer hose.
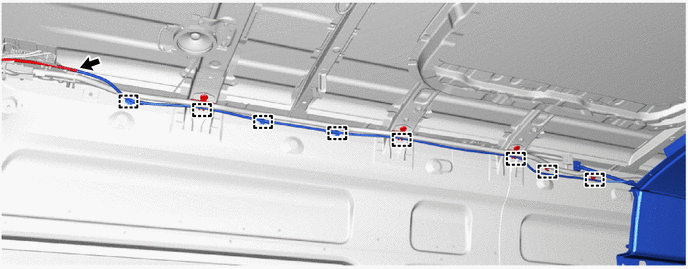
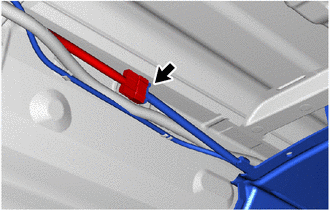
Connect the connector.
for Front Pillar LH Side:
w/ Curtain Shield Airbag:
Remove the protective cover installed to the front pillar LH.
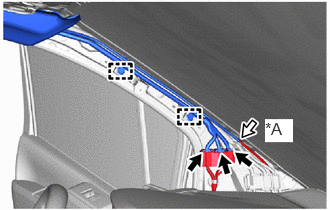
| *A | w/ Rear Wiper or w/ Digital Inner Mirror |
|
|
Connector |
|
|
Washer Hose |
w/ Rear Wiper or w/ Digital Inner Mirror:
Connect the washer hose.
Attach the wire harness clamp.
Connect the 3 connectors.
w/ Curtain Shield Airbag:
Install the protective cover to the front pillar LH.
for Windshield Glass Side:
Connect each connector.
65896J
3.INSTALL COVER TOP SET BOLT CAP (for Standard Roof)
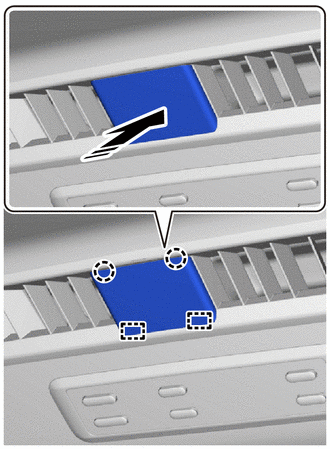

|
Install in this Direction |
Attach the guide and claw to install the cover top set bolt cap.
63413C
4.INSTALL FRONT INNER ROOF RACK BOARD (for High Roof)
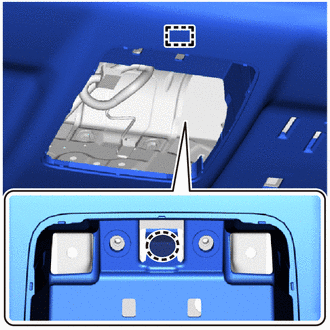

|
Press Here with Finger |
Press the hook in the illustration with your finger and hook the front inner roof rack board.
Attach the claw to install the visor holder base.
- HINT:
-
Use the same procedure for the opposite side.
Attach the guide and clip.
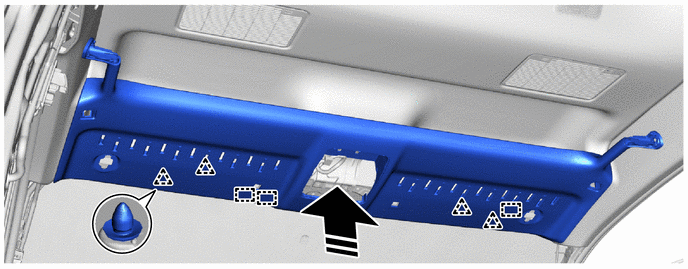
|
|
Install in this Direction | - | - |
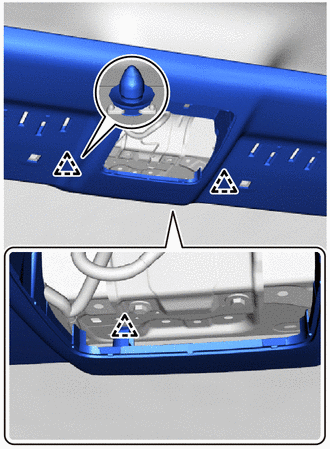
Attach the clip.
Install the front inner roof rack board with the 6 bolts.
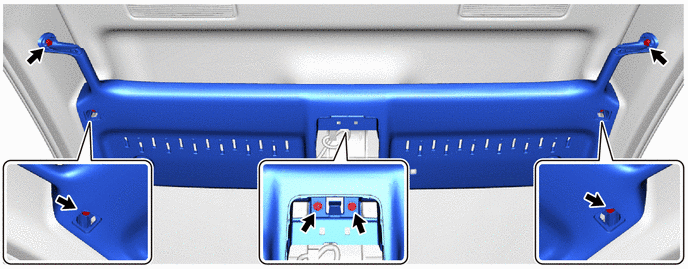
63439D
5.INSTALL NO. 2 INNER ROOF RACK COVER (for High Roof)
- HINT:
-
Use the same procedure for the opposite side.
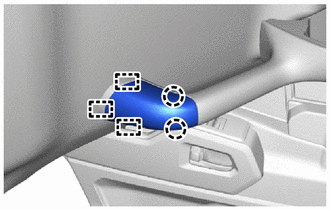
Attach the guide and claw to install the No. 2 roof rack cover.
63438F
6.INSTALL NO. 1 INNER ROOF RACK COVER (for High Roof)
- HINT:
-
Use the same procedure for the opposite side.
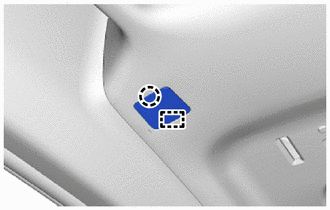
Attach the guide and claw to install the No. 1 roof rack cover.
Remove the protective tape.
53989A
7.INSTALL AIR INTAKE NET
- HINT:
-
Use the same procedure for the opposite side.
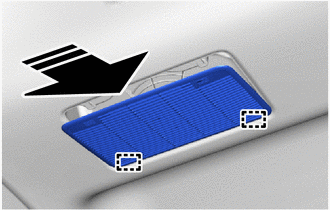
|
|
Install in this Direction |
Attach the guide as shown in the illustration.
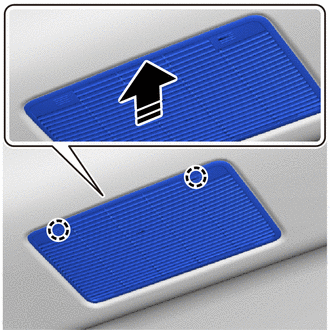
|
|
Install in this Direction |
Attach the claw as shown in the illustration to install the air intake net.
74348
8.INSTALL VISOR HOLDER
- HINT:
-
Use the same procedure for the opposite side.
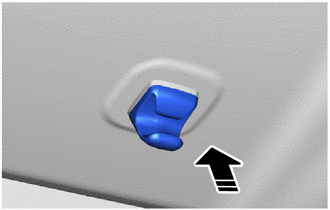
|
|
Install in this Direction |
Push in the end of the visor holder to install the visor holder.
74320
9.INSTALL VISOR ASSEMBLY LH
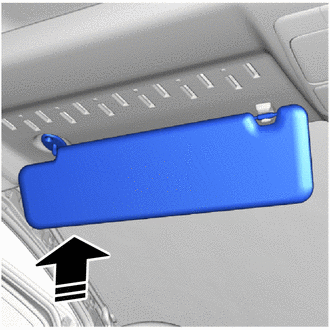
|
|
Install in this Direction |
Set the visor assembly LH into place by aligning it upward with the screw fastening hole.
- NOTICE:
-
Hold the visor assembly with one hand so that it does not drop.
Connect the visor assembly LH to the visor holder LH to set it into place.
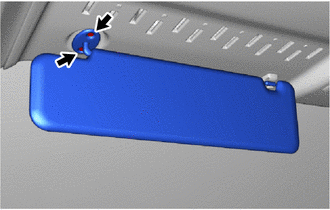
Install the visor assembly LH with the 2 screws.
74310
10.INSTALL VISOR ASSEMBLY RH
- HINT:
-
Use the same procedure described for the LH side.
11.INSTALL ASSIST GRIP ASSEMBLY (w/ Assist Grip)
- HINT:
-
Use the same procedure for all assist grip assemblies.
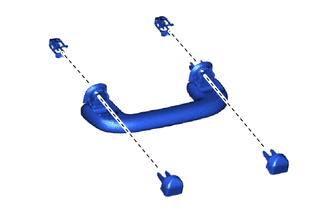
Install the 2 clips to the assist grip assembly.
Temporarily install the 2 assist grip covers to the assist grip assembly as shown in the illustration.
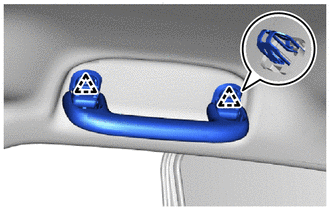
Attach the clip to install the assist grip assembly.
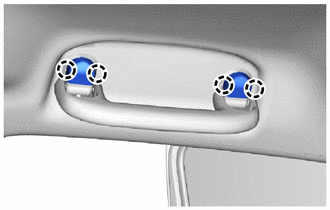
Attach the claw to install the 2 assist grip covers.
- NOTICE:
-
Check that the 2 clips are securely attached.
86768
12.INSTALL ROOF ANTENNA COVER (w/ Digital Audio Broadcasting Antenna)
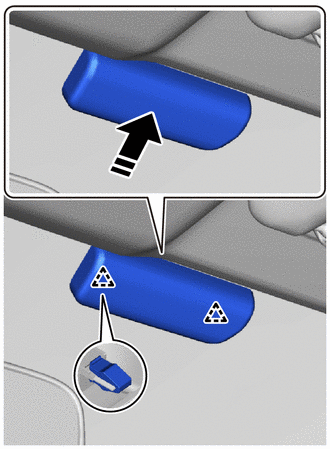
|
|
Install in this Direction |
Attach the clip as shown in the illustration to install the roof antenna cover.
86466D
13.INSTALL NO. 1 FORWARD RECOGNITION COVER (w/ Pre-collision System)
81260A
14.INSTALL MAP LIGHT ASSEMBLY
87834
15.INSTALL INNER REAR VIEW MIRROR STAY HOLDER COVER
w/ EC Mirror:
Click hereVehicle Interior>MIRROR (INT)>INNER REAR VIEW MIRROR (w/ EC Mirror)>INSTALLATION
w/ Digital Inner Mirror:
Click hereVehicle Interior>MIRROR (INT)>DIGITAL INNER MIRROR>INSTALLATION
16.INSTALL REAR ROOF HEADLINING ASSEMBLY
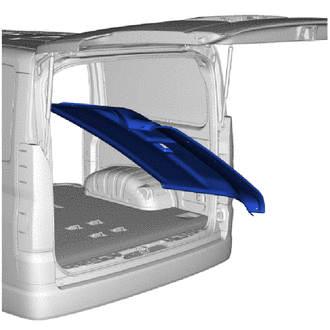
Tilt the rear roof headlining assembly vertically and carry it onto the vehicle through the back door.
- NOTICE:
- ·
Installation of the rear roof headlining assembly must be performed by multiple people to prevent deformation of the roof headlining assembly.
·Check that the corners of the roof headlining are not folded, twisted or otherwise deformed and that none of the mounted parts have fallen off.
·Make sure that the roof headlining does not get caught on anything as it may become bent or damaged.
·Do not damage the roof headlining or vehicle interior.
for Standard Roof:
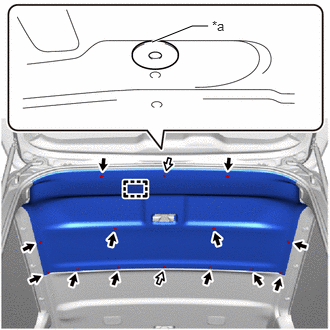
| *a | Plate |
|
|
w/ Plate |
Attach the guide.
Install the rear roof headlining assembly with the 14 clips and 2 plates.
- HINT:
-
When installing the clips indicated by the white arrow, make sure to install the plate between the rear roof headlining assembly.
for High Roof:
w/o Roof Window Glass:
Install the rear roof headlining assembly with the 20 clips and 4 plates.
- HINT:
-
When installing the clips indicated by the white arrow, make sure to install the plate between the rear roof headlining assembly.
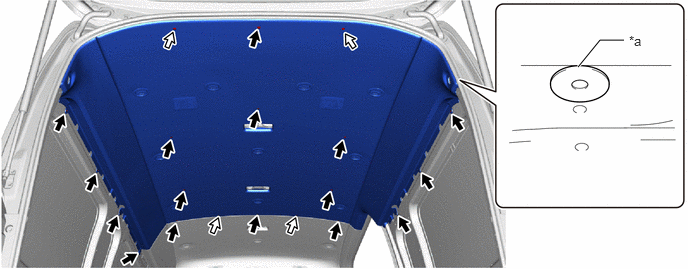
| *a | Plate | - | - |
|
|
w/ Plate | - | - |
w/ Roof Window Glass:
Install the rear roof headlining assembly with the 22 clips and 4 plates.
- HINT:
-
When installing the clips indicated by the white arrow, make sure to install the plate between the rear roof headlining assembly.
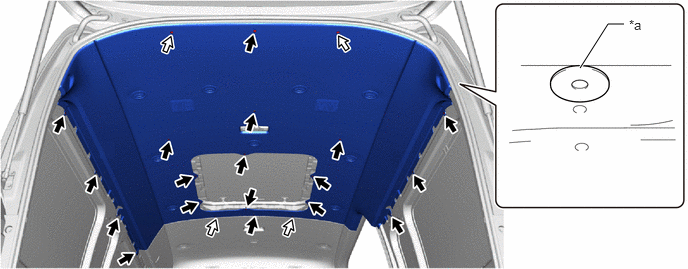
| *a | Plate | - | - |
|
|
w/ Plate | - | - |
63349A
17.INSTALL REAR ROOF HEADLINING GARNISH (w/ Roof Window Glass)
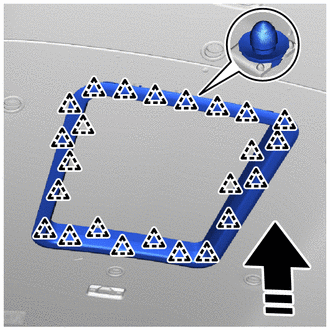
|
|
Install in this Direction |
Attach the clip to install the roof headlining garnish as shown in the illustration.
81240
18.INSTALL NO. 1 ROOM LIGHT ASSEMBLY
81240D
19.INSTALL NO. 2 ROOM LIGHT ASSEMBLY (for High Roof, w/ No. 2 Room Light Assembly)
- HINT:
-
Use the same procedure described for the No. 1 room light assembly.
62440D
20.INSTALL FRONT ROOF SIDE RAIL GARNISH ASSEMBLY LH
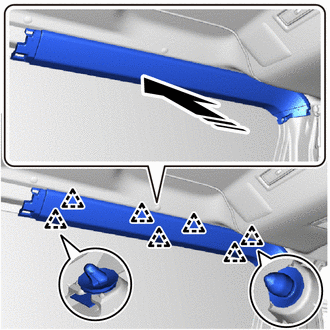
|
|
Install in this Direction |
for Standard Roof:
Attach the clip to install the front roof side rail garnish assembly LH as shown in the illustration.
for High Roof:
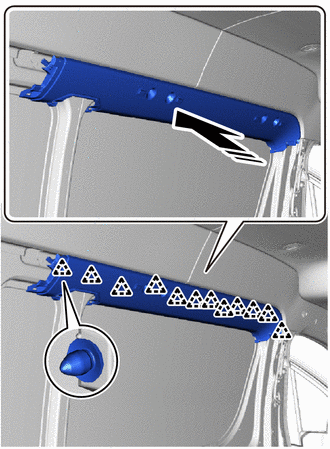
|
|
Install in this Direction |
Attach the clip to install the front roof side rail garnish assembly LH as shown in the illustration.
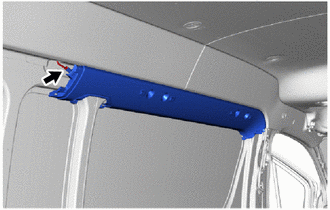
Connect the connector.
62430D
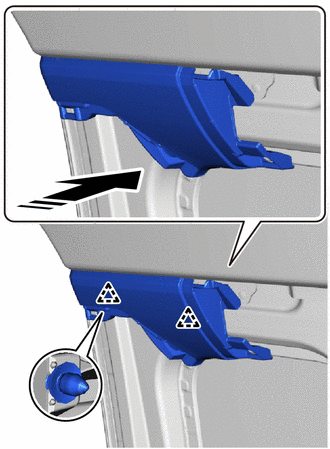
21.INSTALL FRONT ROOF SIDE RAIL GARNISH ASSEMBLY RH (for High Roof)
|
|
Install in this Direction |
Attach the clip to install the front roof side rail garnish assembly RH as shown in the illustration.
62460A
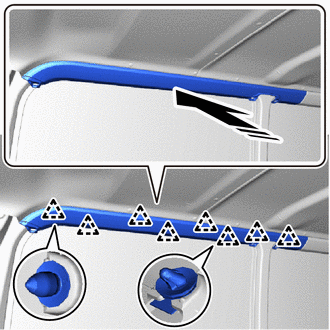
22.INSTALL REAR ROOF SIDE RAIL GARNISH ASSEMBLY LH
|
|
Install in this Direction |
for Standard Roof:
Attach the clip to install the rear roof side rail garnish assembly LH as shown in the illustration.
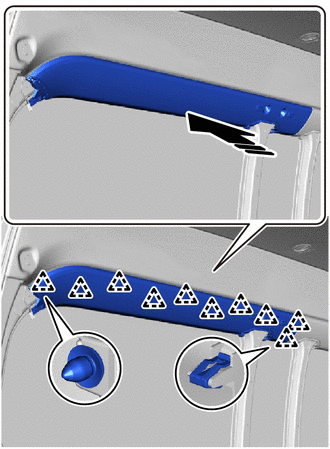
for High Roof:
|
|
Install in this Direction |
Attach the clip to install the rear roof side rail garnish assembly LH as shown in the illustration.
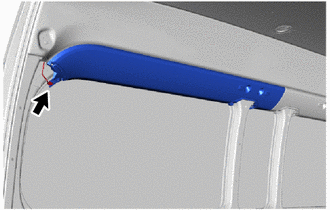
Connect the connector.
62450A
23.INSTALL REAR ROOF SIDE RAIL GARNISH ASSEMBLY RH
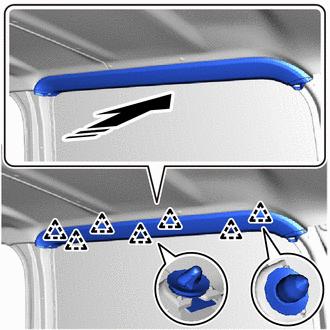
|
|
Install in this Direction |
for Standard Roof:
Attach the clip to install the rear roof side rail garnish assembly RH as shown in the illustration.
for High Roof:
- HINT:
-
Use the same procedure described for the LH side.
62472D
24.INSTALL REAR UPPER PILLAR GARNISH LH
for Standard Roof:
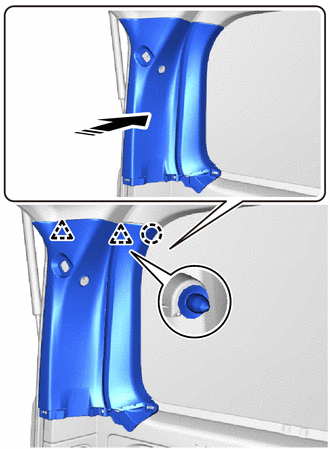
|
|
Install in this Direction |
Attach the clip and claw as shown in the illustration.
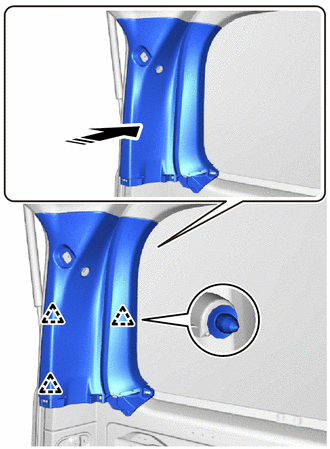
|
|
Install in this Direction |
Attach the clip as shown in the illustration.
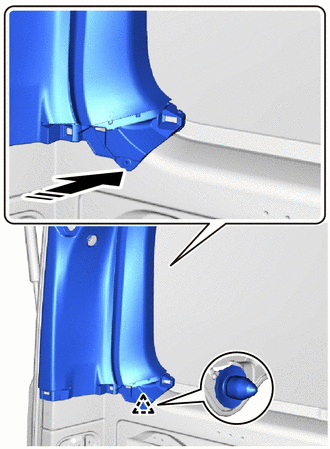
|
|
Install in this Direction |
Attach the clip as shown in the illustration to install the rear upper pillar garnish LH.
for High Roof:
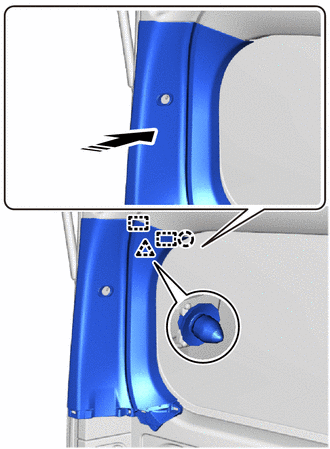
|
|
Install in this Direction |
Attach the clip, claw and guide as shown in the illustration.
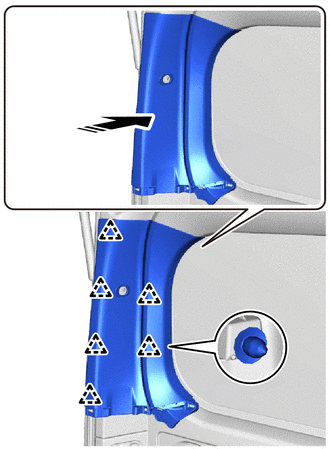
|
|
Install in this Direction |
Attach the clip as shown in the illustration.
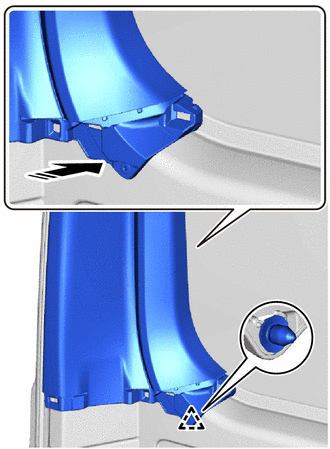
|
|
Install in this Direction |
Attach the clip as shown in the illustration to install the rear upper pillar garnish LH.
62471D
25.INSTALL REAR UPPER PILLAR GARNISH RH
- HINT:
-
Use the same procedure described for the LH side.
72681E
26.INSTALL REAR SEAT HOOK (w/ Seat Hook)
- HINT:
-
Use the same procedure for the other side.
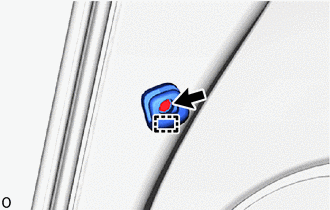
Attach the guide.
Install the rear seat hook with the screw.
62638A
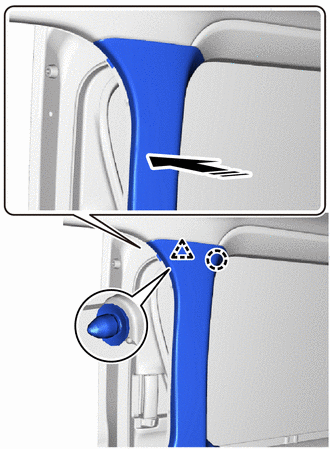
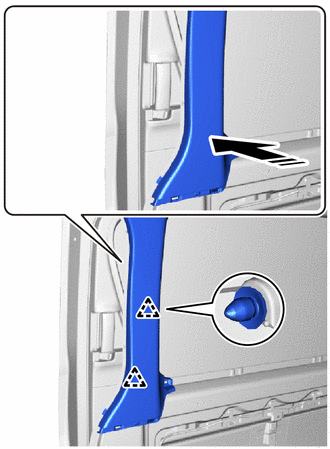
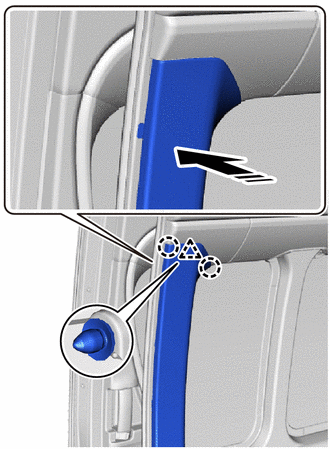
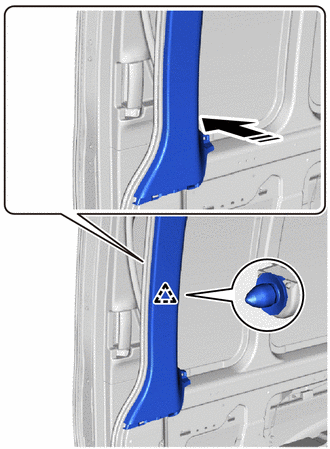
27.INSTALL QUARTER PILLAR GARNISH RH
for Standard Roof:
|
|
Install in this Direction |
Attach the claw and clip as shown in the illustration.
|
|
Install in this Direction |
Attach the clip as shown in the illustration to install the quarter pillar garnish RH.
for High Roof:
|
|
Install in this Direction |
Attach the claw and clip as shown in the illustration.
|
|
Install in this Direction |
Attach the clip as shown in the illustration to install the quarter pillar garnish RH.
62412
28.INSTALL CENTER PILLAR GARNISH LH
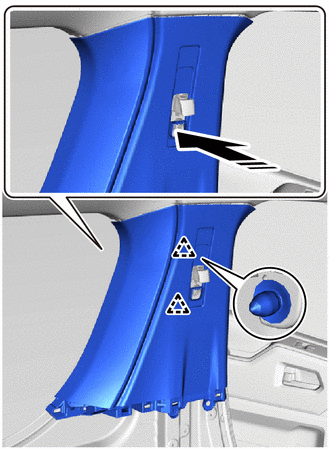
|
|
Install in this Direction |
Attach the clip as shown in the illustration.
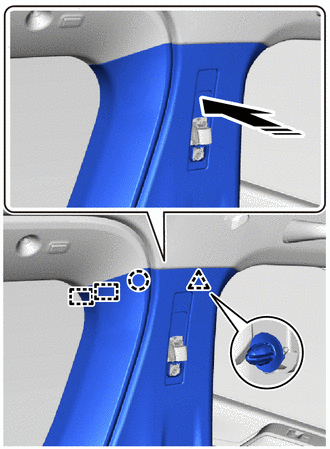
|
|
Install in this Direction |
Attach the clip, claw and guide as shown in the illustration.
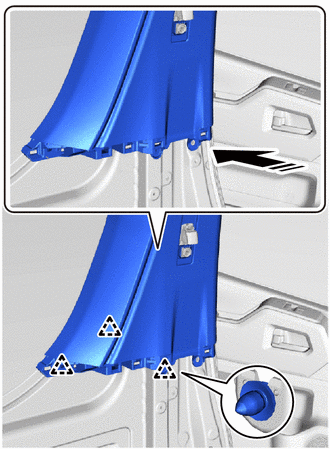
|
|
Install in this Direction |
Attach the clip as shown in the illustration to install the center pillar garnish LH.
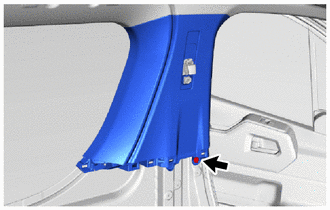
Install the clip.
62639A
29.INSTALL QUARTER PILLAR GARNISH LH
for Standard Body:
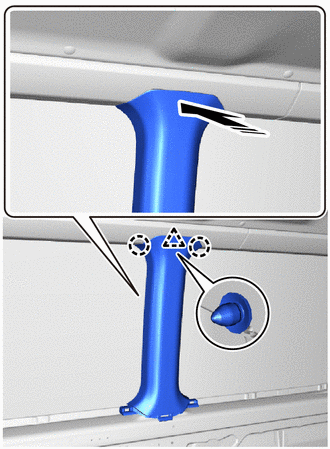
|
|
Install in this Direction |
Attach the clip and claw as shown in the illustration.
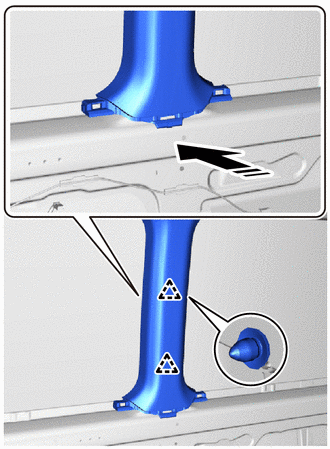
|
|
Install in this Direction |
Attach the clip as shown in the illustration to install the quarter pillar garnish LH.
for High Roof:
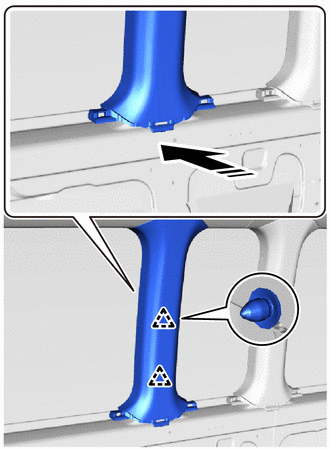
|
|
Install in this Direction |
Attach the clip as shown in the illustration.
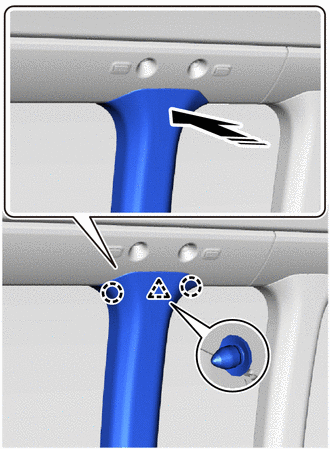
|
|
Install in this Direction |
Attach the clip and claw as shown in the illustration to install the quarter pillar garnish LH.
62639A
30.INSTALL QUARTER PILLAR GARNISH LH (for High Roof)
- HINT:
-
Use the same procedure to install the quarter pillar garnish LH the other side.
62638A
31.INSTALL QUARTER PILLAR GARNISH RH (for High Roof)
- HINT:
-
Use the same procedure described for the LH side.
62610K
32.INSTALL SIDE TRIM BOARD ASSEMBLY RH (for High Roof)
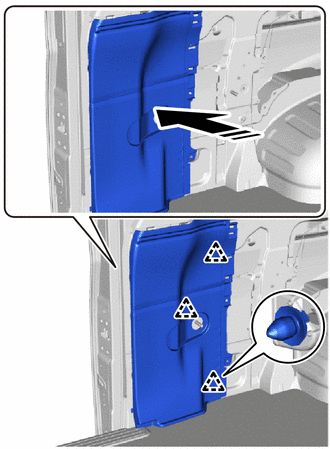
|
|
Install in this Direction |
Attach the clip as shown in the illustration.
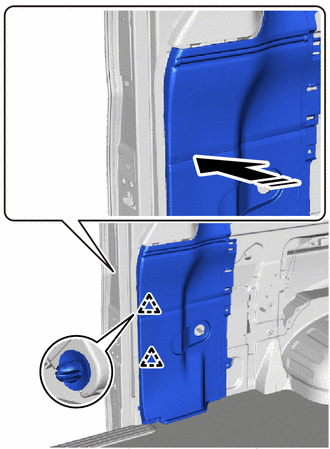
|
|
Install in this Direction |
Attach the clip as shown in the illustration.
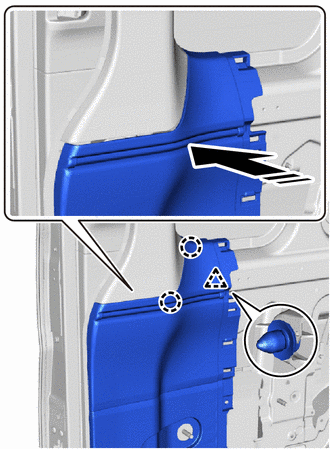
|
|
Install in this Direction |
Attach the clip and claw as shown in the illustration.
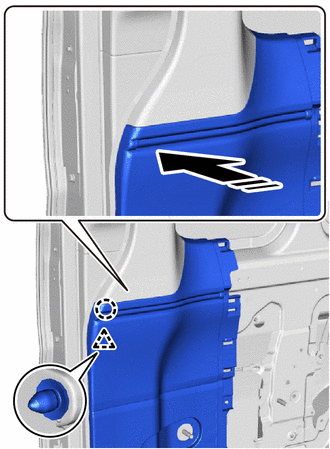
|
|
Install in this Direction |
Attach the clip and claw as shown in the illustration to install the side trim board assembly RH.
74680
33.INSTALL PILLAR ASSIST GRIP ASSEMBLY C (w/ Assist Grip)
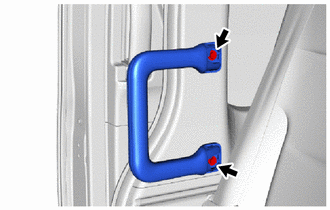
Install the pillar assist grip assembly C with the 2 bolts.
74617A
34.INSTALL ASSIST GRIP PLUG (w/ Assist Grip)
- HINT:
-
Use the same procedure for both assist grip plugs.
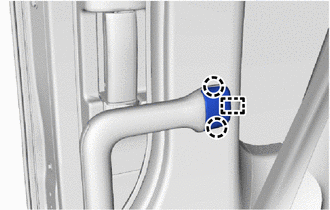
Attach the guide and claw to install the assist grip plug.
62520B
35.INSTALL QUARTER TRIM PANEL ASSEMBLY LH
w/ USB Charger:
Connect the connector.
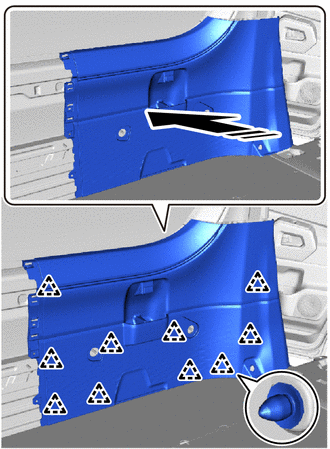
|
|
Install in this Direction |
Attach the clip as shown in the illustration.
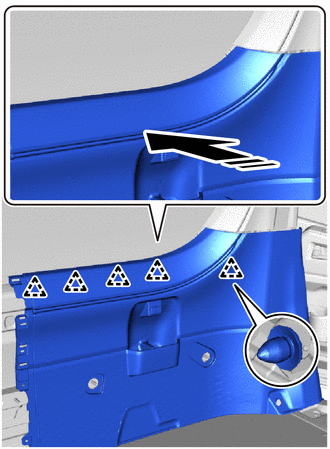
|
|
Install in this Direction |
Attach the clip as shown in the illustration.
|
|
Install in this Direction |
Attach the clip as shown in the illustration.
|
|
Install in this Direction |
Attach the clip and claw as shown in the illustration.
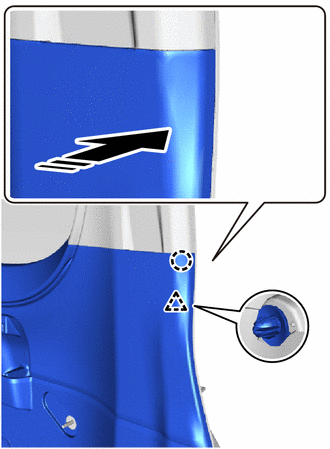
|
|
Install in this Direction |
Attach the clip and claw as shown in the illustration to install the quarter trim panel assembly LH.
62620K
36.INSTALL SIDE TRIM BOARD ASSEMBLY LH (for High Roof)
w/ USB Charger:
Connect the connector.
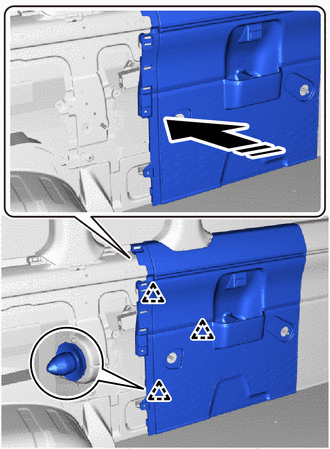
|
|
Install in this Direction |
Attach the clip as shown in the illustration.
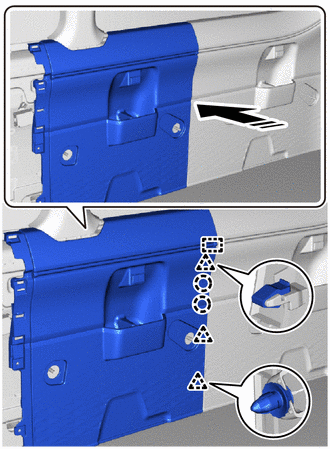
|
|
Install in this Direction |
Attach the clip, claw and guide as shown in the illustration.
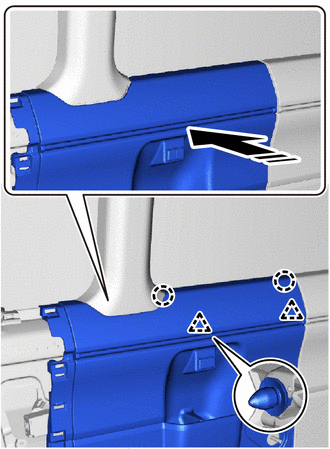
|
|
Install in this Direction |
Attach the clip and claw as shown in the illustration.
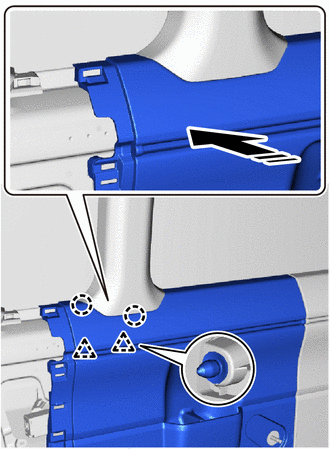
|
|
Install in this Direction |
Attach the clip and claw as shown in the illustration to install the side trim board assembly LH.
62640M
37.INSTALL REAR QUARTER TRIM BOARD ASSEMBLY LH
w/ USB Charger:
Connect the connector.
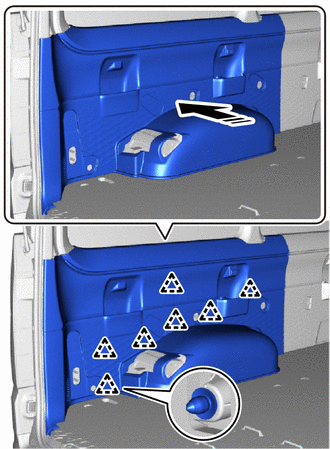
|
|
Install in this Direction |
Attach the clip as shown in the illustration.
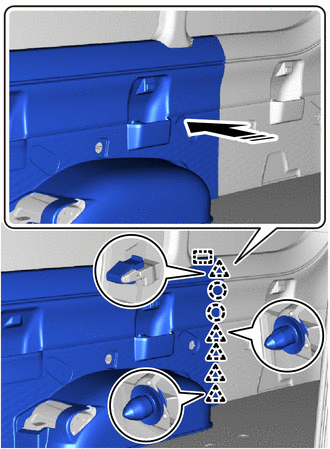
|
|
Install in this Direction |
Attach the clip, claw and guide as shown in the illustration.
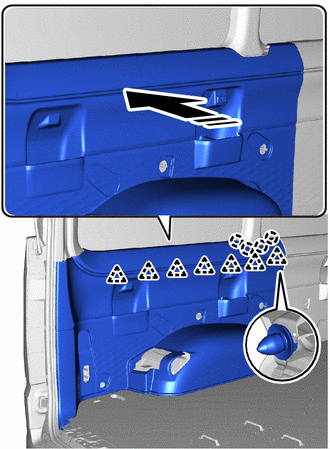
|
|
Install in this Direction |
Attach the clip and claw as shown in the illustration.
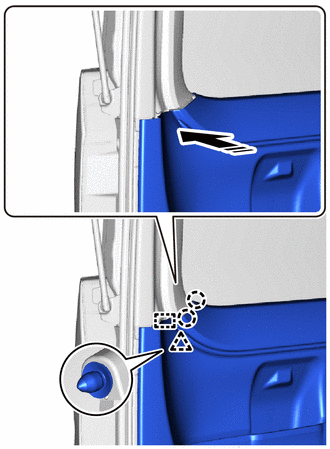
|
|
Install in this Direction |
Attach the clip, claw and guide as shown in the illustration.
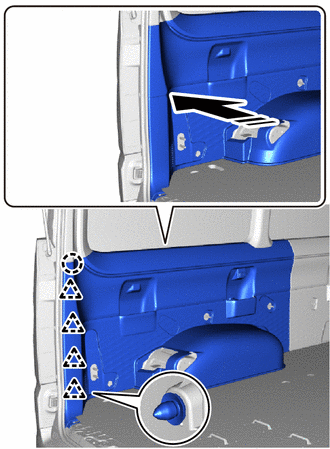
|
|
Install in this Direction |
Attach the clip and claw as shown in the illustration to install the rear quarter trim board assembly LH.
62630L
38.INSTALL REAR QUARTER TRIM BOARD ASSEMBLY RH
for Standard Roof:
w/ USB Charger:
Connect the connector.
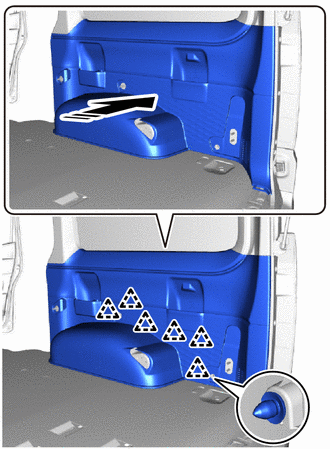
|
|
Install in this Direction |
Attach the clip as shown in the illustration.
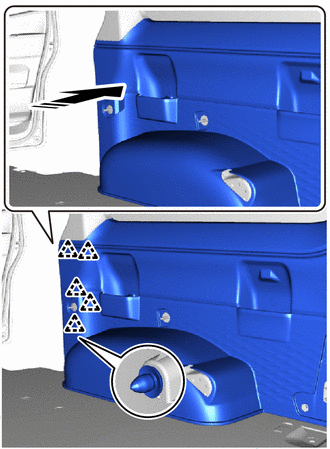
|
|
Install in this Direction |
Attach the clip as shown in the illustration.
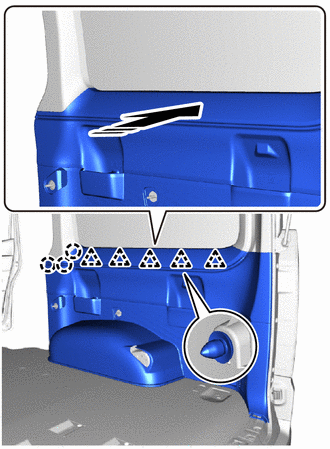
|
|
Install in this Direction |
Attach the clip and claw as shown in the illustration.
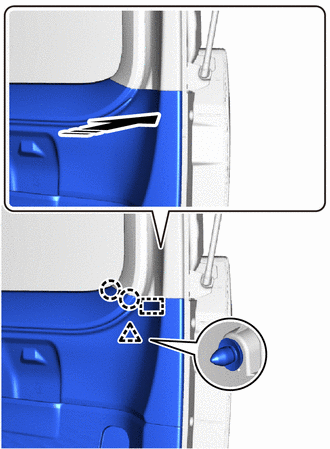
|
|
Install in this Direction |
Attach the clip, claw and guide as shown in the illustration.
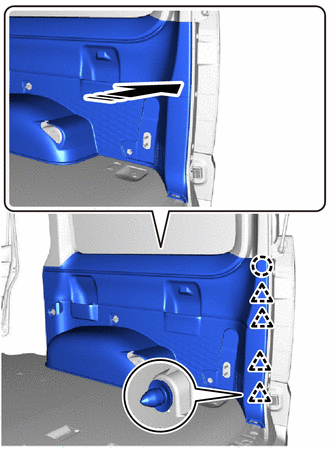
|
|
Install in this Direction |
Attach the clip and claw as shown in the illustration to install the rear quarter trim board assembly RH.
for High Roof:
- HINT:
-
Use the same procedure described for the LH side.
58777A
39.INSTALL TOOL BAG HOLDER
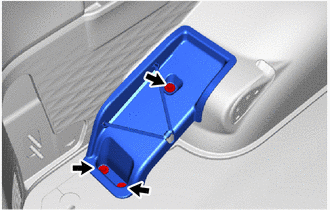
Install the tool bag holder with the 3 bolts.
- Torque:
- 5.5 N*m (56 kgf*cm, 49 in.*lbf)
73370E
40.INSTALL REAR SEAT OUTER BELT ASSEMBLY LH (w/ Seat Belt)
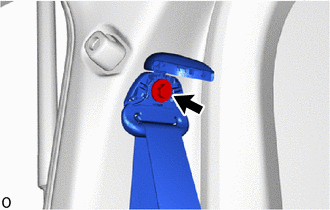
Install the bolt.
- Torque:
- 42 N*m (428 kgf*cm, 31 ft.*lbf)
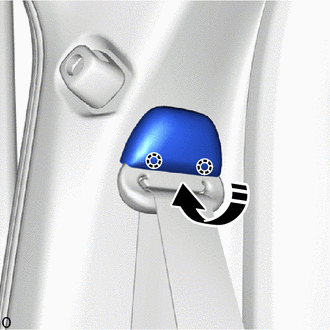
|
|
Close in this Direction |
Attach the claw and close the cover as shown in the illustration.
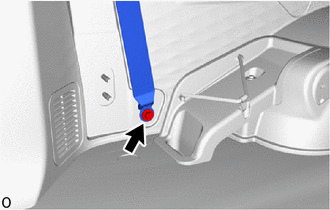
Install the floor anchor of the rear seat outer belt assembly LH with the bolt.
- Torque:
- 42 N*m (428 kgf*cm, 31 ft.*lbf)
73360D
41.INSTALL REAR SEAT OUTER BELT ASSEMBLY RH (w/ Seat Belt)
- HINT:
-
Use the same procedure described for the LH side.
67935
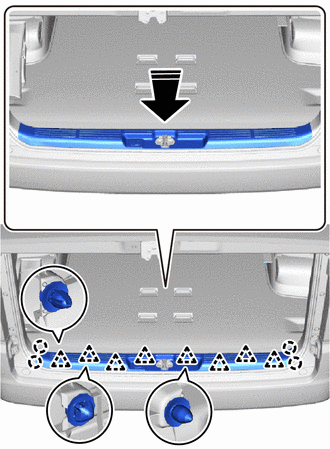
42.INSTALL BACK DOOR SCUFF PLATE
|
|
Install in this Direction |
Attach the claw and clip to install the back door scuff plate.
62411
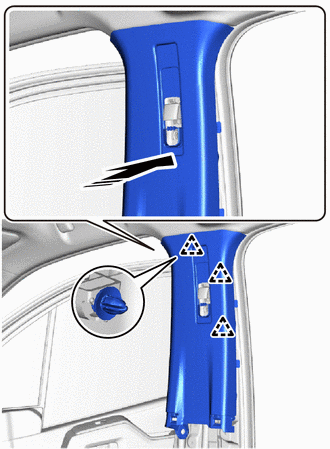
43.INSTALL CENTER PILLAR GARNISH RH
|
|
Install in this Direction |
Attach the clip as shown in the illustration.
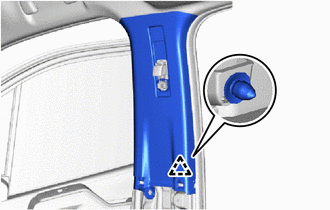
Attach the clip to install the center pillar garnish RH.
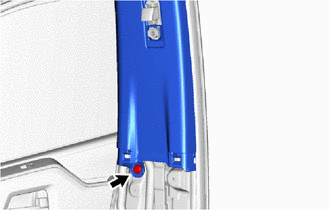
Install the clip.
62413A
44.INSTALL LOWER CENTER PILLAR GARNISH RH
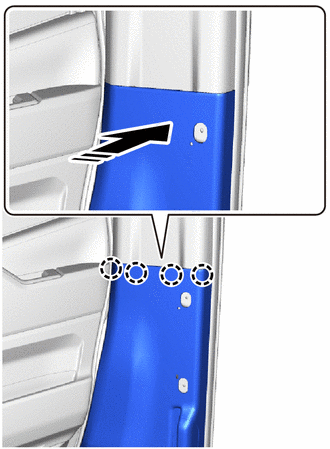
|
|
Install in this Direction |
Attach the claw as shown in the illustration.
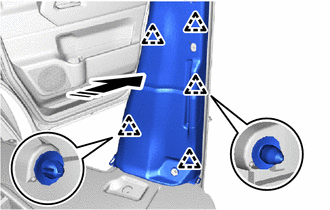
|
|
Install in this Direction |
Attach the clip as shown in the illustration to install the lower center pillar garnish RH.
67871E
45.INSTALL NO. 1 SLIDE DOOR WEATHERSTRIP RH
74680
46.INSTALL PILLAR ASSIST GRIP ASSEMBLY B (w/ Assist Grip)
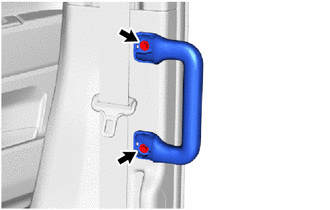
Install the pillar assist grip assembly B with the 2 bolts.
74617A
47.INSTALL ASSIST GRIP PLUG (w/ Assist Grip)
- HINT:
-
Use the same procedure for both assist grip plugs.
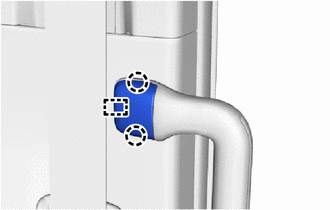
Attach the guide and claw to install the assist grip plug.
67917C
48.INSTALL REAR DOOR SCUFF PLATE RH
w/ Scuff Plate Light:
Connect the connector.
w/ Interior Illumination:
Connect the connector.
for Standard Roof:
|
|
Install in this Direction |
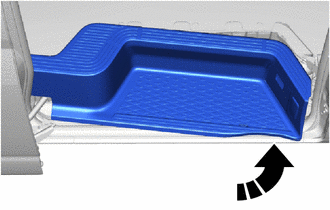
Temporarily install the rear door scuff plate RH in the direction indicated by the arrow shown in the illustration.
|
|
Install in this Direction |
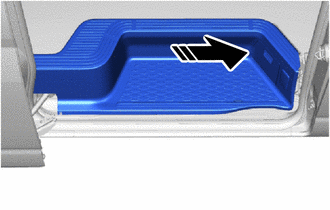
Move the rear door scuff plate RH toward the front of the vehicle.
|
|
Install in this Direction |
w/ Power Slide Door:
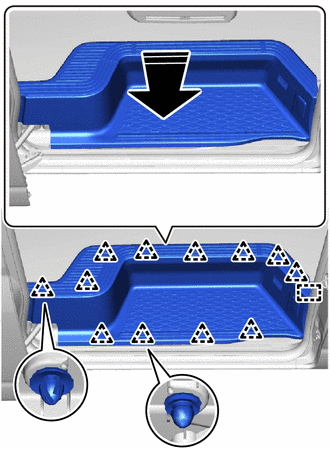
Attach the clip and guide as shown in the illustration to install the rear door scuff plate RH.
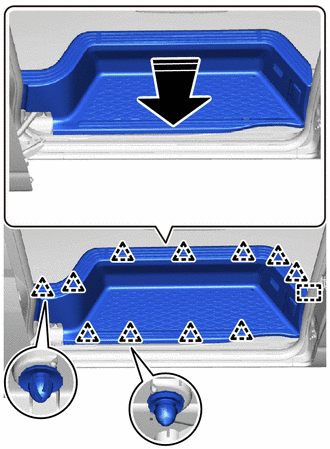
|
|
Install in this Direction |
w/o Power Slide Door:
Attach the clip and guide as shown in the illustration to install the rear door scuff plate RH.
for High Roof:
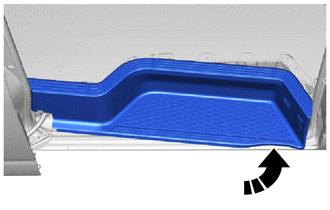
|
|
Install in this Direction |
Temporarily install the rear door scuff plate RH in the direction indicated by the arrow shown in the illustration.
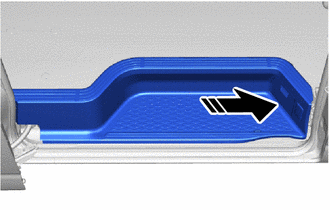
|
|
Install in this Direction |
Move the rear door scuff plate RH toward the front of the vehicle.
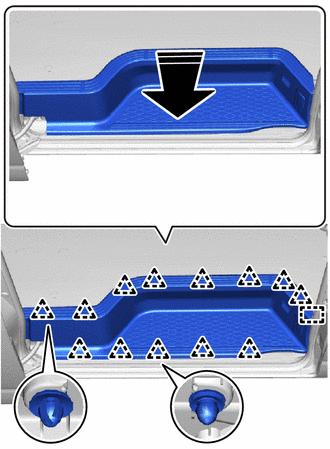
|
|
Install in this Direction |
w/ Power Slide Door:
Attach the clip and guide as shown in the illustration to install the rear door scuff plate RH.
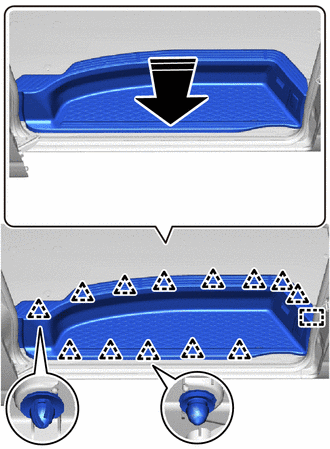
|
|
Install in this Direction |
w/o Power Slide Door:
Attach the clip and guide as shown in the illustration to install the rear door scuff plate RH.
74708
49.INSTALL NO. 2 HAND GRIP FRAME SUB-ASSEMBLY (for RHD, w/ Hand Rail)
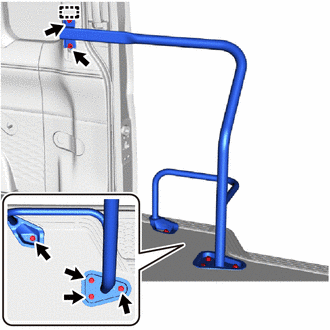
Attach the guide.
Install the No. 2 hand grip frame sub-assembly with the 6 bolts.
- Torque:
- 27 N*m (275 kgf*cm, 20 ft.*lbf)
74733
50.INSTALL NO. 1 HAND GRIP COVER (for RHD, w/ Hand Rail)
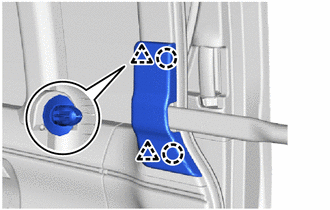
Attach the claw and clip to install the No. 1 hand grip cover.
73220
51.INSTALL FRONT SEAT OUTER BELT ASSEMBLY LH
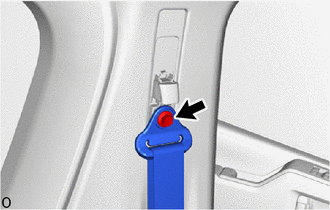
Install the bolt.
- Torque:
- 42 N*m (428 kgf*cm, 31 ft.*lbf)
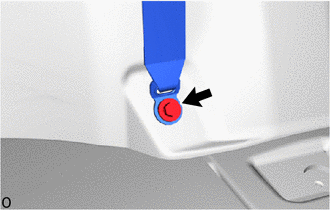
Install the floor anchor of the front seat outer belt assembly LH with the bolt.
- Torque:
- 42 N*m (428 kgf*cm, 31 ft.*lbf)
73210
52.INSTALL FRONT SEAT OUTER BELT ASSEMBLY RH
- HINT:
-
Use the same procedure described for the LH side.
73233
53.INSTALL OUTER LAP BELT ANCHOR COVER
73178C
54.INSTALL SEAT BELT ANCHOR COVER CAP
55.INSTALL REAR SEAT ASSEMBLY LH
for Folding Type:
Click hereVehicle Interior>SEAT>REAR SEAT ASSEMBLY (for Folding Type)>INSTALLATION
for Commuter, 3-Passenger Seat with 2-Point Type Seat Belt:
for Commuter, 4-Passenger Seat:
Click hereVehicle Interior>SEAT>REAR SEAT ASSEMBLY (for Commuter, 4-Passenger Seat)>INSTALLATION
for Commuter, 2-Passenger Seat with 2-Point Type Seat Belt and Headrest:
for Commuter, 2-Passenger Seat with 2-Point Type Seat Belt without Headrest:
56.INSTALL REAR SEAT ASSEMBLY RH
for Commuter, Single-Passenger Seat with 2-Point Type Seat Belt:
for Commuter, 2-Passenger Seat with 2-Point Type Seat Belt without Headrest:
- HINT:
-
Use the same procedure described for the LH side.
57.INSTALL FRONT SEAT ASSEMBLY
for Separate Seat Type:
Click hereVehicle Interior>SEAT>FRONT SEAT ASSEMBLY (for Separate Seat Type)>INSTALLATION
for Fixed Bench Seat Type:
Click hereVehicle Interior>SEAT>FRONT SEAT ASSEMBLY (for Fixed Bench Seat Type)>INSTALLATION
for Sliding Bench Seat Type:
Click hereVehicle Interior>SEAT>FRONT SEAT ASSEMBLY (for Sliding Bench Seat Type)>INSTALLATION
62212
58.INSTALL FRONT PILLAR GARNISH LH
w/ Curtain Shield Airbag:
Peel off the adhesive tape and remove the protective cover.
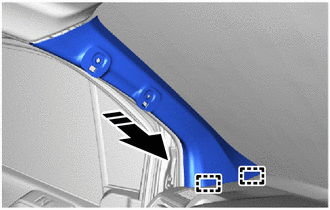
|
|
Install in this Direction |
Insert the guide in the direction indicated by the arrow shown in the illustration.
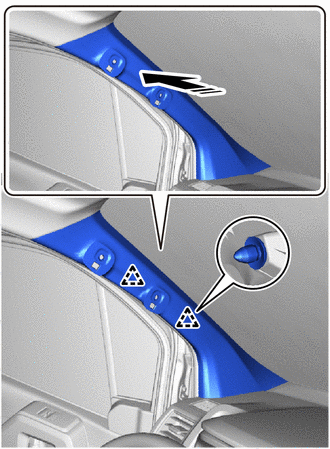
|
|
Install in this Direction |
Push in the direction indicated by the arrow shown in the illustration to attach the clip to install the front pillar garnish LH.
62211
59.INSTALL FRONT PILLAR GARNISH RH
- HINT:
-
Use the same procedure described for the LH side.
74680
60.INSTALL PILLAR ASSIST GRIP ASSEMBLY LH
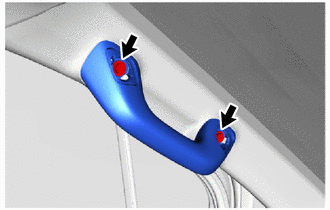
Install the pillar assist grip assembly LH with the 2 bolts.
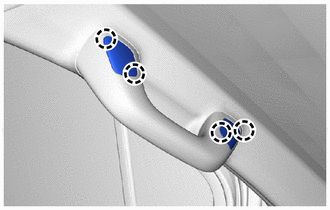
Attach the claw to install the 2 assist grip covers.
74680
61.INSTALL PILLAR ASSIST GRIP ASSEMBLY RH
- HINT:
-
Use the same procedure described for the LH side.
62312B
62.INSTALL FRONT DOOR OPENING TRIM WEATHERSTRIP LH
62311B
63.INSTALL FRONT DOOR OPENING TRIM WEATHERSTRIP RH
- HINT:
-
Use the same procedure described for the LH side.
62112
64.INSTALL COWL SIDE TRIM BOARD LH
62111C
65.INSTALL COWL SIDE TRIM BOARD RH
- HINT:
-
Use the same procedure described for the LH side.
67914B
66.INSTALL FRONT DOOR SCUFF PLATE LH
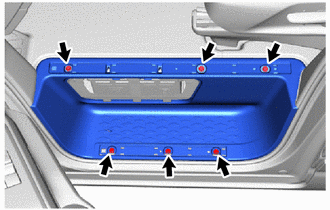
Attach the claw to install the front door scuff plate LH.
Install the 6 bolts.
67912A
67.INSTALL FRONT DOOR OUTSIDE SCUFF PLATE LH
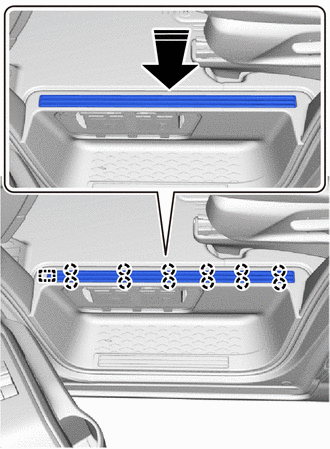
|
|
Install in this Direction |
for Upper Side:
Attach the guide and claw as shown in the illustration to install the front door outside scuff plate LH.
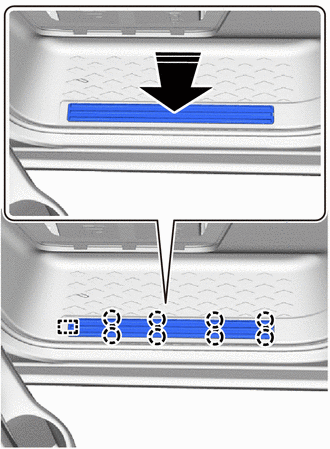
|
|
Install in this Direction |
for Lower Side:
Attach the guide and claw as shown in the illustration to install the front door outside scuff plate LH.
67913B
68.INSTALL FRONT DOOR SCUFF PLATE RH
- HINT:
-
Use the same procedure described for the LH side.
67911B
69.INSTALL FRONT DOOR OUTSIDE SCUFF PLATE RH
- HINT:
-
Use the same procedure described for the LH side.
61890A
70.INSTALL BACK WINDOW GLASS HAMMER ASSEMBLY (w/ Hammer)
71.CONNECT CABLE TO NEGATIVE BATTERY TERMINAL (w/ Airbag System)
for 7GR-FKS:
for 1GD-FTV:
72. INITIALIZATION AFTER RECONNECTING BATTERY TERMINAL (w/ Airbag System)
Click hereGeneral>SETUP>WHEN DISCONNECTING OR RECONNECTING BATTERY TERMINAL>WORK PROCEDURE
- HINT:
-
When disconnecting and reconnecting the battery, there is an automatic learning function that completes learning when the respective system is used.
-
Click hereGeneral>SETUP>WHEN DISCONNECTING OR RECONNECTING BATTERY TERMINAL>AUTOMATIC LEARNING CHART
73. PERFORM DIAGNOSTIC SYSTEM CHECK (w/ Airbag System)
74.CHECK SRS WARNING LIGHT (w/ Airbag System)
75.INSPECT SEAT BELT WARNING SYSTEM (w/ Seat Belt Warning System)