INTERIOR PANELS / TRIM INSTRUMENT PANEL SAFETY PAD INSTALLATION
CAUTION / NOTICE / HINT
- HINT:
- ·
Use the same procedure for RHD and LHD vehicles.
·The procedure listed below is for LHD vehicles.
PROCEDURE

 55301
1.INSTALL INSTRUMENT PANEL SUB-ASSEMBLY (except Wagon)
When installing a new instrument panel sub-assembly:
Immediately before installing the instrument panel sub-assembly, twist and cut off the portion as shown in the illustration.
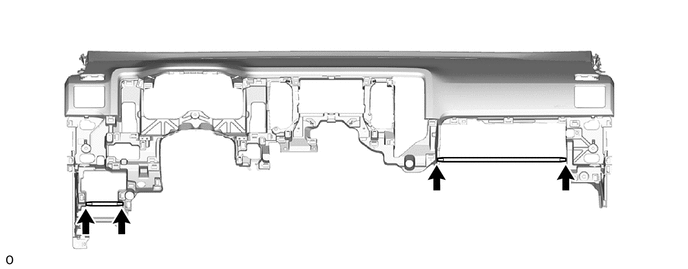
for LHD:
Push in the direction indicated by the arrow shown in the illustration and insert the guide to set the instrument panel sub-assembly.
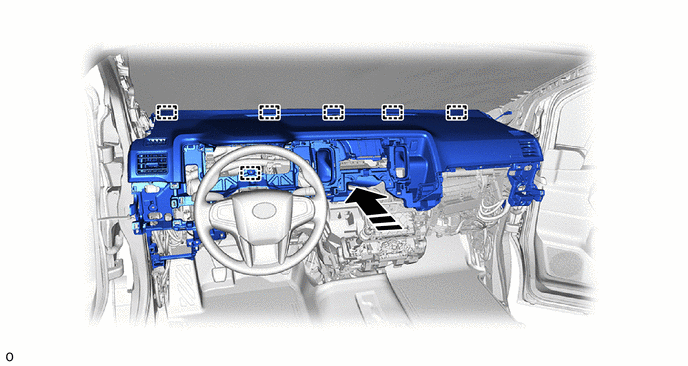

|
Install in this Direction | - | - |
Install the instrument panel sub-assembly with the 7 bolts <B>, nut <G> and 2 clips <F>.
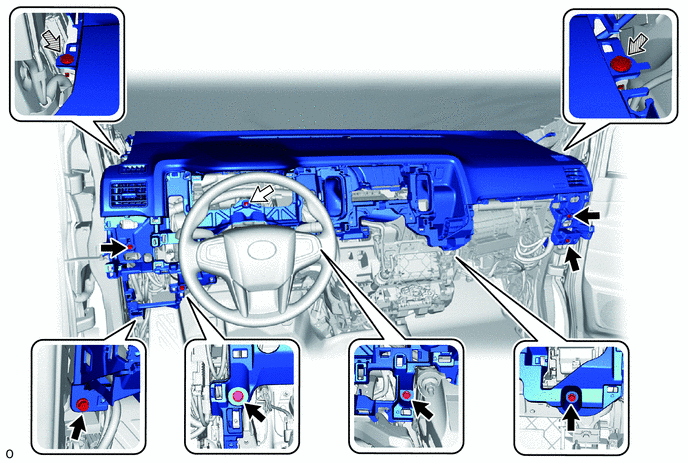

|
Bolt <B> | 
|
Nut <G> |

|
Clip <F> | - | - |
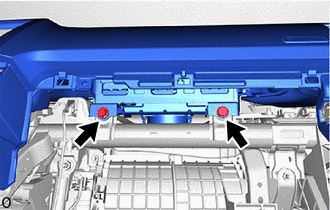
|
|
Bolt <D> |
Install the 2 bolts <D>.
- Torque:
- 20 N*m (204 kgf*cm, 15 ft.*lbf)
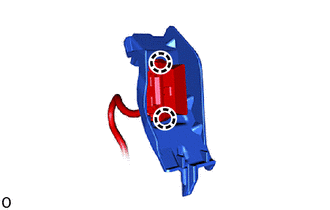
Attach the claw to install the DLC3.
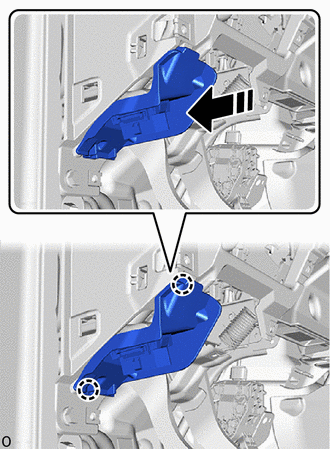
|
|
Install in this Direction |
Attach the claw to install the connector holder as shown in the illustration.
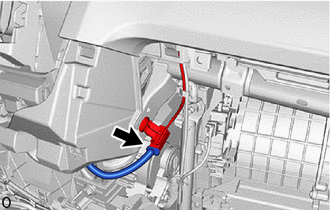
w/Telematics Transceiver:
Connect the connector.
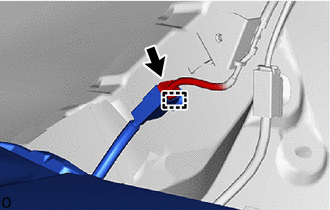
Connect the connector and attach the clamp.
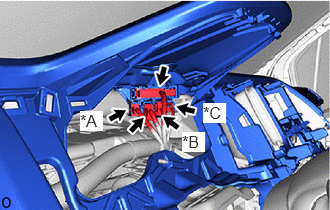
| *A | w/ Solar Sensor |
| *B | w/ Front Passenger Airbag |
| *C | w/ Parking Assist Monitor System |
Connect each connector.
for RHD:
Push in the direction indicated by the arrow shown in the illustration and insert the guide to set the instrument panel sub-assembly.
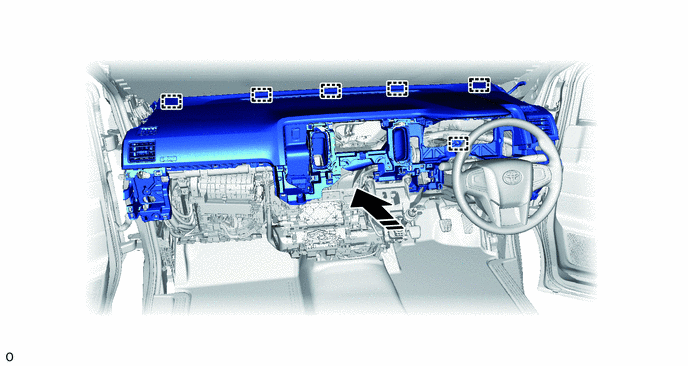
|
|
Install in this Direction | - | - |
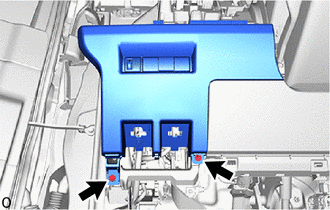
Install the instrument panel sub-assembly with the 7 bolts <B>, nut <G> and 2 clips <F>.
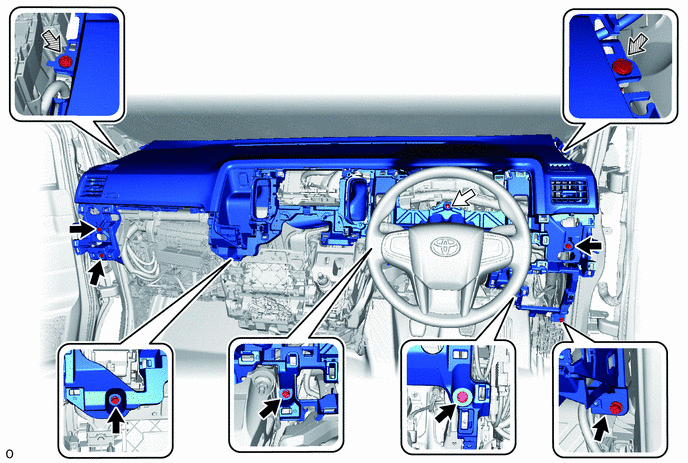
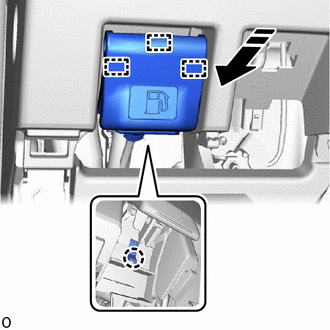
|
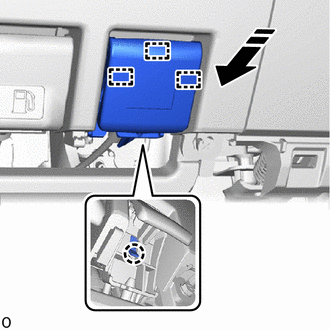
|
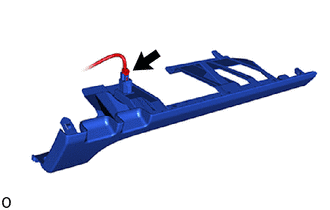
Bolt <B> |
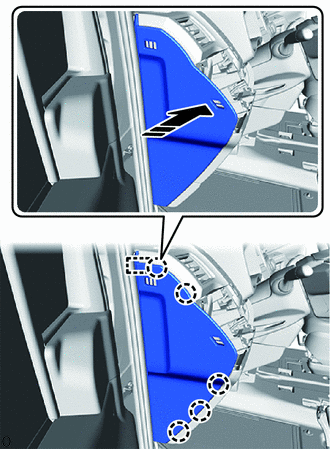
|
Nut <G> |
|
|
Clip <F> | - | - |
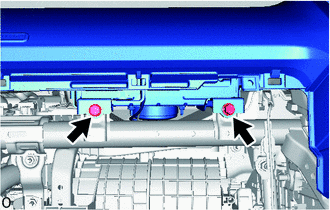
|
|
Bolt <D> |
Install the 2 bolts <D>.
- Torque:
- 20 N*m (204 kgf*cm, 15 ft.*lbf)
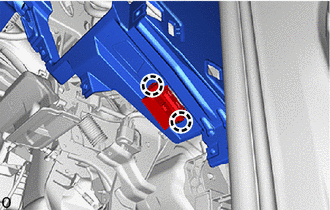
Attach the claw to install the DLC3.
Connect the connector and attach the clamp.
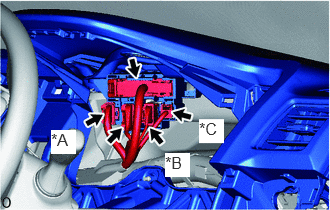
| *A | w/ Solar Sensor or w/ Blind Spot Monitor System |
| *B | w/ Front Passenger Airbag |
| *C | w/ Parking Assist Monitor System |
Connect each connector.
55301
2.INSTALL INSTRUMENT PANEL SUB-ASSEMBLY (for Wagon)
When installing a new instrument panel sub-assembly:
Immediately before installing the instrument panel sub-assembly, twist and cut off the portion as shown in the illustration.
for LHD:
Push in the direction indicated by the arrow shown in the illustration and insert the guide to set the instrument panel sub-assembly.
|
|
Install in this Direction | - | - |
Install the instrument panel sub-assembly with the 7 bolts <B>, nut <G> and 2 clips <F>.
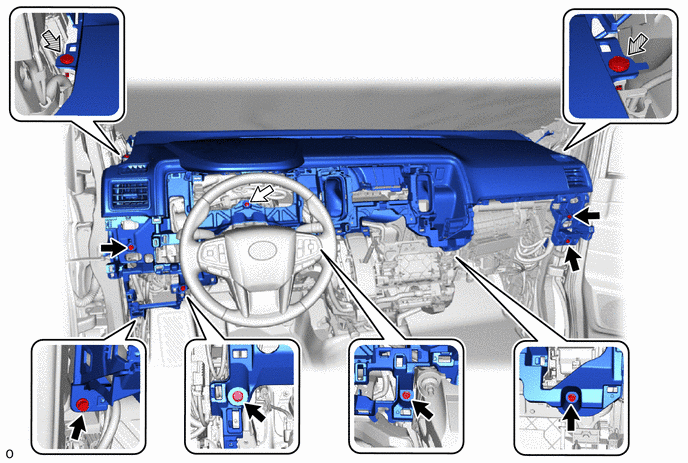
|
|
Bolt <B> |
|
Nut <G> |
|
|
Clip <F> | - | - |
|
|
Bolt <D> |
Install the 2 bolts <D>.
- Torque:
- 20 N*m (204 kgf*cm, 15 ft.*lbf)
Attach the claw to install the DLC3.
|
|
Install in this Direction |
Attach the claw to install the connector holder as shown in the illustration.
w/Telematics Transceiver:
Connect the connector.
Connect the connector and attach the clamp.
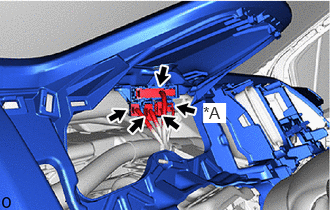
| *A | w/ Parking Assist Monitor System |
Connect each connector.
for RHD:
Push in the direction indicated by the arrow shown in the illustration and insert the guide to set the instrument panel sub-assembly.
|
|
Install in this Direction | - | - |
Install the instrument panel sub-assembly with the 7 bolts <B>, nut <G> and 2 clips <F>.
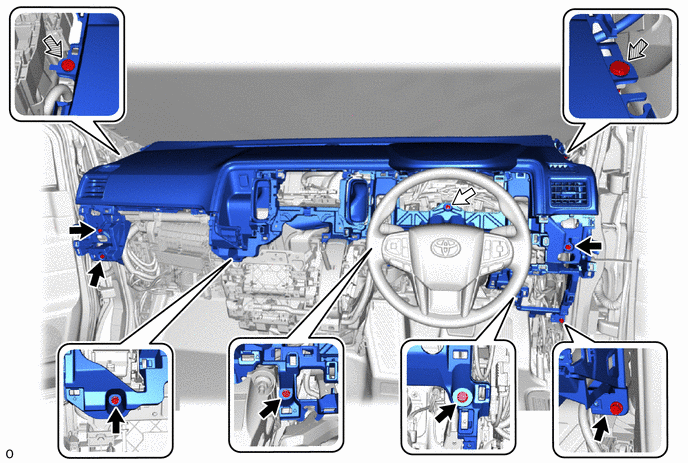
|
|
Bolt <B> |
|
Nut <G> |
|
|
Clip <F> | - | - |
|
|
Bolt <D> |
Install the 2 bolts <D>.
- Torque:
- 20 N*m (204 kgf*cm, 15 ft.*lbf)
Attach the claw to install the DLC3.
Connect the connector and attach the clamp.
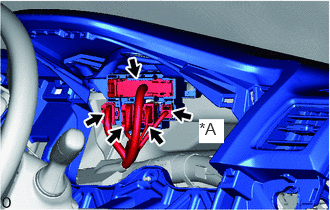
| *A | w/ Parking Assist Monitor System |
Connect each connector.
3.INSTALL TRANSMISSION INSTRUMENT PANEL SHIFT ASSEMBLY (for Automatic Transmission)
62212
4.INSTALL FRONT PILLAR GARNISH LH
except Wagon:
Click hereVehicle Interior>INTERIOR PANELS / TRIM>ROOF HEADLINING (for Full-trim)>INSTALLATION
for Wagon:
Click hereVehicle Interior>INTERIOR PANELS / TRIM>ROOF HEADLINING (for Wagon)>INSTALLATION
62211
5.INSTALL FRONT PILLAR GARNISH RH
- HINT:
-
Use the same procedure described for the LH side.
74680
6.INSTALL PILLAR ASSIST GRIP ASSEMBLY LH
74680
7.INSTALL PILLAR ASSIST GRIP ASSEMBLY RH
- HINT:
-
Use the same procedure described for the LH side.
62312B
8.INSTALL FRONT DOOR OPENING TRIM WEATHERSTRIP LH
Install the front door opening trim weatherstrip LH.
62311B
9.INSTALL FRONT DOOR OPENING TRIM WEATHERSTRIP RH
- HINT:
-
Use the same procedure described for the LH side.
55314A
10.INSTALL CENTER LOWER INSTRUMENT PANEL (for Semi-trim)
When installing a new center lower instrument panel:
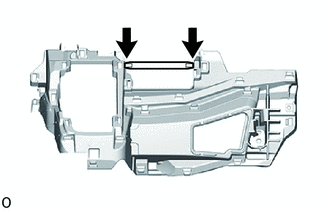
Immediately before installing the center lower instrument panel, twist and cut off the portion as shown in the illustration.
for Automatic Transmission:
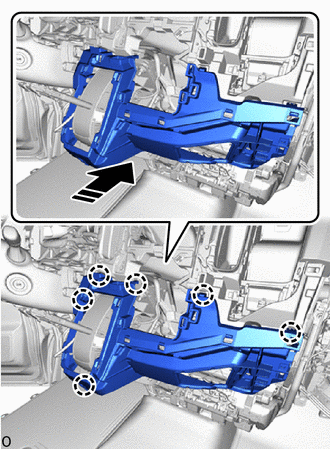
|
|
Install in this Direction |
Attach the claw to install the center lower instrument panel.
for Manual Transmission:
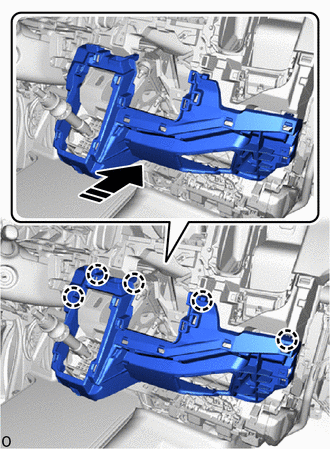
|
|
Install in this Direction |
Attach the claw to install the center lower instrument panel.
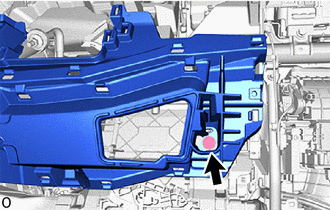
|
|
Screw <C> |
Install the screw <C>.
55314A
11.INSTALL CENTER LOWER INSTRUMENT PANEL (for Full-trim)
When installing a new center lower instrument panel:
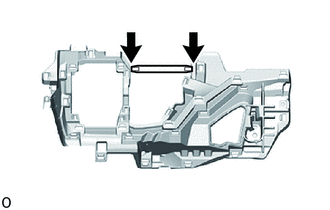
Immediately before installing the center lower instrument panel, twist and cut off the portion as shown in the illustration.
for Automatic Transmission:
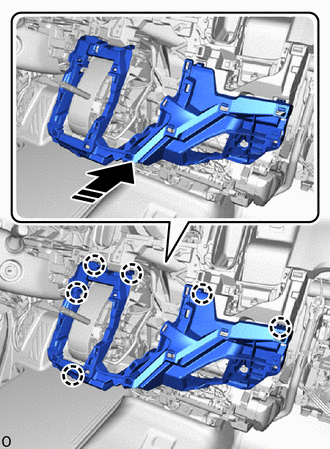
|
|
Install in this Direction |
Attach the claw to install the center lower instrument panel.
for Manual Transmission:
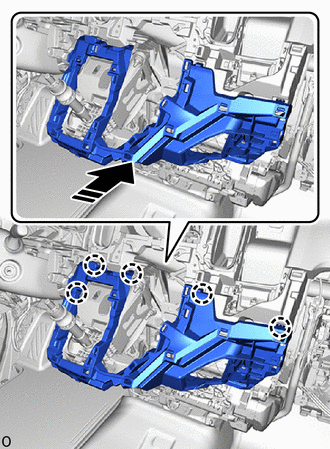
|
|
Install in this Direction |
Attach the claw to install the center lower instrument panel.
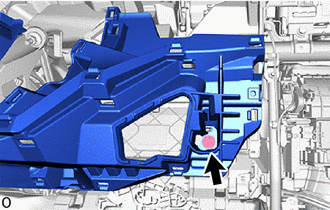
|
|
Screw <C> |
Install the screw <C>.
55476A
12.INSTALL NO. 3 INSTRUMENT CLUSTER FINISH PANEL GARNISH
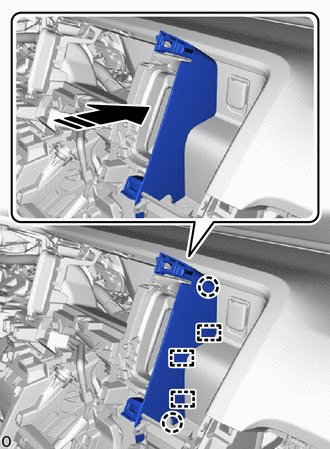
|
|
Install in this Direction |
Attach the guide and claw to install the No. 3 instrument cluster finish panel garnish as shown in the illustration.
55447C
13.INSTALL NO. 2 SWITCH HOLE BASE
Connect each connector.
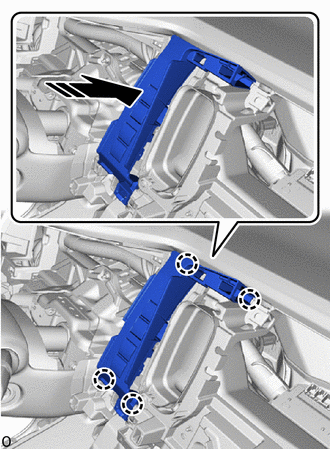
|
|
Install in this Direction |
Attach the claw to install the No. 2 switch hole base as shown in the illustration.
55446A
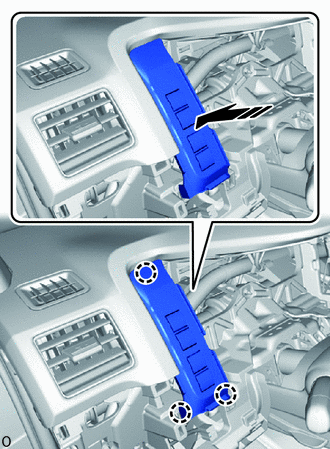
14.INSTALL NO. 1 SWITCH HOLE BASE
|
|
Install in this Direction |
Attach the claw to install the No. 1 switch hole base as shown in the illustration.
55680A
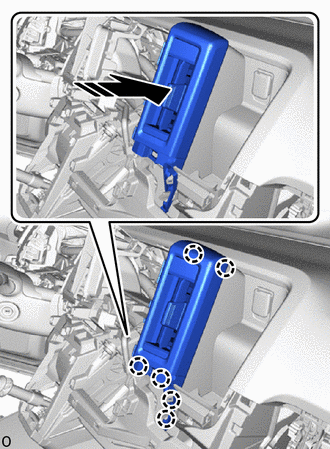
15.INSTALL NO. 4 INSTRUMENT PANEL REGISTER ASSEMBLY
|
|
Install in this Direction |
Attach the claw to install the No. 4 instrument panel register assembly as shown in the illustration.
55670
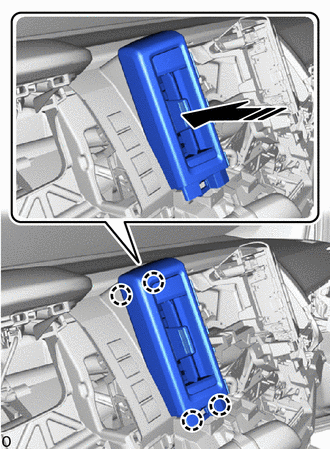
16.INSTALL NO. 3 INSTRUMENT PANEL REGISTER ASSEMBLY
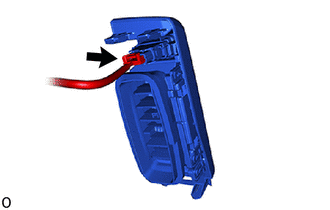
Connect the connector.
|
|
Install in this Direction |
Attach the claw to install the No. 3 instrument panel register assembly as shown in the illustration.
83100
17.INSTALL COMBINATION METER ASSEMBLY
55404E
18.INSTALL UPPER INSTRUMENT CLUSTER FINISH PANEL SUB-ASSEMBLY
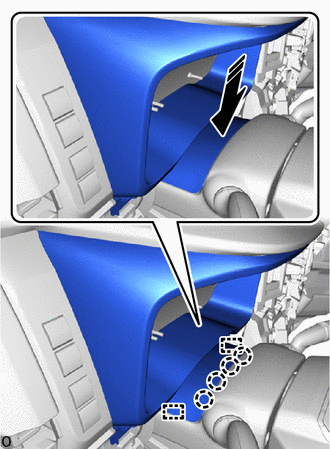
|
|
Install in this Direction |
Attach the guide and claw.
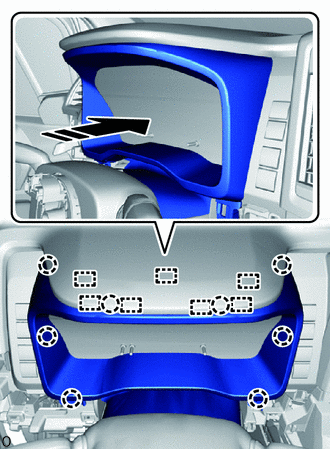
|
|
Install in this Direction |
Attach the guide and claw to install the upper instrument cluster finish panel sub-assembly.
55413D
19.INSTALL CENTER LOWER INSTRUMENT CLUSTER FINISH PANEL
for Semi-trim:
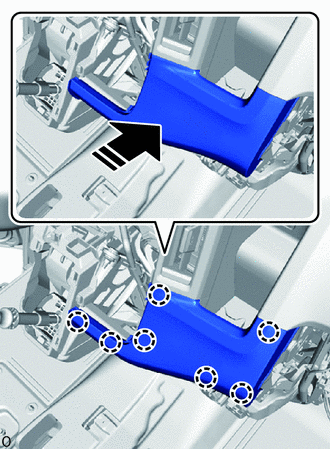
|
|
Install in this Direction |
Attach the claw to install the center lower instrument cluster finish panel.
for Full-trim:
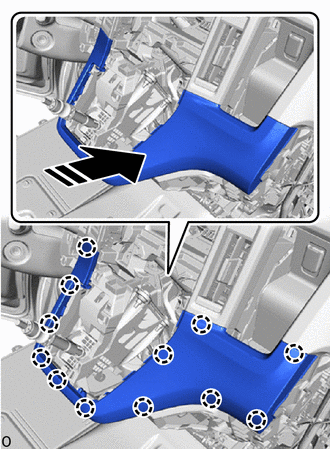
|
|
Install in this Direction |
Attach the claw to install the center lower instrument cluster finish panel.
55414A
20.INSTALL INSTRUMENT CLUSTER FINISH PANEL END (for Semi-trim)
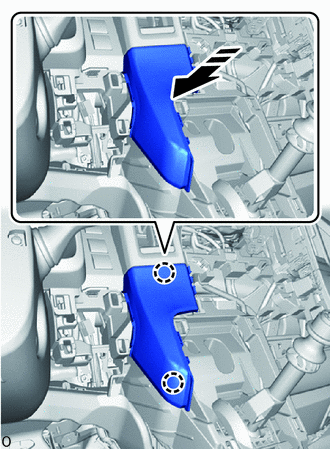
|
|
Install in this Direction |
Attach the claw to install the instrument cluster finish panel end.
55320
21.INSTALL LOWER NO. 2 INSTRUMENT PANEL ASSEMBLY
w/ Illumination:
Connect the connector.
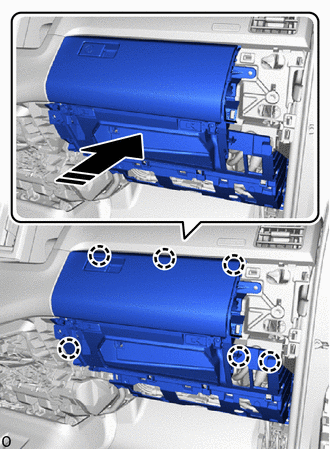
|
|
Install in this Direction |
Attach the claw to install the lower No. 2 instrument panel assembly.
Open the glove compartment door assembly.
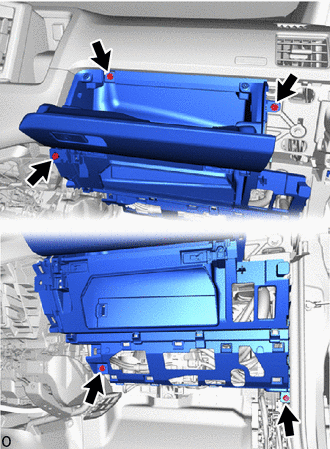
|
|
Bolt <B> |
Install the 5 bolts <B>.
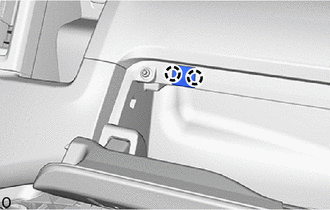
Attach the claw to install the instrument panel box door knob.
Close the glove compartment door assembly.
55434B
22.INSTALL CENTER LOWER INSTRUMENT PANEL FINISH PANEL
for Semi-trim:
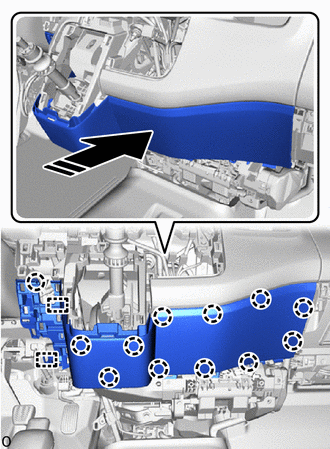
|
|
Install in this Direction |
Attach the guide and claw to install the center lower instrument panel finish panel.
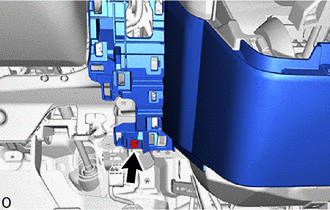
|
|
Bolt <B> |
Install the bolt <B>.
for Full-trim:
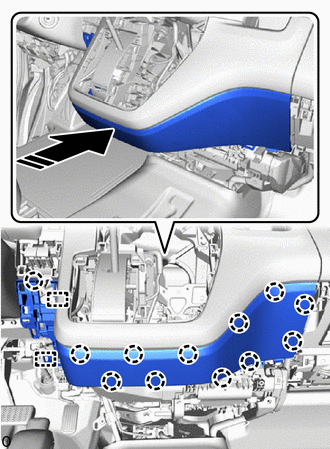
|
|
Install in this Direction |
Attach the guide and claw to install the center lower instrument panel finish panel.
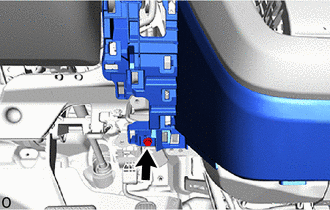
|
|
Bolt <B> |
Install the bolt <B>.
23.INSTALL RADIO TUNER OPENING COVER WITH BRACKET (w/ Radio Receiver Opening Cover)
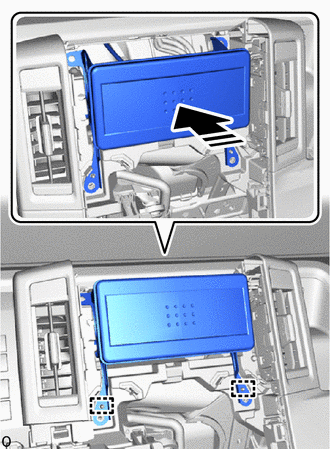
|
|
Install in this Direction |
Attach the guide to install the radio tuner opening cover with bracket as shown in the illustration.
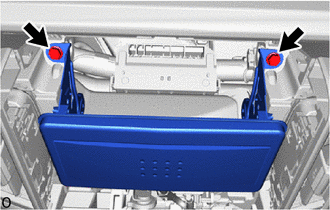
Install the 2 bolts.
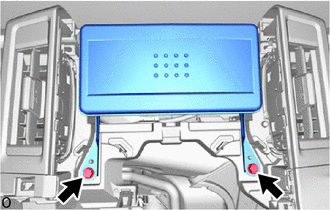
Install the 2 bolts.
24.INSTALL DISPLAY AND NAVIGATION ASSEMBLY WITH BRACKET (w/ Navigation System)
25.INSTALL RADIO AND DISPLAY RECEIVER ASSEMBLY WITH BRACKET (for Radio and Display Type)
26.INSTALL RADIO RECEIVER ASSEMBLY WITH BRACKET (for Radio Receiver Type)
55410C
27.INSTALL INSTRUMENT CLUSTER FINISH PANEL ASSEMBLY
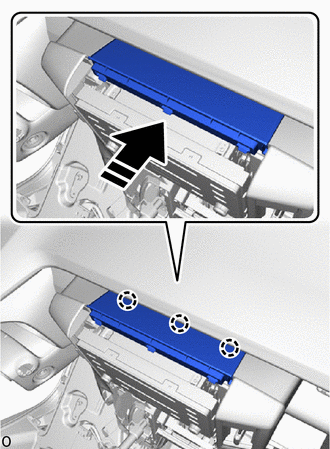
|
|
Install in this Direction |
Attach the claw to install the instrument cluster finish panel assembly.
55900
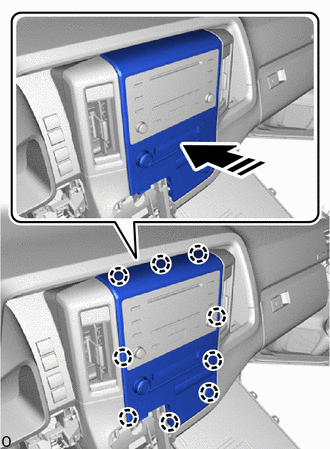
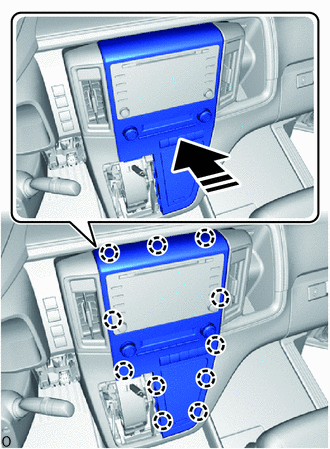
28.INSTALL AIR CONDITIONING CONTROL ASSEMBLY (for Automatic Air Conditioning System)
for Semi-trim:
Connect each connector.
|
|
Install in this Direction |
Attach the claw to install the air conditioning control assembly.
for Full-trim:
Connect each connector.
|
|
Install in this Direction |
Attach the claw to install the air conditioning control assembly.
55405B
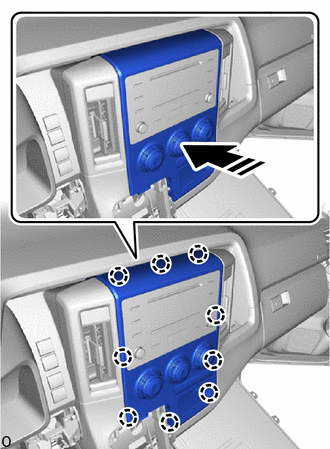
29.INSTALL CENTER INSTRUMENT CLUSTER FINISH PANEL SUB-ASSEMBLY (for Manual Air Conditioning System)
for Semi-trim:
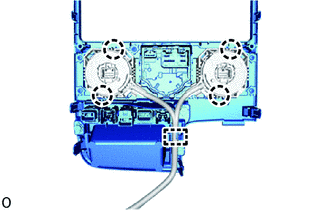
Attach the guide and claw to install the No. 2 heater control cable sub-assembly and air mix damper control cable sub-assembly.
Connect each connector.
|
|
Install in this Direction |
Attach the claw to install the center instrument cluster finish panel sub-assembly.
for Full-trim:
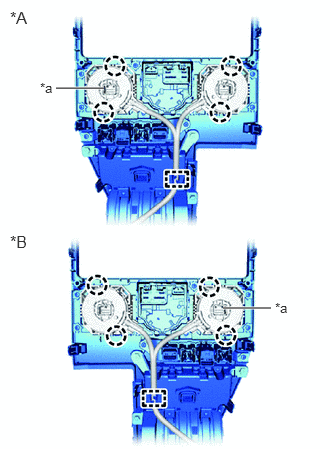
| *A | for LHD |
| *B | for RHD |
| *a | Heater Control Knob |
Attach the guide and claw to install the No. 2 heater control cable sub-assembly and air mix damper control cable sub-assembly.
Connect each connector.
| Location | Color |
|---|---|
| Heater Control Knob x Wire Harness Connector | Gray |
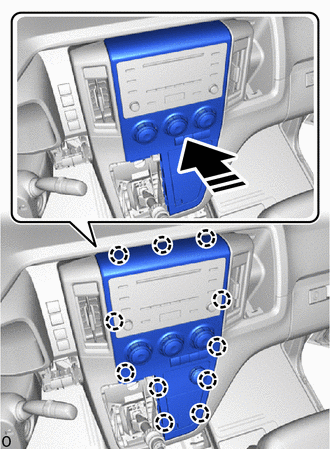
|
|
Install in this Direction |
Attach the claw to install the center instrument cluster finish panel sub-assembly.
35970F
30.INSTALL POSITION INDICATOR HOUSING ASSEMBLY (for Automatic Transmission)
for Semi-trim:
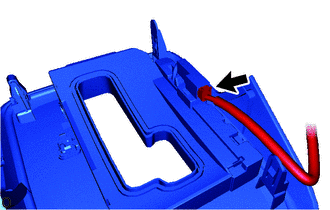
Connect the connector.
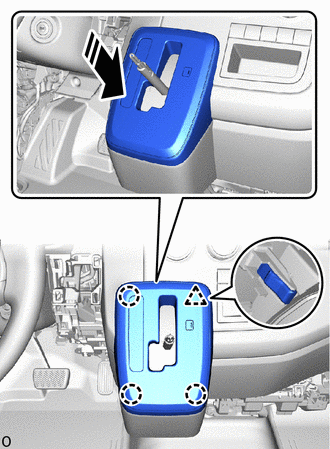
|
|
Install in this Direction |
Attach the clip and claw to install the position indicator housing assembly.
for Full-trim:
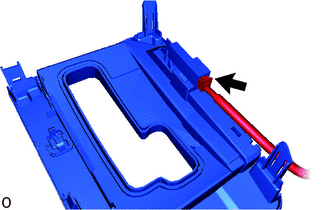
Connect the connector.
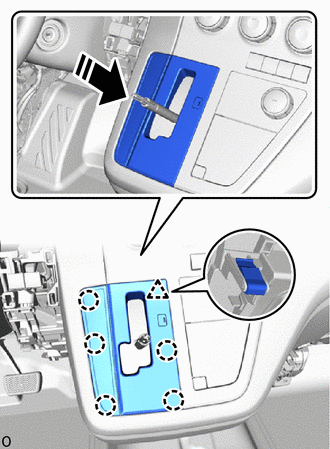
|
|
Install in this Direction |
Attach the clip and claw to install the position indicator housing assembly.
58840Q
31.INSTALL SHIFTING HOLE COVER ASSEMBLY (for Manual Transmission)
for Semi-trim:
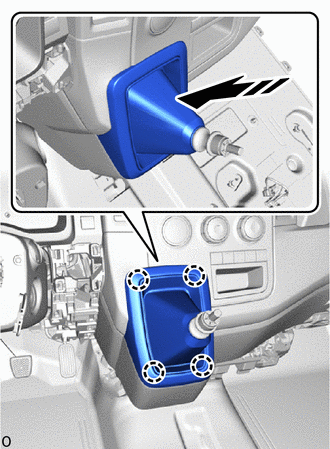
|
|
Install in this Direction |
Attach the claw to install the shifting hole cover assembly.
for Full-trim:
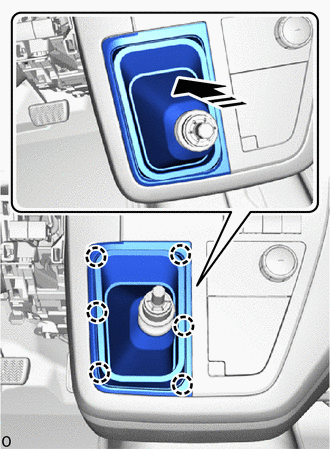
|
|
Install in this Direction |
Attach the claw to install the shifting hole cover assembly.
33504F
32.INSTALL SHIFT LEVER KNOB SUB-ASSEMBLY (for Automatic Transmission)
33622
33.INSTALL NO. 1 SHIFT LEVER KNOB COVER (for Automatic Transmission)
33504F
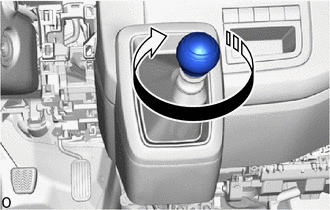
34.INSTALL SHIFT LEVER KNOB SUB-ASSEMBLY (for Manual Transmission)
|
|
Install in this Direction |
Twist the shift lever knob sub-assembly in the direction indicated by the arrow to install it.
55634
35.INSTALL NO. 3 INSTRUMENT PANEL UNDER TRAY SUPPORT (for Wagon)
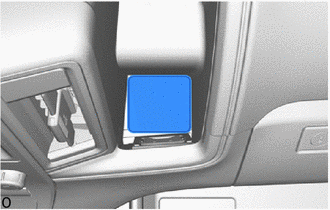
Install the No. 3 instrument panel under tray support.
55646
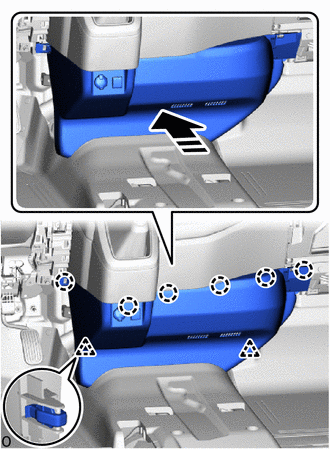
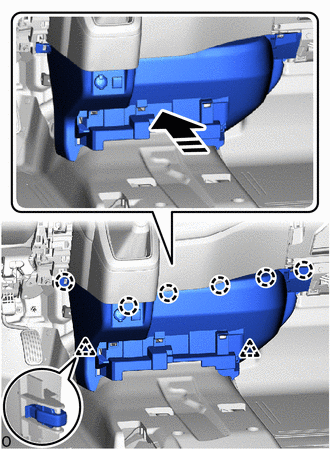
36.INSTALL NO. 3 INSTRUMENT PANEL UNDER COVER
w/o Console Tray:
Connect each connector.
|
|
Install in this Direction |
Attach the clip and claw to install the No. 3 instrument panel under cover.
w/ Console Tray:
Connect each connector.
|
|
Install in this Direction |
Attach the clip and claw to install the No. 3 instrument panel under cover.
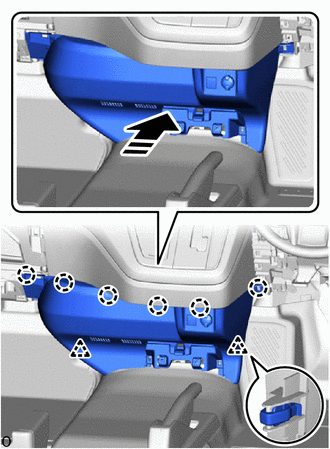
for Wagon, w/o Console Box:
Connect each connector.
|
|
Install in this Direction |
Attach the clip and claw to install the No. 3 instrument panel under cover.
58534E
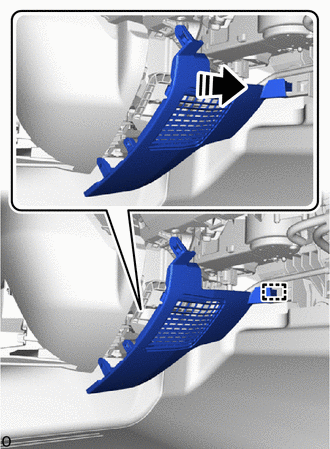
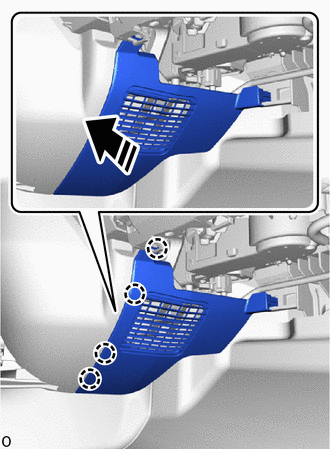
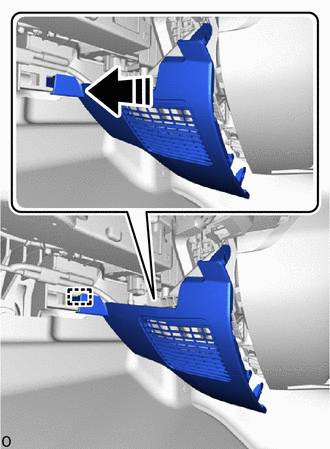
37.INSTALL CENTER FLOOR CARPET COVER LH
for LHD:
|
|
Insert in this Direction |
Insert the guide in the direction indicated by the arrow shown in the illustration.
|
|
Install in this Direction |
Attach the claw to install the center floor carpet cover LH.
for RHD:
|
|
Insert in this Direction |
Insert the guide in the direction indicated by the arrow shown in the illustration.
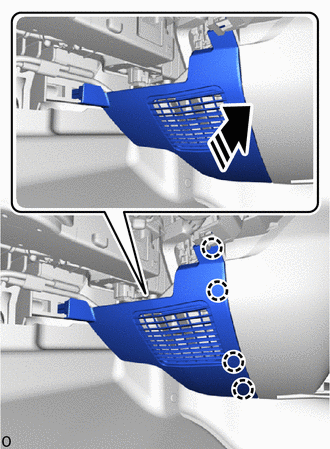
|
|
Install in this Direction |
Attach the claw to install the center floor carpet cover LH.
58533C
38.INSTALL CENTER FLOOR CARPET COVER RH
for LHD:
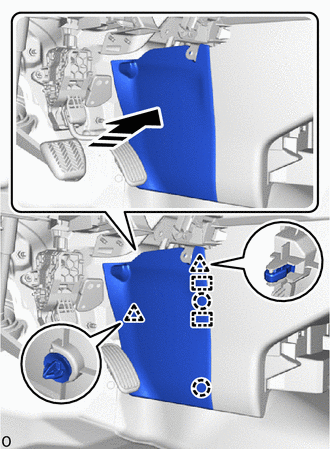
|
|
Install in this Direction |
Attach the guide, claw and clip to install the center floor carpet cover RH.
for RHD:
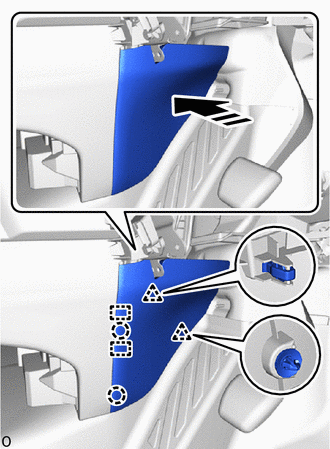
|
|
Install in this Direction |
Attach the guide, claw and clip to install the center floor carpet cover RH.
39.INSTALL FRONT CONSOLE BOX (w/ Console Tray)
73900
40.INSTALL LOWER NO. 1 INSTRUMENT PANEL AIRBAG ASSEMBLY (w/ Knee Airbag)
55313
41.INSTALL LOWER INSTRUMENT PANEL LH (w/o Knee Airbag)
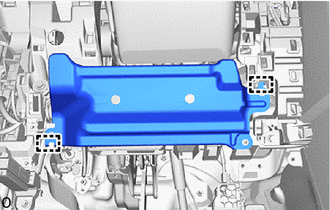
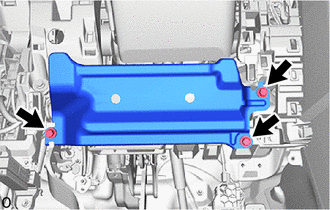
Attach the guide to set the lower instrument panel LH.
|
|
Bolt <E> |
Install the lower instrument panel LH with the 3 bolts <E>.
55445B
42.INSTALL INSTRUMENT PANEL FINISH PLATE (w/o Knee Airbag)
|
|
Install in this Direction |
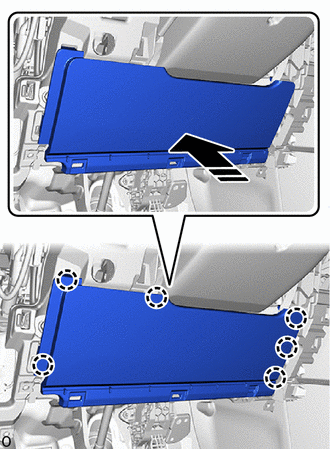
Attach the claw to install the instrument panel finish plate.
55433B
43.INSTALL LOWER NO. 2 INSTRUMENT PANEL FINISH PANEL
for Automatic Air Conditioning System:
|
|
Connector |
|
|
Aspirator Hose |
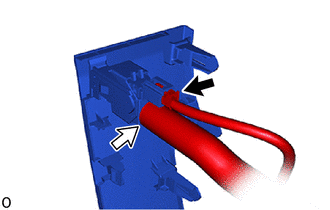
Connect the connector and install the aspirator hose.
|
|
Install in this Direction |
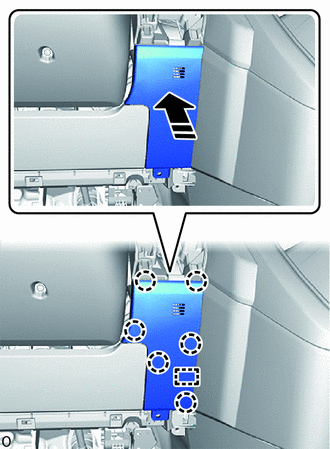
Attach the guide and claw to install the lower No. 2 instrument panel finish panel.
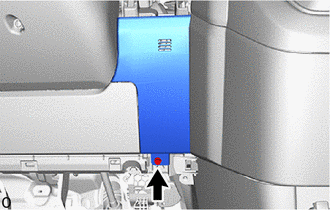
|
|
Screw <A> |
Install the screw <A>.
55044C
44.INSTALL INSTRUMENT PANEL FINISH PANEL SUB-ASSEMBLY
except Wagon:
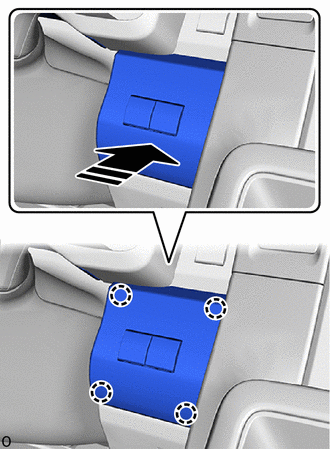
|
|
Install in this Direction |
Attach the claw to install the instrument panel finish panel sub-assembly.
for Wagon:
Connect the connector.
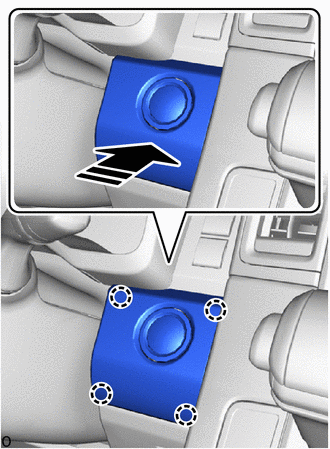
|
|
Install in this Direction |
Attach the claw to install the instrument panel finish panel sub-assembly.
55432D
45.INSTALL LOWER NO. 1 INSTRUMENT PANEL FINISH PANEL
Connect each connector.
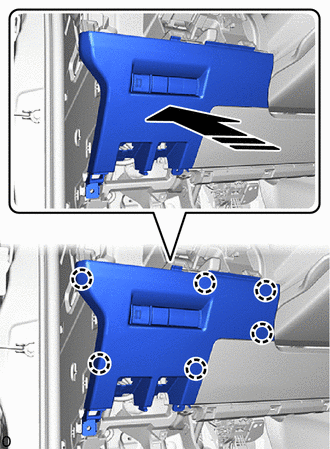
|
|
Install in this Direction |
Attach the claw to install the lower No. 1 instrument panel finish panel.
|
|
Screw <A> |
Install the 2 screws <A>.
77306
46.INSTALL FUEL LID LOCK OPEN LEVER SUB-ASSEMBLY
|
|
Install in this Direction |
Attach the guide and claw to install the fuel lid lock open lever sub-assembly in the direction indicated by the arrow shown in the illustration.
53601
47.INSTALL HOOD LOCK CONTROL LEVER SUB-ASSEMBLY
|
|
Install in this Direction |
Attach the guide and claw to install the hood lock control lever sub-assembly in the direction indicated by the arrow shown in the illustration.
55641
48.INSTALL NO. 1 INSTRUMENT PANEL UNDER COVER
for LHD:
w/ Tire Pressure Warning System:
Connect the connector.
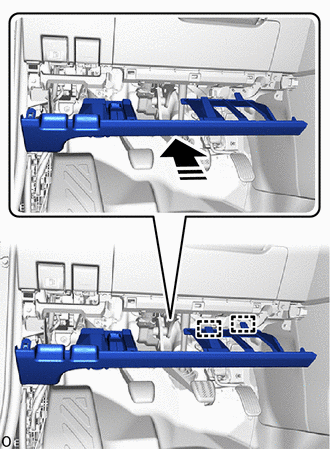
|
|
Insert in this Direction |
Insert the guide in the direction indicated by the arrow shown in the illustration.
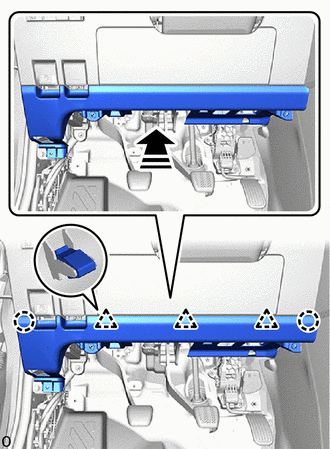
|
|
Install in this Direction |
Attach the clip and claw to install the No. 1 instrument panel under cover shown in the illustration.
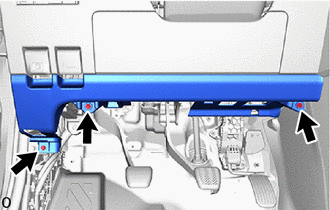
|
|
Screw <A> |
Install the 3 screws <A>.
for RHD:
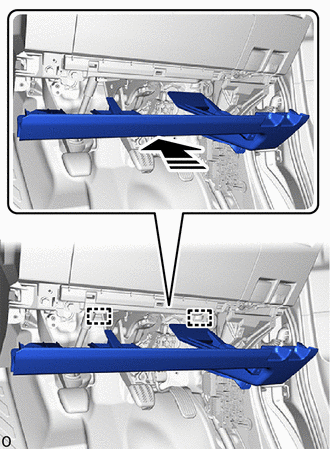
|
|
Insert in this Direction |
Insert the guide in the direction indicated by the arrow shown in the illustration.
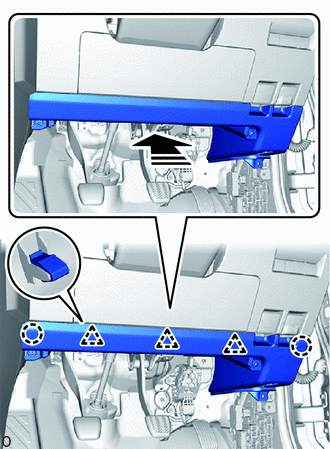
|
|
Install in this Direction |
Attach the clip and claw to install the No. 1 instrument panel under cover shown in the illustration.
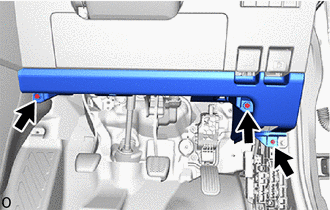
|
|
Screw <A> |
Install the 3 screws <A>.
55318C
49.INSTALL INSTRUMENT SIDE PANEL LH
except Wagon:
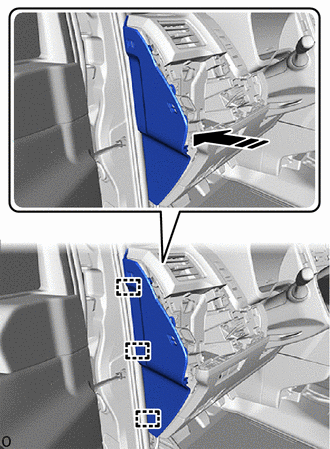
|
|
Insert in this Direction |
Insert in the direction indicated by the arrow shown in the illustration to attach the guide.
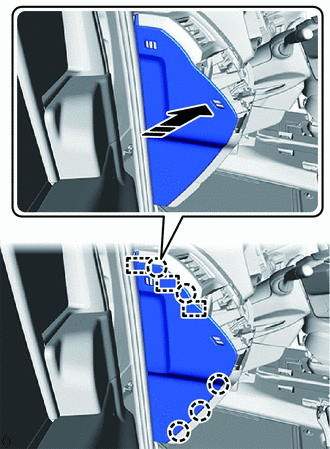
|
|
Install in this Direction |
Attach the guide and claw to install the instrument side panel LH as shown in the illustration.
for Wagon:
|
|
Insert in this Direction |
Insert in the direction indicated by the arrow shown in the illustration to attach the guide.
|
|
Install in this Direction |
Attach the guide and claw to install the instrument side panel LH as shown in the illustration.
55011A
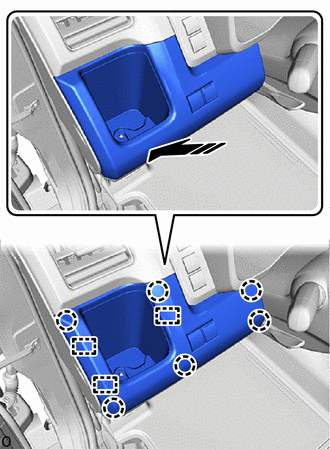
50.INSTALL NO. 1 INSTRUMENT PANEL GARNISH SUB-ASSEMBLY
w/ Power Slide Door:
Connect each connector.
|
|
Install in this Direction |
Attach the guide and claw to install the No. 1 instrument panel garnish sub-assembly.
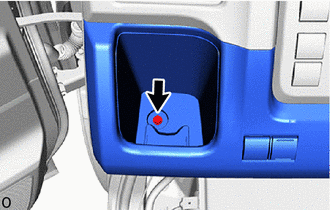
|
|
Screw <A> |
Install the screw <A>.
55631A
51.INSTALL NO. 1 INSTRUMENT PANEL UNDER TRAY STOPPER
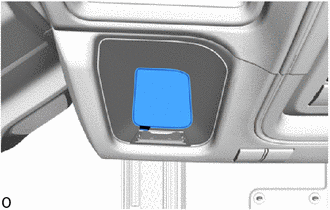
Install the No. 1 instrument panel under tray stopper.
62112
52.INSTALL COWL SIDE TRIM BOARD LH
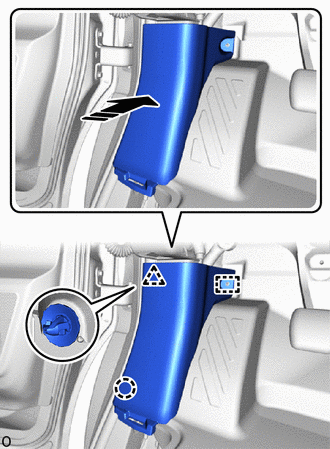
|
|
Install in this Direction |
Attach the guide, claw and clip to install the cowl side trim board LH.
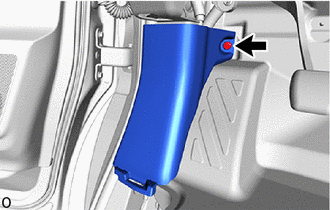
Install the cap nut.
67914B
53.INSTALL FRONT DOOR SCUFF PLATE LH
67912A
54.INSTALL FRONT DOOR OUTSIDE SCUFF PLATE LH
55438A
55.INSTALL NO. 2 INSTRUMENT PANEL FINISH PANEL RETAINER
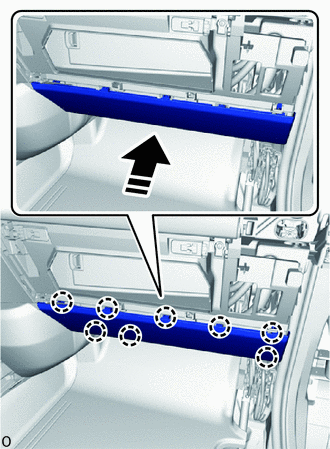
|
|
Install in this Direction |
Attach the claw to install the No. 2 instrument panel finish panel retainer as shown in the illustration.
55312
56.INSTALL LOWER INSTRUMENT PANEL
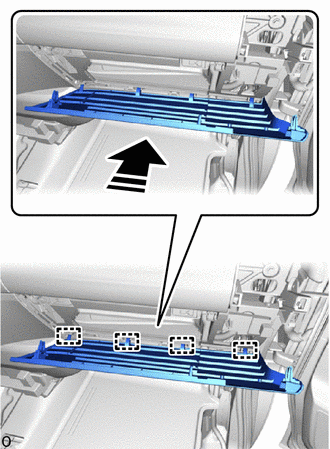
|
|
Install in this Direction |
Attach the guide as shown in the illustration.
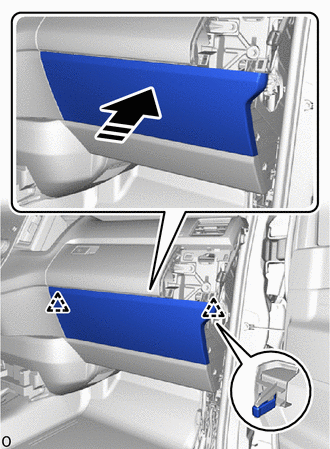
|
|
Install in this Direction |
Attach the clip to install the lower instrument panel.
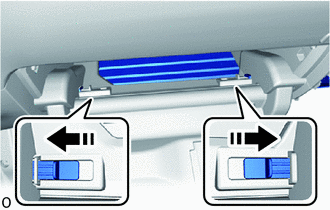
|
|
Slide in this Direction |
Open the glove compartment door and slide the instrument panel box lock knob in the direction of the arrow shown in the illustration.
55642
57.INSTALL NO. 2 INSTRUMENT PANEL UNDER COVER
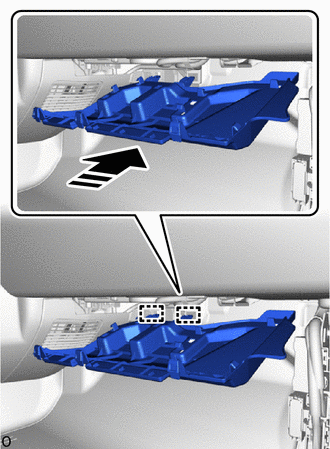
|
|
Insert in this Direction |
Insert the guide in the direction indicated by the arrow shown in the illustration.
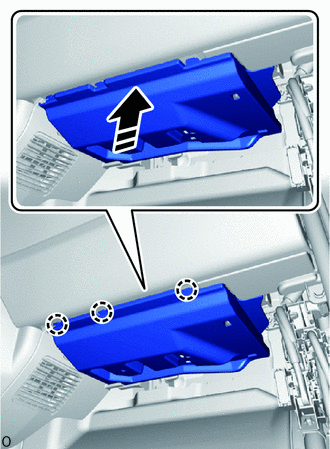
|
|
Install in this Direction |
Lift up in the direction indicated by the arrow shown in the illustration to attach the claw to install the No. 2 instrument panel under cover.
55317A
58.INSTALL INSTRUMENT SIDE PANEL RH
except Wagon:
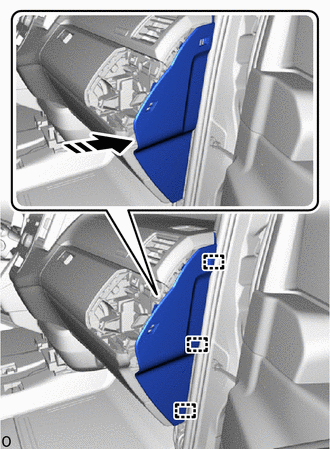
|
|
Insert in this Direction |
Insert in the direction indicated by the arrow shown in the illustration to attach the guide.
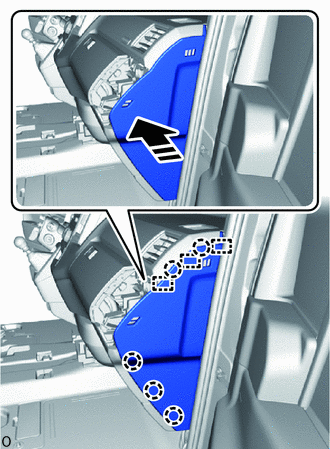
|
|
Install in this Direction |
Attach the guide and claw to install the instrument side panel RH as shown in the illustration.
for Wagon:
|
|
Insert in this Direction |
Insert in the direction indicated by the arrow shown in the illustration to attach the guide.
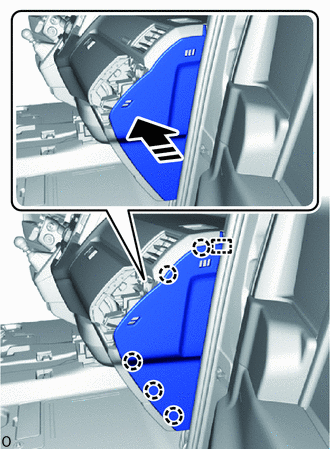
|
|
Install in this Direction |
Attach the guide and claw to install the instrument side panel RH as shown in the illustration.
55012A
59.INSTALL NO. 2 INSTRUMENT PANEL GARNISH SUB-ASSEMBLY
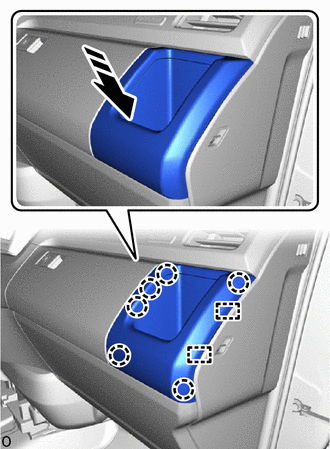
|
|
Install in this Direction |
Attach the guide and claw to install the No. 2 instrument panel garnish sub-assembly.
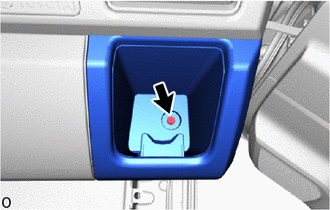
|
|
Screw <A> |
Install the screw <A>.
55632B
60.INSTALL NO. 2 INSTRUMENT PANEL UNDER TRAY SUPPORT
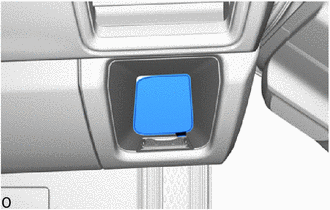
Install the No. 2 instrument panel under tray support.
62111C
61.INSTALL COWL SIDE TRIM BOARD RH
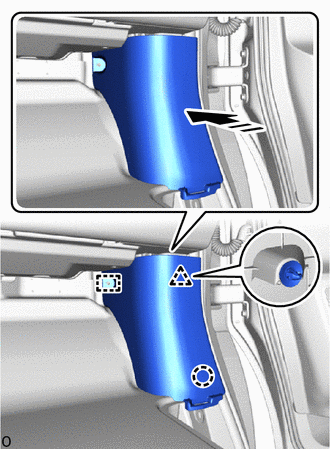
|
|
Install in this Direction |
Attach the guide, claw and clip to install the cowl side trim board RH.
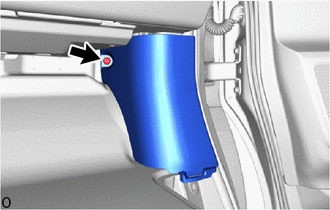
Install the cap nut.
67913B
62.INSTALL FRONT DOOR SCUFF PLATE RH
- HINT:
-
Use the same procedure described for the LH side.
-
Click hereVehicle Interior>INTERIOR PANELS / TRIM>ROOF HEADLINING (for Full-trim)>INSTALLATION
67911B
63.INSTALL FRONT DOOR OUTSIDE SCUFF PLATE RH
- HINT:
-
Use the same procedure described for the LH side.
-
Click hereVehicle Interior>INTERIOR PANELS / TRIM>ROOF HEADLINING (for Full-trim)>INSTALLATION
64.CONNECT CABLE TO NEGATIVE BATTERY TERMINAL
for 7GR-FKS:
for 1GD-FTV:
65. INITIALIZATION AFTER RECONNECTING BATTERY TERMINAL (w/ Airbag System)
Click hereGeneral>SETUP>WHEN DISCONNECTING OR RECONNECTING BATTERY TERMINAL>WORK PROCEDURE
- HINT:
-
When disconnecting and reconnecting the battery, there is an automatic learning function that completes learning when the respective system is used.
-
Click hereGeneral>SETUP>WHEN DISCONNECTING OR RECONNECTING BATTERY TERMINAL>AUTOMATIC LEARNING CHART
66. PERFORM DIAGNOSTIC SYSTEM CHECK
67.CHECK SRS WARNING LIGHT
68.PERFORM SYSTEM INITIALIZATION AND CALIBRATION