SUPPLEMENTAL RESTRAINT SYSTEMS SIDE AIRBAG SENSOR(for Rear Door) INSTALLATION
CAUTION / NOTICE / HINT
- HINT:
- ·
Use the same procedure for RHD and LHD vehicles.
·The procedure listed below is for LHD vehicles.
·Use the same procedure for the RH and LH sides.
·The procedure listed below is for the LH side.
PROCEDURE

 1.INSTALL CLIP
- NOTICE:
-
If the clip is removed, do not reuse it.
- HINT:
-
Perform this procedure only when removal/installation of the clip is necessary.
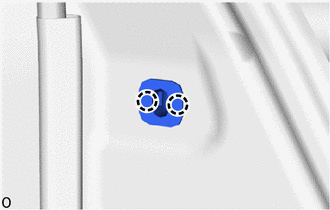
Attach the claw and install a new clip.
89831G
2.INSTALL NO. 3 SIDE AIRBAG SENSOR
Check that the ignition switch is off.
Check that the cable is disconnected from the negative (-) battery terminal.
- CAUTION:
- ·
Wait at least 90 seconds after disconnecting the cable from the negative (-) battery terminal to disable the SRS system.
·If the airbag deploys for any reason, it may cause a serious accident.
for Van:
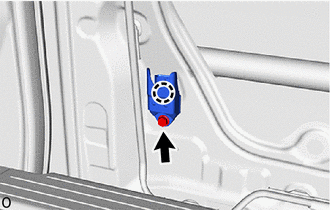
Attach the claw and hold the No. 3 side airbag sensor in place.
- NOTICE:
- ·
If the No. 3 side airbag sensor has been dropped, replace it with a new one.
·When installing the No. 3 side airbag sensor, be careful that the SRS wiring does not interfere with or is not pinched between other parts.
for Wagon:
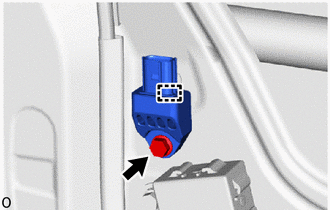
Attach the guide and hold the No. 3 side airbag sensor in place.
- NOTICE:
- ·
If the No. 3 side airbag sensor has been dropped, replace it with a new one.
·When installing the No. 3 side airbag sensor, be careful that the SRS wiring does not interfere with or is not pinched between other parts.
Install the bolt.
- Torque:
- 9.0 N*m (92 kgf*cm, 80 in.*lbf)
- NOTICE:
-
Tighten the bolt while holding the No. 3 side airbag sensor because the No. 3 side airbag sensor claw is easily damaged.
Check that there is no looseness in the installation parts of the No. 3 side airbag sensor.
Connect the airbag connector.
- NOTICE:
-
When connecting any airbag connector, take care not to damage the airbag wire harness.
- HINT:
-
Refer to How to Connect or Disconnect Airbag Connector:
- ·
67604
3.INSTALL REAR DOOR TRIM BOARD SUB-ASSEMBLY LH (for Van)
- HINT:
-
Use the same procedure described for the RH side.
-
Click hereVehicle Exterior>DOOR / HATCH>SLIDE DOOR (except Wagon)>REASSEMBLY
67690C
4.INSTALL SLIDE DOOR TRIM BOARD ASSEMBLY LH (for Wagon)
- HINT:
-
Use the same procedure described for the RH side.
-
Click hereVehicle Exterior>DOOR / HATCH>SLIDE DOOR (for Wagon)>REASSEMBLY
81380D
5.INSTALL STEP LIGHT ASSEMBLY (for Wagon)
67488A
6.INSTALL REAR DOOR REAR GUIDE BRACKET GARNISH LH (for Wagon)
- HINT:
-
Use the same procedure described for the RH side.
-
Click hereVehicle Exterior>DOOR / HATCH>SLIDE DOOR (for Wagon)>REASSEMBLY
67668A
7.INSTALL SLIDE DOOR WINDOW GARNISH LH (for Wagon)
- HINT:
-
Use the same procedure described for the RH side.
-
Click hereVehicle Exterior>DOOR / HATCH>SLIDE DOOR (for Wagon)>REASSEMBLY
67693B
8.INSTALL UPPER SLIDE DOOR TRIM COVER LH (for Wagon)
- HINT:
-
Use the same procedure described for the RH side.
-
Click hereVehicle Exterior>DOOR / HATCH>SLIDE DOOR (for Wagon)>REASSEMBLY
65988A
9.INSTALL SUNSHADE HOOK (for Wagon, w/ Sunshade)
10.CONNECT CABLE TO NEGATIVE BATTERY TERMINAL
for 7GR-FKS:
for 1GD-FTV:
11. INITIALIZATION AFTER RECONNECTING BATTERY TERMINAL
Click hereGeneral>SETUP>WHEN DISCONNECTING OR RECONNECTING BATTERY TERMINAL>WORK PROCEDURE
- HINT:
-
When disconnecting and reconnecting the battery, there is an automatic learning function that completes learning when the respective system is used.
-
Click hereGeneral>SETUP>WHEN DISCONNECTING OR RECONNECTING BATTERY TERMINAL>AUTOMATIC LEARNING CHART
12.PERFORM DIAGNOSTIC SYSTEM CHECK
13.CHECK SRS WARNING LIGHT
14.PERFORM SYSTEM INITIALIZATION AND CALIBRATION