1GD-FTV ENGINE CONTROL ECM REMOVAL
CAUTION / NOTICE / HINT
The necessary procedures (adjustment, calibration, initialization or registration) that must be performed after parts are removed, installed or replaced during the ECM removal/installation are shown below.
| Replacement Part or Procedure | Necessary Procedures | Effect/Inoperative Function When Necessary Procedures are not Performed | Link |
|---|---|---|---|
| Battery terminal is disconnected/reconnected | Memorize steering angle neutral point | Parking assist monitor system | ( ) |
| Panoramic view monitor system | ()
|
||
| ECM | ·
Learning values save ·
Learning values write ·
Perform Vehicle Identification Number (VIN) or frame number registration |
DTC is stored | w/ DPF:
( )
for Water Cooled Type Intercooler: ( )
w/ EGR Cooler: ( )
w/o EGR Cooler: ( )
|
| ECU communication ID registration | Engine start function | See Service Bulletin for the registration method. | |
for RC60J:
Performing iMT installation information reset |
·
iMT system ·
DTCs are output |
()
|
- HINT:
-
When the cable is disconnected / reconnected to the battery terminal, systems temporarily stop operating. However, each system has a function that completes learning the first time the system is used.
- ·
Learning completes when vehicle is driven
Effect/Inoperative when not Performed Necessary Procedures Link Stop and start system Drive the vehicle until stop and start control is permitted (approximately 5 to 60 minutes). ( )
Lane control system Drive the vehicle straight ahead at 15 km/h (10 mph) or more for 1 second or more. ( )
Pre-collision system
·Learning completes when vehicle is operated normally
Effect/Inoperative when not Performed Necessary Procedures Link Power slide door system Fully close the slide door by hand.
- HINT:
-
Initialization is not necessary if the above procedures are performed while the slide door is closed.
( )
Air conditioning system After the ignition switch is turned to ON, the servo motor standard position is recognized. -
- NOTICE:
- ·
If the ECM has been struck or dropped, replace it.
·Perform Vehicle Identification Number (VIN) registration when replacing the ECM.
PROCEDURE

 1. PRECAUTION
- NOTICE:
-
After turning the ignition switch is turned off, there may be a waiting time before disconnecting the negative (-) battery terminal.
-
Click hereGeneral>INTRODUCTION>REPAIR INSTRUCTION>PRECAUTION
2.DISCONNECT CABLE FROM NEGATIVE BATTERY TERMINAL
55320
3.REMOVE LOWER NO. 2 INSTRUMENT PANEL ASSEMBLY
89661
4.REMOVE ECM
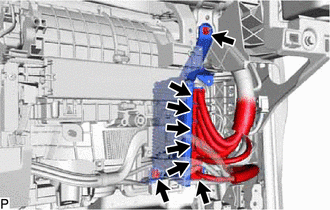
for LHD:
Disconnect the 6 connectors from the ECM.
Remove the bolt, nut and ECM.
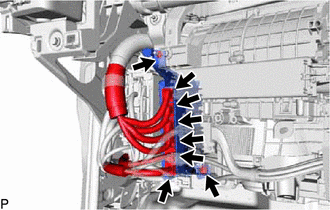
for RHD:
Disconnect the 6 connectors from the ECM.
Remove the bolt, nut and ECM.
89667E
5.REMOVE NO. 1 ECM BRACKET
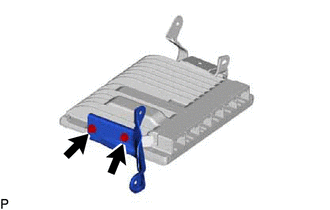
for LHD:
Remove the 2 screws and No. 1 ECM bracket from the ECM.
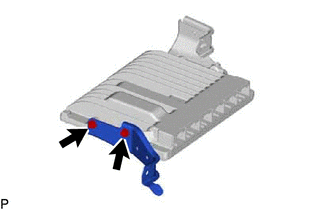
for RHD:
Remove the 2 screws and No. 1 ECM bracket from the ECM.
89668
6.REMOVE NO. 2 ECM BRACKET
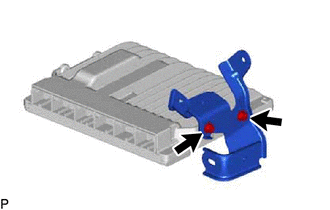
for LHD:
Remove the 2 screws and No. 2 ECM bracket from the ECM.
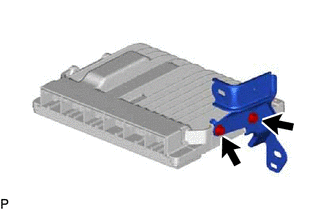
for RHD:
Remove the 2 screws and No. 2 ECM bracket from the ECM.