Home › ENGINE › 2GR-FE ENGINE CONTROL SYSTEM › SFI SYSTEMFuel Pump Control Circuit
Circuit diagnosis · Vehicles built Aug 2008 – Jun 2010
Versions by build date: May 2007 – Jul 2008 Aug 2008 – Jun 2010 from Jul 2010
DESCRIPTION
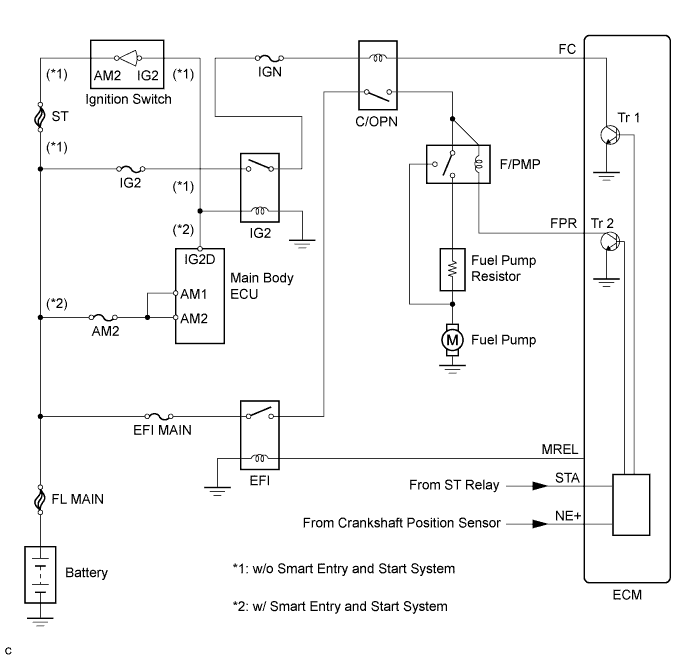
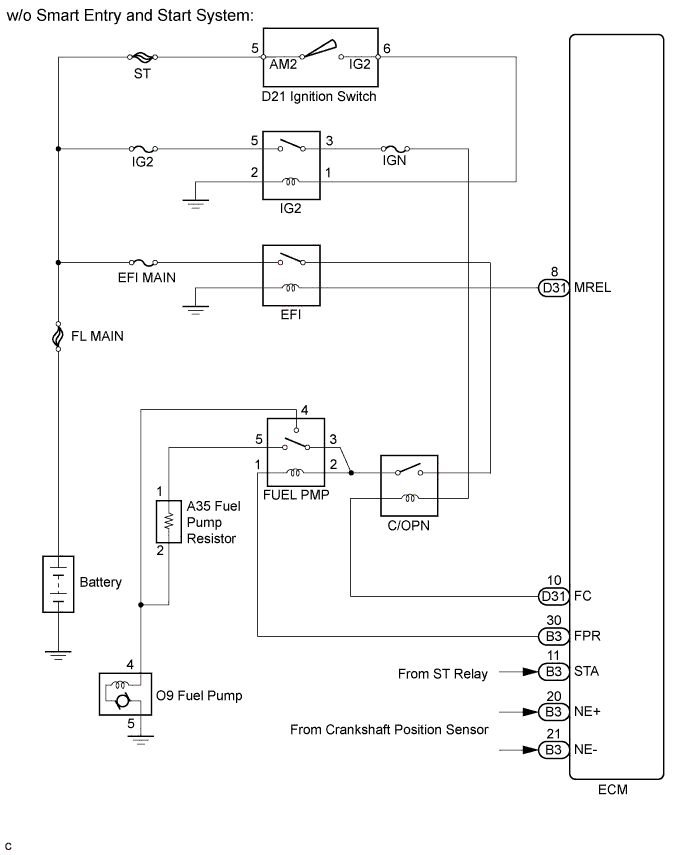
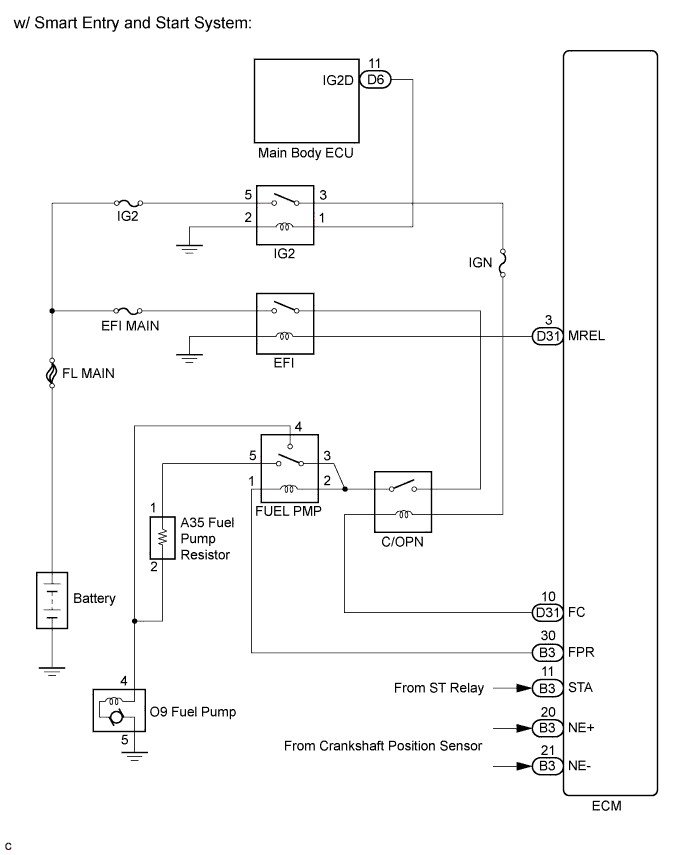
The FUEL PUMP relay switches the fuel pump speed according to the engine conditions. The fuel pump operates when the ECM receives the starter-operating signal (STA) and crankshaft-rotating signal (NE). The FUEL PUMP relay is turned ON while the engine is idling or operating at low load. This causes current to flow through the fuel pump resistor to the fuel pump. The fuel pump then operates at low speed. The FUEL PUMP relay is turned OFF while the engine is cranking or operating at high load. The fuel pump then operates at normal speed. WIRING DIAGRAM
INSPECTION PROCEDURE
1. PERFORM ACTIVE TEST USING INTELLIGENT TESTER (OPERATE C/OPN RELAY)
Connect the intelligent tester to the DLC3.
Turn the ignition switch on (IG), and turn the tester on.
Enter the following menus: Powertrain / Engine and ECT / Active Test / Control the Fuel Pump / Speed.
Check the relay operation while operating it using the intelligent tester.
Standard:
Operating noise can be heard from the relay.
NG
OK
2. INSPECT TERMINAL VOLTAGE (FUEL PMP RELAY TERMINAL)
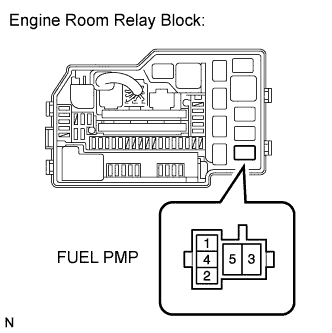
Remove the FUEL PMP relay from the engine room relay block. Turn the ignition switch on (IG).
Measure the voltage according to the value(s) in the table below.
Standard voltage:
Tester Connection
Switch Condition
Specified Condition
FUEL PMP relay terminal 2 - Body ground
Ignition switch on (IG)
9 to 14 V
FUEL PMP relay terminal 3 - Body ground
Ignition switch on (IG)
9 to 14 V
Reinstall the FUEL PMP relay.
NG
REPAIR OR REPLACE HARNESS OR CONNECTOR (FUEL PMP RELAY - C/OPN RELAY)
OK
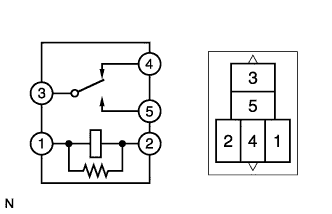
3. INSPECT RELAY (FUEL PMP RELAY)
Remove the FUEL PMP relay from the engine room relay block. Measure the resistance according to the value(s) in the table below.
Standard resistance:
Tester Connection
Condition
Specified Condition
3 - 4
When no battery voltage is applied terminals 1 and 2
Below 1 Ω
3 - 5
When no battery voltage is applied terminals 1 and 2
10 kΩ or higher
3 - 4
When battery voltage is applied terminals 1 and 2
10 kΩ or higher
3 - 5
When battery voltage is applied terminals 1 and 2
Below 1 Ω
Reinstall the FUEL PMP relay.
NG
OK
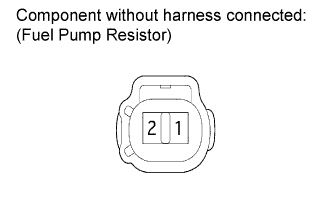
4. INSPECT FUEL PUMP RESISTOR
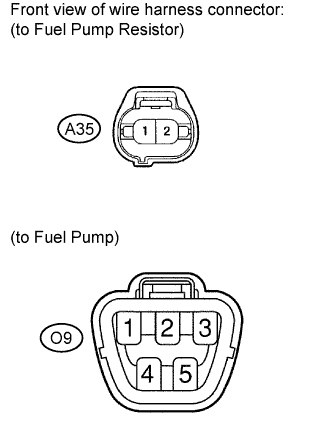
Disconnect the fuel pump resistor connector. Measure the resistance according to the value(s) in the table below.
Standard resistance:
Tester Connection
Condition
Specified Condition
1 - 2
20°C (68°F)
0.30 to 0.34 Ω
Reconnect the fuel pump resistor connector.
NG
OK
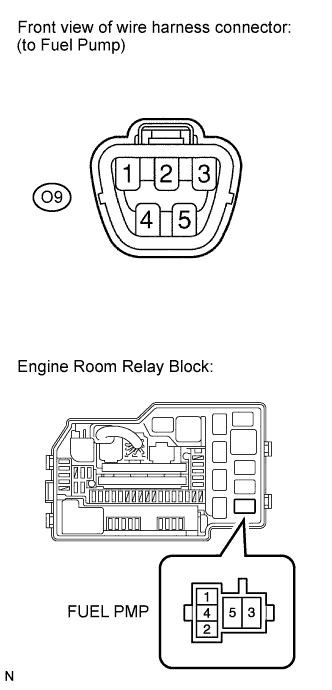
5. CHECK HARNESS AND CONNECTOR (FUEL PUMP - FUEL PMP RELAY)
Check the wire harness between the FUEL PMP relay and fuel pump.
Remove the FUEL PMP relay from the engine room relay block.
Disconnect the fuel pump connector.
Measure the resistance according to the value(s) in the table below.
Standard resistance:
Tester Connection
Condition
Specified Condition
FUEL PMP relay terminal 4 - O9-4
Always
Below 1 Ω
FUEL PMP relay terminal 4 or O9-4 - Body ground
Always
10 kΩ or higher
NG
REPAIR OR REPLACE HARNESS OR CONNECTOR
OK
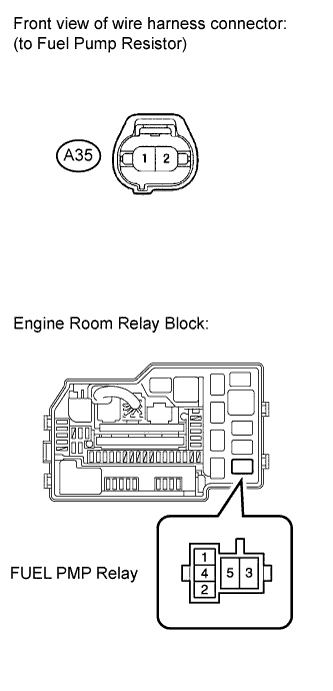
6. CHECK HARNESS AND CONNECTOR (FUEL PUP RELAY - FUEL PUMP RESISTOR)
Disconnect the fuel pump resistor connector. Remove the FUEL PMP relay from the engine room relay block.
Measure the resistance according to the value(s) in the table below.
Standard resistance (Check for open):
Tester Connection
Condition
Specified Condition
FUEL PMP relay terminal (5) - A35-1
Always
Below 1 Ω
Standard resistance (Check for short):
Tester Connection
Condition
Specified Condition
FUEL PMP relay terminal (5) or A35-1 - Body ground
Always
10 kΩ or higher
Reconnect the fuel pump resistor connector.
Reinstall the FUEL PMP relay.
NG
REPAIR OR REPLACE HARNESS OR CONNECTOR
OK
7. CHECK HARNESS AND CONNECTOR (FUEL PUMP RESISTOR - FUEL PUMP)
Disconnect the fuel pump resistor connector. Disconnect the fuel pump connector.
Measure the resistance according to the value(s) in the table below.
Standard resistance (Check for open):
Tester Connection
Condition
Specified Condition
A35-2 - O9-4
Always
Below 1 Ω
Standard resistance (Check for short):
Tester Connection
Condition
Specified Condition
A35-2 or O9-4 - Body ground
Always
10 kΩ or higher
Reconnect the fuel pump resistor connector.
Reconnect the fuel pump connector.
NG
REPAIR OR REPLACE HARNESS OR CONNECTOR
OK
8. INSPECT FUEL PUMP
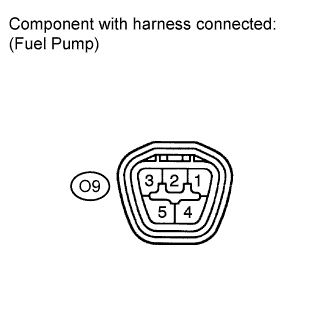
Measure the resistance of the fuel pump. Measure the resistance according to the value(s) in the table below.
Standard resistance:
Terminal Connections
Condition
Specified Condition
4 - 5
20°C (68°F)
0.2 to 0.3 Ω
Check operation of the fuel pump.
Apply battery voltage to both terminals. Check that the pump operates.
NOTICE:
These tests must be done quickly (within 10 seconds) to prevent the coil from burning out.
Keep the fuel pump as far away from the battery as possible.
Always turn ON and OFF the voltage on the battery side, not on the fuel pump side.
NG
OK
REPAIR OR REPLACE HARNESS OR CONNECTOR (ECM - C/OPN RELAY)
9. CHECK ECM POWER SOURCE CIRCUIT
HINT:
(Click here ).
NG
REPAIR OR REPLACE ECM POWER SOURCE CIRCUIT
OK
10. INSPECT ENGINE ROOM JUNCTION BLOCK ASSEMBLY (C/OPN RELAY)
Inspect the C/OPN relay (Click here ).
NG
OK
11. INSPECT ECM (FC VOLTAGE)
Turn the ignition switch on (IG). Measure the voltage according to the value(s) in the table below.
Standard voltage:
Tester Connection
Switch Condition
Specified Condition
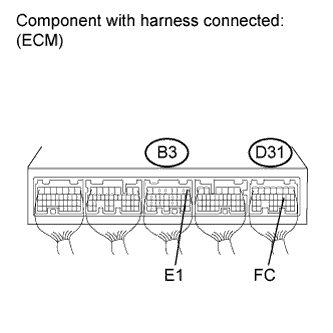
D31-10 (FC) - B3-1 (E1)
Ignition switch on (IG)
9 to 14 V
NG
OK
12. CHECK HARNESS AND CONNECTOR (ECM - C/OPN RELAY)
Disconnect the ECM connector. Remove the engine room junction block assembly.
Measure the resistance according to the value(s) in the table below.
Standard resistance (Check for open):
Tester Connection
Condition
Specified Condition
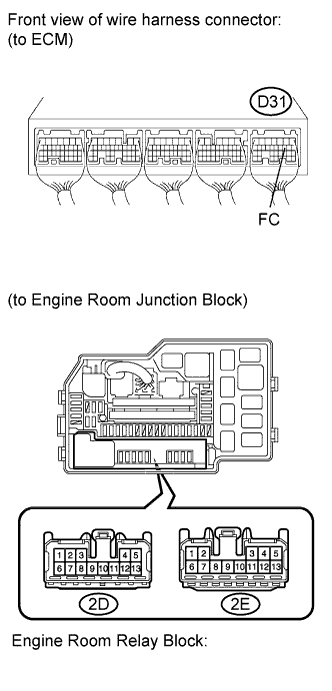
D31-10 (FC) - 2D-12 (C/OPN relay terminal)
Always
Below 1 Ω
Standard resistance (Check for short):
Tester Connection
Condition
Specified Condition
D31-10 (FC) or 2D-12 (C/OPN relay terminal) - Body ground
Always
10 kΩ or higher
Reconnect the ECM connector.
Reinstall the engine room junction block assembly.
NG
REPAIR OR REPLACE HARNESS OR CONNECTOR (ECM - C/OPN RELAY)
OK
REPLACE ENGINE ROOM JUNCTION BLOCK ASSEMBLY (Click here )