All Doors LOCK/UNLOCK Functions do not Operate Via Master Switch, Driver Side Door Key Cylinder
Circuit diagnosis · Vehicles built from Jul 2010
Versions by build date: May 2007 – Jul 2008 Aug 2008 – Jun 2010 from Jul 2010
DESCRIPTION
The main body ECU (instrument panel junction block) receives switch signals from the power window master switch and driver side door key cylinder, and activates the door lock motor on each door according to these signals.WIRING DIAGRAM
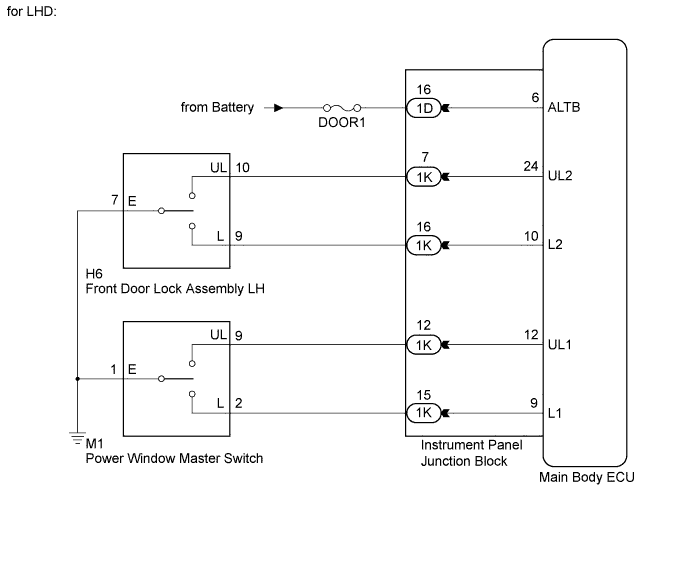

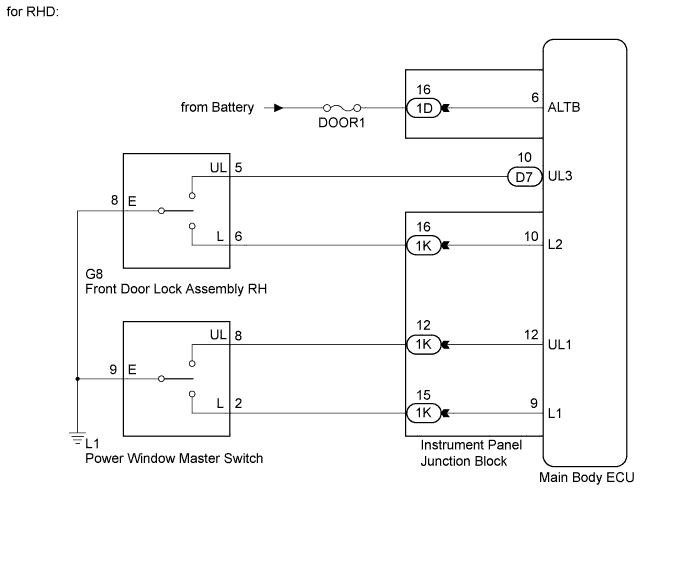
INSPECTION PROCEDURE
| 1. INSPECT FUSE (DOOR1) |

Remove the DOOR1 fuse from the engine room relay block.
Measure the resistance according to the value(s) in the table below.
- Standard resistance:
Tester Connection
Condition
Specified Condition
DOOR1 fuse
Always
Below 1 Ω
|
|
||||

| OK | |
 |
| 2. CHECK DOOR LOCK OPERATION |
- Result:
Result
Proceed to
Doors cannot be locked through driver side door key cylinder.
A
Doors cannot be locked through master switch.
B
|
|
||||

| B | |
|
| 3. READ VALUE USING INTELLIGENT TESTER (DOOR CONTROL SWITCH) |
Connect the intelligent tester to the DLC3.
Turn the ignition switch on (IG).
Turn the tester on.
Select Door Lock SW-Lock or Door Lock SW-Unlock in the Data List and read the tester display.
Main Body (Main Body ECU): Tester Display
Measurement Item/Range
Normal Condition
Diagnostic Note
Door Lock SW-Lock
Door manual lock switch signal/ON or OFF
ON: Door control switch on power window regulator master switch is pushed to LOCK
OFF: Door control switch on power window regulator master switch is not pushed
-
Door Lock SW-Unlock
Door manual unlock switch signal/ON or OFF
ON: Door control switch on power window regulator master switch is pushed to UNLOCK
OFF: Door control switch on power window regulator master switch is not pushed
-
- OK:
- On the tester screen, each item changes between ON and OFF according to the chart above.
|
|
||||
| OK | ||
 |
||
| ||
| 4. INSPECT POWER WINDOW MASTER SWITCH |
Remove the power window master switch (Click here).
for LHD:
Measure the resistance according to the value(s) in the table below.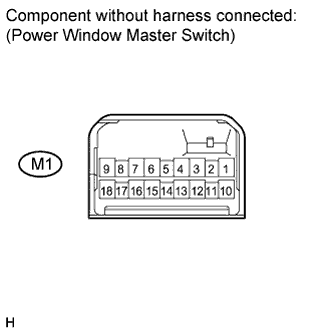
- Standard resistance:
Tester Connection
Condition
Specified Condition
1 - 2
Locked
Below 1 Ω
1 - 2
1 - 9
OFF (Free)
10 kΩ or higher
1 - 9
Unlocked
Below 1 Ω
for RHD:
Measure the resistance according to the value(s) in the table below.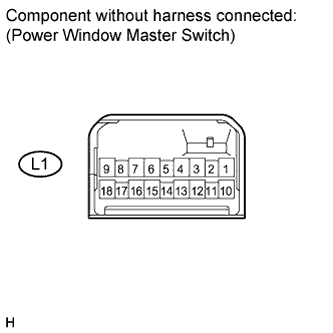
- Standard resistance:
Tester Connection
Condition
Specified Condition
9 - 2
Locked
Below 1 Ω
9 - 2
9 - 8
OFF (Free)
10 kΩ or higher
9 - 8
Unlocked
Below 1 Ω
|
|
||||
| OK | |
|
| 5. CHECK HARNESS AND CONNECTOR (POWER WINDOW MASTER SWITCH CIRCUIT) |
Disconnect the instrument panel junction block connector.
for LHD: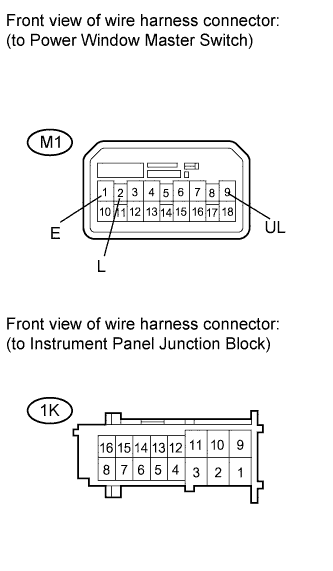
Measure the resistance according to the value(s) in the table below.
- Standard resistance:
Tester Connection
Condition
Specified Condition
M1-2 (L) - 1K-15
Always
Below 1 Ω
M1-9 (UL) - 1K-12
Always
Below 1 Ω
M1-1 (E) - Body ground
Always
Below 1 Ω
M1-2 (L) - Body ground
Always
10 kΩ or higher
M1-9 (UL) - Body ground
Always
10 kΩ or higher
for RHD: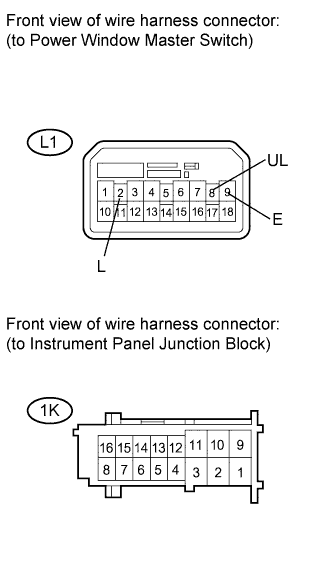
Measure the resistance according to the value(s) in the table below.
- Standard resistance:
Tester Connection
Condition
Specified Condition
L1-2 (L) - 1K-15
Always
Below 1 Ω
L1-8 (UL) - 1K-12
Always
Below 1 Ω
L1-9 (E) - Body ground
Always
Below 1 Ω
L1-2 (L) - Body ground
Always
10 kΩ or higher
L1-8 (UL) - Body ground
Always
10 kΩ or higher
|
|
||||
| OK | ||
|
||
| ||
| 6. READ VALUE USING INTELLIGENT TESTER (DOOR KEY LINKED LOCK AND UNLOCK SWITCH) |
Connect the intelligent tester to the DLC3.
Turn the ignition switch on (IG).
Turn the tester on.
Select Door Key SW-Lock or Door Key SW-Unlock in the Data List and read the tester display.
Main Body (Main Body ECU): Tester Display
Measurement Item/Range
Normal Condition
Diagnostic Note
Door Key SW-Lock
Door key linked lock switch signal/ON or OFF
ON: Driver side door key cylinder is turned to LOCK
OFF: Driver side door key cylinder is not turned
-
Door Key SW-Unlock
Door key linked unlock switch signal/ON or OFF
ON: Driver side door key cylinder is turned to UNLOCK
OFF: Driver side door key cylinder is not turned
-
- OK:
- On the tester screen, each item changes between ON and OFF according to the chart above.
|
|
||||
| OK | ||
|
||
| ||
| 7. INSPECT FRONT DOOR LOCK ASSEMBLY (FOR DRIVER SIDE) |
Remove the front door lock assembly (for Driver Side) (Click here).
for LHD: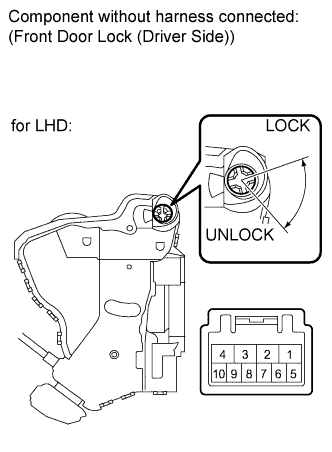
Measure the resistance according to the value(s) in the table below.
- Standard resistance:
Tester Connection
Condition
Specified Condition
7 - 9
Locked
Below 1 Ω
7 - 9
7 - 10
OFF (Free)
10 kΩ or higher
7 - 10
Unlocked
Below 1 Ω
for RHD: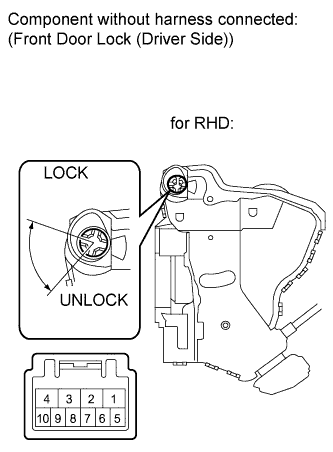
Measure the resistance according to the value(s) in the table below.
- Standard resistance:
Tester Connection
Condition
Specified Condition
8 - 6
Locked
Below 1 Ω
8 - 6
8 - 5
OFF (Free)
10 kΩ or higher
8 - 5
Unlocked
Below 1 Ω
|
|
||||
| OK | |
|
| 8. CHECK HARNESS AND CONNECTOR (DOOR KEY LINKED LOCK UNLOCK SWITCH CIRCUIT) |
for LHD:
Disconnect the instrument panel junction block connector.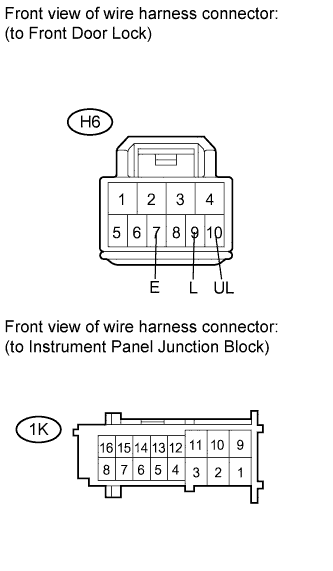
Measure the resistance according to the value(s) in the table below.
- Standard resistance:
Tester Connection
Condition
Specified Condition
H6-9 (L) - 1K-16 (L2)
Always
Below 1 Ω
H6-10 (UL) - 1K-7 (UL2)
Always
Below 1 Ω
H6-7 (E) - Body ground
Always
Below 1 Ω
H6-9 (L) - Body ground
Always
10 kΩ or higher
H6-10 (UL) - Body ground
Always
10 kΩ or higher
for RHD:
Disconnect the main body ECU (instrument panel junction block) and instrument panel junction block connectors.
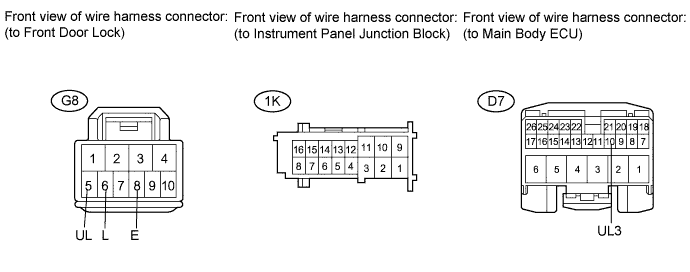
Measure the resistance according to the value(s) in the table below.
- Standard resistance:
Tester Connection
Condition
Specified Condition
G8-6 (L) - 1K-16
Always
Below 1 Ω
G8-5 (UL) - D7-10 (UL3)
Always
Below 1 Ω
G8-8 (E) - Body ground
Always
Below 1 Ω
G8-6 (L) - Body ground
Always
10 kΩ or higher
G8-5 (UL) - Body ground
Always
10 kΩ or higher
|
|
||||
| OK | ||
|
||
| ||