INSTALLATION
Removal / installation · Vehicles built from Jul 2010
Versions by build date: May 2007 – Jul 2008 Aug 2008 – Jun 2010 from Jul 2010
| 1. INSTALL HOOD LOCK CONTROL CABLE ASSEMBLY |

Pass the hood lock control cable assembly into the engine compartment.
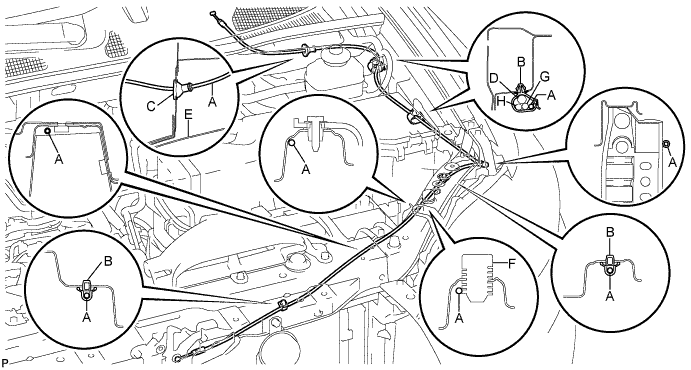

Area
Part Name
Area
Part Name
A
Hood lock control cable
E
Fender liner
B
Clamp
F
Hood stopper rubber
C
Hood cable grommet
G
Front washer hose
D
Wire harness
H
Rear washer hose
Pass the cable through the upper radiator support.
Connect the clamps as shown in the illustration.
Connect the hood lock control cable to the hood lock control lever.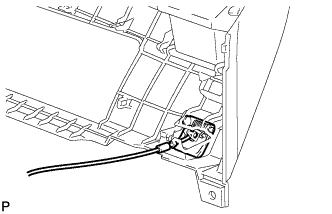
| 2. INSTALL HOOD LOCK ASSEMBLY (w/o Engine Hood Courtesy Switch) |
Apply MP grease to the sliding areas of the lock.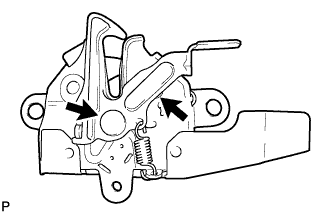
Connect the hood lock control cable.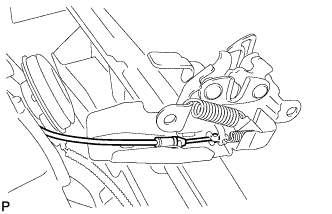
Install the hood lock assembly with the 3 bolts.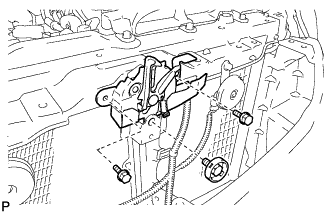
- Torque:
- 8.0 N*m{ 82 kgf*cm , 71 in.*lbf }
Install the hood lock nut cap.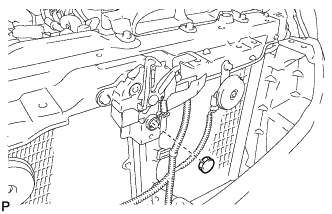
| 3. INSTALL HOOD LOCK ASSEMBLY (w/ Engine Hood Courtesy Switch) |
Apply MP grease to the sliding areas of the lock.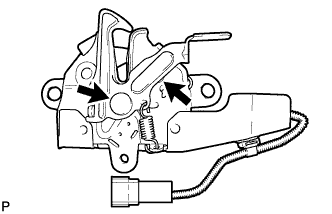
Connect the hood lock control cable.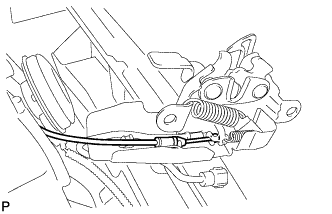
Install the hood lock assembly with the 3 bolts.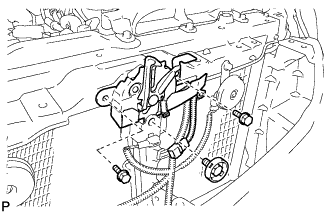
- Torque:
- 8.0 N*m{ 82 kgf*cm , 71 in.*lbf }
Install the hood lock nut cap.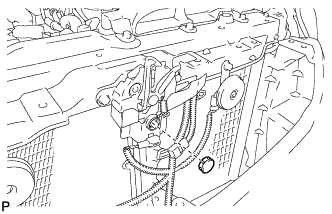
Connect the connector.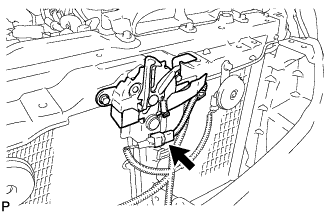
| 4. INSPECT HOOD SUB-ASSEMBLY |
Check that the clearance measurements of areas A through D are within each standard range.
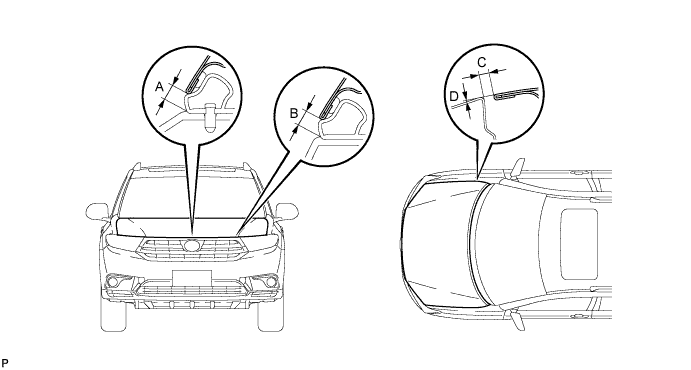
- Standard clearance:
Area
Measurement
Area
Measurement
A
4.5 to 8.5 mm (0.1777 to 0.335 in.)
C
2.5 to 5.5 mm (0.098 to 0.217 in.)
B
4.5 to 8.5 mm (0.1777 to 0.335 in.)
D
-1.5 to 1.5 mm (-0.059 to 0.059 in.)
| 5. ADJUST HOOD SUB-ASSEMBLY |
Horizontally and vertically adjust the hood.
Loosen the 4 hinge bolts of the hood.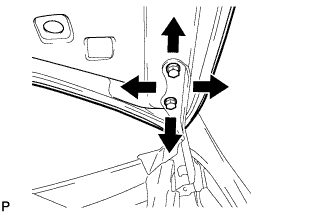
Adjust the clearance between the hood and front fender by moving the hood.
Tighten the 4 hinge bolts after the adjustment.
- Torque:
- 13 N*m{ 133 kgf*cm , 10 ft.*lbf }
Adjust the height of the front end of the hood using the cushion rubber.
Adjust the cushion rubbers so that the heights of the hood and fender are aligned.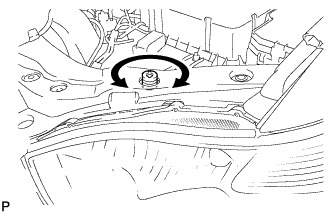
- HINT:
- Raise or lower the front end of the hood by turning the cushion rubber.
Adjust the hood lock.
Remove the hood lock nut cap.
Loosen the 3 bolts.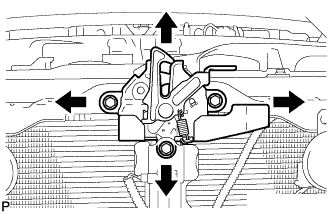
Tighten the bolts after the adjustment.
- Torque:
- 8.0 N*m{ 82 kgf*cm , 71 in.*lbf }
Install the hood lock nut cap.
Check that the striker can engage with the hood lock smoothly.
| 6. INSTALL RADIATOR GRILLE SUB-ASSEMBLY |
Engage the 2 guides and 8 claws, and install the radiator grille sub-assembly.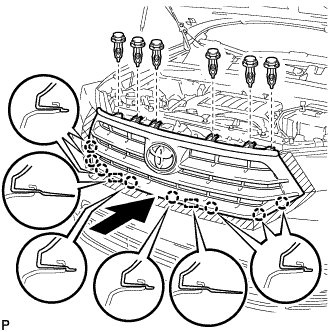
Install the 6 clips.
| 7. INSTALL COOL AIR INTAKE DUCT SEAL |
Install the cool air intake duct seal with the 11 clips.
| 8. INSTALL FRONT FENDER LINER LH |
Install the front fender liner LH with the 5 clips and 8 screws.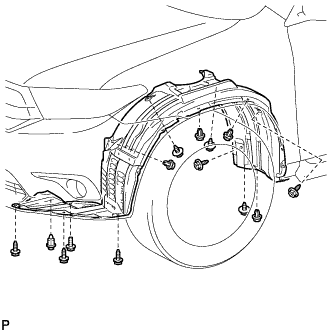
Install the bolt.
Install 3 new grommets.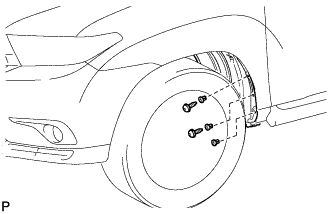
Using a 4 mm hexagon wrench, install the 2 screws.
Install the screw and 2 pin hold clips.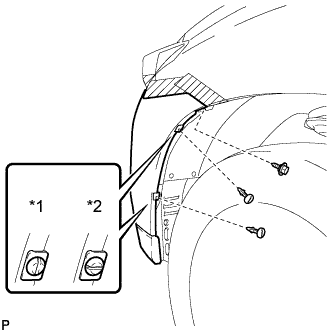
Text in Illustration *1
Correct
*2
Incorrect
- NOTICE:
- Insert the pin hold clip with the slot aligned vertically. Do not rotate the clip after inserting it. After installation, confirm that the slot is aligned vertically.
| 9. INSTALL FRONT FENDER MOULDING SUB-ASSEMBLY LH |
Clean the vehicle body surface.
Using a heat light, heat the vehicle body surface.
Remove the front fender side protector from the vehicle body.
Wipe off any tape adhesive residue with cleaner.
Clean the front fender moulding sub-assembly (if reusing the front fender moulding sub-assembly).
Using a heat light, heat the front fender moulding sub-assembly.
Remove the double-sided tape from the front fender moulding sub-assembly.
Wipe off any tape adhesive residue with cleaner.
Apply new double-sided tape to the front fender moulding sub-assembly.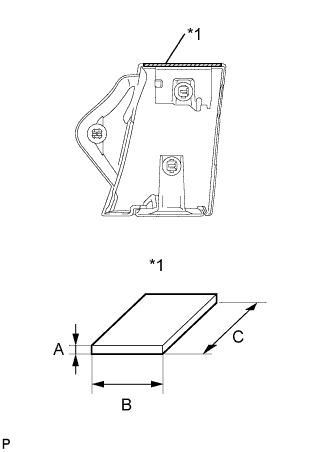
Text in Illustration *1
Double-sided Tape
Item
Dimension
A
1.2 mm (0.0472 in.)
B
3.0 mm (0.1181 in.)
C
72.0 mm (2.83 in.)
Install 2 new No. 4 clips on the front fender moulding sub-assembly.
Install a new pad on the front fender moulding sub-assembly.
Install the front fender moulding sub-assembly.
Using a heat light, heat the vehicle body and the front fender moulding sub-assembly.
Remove the release paper from the front fender moulding sub-assembly.
- HINT:
- After removing the release paper, keep the exposed adhesive free from foreign matter.
Engage the 3 clips and install the front fender moulding sub-assembly.
Using a 4 mm hexagon wrench, install the screw.
Install the clip.