2007-2013 Highlander Kluger · Service Manual BODY ELECTRICAL

Vehicle Speed Signal Circuit between Radio Receiver and Combination Meter

Circuit diagnosis · Vehicles built Aug 2008 – Jun 2010

Versions by build date: May 2007 – Jul 2008 Aug 2008 – Jun 2010 from Jul 2010

DESCRIPTION

The circuit is necessary for the ASL (Automatic Sound Levelizer) built into the radio receiver.
Speed signals are received from the combination meter and used for the ASL.
The ASL function automatically adjusts the sound volume in order to enable clear audio quality even when vehicle noise increases (as vehicle noise increases, the volume is turned up etc.).

HINT:
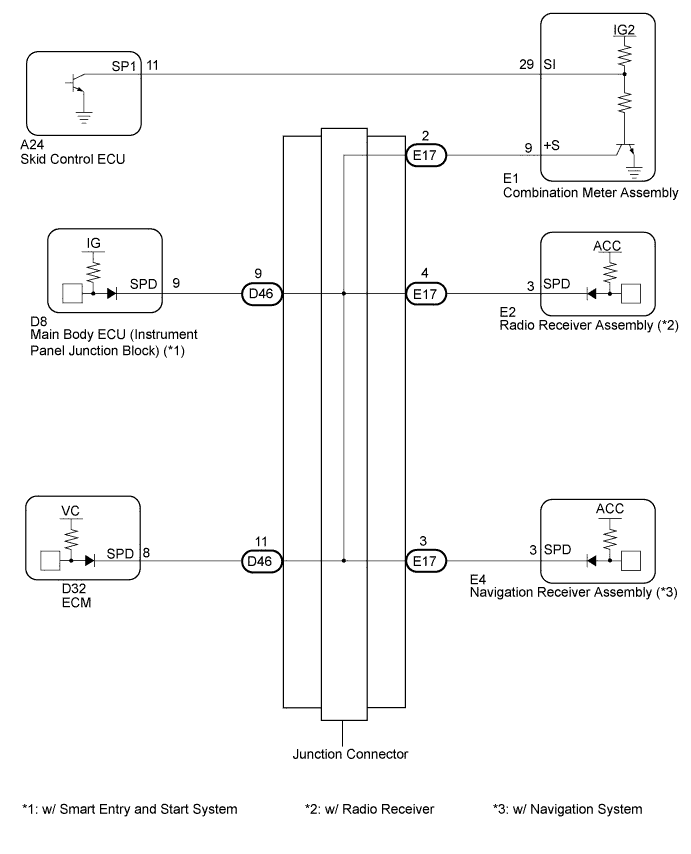
  1. A voltage of 12 V or 5 V is output from each ECU and then input to the combination meter. The signal is changed to a pulse signal at the transistor in the combination meter. Each ECU controls the respective system based on the pulse signal.
  2. If a short occurs in any of the ECUs or in the wire harness connected to an ECU, all systems in the diagram below will not operate normally.


WIRING DIAGRAM

E152376E01

INSPECTION PROCEDURE


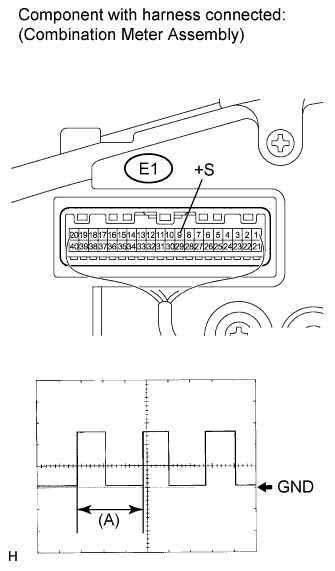
1. INSPECT COMBINATION METER ASSEMBLY (OUTPUT WAVEFORM)

  1. E152386E01
    Check the output waveform.
    1. Remove the combination meter assembly with the connector still connected.

    2. Connect an oscilloscope to terminals E1-9 (+S) and body ground.

    3. Ignition switch on (IG).

    4. Turn the wheel slowly.

    5. Check the signal waveform according to the condition(s) in the table below.

      Item
      Condition
      Tool setting
      5 V/DIV., 20 ms./DIV.
      Vehicle condition
      Driving at approx. 20 km/h (12 mph)

      OK:
      The waveform is displayed as shown in the illustration.

      HINT:
      When the system is functioning normally, one wheel revolution generates 4 pulses. As the vehicle speed increases, the width indicated by (A) in the illustration narrows.


NG
GO TO METER / GAUGE SYSTEM (Click here)
OK


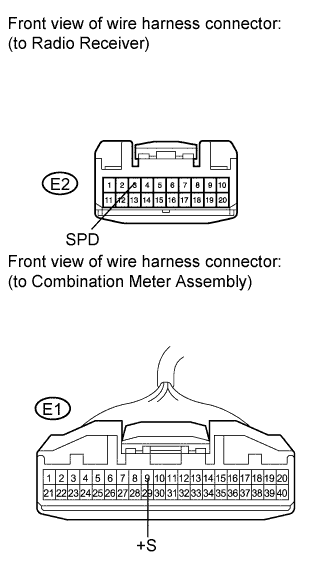
2. CHECK HARNESS AND CONNECTOR (RADIO RECEIVER - COMBINATION METER ASSEMBLY)

  1. E144311E08
    Disconnect the radio receiver connector and the combination meter assembly connector.

  1. Measure the resistance according to the value(s) in the table below.

    Standard resistance:
    Tester Connection
    Condition
    Specified Condition
    E2-3 (SPD) - E1-9 (+S)
    Always
    Below 1 Ω


NG
Go to step 3
OK

REPLACE RADIO RECEIVER (Click here)

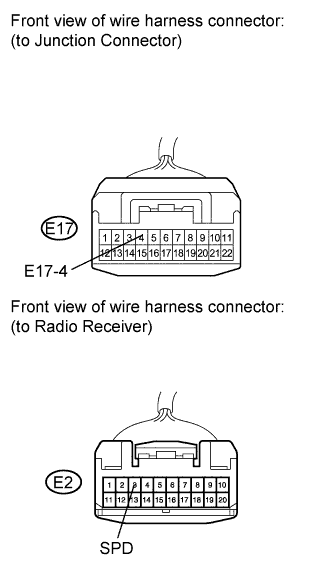
3. CHECK HARNESS AND CONNECTOR (RADIO RECEIVER - JUNCTION CONNECTOR)

  1. E155104E01
    Disconnect the junction connector.

  1. Measure the resistance according to the value(s) in the table below.

    Standard resistance:
    Tester Connection
    Condition
    Specified Condition
    E17-4 - E2-3 (SPD)
    Always
    Below 1 Ω


NG
REPAIR OR REPLACE HARNESS OR CONNECTOR (RADIO RECEIVER - JUNCTION CONNECTOR)
OK

REPAIR OR REPLACE HARNESS OR CONNECTOR (JUNCTION CONNECTOR)


← Vehicle Speed Signal Circuit between Radio Receiver and Combination Meter (May 2007 – Jul 2008)Vehicle Speed Signal Circuit between Radio Receiver and Combination Meter (from Jul 2010) →