INSPECTION
Inspection · Vehicles built May 2007 – Jun 2010
Versions by build date: May 2007 – Jun 2010 from Jul 2010
| INSPECT OUTER REAR VIEW MIRROR ASSEMBLY RH |

Disconnect the mirror connector.
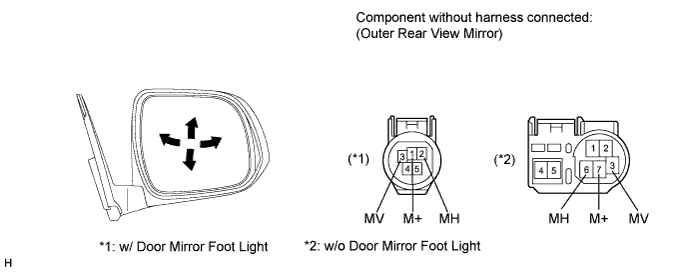

Apply battery voltage and check the operation of the mirror.
- OK:
- w/ Door Mirror Foot Light
Measurement Condition
Specified Condition
Battery positive (+) → Terminal 3 (MV)
Battery negative (-) → Terminal 1 (M+)
Turns upward
Battery positive (+) → Terminal 1 (M+)
Battery negative (-) → Terminal 3 (MV)
Turns downward
Battery positive (+) → Terminal 2 (MH)
Battery negative (-) → Terminal 1 (M+)
Turns left
Battery positive (+) → Terminal 1 (M+)
Battery negative (-) → Terminal 2 (MH)
Turns right
- w/o Door Mirror Foot Light
Measurement Condition
Specified Condition
Battery positive (+) → Terminal 3 (MV)
Battery negative (-) → Terminal 7 (M+)
Turns upward
Battery positive (+) → Terminal 7 (M+)
Battery negative (-) → Terminal 3 (MV)
Turns downward
Battery positive (+) → Terminal 6 (MH)
Battery negative (-) → Terminal 7 (M+)
Turns left
Battery positive (+) → Terminal 7 (M+)
Battery negative (-) → Terminal 6 (MH)
Turns right
w/ Mirror Heater:
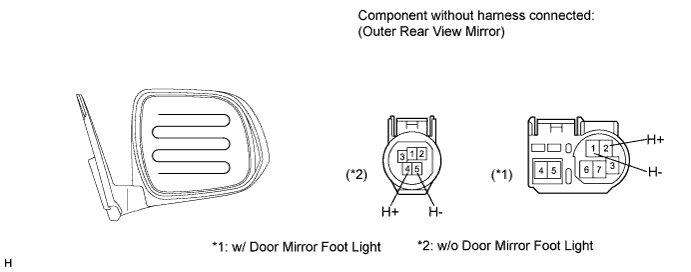
Check the resistance.Measure the resistance according to the value(s) in the table bellow.
- Standard resistance:
- w/ Door Mirror Foot Light
Tester Connection
Condition
Specified Condition
2 (H+) - 1 (H-)
Always
3.8 to 4.8 Ω
- w/o Door Mirror Foot Light
Tester Connection
Condition
Specified Condition
4 (H+) - 5 (H-)
Always
3.8 to 4.8 Ω
Connect the cable from the positive battery (+) terminal to terminal 2*1 or 4*2 and the negative battery (-) terminal to terminal 1*1 or 5*2, then check that the mirror becomes warm.
- HINT:
-
*1: w/ Door Mirror Foot Light
-
*2: w/o Door Mirror Foot Light
-
*1: w/ Door Mirror Foot Light
- OK:
- Mirror becomes warm.
- HINT:
- It takes a short time for the mirror to become warm.
| INSPECT OUTER REAR VIEW MIRROR ASSEMBLY LH |
Disconnect the mirror connector.
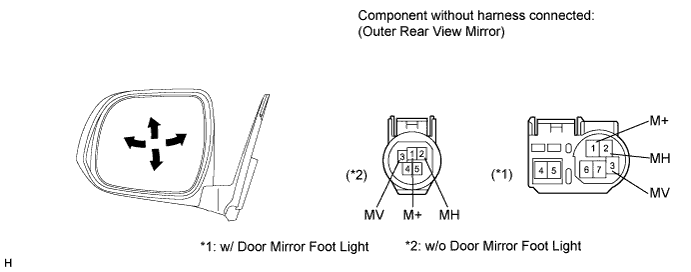
Apply battery voltage and check the operation of the mirror.
- OK:
- w/ Door Mirror Foot Light
Measurement Condition
Specified Condition
Battery positive (+) → Terminal 3 (MV)
Battery negative (-) → Terminal 1 (M+)
Turns upward
Battery positive (+) → Terminal 1 (M+)
Battery negative (-) → Terminal 3 (MV)
Turns downward
Battery positive (+) → Terminal 2 (MH)
Battery negative (-) → Terminal 1 (M+)
Turns left
Battery positive (+) → Terminal 1 (M+)
Battery negative (-) → Terminal 2 (MH)
Turns right
- w/o Door Mirror Foot Light
Measurement Condition
Specified Condition
Battery positive (+) → Terminal 3 (MV)
Battery negative (-) → Terminal 7 (M+)
Turns upward
Battery positive (+) → Terminal 7 (M+)
Battery negative (-) → Terminal 3 (MV)
Turns downward
Battery positive (+) → Terminal 6 (MH)
Battery negative (-) → Terminal 7 (M+)
Turns left
Battery positive (+) → Terminal 7 (M+)
Battery negative (-) → Terminal 6 (MH)
Turns right
w/ Mirror Heater:
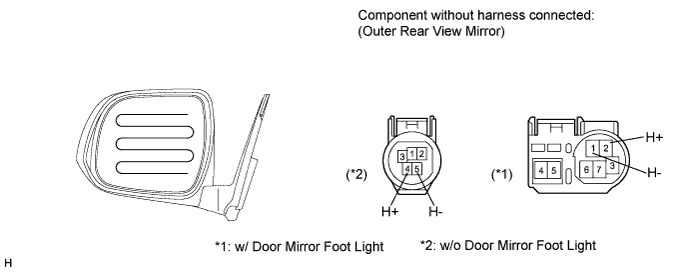
Check the resistance.Measure the resistance according to the value(s) in the table bellow.
- Standard resistance:
- w/ Door Mirror Foot Light
Tester Connection
Condition
Specified Condition
2 (H+) - 1 (H-)
Always
3.8 to 4.8 Ω
- w/o Door Mirror Foot Light
Tester Connection
Condition
Specified Condition
4 (H+) - 5 (H-)
Always
3.8 to 4.8 Ω
Connect the cable from the positive battery (+) terminal to terminal 2*1 or 4*2 and the negative battery (-) terminal to terminal 1*1 or 5*2, then check that the mirror becomes warm.
- HINT:
-
*1: w/ Door Mirror Foot Light
-
*2: w/o Door Mirror Foot Light
-
*1: w/ Door Mirror Foot Light
- OK:
- Mirror becomes warm.
- HINT:
- It takes a short time for the mirror to become warm.